
CCTs-How to change OEM to Manual Ape CCTs

Senior Member
MotoGP
Joined: Aug 2006
Posts: 2,934
From: altoona, pa

Little worried about the 1/4 to 3/8" play in the chain. Finger tight for me seems to tight on the chain. Is the chain supposed to be super tight? I made the mistake of not checking the tension with my finger before I pulled out the old CCT. How much resistance from my finger tip is required to get this 1/4"? Thanks

Member
Squid
Joined: Feb 2008
Posts: 94
From: Jupiter, Florida
LAZN- I have removed the old cct and installed the manuel rear, I did not hear any clicking or indication of jumping, is there anything to see visually looking down at the chain to tell if it has jumped or not? would it jump at the top or bottom? Is there anything else to check before moving to the front? Thanks.

Senior Member
MotoGP
Joined: Mar 2007
Posts: 3,132
From: Phoenix, AZ
Did you remove the valve cover? If so, and you are at TDC compression you should be fine.. Now just rotate the engine 450 degrees counter clockwise before doing the front.
did you read my write up? http://dl.dropbox.com/u/219618/cctwt.pdf
did you read my write up? http://dl.dropbox.com/u/219618/cctwt.pdf
Senior Member
Back Marker
Joined: May 2005
Posts: 216
From: Seattle, WA

Just finished doing this as well, and man that front cover was a PITA!  Also checked my valves while I was in there, and happily all in spec.
I keep reading three different takes on the adjusting of the Apes. The auto tensioners when I removed them put a decent amount of pressure on the chain, yet some say finger adjust until contact and nothing more? I've also heard it has to be running when you do it, or if you are at TDC (which weren't we all?) you can adjust it while its off.
Are these all just opinions, or is one the right way? Mine is finger tight -1/4 turn while at TDC (the no lobe contact one) not running. Much more work to do before I can fire it up so won't be running for a bit.
I keep reading three different takes on the adjusting of the Apes. The auto tensioners when I removed them put a decent amount of pressure on the chain, yet some say finger adjust until contact and nothing more? I've also heard it has to be running when you do it, or if you are at TDC (which weren't we all?) you can adjust it while its off.
Are these all just opinions, or is one the right way?
Senior Member
MotoGP
Joined: Mar 2007
Posts: 3,132
From: Phoenix, AZ
Nope, nothing special to listen for.. No valves meeting pistons etc. If you did not hear a loud click when you removed the OEM ccts (the chain jumping a tooth or two) you are done.
Senior Member
MotoGP
Joined: Mar 2007
Posts: 3,132
From: Phoenix, AZ
Just finished doing this as well, and man that front cover was a PITA! Also checked my valves while I was in there, and happily all in spec.
I keep reading three different takes on the adjusting of the Apes. The auto tensioners when I removed them put a decent amount of pressure on the chain, yet some say finger adjust until contact and nothing more? I've also heard it has to be running when you do it, or if you are at TDC (which weren't we all?) you can adjust it while its off.
Are these all just opinions, or is one the right way? Mine is finger tight -1/4 turn while at TDC (the no lobe contact one) not running. Much more work to do before I can fire it up so won't be running for a bit.
I keep reading three different takes on the adjusting of the Apes. The auto tensioners when I removed them put a decent amount of pressure on the chain, yet some say finger adjust until contact and nothing more? I've also heard it has to be running when you do it, or if you are at TDC (which weren't we all?) you can adjust it while its off.
Are these all just opinions, or is one the right way?
Way way too tight can cause problems too, but I have only heard of that happening once to a member that had a shop install them for him.

Senior Member
SuperSport
Joined: Feb 2010
Posts: 667
From: NY State
Great write-up, I followed this and it worked perfectly. Be safe, use the zip-ties to hold the cam-chain on the cam-sprocket, great idea. I have yet to run the engine to test it.
I could not find a torque setting for the CCT mounting bolts (the two allen bolts that hold the CCT to the cylinder head) in the Honda Service Manual, but the Haynes Manual lists it at 23Nm. I used blue lock-tite on the threads.
An update from APE on the adjustment procedure. This was on the back of the APE package:
" ----> Instructions <----
To set the tensioner adjustment, rotate
the engine forward while screwing the
tensioner in. When you feel the engine
tensioners parts (guide, rollers, etc.)
make contact with the moving cam chain,
back the tensioner bolt up 1/4 turn and
tighten the jam nut.
*** CAUTION ***
Do NOT over tighten cam chain, as
cam chain damage could occur. Be
sure jam nut is tight against tensioner
body when complete."
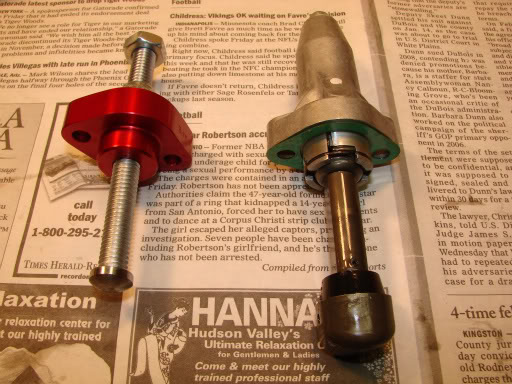
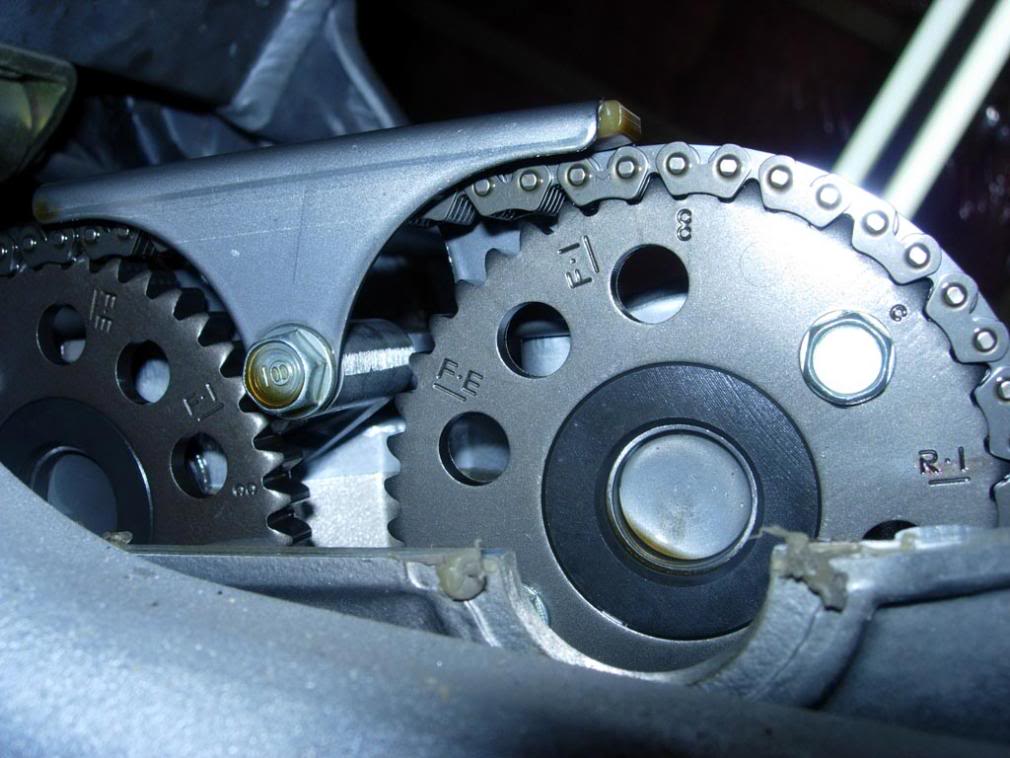
Here is a photo with APE CCT on left, OEM CCT on right (item 4 on the fiche below):
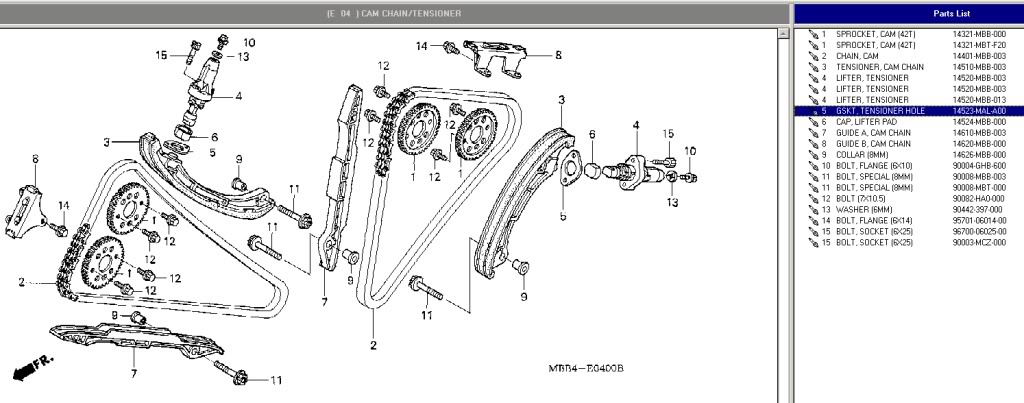
CCT Fiche - remember to order 2 new gaskets, item 5, part # 14523-MAL-A00
I could not find a torque setting for the CCT mounting bolts (the two allen bolts that hold the CCT to the cylinder head) in the Honda Service Manual, but the Haynes Manual lists it at 23Nm. I used blue lock-tite on the threads.
An update from APE on the adjustment procedure. This was on the back of the APE package:
" ----> Instructions <----
To set the tensioner adjustment, rotate
the engine forward while screwing the
tensioner in. When you feel the engine
tensioners parts (guide, rollers, etc.)
make contact with the moving cam chain,
back the tensioner bolt up 1/4 turn and
tighten the jam nut.
*** CAUTION ***
Do NOT over tighten cam chain, as
cam chain damage could occur. Be
sure jam nut is tight against tensioner
body when complete."
Here is a photo with APE CCT on left, OEM CCT on right (item 4 on the fiche below):
CCT Fiche - remember to order 2 new gaskets, item 5, part # 14523-MAL-A00
Last edited by residentg; Mar 24, 2010 at 12:58 AM.

Former Superchicken Owner
SuperBike
Joined: Sep 2008
Posts: 1,607
From: Ft. Worth, TX
Went APE today following these instructions and it went like a breeze. I was fortunate enough not not have the "click" of death. The only hitch I found were with the instructions for adjustment. Apparently "finger-tight" is a very subjective term when you have hugemongous dick-beaters like I do. I had to loosen the things up a bunch to get them to stop squealing. Great walk through on the instructions.

Senior Member
SuperSport
Joined: Aug 2009
Posts: 684
From: Richmond, VA

i had the same problem. that squealing is gotta be one of the worst sound ive heard after working on my bike. kept thinking to myself, what the hell did i do now!
Senior Member
MotoGP
Joined: Aug 2006
Posts: 2,934
From: altoona, pa
I guess finger tight actually does mean finger tight in the sense that you feel with your fingers that it's snugly up against, where it stops, back it off, where it stops, back it off, turn in til it stops. Amen.

Senior Member
Superstock
Joined: Jul 2008
Posts: 320
I want to switch out my stock CCTs with APEs since my bike has 24K on it. But I literally just changed my oil. I assumed I needed to drain the oil if I was going to replace the CCTs and open up the valve cover. Can someone confirm that I can do this without draining the oil?
And how often should I check/adjust the manual CCTs after installation?
PS: Awesome post by the way. I'm learning a ton about my bike. I'm a mechanical noob.


Banned
MotoGP
Joined: Aug 2007
Posts: 5,942
From: Lake View Terrace, CA
What to ask me how I know these things?????

Member
Squid
Joined: Mar 2010
Posts: 62
From: Minneapolis, MN
When you line up the "RT" to the index mark in the timing hole where are the marks suppose to be lined up if I'm looking at the cam's (this is the rear of course). I'm afraid I've messed up the timing (a little too ambitious) Just wanna absolutely positive. I hope this makes sense.
Senior Member
MotoGP
Joined: Mar 2007
Posts: 3,132
From: Phoenix, AZ
When you line up the "RT" to the index mark in the timing hole where are the marks suppose to be lined up if I'm looking at the cam's (this is the rear of course). I'm afraid I've messed up the timing (a little too ambitious) Just wanna absolutely positive. I hope this makes sense.
RT lines up with the mark twice in the 4 stroke process, so there are two possible answers to your question.
Senior Member
MotoGP
Joined: Mar 2007
Posts: 3,132
From: Phoenix, AZ
If you are on the Compression stroke you want it to look like this:
(image stolen from gboezio's earlier explanation of this same thing here: https://www.superhawkforum.com/forum...ght=cam+timing)
(image stolen from gboezio's earlier explanation of this same thing here: https://www.superhawkforum.com/forum...ght=cam+timing)
Senior Member
MotoGP
Joined: Mar 2007
Posts: 3,132
From: Phoenix, AZ
Member
Squid
Joined: Mar 2010
Posts: 62
From: Minneapolis, MN
Nice wright-up! I do well with pictures... I know for a fact that I fudged up the timing. If you don't mind I'll send you a pic to see if you can tell me what the damage is. by the way I haven't touched the front cylinder yet... that should still be fine right?
Sorry if I'm asking to many questions.
Sorry if I'm asking to many questions.
Senior Member
MotoGP
Joined: Mar 2007
Posts: 3,132
From: Phoenix, AZ
So did it just jump by a tooth or two? Or did the cams totally spin?
If they are just off by a few teeth you can just loosen the CCT and "inchworm" your way back to the correct timing. If you are a long ways off, download the service manual and look through the reassembly process for replacing the heads, as it has how to time your cams in that section of the book.
Manual available here: https://www.superhawkforum.com/forum...ad.php?t=11365
Member
Squid
Joined: Mar 2010
Posts: 62
From: Minneapolis, MN
Got'er done!...
It did jump ahead quite a bit I had to remove one of the cam sprockets to re-align... yikes! I just made sure to take my time and also study the manual an that awsome wright-up Iazn did APE CCT's
Now she's back on the road!
It did jump ahead quite a bit I had to remove one of the cam sprockets to re-align... yikes! I just made sure to take my time and also study the manual an that awsome wright-up Iazn did APE CCT's
Now she's back on the road!
Member
Squid
Joined: Mar 2010
Posts: 62
From: Minneapolis, MN
As you can see by the previous post I got the Manual CCT's in! However with the "finger tight" then a 1/4 turn the front cams still seem to be slipping (click and lurch) every so often... not as much if any when the bike is at operating temp. So does this mean I need to go tighter? Anybody?
Senior Member
MotoGP
Joined: Mar 2007
Posts: 3,132
From: Phoenix, AZ
As you can see by the previous post I got the Manual CCT's in! However with the "finger tight" then a 1/4 turn the front cams still seem to be slipping (click and lurch) every so often... not as much if any when the bike is at operating temp. So does this mean I need to go tighter? Anybody?
It may have slipped while doing the swap, so you might be mistimed by a tooth or two, and that will cause it to run poorly.. but if it were actually actively slipping the bike would not be long for this world.
(that doesn't mean it isn't worth adjusting them some.. What you can try if you are careful about it is adjusting them with the engine running. If you search you will find the procedure for that, I didn't want to risk it though when I did it)
My guess is you are experiencing the famous "carb fart" I don't recall the procedure to fix that one though.
Member
Squid
Joined: Mar 2010
Posts: 62
From: Minneapolis, MN
Well the bike is runnin' just fine and sounds great... So as to what that noise and hesitation while riding is I have know idea. You did mention the "carb fart" does that seem to be a common issue and would it give you that hesitation (more like a lurch) feeling while riding?

Senior Member
Back Marker
Joined: Aug 2009
Posts: 112
From: North
Just in the process of putting the top end back together after adjusting the valve clearances on my '98 VTR. Cams (Yoshimura stage 1) installed and timed per the Honda repair manual procedure. 
I considered installing APE's but decided to install new OEM CCT lifters instead. Never had a problem with the original ones after 56,000 miles, so replacing these is just a preventive measure. Prefer not to be bothered with maintaining cam chain tension manually.
Apparently the '98 to '01 CCT lifters were superseded in '02 with a revised (and improved ) design according to what the dealer advised.
I considered installing APE's but decided to install new OEM CCT lifters instead. Never had a problem with the original ones after 56,000 miles, so replacing these is just a preventive measure. Prefer not to be bothered with maintaining cam chain tension manually.
Apparently the '98 to '01 CCT lifters were superseded in '02 with a revised (and improved
) design according to what the dealer advised.


