When you click on links to various merchants on this site and make a purchase, this can result in this site earning a commission. Affiliate programs and affiliations include, but are not limited to, the eBay Partner Network.
First off I would like to thank Calitoz for starting this excellent thread on How to change OEM to Manuals. It really helped me to go over it, along with Lazn's post and thread on his process to do it. Also everyone elses posts of their experiences.
Just installed my MCCT's yesterday. Initial install went pretty well. One thing that did come to mind was the amount of effort to turn the crank bolt. With the bike on the rear stand and stator/inspection plugs off I proceeded to turn the crank bolt to look for RT line. As I was turning I could feel a definate greater amount of effort as I approached the RT line. I was sure it was coming on to TDC Comp. As I lined up the marks I then took off the rear cover to check the cams. Sure enough, I was at TDC-Exhaust. (I had removed both spark plugs previously). Not thinking/remembering about the plugs being out. What I was experiencing was the lobes of the cams compressing the buckets. As
I am sure a lot of you know, its seems logical. But what I am saying is that without removing the covers it can be definately felt(TDC-Exhaust). Just a note of caution to others who might be doing theirs. It was definately worth taking off the cover to check.
Still got lots to do. Need to check tension again along with valves and put it all back together.
I did the front, at FT and lined up the mark under it. I did what the manual said and lined the FI ->> on the intake side, parallel with the top surface of the cam/valve cover where it meets with the head. Likewise, I lined up the Exhaust side with FE ->> parallel with where the cover meets the head and opposing sides of the Intake cam. So they are pointing outward of each other as per the manual. I cranked up the bike after verifying nothing was going to touch or bind. It sounds as though it's firing on one cylinder and the rear HONDA CCTs ( I replaced with stock Honda parts ) is making a noise, so I just popped that cover off, going to rotate to RT and see if the timing jumped on the rear.
finally got around to doing this tonight along with other routine maintenance, with the write up here and the pictoral one elsewhere it went pretty damn easy
one quick question though... i didnt put locktite on the CCT bolts, i was following the write up that came with and it didnt say to in there, reading this it says to do so, what do people think? take everything off and add it?
........
one quick question though... i didnt put locktite on the CCT bolts, i was following the write up that came with and it didnt say to in there, reading this it says to do so, what do people think? take everything off and add it?
You should be able to pull one bolt at a time to put Loctite on the bolts without any problems. I know GTS wished the previous owner had done it when one of his fell out!
This thread has been beaten to death, so, my 2 cents on the subject will
not be on 'how tight should the center nut be ?'
I have read in the past, either on this forum, or news article, or other, do not really remember, Honda is supposed to have taken care of the CCT problem on this motorcycle somewhere near the mid 2000's.
Since it's freak 'in cold here, and have time for this, I decided to do the job on my '05, with Krieger CCT's I bought last summer. Since I have no official info on this, I did not want to chance it, so replaced the OEM ones, with 17000km on the bike.
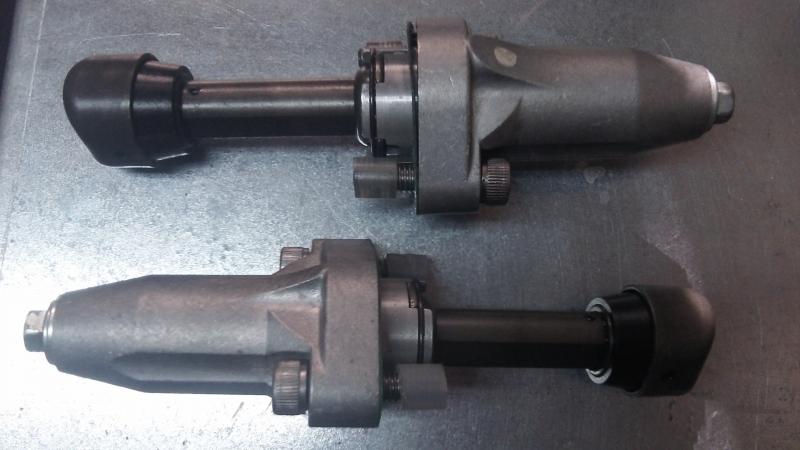
If Honda has done something about the CCT's, then, perhaps they have changed in design. So, I am posting a picture of my CCT's, and, if someone has older style CCT's, and look different them mine, then this would help us determine if the info is true. if not, then it may be just a rumor, and I probably took the right decision in replacing them. Mind you, it still does not prove they have not improved them, even if design is the same. They just may have used better materials in fabrication.
BTW...I really hated this GD job ! Finger tight ! Are you kidding me ?
Who's fingers do you use, mine or the Hulks ? Very precise.
The short answer to the first part of your question is: No, there is no definitive improvement in the newer CCT's. They have failed. Maybe not as often (which could just be from age or amount of newer bikes) but if there was a sure fire reliable OEM CCT, this forum would know about it. The rest is found in threads everywhere.
The second part: If finger tight is to ambiguous (which I totally agree), you can take the valve covers off, take the little CCT cover off that''s in between the cam sprockets, and set the slack to 1/4" of play (as per APE CCT spec) This will get you a safe amount of slack. If you want more info, I can elaborate. It takes a little more time, and is rough getting the front valve cover off, but won't make you in constant fear of over or under tightening.
The nut on the tensioner bolt (touching the base of the CCT) can be tightened pretty tight. It's a steel nut on steel threads, so you're not really going to brake anything unless you get a long wrench or make a mission out of it. Just make sure you hold the bolt so it doesn't twist while you're tightening the lock nut. Hope this helps.
Thanks 7moore, it was what I believed originally. Just wanted to be sure. As for the second part, it was meant to be rhetorical. It's just I'm pretty **** when I need to do engine work, and I like precise info before tackling a job like that. But lucky for me, my personal experiences have taught me it's better to be safe then sorry. So, I did what I needed to do to be sure before I closed everything up.
Since I did not see this method of determining the right TDC, I thought I share it.
Because I really didn't feel the need to remove the valve covers,
here is another method for determining TDC of the compression stroke that I used.
It requires a compressor, a short length (18"-24") of 1/2" pvc pipe, an air blow gun and the removal of one or both spark plugs.
Since the timing marks for a cylinder will line up at TDC on both the exhaust and compression strokes you want to be sure that you are on the right stroke. This is the reason that some people have had the chain jump the cam gear. The premises here is that when your on TDC of the compression stroke both valves are closed and no air will go out the carbs or exhaust. Conversely if the engine is TDC on the exhaust stroke (strokes) both valves will be open some allowing air to escape out the carbs and exhaust.
Rotate the engine to line up the timing marks for the cylinder you working on (the one that you took the spark plug out of), the take the length of pvc put it down the plug recess in the head and blow some air into that cylinder. I advise a bit of caution here because if you are at TDC of the compression stroke and make the seal on the "air tool" too good the air pressure can rotate the engine, maybe even backwards. So just a loose fit on the air nozzle and pipe and you'll be good. If your on TDC of the compression stroke there will be no air or sound coming from the exhaust or carbs. Since it's hard to reach to feel the exhaust pipe when doing the front cylinder (you can hold your ear to the carb with the throttle open). I put a piece of paper shop towel loosely in the exhaust pipe. When air is forced into that cylinder and your not on TDC of the compression stroke the towel will be blown out of the exhaust and/or you will hear/feel air at the carb or exhaust pipe. If your unsure that you have it right rotate the engine 360* so the same mark is lined up and do the air again. The difference is very apparent. If you had it right the first time, and did this double check, don't forget to rotate the engine 360* again to bring you back to TDC of the compression stroke.
Then rotate the engine 450* to line up the other cylinder's timing marks to do the other cylinder. I pulled both plugs so I could absolutely verify that I was on TDC compression for each cylinder being worked on.
Ive read this thread over and over and i am wondering if this is the full proof way :
dont be lazy and pull both cam covers of to double check everything like the markings and lobes
then put it on tdc compression stroke by turning the wheel or fly wheel nut
when do you put on the zip tie before or after you are on tdc ?
because when i understand it correctly doing both these things nothing can go wrong
because you are at tdc and the chain is zip tied and you can see the lobes en markings on the sprockets,
and what if youre not on the compression stroke tdc but still have the zip tie will this be a failsafe ?
and removing the old OEM CCTS should be done carefully i understand but not so much so if you havent got the covers removed and checked everything and have the zip tie on
i cant understand that some one will do this work without pulling cam covers
when do you put on the zip tie before or after you are on tdc ?
After.
Everything else you said is the same way I feel. Unless you're in a hurry; no reason to not pull both covers, check valve tolerances, set tension with more confidence, line everything up patiently.
If you were in a hurry or replacing with OEM I could see not pulling covers. OEM are easier because you just have to make sure the chain doesn't skip teeth; setting correct tension is a non-issue.
and what if youre not on the compression stroke tdc but still have the zip tie will this be a failsafe ?
Sort of, but not really. The cam lobes will be pressing against the valve buckets in this case and so your cam chain tension may not be all the way slack (meaning you won't set correct tension). You won't skip teeth or anything, but you want to be on compression stroke. If the covers are off, it's pretty easy to tell as the lobes are pointing up and at an angle and not pressing on the valve buckets.
Sort of, but not really. The cam lobes will be pressing against the valve buckets in this case and so your cam chain tension may not be all the way slack (meaning you won't set correct tension). You won't skip teeth or anything, but you want to be on compression stroke. If the covers are off, it's pretty easy to tell as the lobes are pointing up and at an angle and not pressing on the valve buckets.
thanks 7moore7, what you say makes sense and if its not on compression stroke there's tension you dont want and then you will set the manual tensioners to weak, and for people who are not on compression stroke but with the zip tie on and there installing new OEM CCTS with them its not gonna be so much of a problem, but its always best to be on compression stroke,
only one question I understand in this thread you will need to turn the engine over about 3 times and every time you will see the RT but finally you will be at compression stroke, then people say turn the engine 450 degrees counterclockwise and your at tdc on the front cilinder, are you in compression stroke then on the front or is this a short cut or something and otherwise you will have to complete the search for tdc compression stroke on front cilinder again, (just ordered a pair of kriegers shitting my pants ) and can someone give a indication of how much slack in de chain or how much i can tighten the nut after being finger tight
this is listen on this thread but al in US measurments i need metric system like how many milimeter youre cam chain moves after placing manual ccts
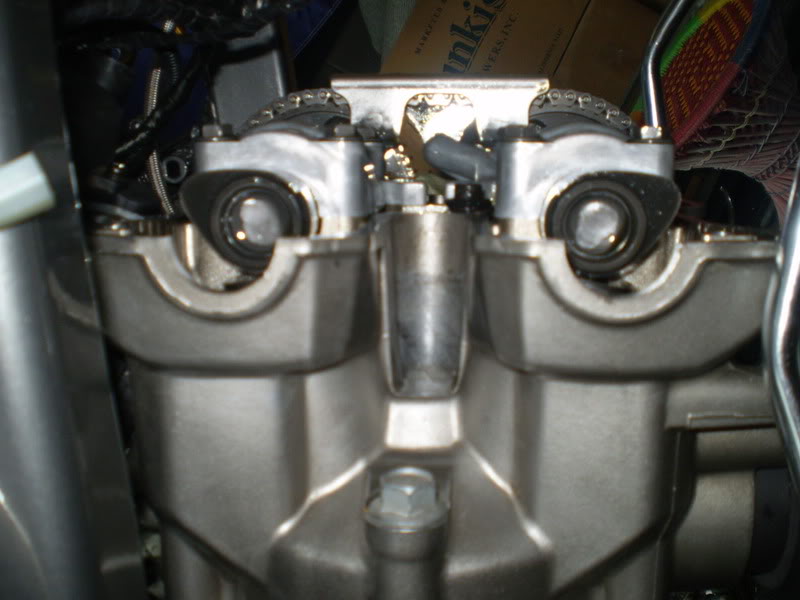
If I have valve covers off, I don't do any of that 3 rotations to find compression stuff. You can see it in the cam lobes. Do the rear first. Rotate it until the pointy part of the egg is pointing up and in. It will look similar to this picture, except the lobes point IN rather than out:
Then you zip the sprockets, remove old CCT, put new one in and adjust (i'll get to that in a sec)
Then you button it all up and rotate it 450 degrees counter clockwise so that the front cylinder is at TDC compression. The motor is at a 450 degree firing order, but fires every other time as four strokes do. So if you miss finding TDC, you have to complete the whole firing sequence (totaling 4 rotations) to get back to TDC (hence the three more rotations). But here's the thing: you don't need to know any of this to do this job. Just rotate the motor until the front cams are pointed up and OUT, just like the picture above.
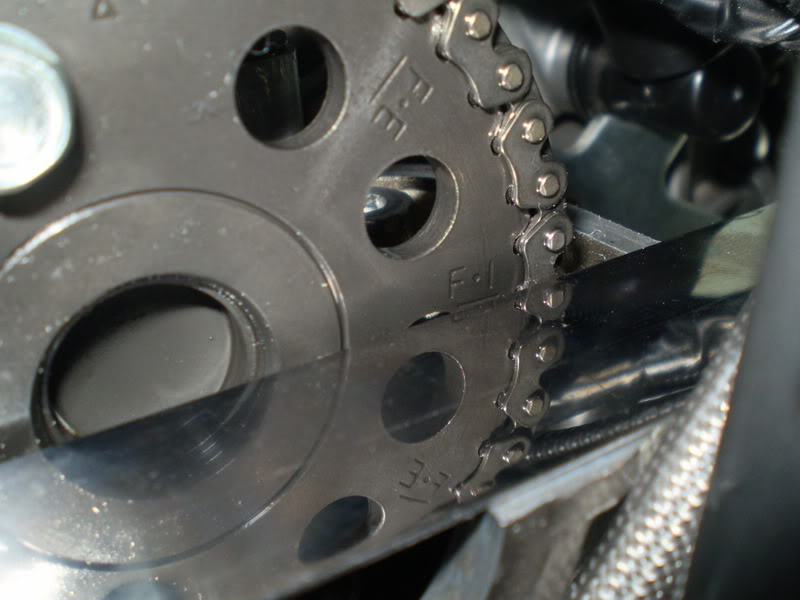
What you're looking for is that the lobes need to be angled up and symmetric to each other. You can confirm that they are in time by looking at the FT/RT marks on the sprockets:
^pic of a straight edge on the engine casing
Then you do the same thing for the front that you did for the rear.
*pause*
Ok, to set tension, the easiest way is to remove the sheet metal cover between the two sprockets (seen in pictures in the initial write up). There are three bolts holding it on. The cam chain in between the two bolts will have a little play. You want to adjust the CCT so this play is at 1/4" total. Just wiggle it by hand and tighten/loosen the CCT bolt until it's there, then lock the CCT down. Google conversion chart tells me this is about 6-7mm. This is the easiest way to get it near ideal without having to run the bike and listen for slap.
so the lobes on the cams needs to be facing towards each other for the rear cilinder to be at TDC CS
and away from each other for the front cilinder TDC CS
thank again i have enough knowlegde to do it myself and not paying for some shop to **** this up , and i got a weird clicking on my hawk now i am not sure if its the cct but they have to changed my bike has 47,000 km on it so its needed
this thread en site helpt me out alot.
You mean FI (front inlet) and FE (front Exhaust) rear cylinder wll be RI and RE.
Can I just add it's a good idea to stuff some rag down the sides of the sprockets before undoing the 3 nuts to remove the cam guide. You dont want to accidentally drop a bolt down inside the engine.
Think of measuring the chain tension being like setting the tension on your drive chain. 7mm up and down movement from the centre between the two sprockets. Also don't forget to put some threadlock around the thread on the manual CCT. This stops any oil that may creep along the thread and helps prevent the CCT from working it's way loose from vibrations.
What are the adjustment intervals for Manual CCTs?
How often do people need to re-adjust their manual CCTs?
Will you experience much stretch and wear in the timing chain assembly?
What are the adjustment intervals for Manual CCTs?
How often do people need to re-adjust their manual CCTs?
Will you experience much stretch and wear in the timing chain assembly?
Most folks check the manual CCTs annually. With use, any chain will stretch which is why you adjust accordingly.
I've checked mine once in two years, but never needed to adjust them yet. If adjusted correctly there should be no more stretch or wear than the stock CCT's, which is very, very little (like 80k miles and the chain is still fine type of thing).
Finger tight and back out a 1/4 turn, same as set up?
Yes, same procedure as when installed.
Im at 29,682 miles as of pulling into the garage tonight.
All by 6K of those with manual APE CCT's, NO chain wear noticed, No re adjustment needed of the MCCT's
I see the same lack of readjustment needed on my DRZ485, My sons bikes and the dozens I work on each quarter.
Good idea to check, but one of the benefits of properly adjusted MCCT's is LESS CHAIN WEAR (they wear, not stretch, that's a misnomer)
Thank you all for the info.
Looking forward to picking up my Hawk in the next few weeks!
This is an amazing thread! I plan to do this over the winter, along with a small handful of other things. While I wish I had a more mechanically inclined friend to run the show while I help, I feel pretty good after reading 9 pages of experience, seeing pictures and watching videos of the process.
You can believe that I'll be back here to report once it's done.
Thanks to the OP, the participants and the forum for this thread.
I would like to add something to this thread that I learned the hard way.
Make sure that there are NO TIGHT SPOTS in the Manual CCT's. The one I installed in the rear had a tight spot I couldn't go past by hand and assumed it to be the chain. It wasn't. The tensioner still wasn't touching the chain and I ate the exhaust valves on my rear cylinder. a $150 mistake. Luckily it didn't damage the head, valve guides, or piston beyond acceptable and only just tweeked the valves. 4 bolts would have saved me from this mistake but I tried doing it without removing the cam covers.
but I tried doing it without removing the cam covers.
that's the risk one takes unfortunately.
And all this talk of finger tight I don't like. This can be very misleading as one persons finger tight is different from another. There is so much room for error. Yes an experianced mechanic who has done the job many times can maybe get away this, but then an experienced mechanic would most likely adjust them by ear once the bike is warmed up. This also has it's problems too if in-experienced as you need to make sure to keep a grip of things, in particular the tensioner end nut. It has been known for the thread to suddenly unwind itself fast from things being loose and the momentum of the engine spinning over. Even more so if no sealant has been used along the thread in the orifice. The chain will then slip teeth and possibly cause damage.
Once the tank is off, the rear cam cover takes a couple of minutes to remove and why not spend an extra 30mns removing the front for peace of mind. MCCT's should have between 5 and 7mm play from the outside edge of the chain from the centre between the two cam sprockets. FYI the Honda auto's leave 5mm play while set on the compression stroke.
As for adjustment, once set correctly manual tensioners normally will not require any adjustment for around 16,000 to 20,000 miles. A good time to check them is when the service intervals come up for checking your valve clearances as there is a likelihood you will have to slacken them off at that point anyway if shimming.
(:-})
Last edited by cybercarl; Sep 22, 2013 at 11:55 AM.
I know, it made me physically ill when it happened. I just about blew chunks in the garage. I used to work in a bike shop and I was a little too cocky because its something I've done 100 times before on 4 cylinders and never had an issue and wanted to get it done quick cause I was supposed to go on a ride today. I made the joke when I went out to the garage that I was going out there to break stuff too.
Lesson learned, never be cocky because it only takes once, and in the end I cost more time than I saved. Thankfully I have a friend that works in a race engine machine shop and I can just drop off the head and new hardware with him and go pick it up the next day for next to nothing. I have a spring compressor and got the old valves out but I don't trust it as it doesn't quite fit the head right (the arm isn't deep enough without a piece of pipe to get into the hole the valve sits in) and I don't want to mess up the new ones installing them.
Perhaps I'm missing something but it seems that the original pictures are not showing up from imageshack.
Not missing a thing, it's a 7 year old thread and the poster hosted the pics on a privet server, not the domain one.. so.. once he deleted or moved them the link was broke.
It'll take nowhere near an hour to find front and rear compression stroke. More like 5 minutes, and that includes removing the spark plug and timing inspection plug.
[Standard disclaimer, this is the method I use, use at your own risk]
Seriously, decide which pot you want to do, and remove the spark plug from the OTHER cylinder. Turn engine anticlockwise using the 17mm bolt in the stator (big plug in the stator cover) until you feel compression. STOP at TDC by looking for the relevant FT or RT timing mark. You are now at compression, with the least camchain tension. You can now release the compression pressure in the cylinder if necessary by loosening the spark plug and (relatively safely) remove the relevant CCT and replace.
Same for the other cylinder. If you're not sure about the 270degree or 450 degree rotation, then replace the plug and remove the other cylinder's spark plug. Stop at TDC compression again.
If you don't understand the above, DON'T attempt the CCT replacement yourself take it to someone who does ;-)
Bottom line is, you can change it at any point in the 4 stroke cycle, but you run a real risk that a camshaft will turn if one of the valve springs is under compression.
Cheers,
Paul.
Sounds to me that it's a good and secure way to change CCT without removing cam covers !?
Just have to unplug spark plugs
@Oldrider78 Photos have been removed or blocked for this discussion. Why?
see below
the original poster probably used an image hosting service that is no longer active. I used to use Photobucket so most of my pics are probably gone too. Is what it is, sorry. If there was something I could do, I would. Did you try the UK site? They may have pics.


 It's just I'm pretty **** when I need to do engine work, and I like precise info before tackling a job like that. But lucky for me, my personal experiences have taught me it's better to be safe then sorry. So, I did what I needed to do to be sure before I closed everything up.