
fairing repair

Thread Starter
Senior Member
SuperSport
Joined: Nov 2007
Posts: 758

I beg to differ. They did a great job on my plastics. I sent them rashed and cracked stuff, dented tank, and multi color parts and the quality for the price can't be beat. I do have one mounting hole that shows a small flaw, but in 8000 miles it has held up just fine. Only I know it's there, and as picky as I am about my bikes I'm fine with it.
if you dont mind me asking, how much did that cost you?
Thread Starter
Senior Member
SuperSport
Joined: Nov 2007
Posts: 758
it would be a good way to go, but im going to try my luck with the abs cement and fiberglass first. a little less costly, and i might as well get the experience anyways.


Senior Member
Back Marker
Joined: Dec 2006
Posts: 113
I posted a tutorial with my resulting repair pics on this very subject:
https://www.superhawkforum.com/forum...ght=chitownson
https://www.superhawkforum.com/forum...ght=chitownson

Junior Member
Squid
Joined: Jan 2009
Posts: 6
From: up state New York
a litte more info if you want to do it yourself something I wrote a few years ago on another forum
Plastic ABS repair
To repair plastic with the welding process you need have the parts clean, oil and decal free. I use the Castrol degreaser to clean any parts that may have oil on them from the crash, it is cheap and can be had at Walmart for around $6.00
Next, off come the decals, the most effective way to remove the decals is with a heat gun and a plastic body paddle and a can of Preston brake cleaner and a dull razor blade. Heat up the decal, just so it is hot to touch, don't make is so hot that you bubble the panel. once the decal is warm you can use the dull razor blade to lift the decal and peel it back with your fingers.
Once the decal is off spray on the brake cleaner and let it soak in. it will require a couple of coats of spray to keep wet, let is soak in for about a minute. Then use the plastic puddy knife to remove all of the glue residue that you can. Once this is off re apply the brake cleaner and let soak a few seconds and then use a coarse rag to take off the remaining glue.
For the repair of the plastic you will need a welding iron, I use a hot foot style welding iron made by the Urethane Supply company, you will need a dremel tool and a bit for v ing out the crack in the plastic. You will also need some stainless steel mesh to re-enforce the repair and 80 grit paper
Clean the damaged area with 80 grit paper, take your dremel tool and take off all of the paint down to the black plastic, on both sides of the crack, use the tool to then v out the crack on the back side, clean with a wire brush, weld in one pass with the welding rod,
you will want to practice on a bunch of broken plastic before doing this, there is a fine line between to much heat which will make the weld brittle and one that is to cold to stick.
after making the pass, you will cut a piece of steel mesh to melt into the plastic on top of the weld, take the time to melt in the mesh and make it flush with the rest of the part.
after this has cooled you will flip over the part and v out the other side. you have meet the weld you have just laid in, clean with a wire brush and weld in a pass of welding rod.
You should be able to sand down the area with 36 grit and then 80. To fill in any voids and imperfections or spots of road rash you will use a material made by Ever coat,called Poly-Coat it is very expensive, $38 for a small bottle of the stuff but it is at this time the only product that works. a 1/8 layer will take a 70 degree bend when it dries, with out breaking. Follow the directions on the can, for mixing, being very careful not to add to much hardner. Block sand your body filler down and then sand down the rest of the body panel for the next step.
In all of the areas were you have broke through the factory paint you will have to add a adhesive promoter. one good one is a product called Bull Dog the other is one made by Sherwin Williams, spray the damaged area with the adhesive promoter before it dries completely you will spray on the primer
The primer that have had the only luck with is a product called Rapid Prime, #8445 it is for rusty metal and a very fast high build primer, it is the only primer I have found that will flex with the plastic and is easy to work with, it is also on the expensive side but have found no short cuts for it.
Spray on a light coat of primer and let flash over, it is very important not to put it on to heavy the same properties that let it bond to the plastic also will dissolve the factory finish causing it to bubble if put on to heavy.. making a real mess.
Apply two to three coats of primer to the entire panel. I have played with doing partial repairs and it has always come back to bite me in the painting process. Let it dry a couple of hours and then block sand with 120 grit any areas that appear un-even. then re apply another coat of primer.
To get ready to paint you will sand with 220 grit wet and then 320 wet and then 400. the primer has to be painted within 12 hours of doing this..
Visit our web site EmpireGP.com to get some ideas of the type of repairs that can be made, with some patience and time you can repair almost any part on your bike, the above info is for ABS plastic, many bike use a PP plastic "different method,"
for the side panels Honda and Yamaha come to mind. the rest of the parts are ABS and can be repaired with this method
If you get stuck Pm me.. If you want your parts repaired by us it is the cheapest part of the painting and repair process, send me a note and I can give you and idea of the cost of repair.Bob
__________________
Bob Brown CSBA #284
Wise men still seek him
EmpireGP
Ride Hard... Take Chances......... WE NEED THE WORK!
Thread Starter
Senior Member
SuperSport
Joined: Nov 2007
Posts: 758
definitely helpful information chitownson and plasticweld. very helpful. thanks for posting that.
as for progress, i have not started yet. im trying to find time around work to get started on it. my ankle isnt entirely healed yet either, it got fucked up pretty good. i should be able to walk well enough to move my bike now though. also, this will be my first time ever doing any plastic repair like this, so if it comes out crappy dont be surprised.
as for progress, i have not started yet. im trying to find time around work to get started on it. my ankle isnt entirely healed yet either, it got fucked up pretty good. i should be able to walk well enough to move my bike now though. also, this will be my first time ever doing any plastic repair like this, so if it comes out crappy dont be surprised.
Senior Member
Back Marker
Joined: Feb 2006
Posts: 112

Permapoxy is the name of the Loctite stuff you're referring to. I think I saw something about it on one of the VFR forums. Was that your father's work? It was impressive! He actually manufactured missing tabs!
Last edited by Lifttruck; Jan 11, 2009 at 05:51 PM.

Senior Member
MotoGP
Joined: Jul 2007
Posts: 5,066
From: NYC
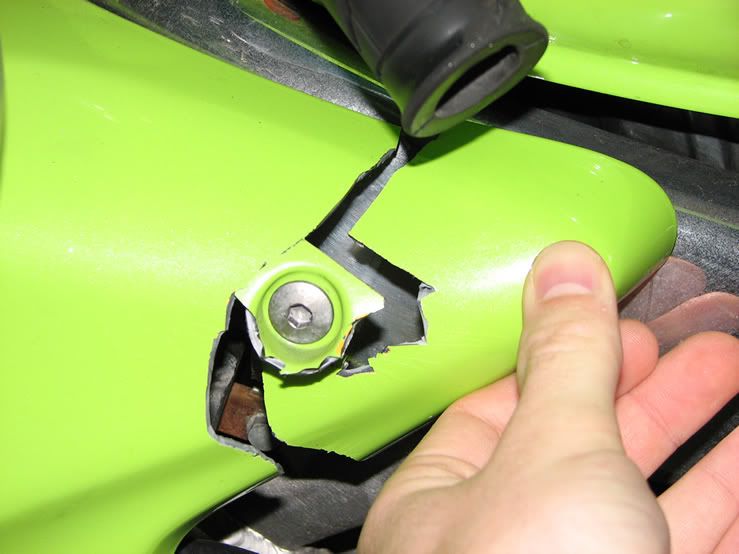
Seems like everyone has something about this one. I have used both the weld and abs cement method. ABS is a thermoplastic which means you can make it molten(liquid) & back again w/o changing its properties. You can get abs welding rods easily. I have had sucess with using steel mesh melted into the back of the plastic to reclaim it, then also rods to add material from behind. You can melt it in with a good soldering iron. That break looks fixable/ fillable to me. But you can always scour around for a cheap replacement. (I got a whole tail section on ebay for $25) My several cents.

Administrator

World Champion
Joined: Dec 2004
Posts: 105,287
From: Fulton, MO
Bob,
 to the forum! Don't worry about your method of introduction. You did good work on MY bike and I've got your back. I'm a satisfied customer and I'll be coming back to you again (PM sent on that, BTW). Though I'm really disappointed you don't have pics of my bike on your website.....
So, are you a Superhawk owner now?
to the forum! Don't worry about your method of introduction. You did good work on MY bike and I've got your back. I'm a satisfied customer and I'll be coming back to you again (PM sent on that, BTW). Though I'm really disappointed you don't have pics of my bike on your website..... So, are you a Superhawk owner now?
Senior Member
Back Marker
Joined: Jan 2005
Posts: 127
From: Northeast Ohio
http://www.chaparral-racing.com/Chap...87F716762AC310Never had to use it for myself but Bud repaired a broken tail section with this stuff and it did a good job.

RUNLEVELZERO #99
SuperBike
Joined: Jan 2007
Posts: 2,223
From: Skokie
Yes welcome
I reviewed Bob's post and have added corrections & footnotes (look for a # after each proprietary product and tools Bob mentions and go to bottom of this post).
I also use cohesive solvents like IPS Weld-On 2354 http://www.tapplastics.com/shop/product.php?pid=134
and weld with & without reinforcement.
If you have more questions for me, PM me.
Plastic ABS repair (see http://www.gotcanyons.net/empiregp/weldplastic.htm)
To repair plastic with the welding process you need have the parts clean, oil and decal free. I use the Castrol degreaser1 to clean any parts that may have oil on them from the crash, it is cheap and can be had at Walmart for around $6.00
Next, off come the decals, the most effective way to remove the decals is with a heat gun and a plastic body paddle and a can of Preston brake
cleaner2 and a dull razor blade. Heat up the decal, just so it is hot to touch, don't make is so hot that you bubble the panel. once the decal is warm you can use the dull razor blade to lift the decal and peel it back with your fingers.
Once the decal is off spray on the brake cleaner and let it soak in. it will require a couple of coats of spray to keep wet, let is soak in for about a minute. Then use the plastic puddy (putty, sic) knife to remove all of the glue residue that you can. Once this is off reapply the brake cleaner and let soak a few seconds and then use a coarse rag to take off the remaining glue.
For the repair of the plastic you will need a welding iron3 , I use a hot foot style welding iron made by the Urethane Supply company4 , you will need a dremel tool and a bit for v ing out the crack in the plastic. You will also need some stainless steel mesh to re-enforce the repair and 80 grit paper
Clean the damaged area with 80 grit paper, take your dremel tool and take off all of the paint down to the black plastic, on both sides of the crack, use the tool to then v out the crack on the back side, clean with a wire brush, weld in one pass with the welding rod,
you will want to practice on a bunch of broken plastic before doing this, there is a fine line between to much heat which will make the weld brittle and one that is to cold to stick.
after making the pass, you will cut a piece of steel mesh to melt into the plastic on top of the weld, take the time to melt in the mesh and make it flush with the rest of the part.
after this has cooled you will flip over the part and v out the other side. you have meet the weld you have just laid in, clean with a wire brush and weld in a pass of welding rod.
You should be able to sand down the area with 36 grit and then 80. To fill in any voids and imperfections or spots of road rash you will use a material made by Ever coat, called Poly-Coat5 (Poly-Flex, sic) it is very expensive, $38 for a small bottle of the stuff but it is at this time the only product that works. a 1/8 layer will take a 70 degree bend when it dries, with out breaking. Follow the directions on the can, for mixing, being very careful not to add to much hardener. Block sand your body filler down and then sand down the rest of the body panel for the next step.
In all of the areas were you have broke through the factory paint you will have to add an adhesive promoter. one good one is a product called Bull Dog6 the other is one made by Sherwin Williams7 , spray the damaged area with the adhesive promoter before it dries completely you will spray on the primer
The primer that have had the only luck with is a product called Rapid Prime8, #8445 it is for rusty metal and a very fast high build primer, it is the only primer I have found that will flex with the plastic and is easy to work with, it is also on the expensive side but have found no short cuts for it.
Spray on a light coat of primer and let flash over, it is very important not to put it on to heavy the same properties that let it bond to the plastic also will dissolve the factory finish causing it to bubble if put on to heavy. making a real mess.
Apply two to three coats of primer to the entire panel. I have played with doing partial repairs and it has always come back to bite me in the painting process. Let it dry a couple of hours and then block sand with 120 grit any areas that appear un-even. then re apply another coat of primer.
To get ready to paint you will sand with 220 grit wet and then 320 wet and then 400. the primer has to be painted within 12 hours of doing this..
Visit our web site EmpireGP.com to get some ideas of the type of repairs that can be made, with some patience and time you can repair almost any part on your Error! Hyperlink reference not valid., the above info is for ABS plastic, many bike use a PP plastic "different method,"
for the side panels Error! Hyperlink reference not valid. and Yamaha come to mind. the rest of the parts are ABS and can be repaired with this method
If you get stuck Pm me.. If you want your parts repaired by us it is the cheapest part of the painting and repair process, send me a note and I can give you and idea of the cost of repair. Bob
__________________
Bob Brown CSBA #284
Wise men still seek him
EmpireGP
Ride Hard... Take Chances......... WE NEED THE WORK!
__________________
Bob Brown
1 Castrol Heavy-Duty Automotive degreaser? http://msdspds.castroladvantage.com/...?OpenForm&l=EN
or Castrol Super Clean Cleaner Degreaser?
http://www.acehardwaresuperstore.com...77.html?ref=42
and other Castrol bread n�butter products besides GTx see http://www.acculube.com/castrol-lubricant.htm
2 Prestone Brake parts Cleaner http://ilrc.ucf.edu/documents/ILRC%2...2000000182.pdf
Xylene and Ethylbenzene is nasty stuff because it�s chlorinated; use of non-chlorinated cleaners is recommended but equivalent effectiveness not known.
List of comparable and non- chlorinated cleaners brake cleaners http://www.arb.ca.gov/consprod/regact/cpwg2006/1.pdf
For brake (read, metal surfaces) cleaning I use I CRC non- chlorinated (see link below) but cheap 91% isopropyl alcohol or diluted ammonia with water rinse for brake cleaning is less toxic if handled properly http://www.acehardwareoutlet.com/(xq...SKU=1000000934
For removal of decal adhesive, standard kerosene is suggested http://www.coleman.com/coleman/msds/kerosene.pdf
After testing, �Goo Off� www.goo-off.com by Lilly Industries, Inc, which contains Xylene, Methyl Carbitol and a Surfactant, is designed for label removal if paint damage is absolutely not unacceptable.
3 Or a plastic heat welding �gun�, both unpressurized (conduction) and pressurized (hot air); see http://www.plasticsmag.com/welding.a...ug-01&aid=3325
also see http://forum.doityourself.com/weldin...c-welding.html
and (although shown for PVC, ABS is very similar and utilizes same equipment http://www.youtube.com/watch?v=hIdtX4JoRpM
Example of conductive plastic welder http://www.autobodytoolmart.com/pc-1...ic-welder.aspx similar to but with specialized tips available.
Sport Rider magazine covered it this way http://www.sportrider.com/tech/146_0204_body/index.html
I use this Harbor Freight kit with a router speed control http://www.harborfreight.com/cpi/cta...emnumber=41592
They also have a possibly better but more cumbersome kit http://www.harborfreight.com/cpi/cta...emnumber=96712
4 http://www.urethanesupply.com/street.php they now list the same air-less welder as Auto Body Toolmart but for $70 more but they do carry ABS welding rod
5 Ply-Flex not �Poly-Coat� http://www.evercoat.com/productDetail.aspx?pID=8
6 http://www.repaintsupply.com/pd-bull...n_promoter.cfm
7 Sherwin Williams; automotive, plastic, preparati& repair products http://www.sherwin-automotive.com/pr...cts.cfm?cat=89
8 Kirker Automotive, no listing for #8445, possible same product http://www.kirkerautomotive.com/imag...APID_PRIME.pdf
Last edited by skokievtr; Jan 13, 2009 at 06:33 PM.
Junior Member
Squid
Joined: Jan 2009
Posts: 6
From: up state New York
Bob,
to the forum! Don't worry about your method of introduction. You did good work on MY bike and I've got your back. I'm a satisfied customer and I'll be coming back to you again (PM sent on that, BTW). Though I'm really disappointed you don't have pics of my bike on your website.....
So, are you a Superhawk owner now?
to the forum! Don't worry about your method of introduction. You did good work on MY bike and I've got your back. I'm a satisfied customer and I'll be coming back to you again (PM sent on that, BTW). Though I'm really disappointed you don't have pics of my bike on your website..... So, are you a Superhawk owner now?
Greg I think you sent me a picture at one time, I must of lost it, if you want I will put one up of your bike, I have not updated it in a long long time.
I am glad that you are pleased work that we did, I can make the repairs and match the paint with no problems,
PM sent....Bob

Senior Member
SuperBike
Joined: Jul 2005
Posts: 1,548
From: MN
I beg to differ. They did a great job on my plastics. I sent them rashed and cracked stuff, dented tank, and multi color parts and the quality for the price can't be beat. I do have one mounting hole that shows a small flaw, but in 8000 miles it has held up just fine. Only I know it's there, and as picky as I am about my bikes I'm fine with it.
They arrived today. The match is perfect, the paint and clear coat is very very good and I'm really happy. It is not perhaps show quality, but it is about OEM quality paint and clear coat and I'd have no problem doing any bike I plan to actually ride this way. He also did some minor scratch repair and a broken tab he fixed on the Nava piece. All for less than $300 on the 3 parts. Overall I would highly recommend him. He's the first to say if you have a local painter use them - but I didn't have one that could be recommended to me. So I gave this a try and must say I'm entirely satisfied and would use again. I'll post some pics when I have a minute
bill

Thread
Thread Starter
Forum
Replies
Last Post
Death Cattle
General Discussion
12
Feb 17, 2009 05:56 PM
SD Hawk
General Discussion
9
Nov 30, 2007 06:44 AM


