
fork rebuild issues


Thread Starter
the boss
SuperBike
SuperBike
Joined: Mar 2010
Posts: 1,182
From: largo,fl

fork rebuild issues
ok,so finally i was able to get everything i needed.
inner and outer fork bushings
fork seals
upper and lower gold valves
5wt pro Honda oil
I took the forks apart,had some troubles,but got thru it.got everything cleaned and wiped down.
I stacked and installed the upper and lower valves.all seemed ok and right.
put forks back together,bled out the fork and rod.first couple of strokes went easy and got filled and harder to push thru.at one point,it was very,very hard too pull or push at all.is this normal behavior.
i just went ahead with it,both forks were acting the exact same.got everything back together,took it for a ride.
it seemed way,way to stiff,i even put it on the softest settings and still was a rough ride.sag almost don't exist on any setting.
On the road,any bumps i hit,driveway,speed humps.it almost didn't budge,this is before the softest setting,but pretty cloe to same with soft settings.
i am a little worried that maybe one or both valves are upside down.could this cause the problem
i did new inner and outer bushings,upper and lower gold valves,130mm 5wt oil,15mm gap,spacers cut for new spring to match the OEM spring and spacer.
just to be sure,how many OZ is in 130mm of fluid
2nd problem i am having,I installed new bushings,OEM from Honda.
when i put them in with the new seal,there is play in the tube,i reinstalled the old ones just to see,and they did the same thing.
they have a little bit of slop.is this normal with new bushing.once i installed the seals and such,it tightened up,but during the ride,it seemed and felt OK,but since the front end was so stiff,just not too sure if there was a problem there.when i was backing out of the drive way,and I lightly applied the front brakes,there was vibration and chatter.
not sure if it was because the brakes was not bled out properly,but the vibration was bad and can see the forks shaking pretty bad.
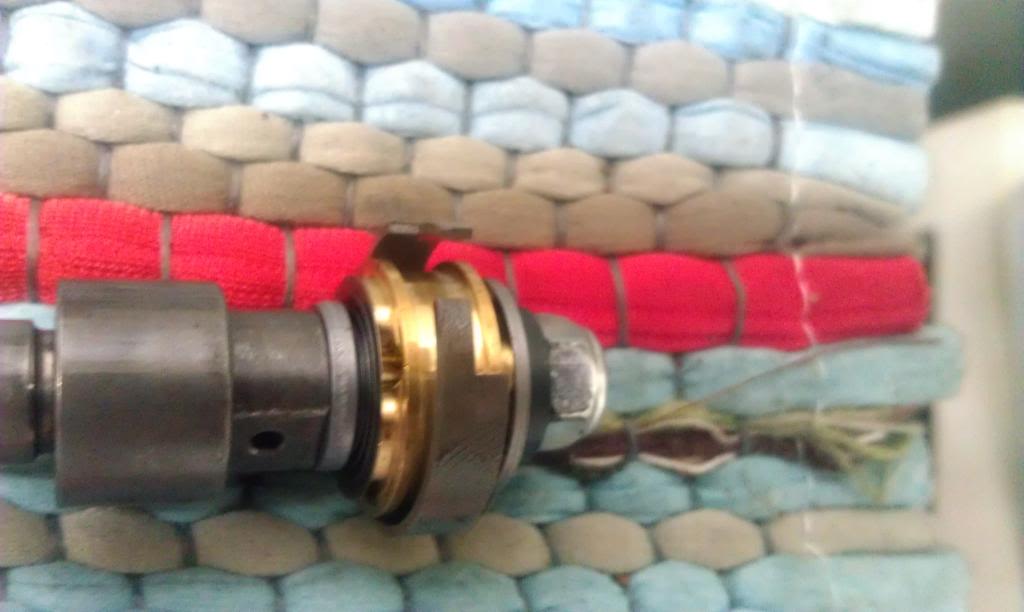
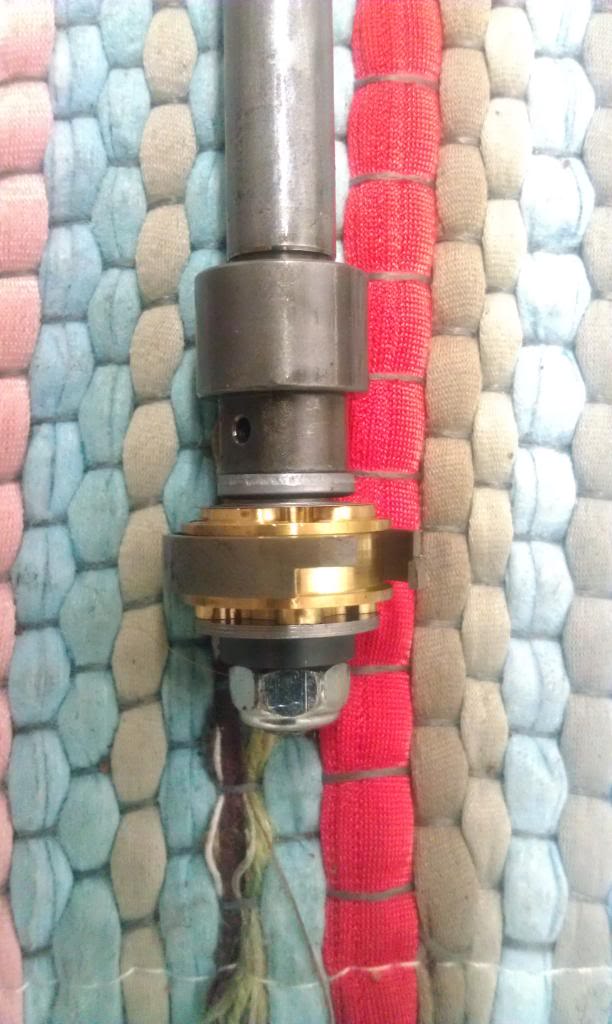
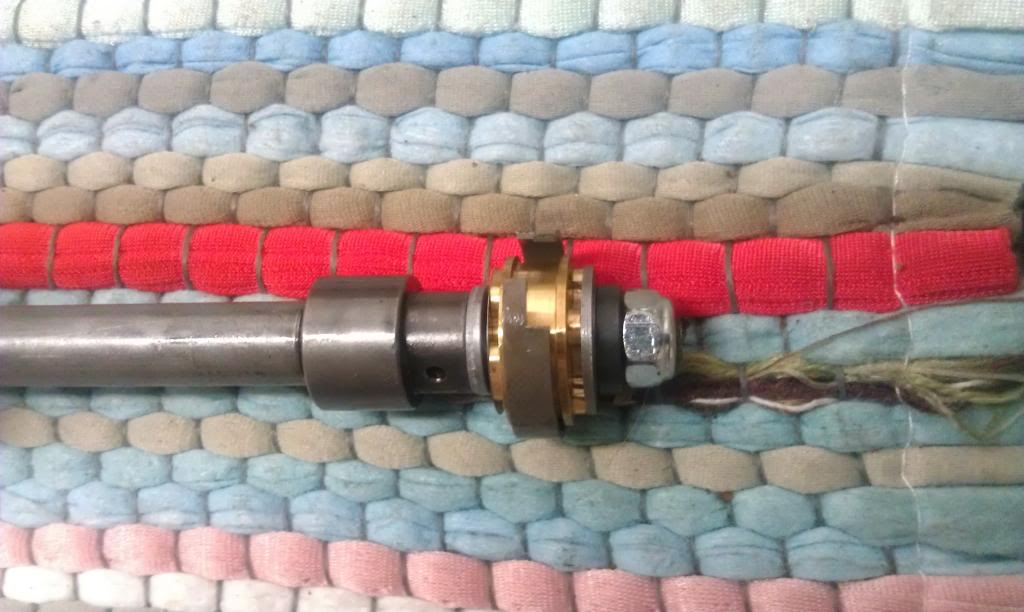
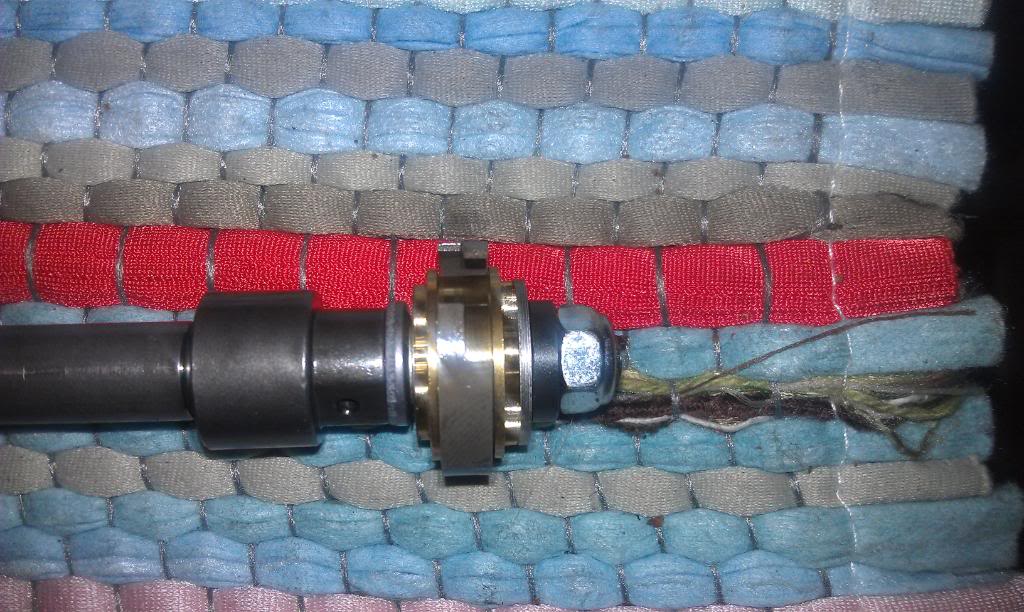
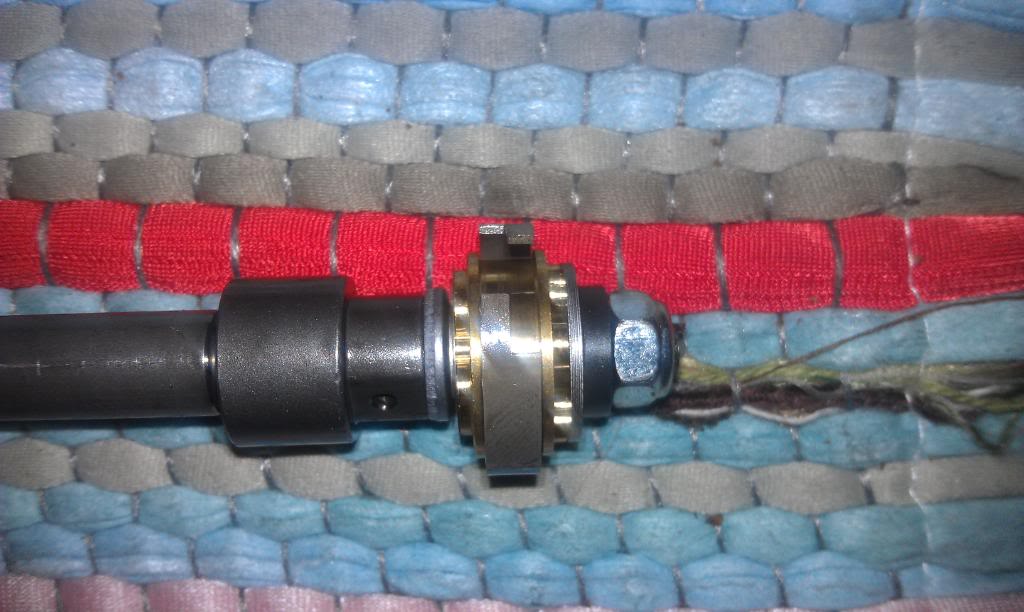
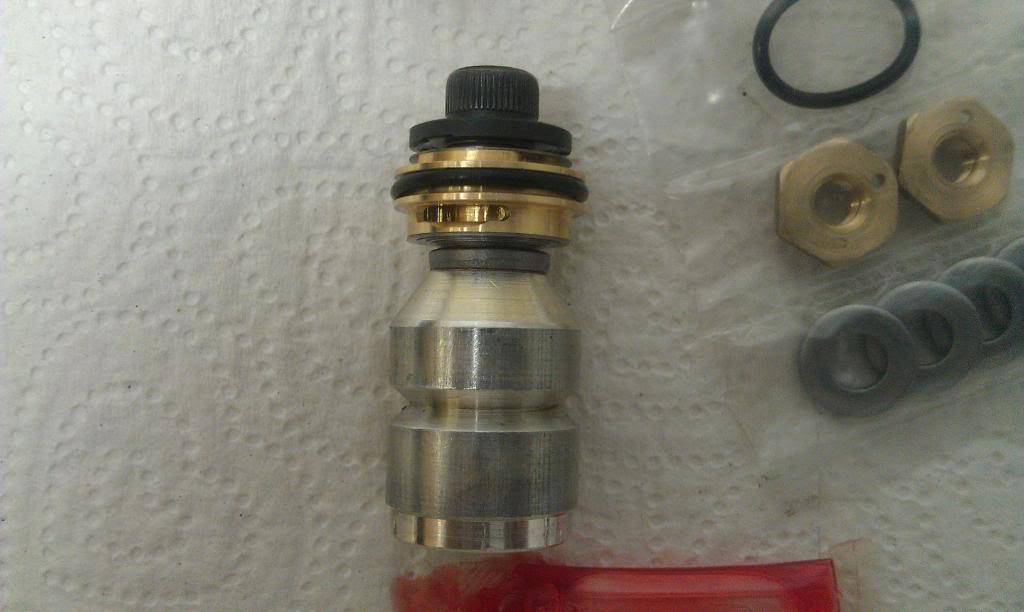
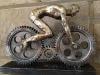
I attached some pics of the valves,if anyone knows for 100% if they are correct or not,please chime in and on anything else you might know of with the other issues I'm having.
thanks


inner and outer fork bushings
fork seals
upper and lower gold valves
5wt pro Honda oil
I took the forks apart,had some troubles,but got thru it.got everything cleaned and wiped down.
I stacked and installed the upper and lower valves.all seemed ok and right.
put forks back together,bled out the fork and rod.first couple of strokes went easy and got filled and harder to push thru.at one point,it was very,very hard too pull or push at all.is this normal behavior.
i just went ahead with it,both forks were acting the exact same.got everything back together,took it for a ride.
it seemed way,way to stiff,i even put it on the softest settings and still was a rough ride.sag almost don't exist on any setting.
On the road,any bumps i hit,driveway,speed humps.it almost didn't budge,this is before the softest setting,but pretty cloe to same with soft settings.
i am a little worried that maybe one or both valves are upside down.could this cause the problem
i did new inner and outer bushings,upper and lower gold valves,130mm 5wt oil,15mm gap,spacers cut for new spring to match the OEM spring and spacer.
just to be sure,how many OZ is in 130mm of fluid
2nd problem i am having,I installed new bushings,OEM from Honda.
when i put them in with the new seal,there is play in the tube,i reinstalled the old ones just to see,and they did the same thing.
they have a little bit of slop.is this normal with new bushing.once i installed the seals and such,it tightened up,but during the ride,it seemed and felt OK,but since the front end was so stiff,just not too sure if there was a problem there.when i was backing out of the drive way,and I lightly applied the front brakes,there was vibration and chatter.
not sure if it was because the brakes was not bled out properly,but the vibration was bad and can see the forks shaking pretty bad.
I attached some pics of the valves,if anyone knows for 100% if they are correct or not,please chime in and on anything else you might know of with the other issues I'm having.
thanks
Last edited by saige; May 8, 2012 at 11:06 PM.

Banned
MotoGP
Joined: Aug 2007
Posts: 5,942
From: Lake View Terrace, CA
It's been so long since I've messed with that type of fork that I don't want to comment and lead you in the wrong direction.... Now if it was an RC fork.... 
Your best bet for a good answer would be shoot Jamie or Greg (If he is around) a PM
Your best bet for a good answer would be shoot Jamie or Greg (If he is around) a PM
Thread Starter
the boss
SuperBike
SuperBike
Joined: Mar 2010
Posts: 1,182
From: largo,fl
just wanted to see if i could get some insight.
ohhhh and trust me,i wish i had the rc forks lol

Thread Starter
the boss
SuperBike
SuperBike
Joined: Mar 2010
Posts: 1,182
From: largo,fl
ok,so far,messed around with it again.took cap off,re-measured to make sure.
took wheels off and pumped the forks and rod.put everything on its recommended settings for installation.
now on softest,it bounces good,im thinking now i can set sag properly.lets hope this is right.
but am still concerned if there is suppose to be a little play where the inner and outer fork bushings go.
i installed old ones for **** and giggles,and they had minor play in them too.but with the oil seal,it seems to fit a little snug,but can still feel a little play.is this normal for bushing installation for anyone that has done fork bushings before.
when all put back together,from being under pressure,cant feel it,but this is all checked by hand.i imagine it would be difference on the road.
Thread Starter
the boss
SuperBike
SuperBike
Joined: Mar 2010
Posts: 1,182
From: largo,fl
ohhhhh and would anybody know how many ounces goes in each tube.dont have proper measuring tools,even tho,everything seems within limits.just want to make sure for ease of mind.
Seasoned tech
SuperSport
Joined: Apr 2012
Posts: 576
From: Issaquah, WA
If you have a ruler or anything that has a 130mm measurement on it just go by that. Also make sure when you do this you have the spring out. Motion Pro makes a fork level tool that's not to expensive too.
Bandit, depending on the type of fork some you can run heavier oil in to stiffen them up and some you can't. The older style with large orfices in the damper tubes you can change the oil weight. However generally on a staked shim style damper you have to run 5wt. or it'll get super stiff and not work properly. I'm guessing your bandit probably has the older style forks.
Bandit, depending on the type of fork some you can run heavier oil in to stiffen them up and some you can't. The older style with large orfices in the damper tubes you can change the oil weight. However generally on a staked shim style damper you have to run 5wt. or it'll get super stiff and not work properly. I'm guessing your bandit probably has the older style forks.

Senior Member
Superstock
Joined: Jan 2012
Posts: 423
From: ABE PA
yeah, old bike old forks LOL...but I overfilled mine too initially, and it was stiff as hell; as the PO described...figured id throw that out there, but thanks for that info...I learn something new every time I log on! LOL
Thread Starter
the boss
SuperBike
SuperBike
Joined: Mar 2010
Posts: 1,182
From: largo,fl
apparently,im actually at about 4.7 to 4.8 from top.is that a big issue or is it ok.
so im guessing im at around 127,128mm
edit=disregard,i just went ahead and took out the excess,will go from there.
so im guessing im at around 127,128mm
edit=disregard,i just went ahead and took out the excess,will go from there.
Last edited by saige; May 9, 2012 at 03:31 PM.
Seasoned tech
SuperSport
Joined: Apr 2012
Posts: 576
From: Issaquah, WA
Being a few mm off won't hurt anything. In fact that's one way to help tune the suspension. More oil/smaller number will stiffin the forks some by reducing the amount of the air chamber, and vice versa.

Administrator

World Champion
Joined: Dec 2004
Posts: 105,287
From: Fulton, MO
Ummm, did you drill a bleed hole in the compression (base) valve? We don't have adjustable compression, thus there is no needle, thus you need a bleed hole. The compression damping is highly affected by bleed hole size and oil weight too. But pick your oil and tune with that oil. Use something high quality, like Silkolene RSF Pro, with a high viscosity index.
Administrator
World Champion
Joined: Dec 2004
Posts: 105,287
From: Fulton, MO
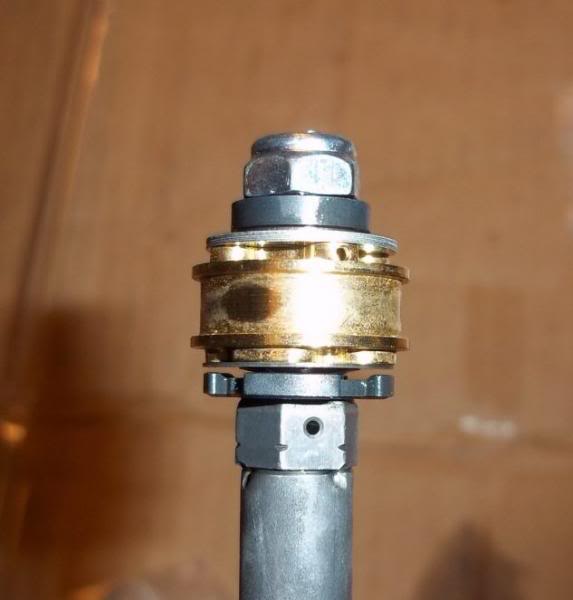
Looking closer at your pics, do you have a check valve on the rod side of the rebound valve? It almost looks like a shim and a spacer, without a spring. You need a spring (or two - hint).
Actually it looks like you have a stack on both sides...and that aint' right.
Shimstacks should always face downward.
Actually it looks like you have a stack on both sides...and that aint' right.
Shimstacks should always face downward.
Thread Starter
the boss
SuperBike
SuperBike
Joined: Mar 2010
Posts: 1,182
From: largo,fl
are you talking about this pic.on the instructions,it says i wont be using them the cupped washer,check spring or check plate.gave specific instructions,called racetech on this and they confirmed,because i didn't think this was right either.but they confirmed.
I didn't drill a bleed hole,because i was told,really unless i plan on doing consecutive track days,it wasn't really a need for it for street riding,unless im gonna be ghostrider for my riding style,i do ride hard sometimes,but didn't think it called for the bleed hole.
do you think it was important that i added the bleed hole?

I didn't drill a bleed hole,because i was told,really unless i plan on doing consecutive track days,it wasn't really a need for it for street riding,unless im gonna be ghostrider
do you think it was important that i added the bleed hole?
Administrator
World Champion
Joined: Dec 2004
Posts: 105,287
From: Fulton, MO
You have ZERO low speed compression if you have no bleed hole. That's why bumps are so harsh. You have to build enough pressure to blow the stack open. That's a decent amount of pressure.
Thread Starter
the boss
SuperBike
SuperBike
Joined: Mar 2010
Posts: 1,182
From: largo,fl
which side does the check valve and spring goes,on the side of the nut or the rod side.
Thread Starter
the boss
SuperBike
SuperBike
Joined: Mar 2010
Posts: 1,182
From: largo,fl
ok,so far,think i got it figured out,wont take long to correct,uggggggg
shouldve done the hole.
on this valve set up,im assuming no hole is drilled,this is gold valve model FMGV S2040G AKA S2040 G2-R
IM understanding you can if needed/wanted.
I will be drilling hole on the valve that is on the rod and adding check valve and spring.
so is drilling needed in the G2-R valve too,or can i live without it being drilled.
I know on older model valves,it was done,very little space,so if it is drilled along with the valve on rod,where can i drill and be safe with it.

the check valve and spring go on the rod side and the hole gets drilled on the side with the nut,is this correct.
And to be sure,it only gets drilled on one side or both,from what ive seen and read,only one side.
im almost positive its not both sides or straight thru the valve.please tell me im right about that one at least
the kit didn't come with a spring,so i would use the stock check valve and spring?

Is this the setup im looking for,similar to this.
really sorry for being annoying,thanks for all the help.
shouldve done the hole.
on this valve set up,im assuming no hole is drilled,this is gold valve model FMGV S2040G AKA S2040 G2-R
IM understanding you can if needed/wanted.
I will be drilling hole on the valve that is on the rod and adding check valve and spring.
so is drilling needed in the G2-R valve too,or can i live without it being drilled.
I know on older model valves,it was done,very little space,so if it is drilled along with the valve on rod,where can i drill and be safe with it.
the check valve and spring go on the rod side and the hole gets drilled on the side with the nut,is this correct.
And to be sure,it only gets drilled on one side or both,from what ive seen and read,only one side.
im almost positive its not both sides or straight thru the valve.please tell me im right about that one at least
the kit didn't come with a spring,so i would use the stock check valve and spring?
Is this the setup im looking for,similar to this.
really sorry for being annoying,thanks for all the help.
Retired- but not tired!
SuperBike
Joined: Aug 2010
Posts: 1,481
From: Pittsburgh
If you are not clear on how many ounces of fluid, how to measure height, etc. refer to page 13-18 in the manual. It makes it crystal clear. Link to searchable manual below.
VTR1000F Honda Service Manual OCR.pdf
VTR1000F Honda Service Manual OCR.pdf
Administrator
World Champion
Joined: Dec 2004
Posts: 105,287
From: Fulton, MO
Sometimes (many times, actually) a wave washer is used in place of a spring. Did a few of those come in your kit? Should've. I'm not familiar with the two port design, so I'm not sure how Racetech sets them up, with one bleed or two. Typically on the 4-port Showa valves I only use one hole. Also, it's pretty much impossible to tell if you have the valve itself in correctly just by looking at the side pics. The bleed and bypass ports are usually different sizes so you have to read the directions carefully to find out which way they are installed.
Don't forget to fully bleed the cartridges before you measure air gap. Should be with spring out and fork slider fully compressed.
Don't forget to fully bleed the cartridges before you measure air gap. Should be with spring out and fork slider fully compressed.

When in doubt, C4
Squid
Joined: Apr 2012
Posts: 72
From: Venice, FL
I was going to comment on the air gap and how to do it, but HawkRider got to it first. I know mine pogo'd previous on bumps before I went in and redid the front springs and measured for the proper fluid level. 5w should be pretty thin also.
Also, this was of big help before I dove into the suspension so I had an idea on what to look for....
VTR1000F FireStorm Suspension Mods!!
Also, this was of big help before I dove into the suspension so I had an idea on what to look for....
VTR1000F FireStorm Suspension Mods!!
Thread Starter
the boss
SuperBike
SuperBike
Joined: Mar 2010
Posts: 1,182
From: largo,fl
I was going to comment on the air gap and how to do it, but HawkRider got to it first. I know mine pogo'd previous on bumps before I went in and redid the front springs and measured for the proper fluid level. 5w should be pretty thin also.
Also, this was of big help before I dove into the suspension so I had an idea on what to look for....
VTR1000F FireStorm Suspension Mods!!
Also, this was of big help before I dove into the suspension so I had an idea on what to look for....
VTR1000F FireStorm Suspension Mods!!
When in doubt, C4
Squid
Joined: Apr 2012
Posts: 72
From: Venice, FL
That was where I was hung up while I had my front end apart. I wasn't sure if I was going to do the gold valves in the future so I left the damping rod alone, thus later saving me from having to buy the new assemblies later on since it says to NOT drill a hole if you will be installing, or your case having already, the gold valves.

Thread
Thread Starter
Forum
Replies
Last Post
HawkRider98
General Discussion
2
Sep 10, 2008 09:07 AM


