
Danmoto 3 way adjustable clip on review


Thread Starter
Senior Member
SuperSport
Joined: Apr 2013
Posts: 834
From: Thousand Oaks, CA

Danmoto 3 way adjustable clip on review
i searched around here, and all over the web for that matter, on reviews for DanMoto's 3 way adjustable clip ons before i purchased a set but for some reason i couldnt seem to find much, so i thought id throw up my 2 cents on the product for anyone who is interested in them.
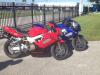
ill start off buy saying for $100 per pair i had to gamble on them before i spent bucoo bucks on apex or helis or something. sol i got a pair of them when i did my RC51 front end swap. the reason i chose them was because i wanted the clip ons to be as low as i could get them and still have enough rise for everything to clear the fairings and such. i didnt know exactley what that height would be so the adjustable bars were an attractive solution.
Now on to the clip ons. the quality straight out of the box was pretty good. i got black and they had an OK finish to them. not great but not bad. they are VERY adjustable which is cool but it takes some time to get them in the same position on each side. the only downside to them is that the threads inside all the clamps were complete crap (3 clamps per clip on, 2 bolts per clamp, so a total of 12 bolt) the bolt would literally pull the threading right out of the housing. fortunatley the end of each internal threading on the clamps is open rather than being enclosed. so a set of longer bolts and some nuts was a great solution. i used M6 thread bolts (same as stock bolts) that were about 1/2 an inch longer than the stock bolts so that when u put them in a portion of the bolt stuck out the other side, then u throw a nut onto the end and tighten that down.
if you get a pair of these clip ons, id say go straight to the aftermarket bolt solution because youll save yourself a bit of a headache. but once you do you have a really solid set of fully adjustable clip ons with almost endless possibilitys for $100 plus another $5 for nuts and bolts.

Senior Member
SuperSport
Joined: Oct 2012
Posts: 501
From: Orlando, FL
i searched around here, and all over the web for that matter, on reviews for DanMoto's 3 way adjustable clip ons before i purchased a set but for some reason i couldnt seem to find much, so i thought id throw up my 2 cents on the product for anyone who is interested in them.
ill start off buy saying for $100 per pair i had to gamble on them before i spent bucoo bucks on apex or helis or something. sol i got a pair of them when i did my RC51 front end swap. the reason i chose them was because i wanted the clip ons to be as low as i could get them and still have enough rise for everything to clear the fairings and such. i didnt know exactley what that height would be so the adjustable bars were an attractive solution.
Now on to the clip ons. the quality straight out of the box was pretty good. i got black and they had an OK finish to them. not great but not bad. they are VERY adjustable which is cool but it takes some time to get them in the same position on each side. the only downside to them is that the threads inside all the clamps were complete crap (3 clamps per clip on, 2 bolts per clamp, so a total of 12 bolt) the bolt would literally pull the threading right out of the housing. fortunatley the end of each internal threading on the clamps is open rather than being enclosed. so a set of longer bolts and some nuts was a great solution. i used M6 thread bolts (same as stock bolts) that were about 1/2 an inch longer than the stock bolts so that when u put them in a portion of the bolt stuck out the other side, then u throw a nut onto the end and tighten that down.
if you get a pair of these clip ons, id say go straight to the aftermarket bolt solution because youll save yourself a bit of a headache. but once you do you have a really solid set of fully adjustable clip ons with almost endless possibilitys for $100 plus another $5 for nuts and bolts.
I had a good experience with my DanMoto rearsets, except like you said the bolts, all of mine were replaced as well. DanMoto's support staff was great, and I wouldn't hesistate to buy from them again, and I had actually been looking at there adjustable clipons, so it's good to hear everything worked out in your favor. BUT!

Thread Starter
Senior Member
SuperSport
Joined: Apr 2013
Posts: 834
From: Thousand Oaks, CA
Sorry for the delayed post. So I just put longer bolts through the stock threads and stuck a nut on the end of each bolt.
Now I'm looking into getting the danmoto rearsets. I read on here that they have similar problems with threads and such but it seems that the issues are easily remedied. From what other people say the good price outweighs the few flaws which is exactly how I would describe the danmoto clip ons.

Senior Member
SuperBike
Joined: Mar 2012
Posts: 1,544
From: New South Wales Australia
+1 for the rearsets from me.
You need longer bolts for the pegs, and lock tight everything.
Gear change is much better too, especially if you load up the splined shaft from the gearbox.
Now changes gears like a hot knife through butter, way smoother and no clunk like before when going from 2nd to 3rd even when the chain needs adjusting.

Thread Starter
Senior Member
SuperSport
Joined: Apr 2013
Posts: 834
From: Thousand Oaks, CA
Just sprang and ordered the danmoto rear sets. Im hoping that they include all the spacers and bolts considering i asked them specifically to do so in the comment section at checkout. ive read that other members orders were missing some smaller parts but danmoto was quick to fix the problem. for a total of $179 with free shipping i dont think i can really loose here when the alternatives are leaps and bounds more money. Especially since im going into it expecting there to be minor flaws in threads and such. but really excited to get a more up/back aggressive foot position. ill let everyone know how they are overall once installed.
Thread Starter
Senior Member
SuperSport
Joined: Apr 2013
Posts: 834
From: Thousand Oaks, CA
+1 for the rearsets from me.
You need longer bolts for the pegs, and lock tight everything.
Gear change is much better too, especially if you load up the splined shaft from the gearbox.
Now changes gears like a hot knife through butter, way smoother and no clunk like before when going from 2nd to 3rd even when the chain needs adjusting.
You need longer bolts for the pegs, and lock tight everything.
Gear change is much better too, especially if you load up the splined shaft from the gearbox.
Now changes gears like a hot knife through butter, way smoother and no clunk like before when going from 2nd to 3rd even when the chain needs adjusting.
Senior Member
SuperBike
Joined: Mar 2012
Posts: 1,544
From: New South Wales Australia
When you fit the gear lever linkage onto the shaft from the gear box rotate the shaft to the position just before it engages the gear.
This shortens the shift by giving you less detent travel when engaging gears.
There is a post on this in the Australian forum under the title "Improving the gear shift"
It realy makes a difference.
You can do this by adjusting your linkage rod whist holding the lever and applying pressure to rotate the shaft in a forward position from memory.
If need be I can post some pics when I get time.

Senior Member
MotoGP
Joined: Apr 2005
Posts: 5,631
From: Montreal
Look at it this way: get the angle between the arm attached to the transmission and the linkage rod as close to a right angle (90-degrees) as possible, this will give you the best possible geometry and shortest shift..... to do this, rotate the arm on the splines (I moved mine by two splines).... takes all of 2 minutes to do.....

RUNLEVELZERO #99
SuperBike
Joined: Jan 2007
Posts: 2,223
From: Skokie
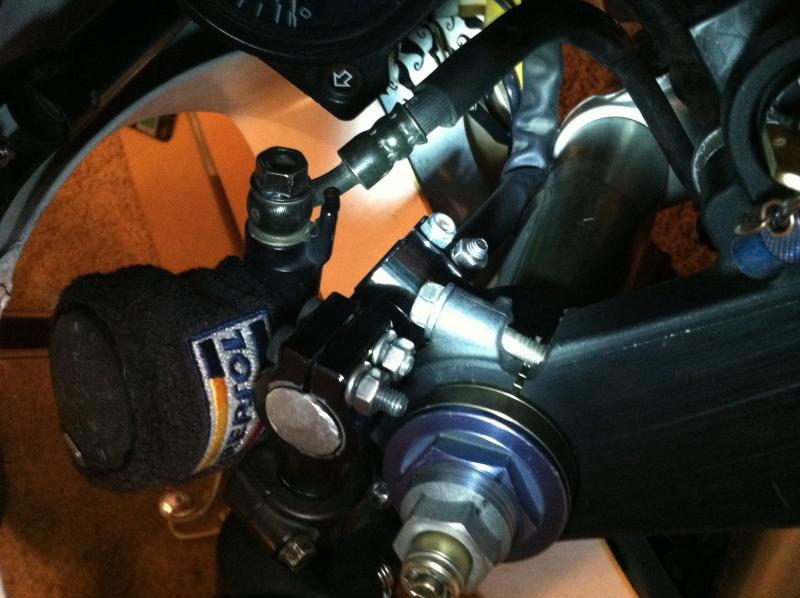
DanMoto Clip-On Max Rise & Setback versus Tomasellis
Could you please measure and tell me the maximum rise possible; i.e., distance between centerline of extension to centerline of bar? I am considering these bars for OE forks but above top clamp for maximum rise and setback for comfort over my 3-axis Tomaselli's (which give more rise & setback than the Helibars I had on for years).
See attached pics and render your opinion if the DanMoto clip-ons will provide more rise and set-back at maximum than the Tomaselli's.
Thx
See attached pics and render your opinion if the DanMoto clip-ons will provide more rise and set-back at maximum than the Tomaselli's.
Thx
Attachment 16603
Sorry for the delayed post. So I just put longer bolts through the stock threads and stuck a nut on the end of each bolt.
Now I'm looking into getting the danmoto rearsets. I read on here that they have similar problems with threads and such but it seems that the issues are easily remedied. From what other people say the good price outweighs the few flaws which is exactly how I would describe the danmoto clip ons.
Thread Starter
Senior Member
SuperSport
Joined: Apr 2013
Posts: 834
From: Thousand Oaks, CA
Could you please measure and tell me the maximum rise possible; i.e., distance between centerline of extension to centerline of bar? I am considering these bars for OE forks but above top clamp for maximum rise and setback for comfort over my 3-axis Tomaselli's (which give more rise & setback than the Helibars I had on for years).
See attached pics and render your opinion if the DanMoto clip-ons will provide more rise and set-back at maximum than the Tomaselli's.
Thx
See attached pics and render your opinion if the DanMoto clip-ons will provide more rise and set-back at maximum than the Tomaselli's.
Thx
RUNLEVELZERO #99
SuperBike
Joined: Jan 2007
Posts: 2,223
From: Skokie
thanks for your prompt reply. Yes, too bad about the trim job you gave them, for me anyway.
I've communicated with DanMoto and he says the rise is only 33mm center to center but it also looks a lot more than that.
They are now $106 but I think I'll give them a shot.
Anyone else tried them?
I've communicated with DanMoto and he says the rise is only 33mm center to center but it also looks a lot more than that.
They are now $106 but I think I'll give them a shot.
Anyone else tried them?
well im sorry to say that i was going for the lowest possible clip ons but i wasnt sure how much rise i would need while doing the front end swap so thats why i got these. also once i found the optimum lowest position, i ground off the remaining extension pieces so i cant measure. from the looks of your bars the danmotos have wayyyyy more rise and adjustability. i was very suprised at how high they could go. i think the web site says 45mm of rise but it seems to be more than that. in my opinion you cant go wrong with them for $100
Thread Starter
Senior Member
SuperSport
Joined: Apr 2013
Posts: 834
From: Thousand Oaks, CA
thanks for your prompt reply. Yes, too bad about the trim job you gave them, for me anyway.
I've communicated with DanMoto and he says the rise is only 33mm center to center but it also looks a lot more than that.
They are now $106 but I think I'll give them a shot.
Anyone else tried them?
I've communicated with DanMoto and he says the rise is only 33mm center to center but it also looks a lot more than that.
They are now $106 but I think I'll give them a shot.
Anyone else tried them?
NO WAY on the 33mm. i cut off about half of the rise and mine are prolly only a little lower than 33mm at the moment. i just looked on the site and it says 45mm but i think you also have to add on the thickness of the clamp that moves on the adjustment column. so i believe if you have the clip on all the way down on the column there is 45mm ABOVE that. buts its deffinatley more than what you have now
RUNLEVELZERO #99
SuperBike
Joined: Jan 2007
Posts: 2,223
From: Skokie
I installed the D-M 3D levers, and what a nightmare it was. I did not want to cut the "ears" off the fairing so it was a real pain to keep the headlight/turn signal and starter/kill switch control "pods" from contacting the tank. When I installed the Tommasellis I drilled and tapped the frame and installed a hex drive set screw to create an adjustable stop for the lower triple tree which reduces steering range. For the D-Ms I had to adjust out the right stop but believe if I re-drill the start/kill pod bar index hole to rotate the pod up, I believe this will enable restoring the steering clearance I had previously.
I off course obtained longer stainless steel socket heat screws so I could use "nylock" nuts on the screws too but also took the step of grinding flat washers to create askew (wedge section) washers due to the radius on the C/O clamp that would have otherwise impinged on the washer under the nut and put lateral load and bound on the screw shank.
I also had to cut, grind, polish and paint the OEM clutch and brake (albeit the latter is off a SP2) master cylinders to remove the brake hose stop lugs and on the clutch MC also remove material from the piston barrel so it would clear the top of the left tube preload adjuster.
I may also re-drill the high beam / turn signal control pod index pin hole in the bar to rotate it up 15 degrees.
All in all I guess it was worth it even though I only raised the bars up about 3/4", back about 3/8" and opened up the bar angle forward and down a bit from then position of the Tommasellis. The D-M bars are longer than the Tommasellis and seem to transfer a bit more vibration (the Tommasellis permitted bar end weights and the solid- end D-M do not).
After the first ride I had to tighten the "extension piece" clamps (the component that connects the bar piece to the fork tube clamp piece). It was very scary when getting on and off the bike as the bars would suddenly move down a hair; I shudder to think of the result if this happened while pitching into a fast turn. Having to swing (high-kick) my leg over the Shad rear trunk requires putting a fair amount of down force on the bars. This tightening procedure required not only technique due to interference with the lever MC and control pods but customizing of a 10 mm double open-ended ignition wrench (thin section and short) and grinding the OD of a 10 mm socket to fit between the two clamp nuts. Even so the nuts had to rotated so their "flats" were opposite other in order to use the "skinny" socket, and it still would not fit between the fork tube clamp nuts because their centers are closer than on the other two clamps (why?). I hope I don't need to keep checking and tightening the clamps but I did not use thread locking compound on them (I actually use a lubricant to prevent galling of the aluminum by the stainless screws).
I'll post pics if anyone cares...
Last edited by skokievtr; Jul 22, 2014 at 09:25 AM.

Thread
Thread Starter
Forum
Replies
Last Post
skokievtr
Modifications - Performance
4
Jul 21, 2014 12:28 PM
bmwalfaone
Modifications - Cosmetic
13
Jan 12, 2011 04:04 AM


