Chi-Knee FOOt peg! An in depth look:
 02-04-2013, 04:20 PM
#31
Senior Member
SuperBike

Join Date: Jan 2007
Posts: 2,119

I've had the MFW Vario adjustable pegs since at least 2008 with no issues (and I far outweigh you and stand on the pegs all the time). I made my own heel guards as I wear size 11+ boots. I shortened the thread brake actuator rod eliminating the lock nut but safety wiring the link, and extended the brake toe portion as the 1-inch extender is about 8 mm wide and moves out your boot on both pegs that amount.
 02-04-2013, 04:56 PM
#32
Senior Member
Superstock
Thread Starter

Join Date: Jan 2012
Location: ABE PA
Posts: 423
Skokievtr thats my next thing...fashion some sort of heel guard...Because that was a big problem BEFORE this and now even worse. Could you do some close up pics? More angles?
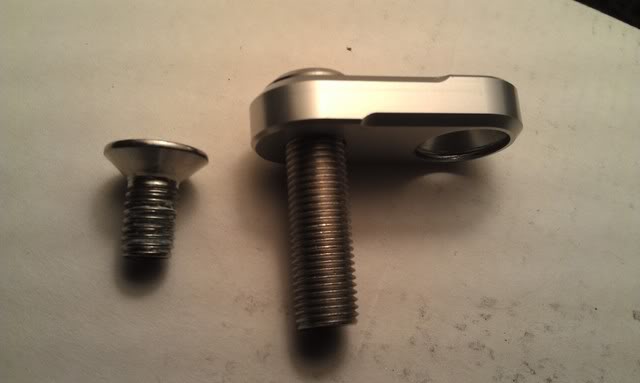
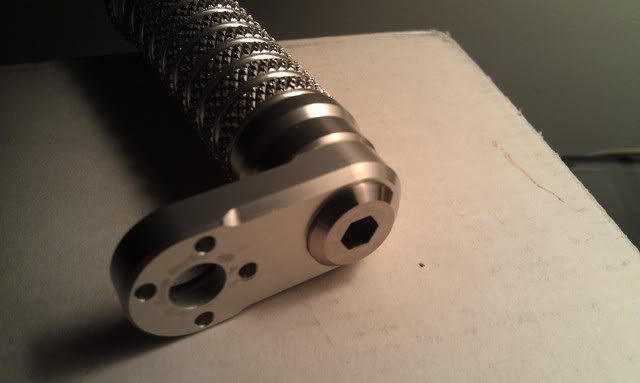
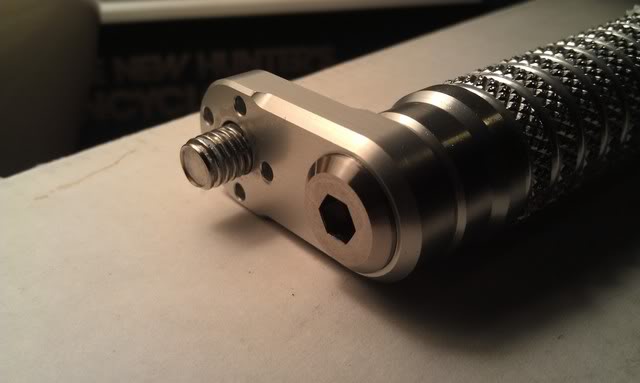
But anyways, as promised are the updated photos:
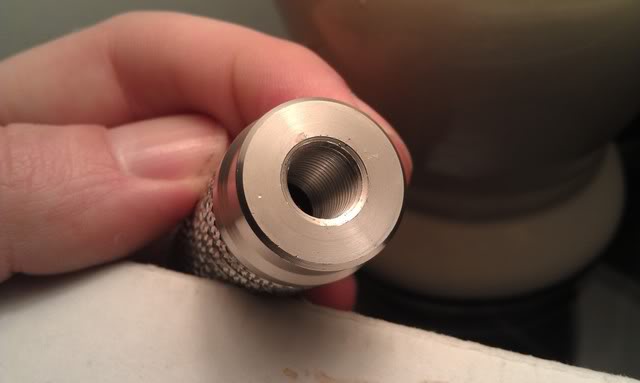
The inside diameter was widened by 0.075"...aka not much but just enough:
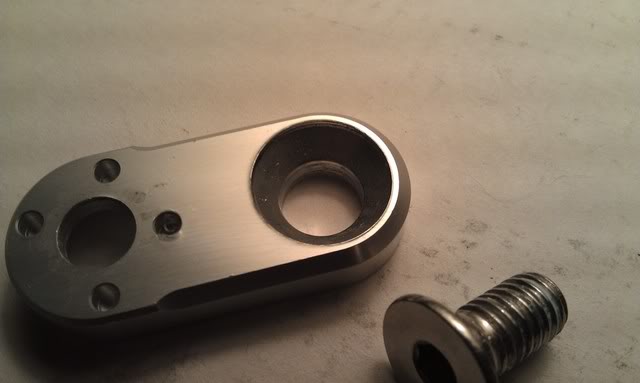
The foot peg bevel eliminated for a more solid contact:
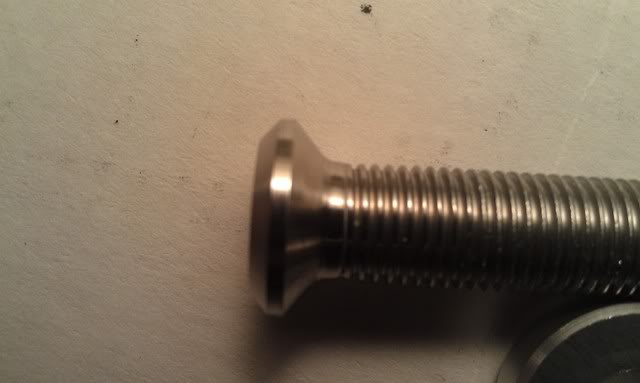
A closeup of the machine work on the screw itself:
And assembled..partly LOL:
I hope this setup works, I imagine it will be more than adequate. What I'm worried about now it the pivot joint itself failing at the point with the (now) least amount of thread. Daytona Bike Week will tell I suppose. But here's hopin! Cheers guys thanks for all the input!
And of course I'll do ANOTHER follow up after my return In late March, tell you guys how they held up.
But anyways, as promised are the updated photos:
The inside diameter was widened by 0.075"...aka not much but just enough:
The foot peg bevel eliminated for a more solid contact:
A closeup of the machine work on the screw itself:
And assembled..partly LOL:
I hope this setup works, I imagine it will be more than adequate. What I'm worried about now it the pivot joint itself failing at the point with the (now) least amount of thread. Daytona Bike Week will tell I suppose. But here's hopin! Cheers guys thanks for all the input!
And of course I'll do ANOTHER follow up after my return In late March, tell you guys how they held up.
02-04-2013, 06:37 PM
#33
Senior Member
SuperBike

Join Date: Jul 2011
Location: South of Live Free or Die & North of Family Guy
Posts: 1,456
I've had the MFW Vario adjustable pegs since at least 2008 with no issues (and I far outweigh you and stand on the pegs all the time). I made my own heel guards as I wear size 11+ boots. I shortened the thread brake actuator rod eliminating the lock nut but safety wiring the link, and extended the brake toe portion as the 1-inch extender is about 8 mm wide and moves out your boot on both pegs that amount.
There is a simple solution relatively easy and cheap.
Get your self a CBR1000RR kick stand mounted instead, just the arm, works really well, it's one inch longer, flat wider base, tubular (which means not flexible as the stock) and lighter, you just have to shave a little material from the front stopper to get the correct position.
Sorry for the
 Bandit400man, just wanted to help
02-04-2013, 06:59 PM
Bandit400man, just wanted to help
02-04-2013, 06:59 PM
#34
Senior Member
SuperSport

Join Date: Mar 2010
Location: Asheville, North Carolina
Posts: 949
Hey, Bandit400.. Just got those peg sets in this morning.. When I came in from work.. Changed my shoes an went to Lowe's... 8m X1.25 X50m... Yeah I get back-get all the photos,put together, installed.. And get to the forum-To show off "THE FIX".. and well GRAND... second fiddle again..
Yeap I will have to ponder the $115.00 for the german produces- to the mere $35.00 that way spent..on the japan stuff..
Yeap I will have to ponder the $115.00 for the german produces- to the mere $35.00 that way spent..on the japan stuff..
02-05-2013, 05:16 AM
#35
Senior Member
Superstock
Thread Starter
Join Date: Jan 2012
Location: ABE PA
Posts: 423
Yeah it makes you think...the cheap levers I got proved be identical to their high priced counterparts...while the pegs proved otherwise.
But post pics of your set up! Any ideas of what to do with the U-joint attachment side? I'm thinking more pins than just one...
And its all good NHSH...good idea too on the kickstand!
But post pics of your set up! Any ideas of what to do with the U-joint attachment side? I'm thinking more pins than just one...
And its all good NHSH...good idea too on the kickstand!
02-05-2013, 06:25 AM
#36
Senior Member
SuperSport
Join Date: Mar 2010
Location: Asheville, North Carolina
Posts: 949
4 roll-pin per side in 4 points, so you can still 360 position the pegs...
A spot of blue -Lok-tite on all threads.
02-05-2013, 08:24 AM
#37
Senior Member
Superstock
Thread Starter
Join Date: Jan 2012
Location: ABE PA
Posts: 423
Word man that's what I was thinkin...where'd you find roll pins that fit? Or do you have access to a machine shop an had em made? That's what I wanted to do, but their tiny an they already helped me out this month lol don't wanna push my luck
02-05-2013, 01:28 PM
#38
Senior Member
SuperBike
Join Date: Jan 2007
Posts: 2,119
I see from the pictures you have a little problem with the kick stand  There is a simple solution relatively easy and cheap.
Get your self a CBR1000RR kick stand mounted instead, just the arm, works really well, it's one inch longer, flat wider base, tubular (which means not flexible as the stock) and lighter, you just have to shave a little material from the front stopper to get the correct position. Sorry for the Bandit400man, just wanted to help 
Get your self a CBR1000RR kick stand mounted instead, just the arm, works really well, it's one inch longer, flat wider base, tubular (which means not flexible as the stock) and lighter, you just have to shave a little material from the front stopper to get the correct position. Sorry for the
Bandit400man, just wanted to help
02-05-2013, 02:09 PM
#39
Senior Member
SuperBike
Join Date: Jul 2011
Location: South of Live Free or Die & North of Family Guy
Posts: 1,456
Very simple fab. .040" AL6061T6 cut, formed, edge & surface polished to shape; drill 4 holes & pop-rivet 2 .028" AL6061T6 top-hat brackets; & attach with SS hose clamps with HT wrap between pipe. Pics below of other simple things I've made (oil filter heat shield & oil cooler rock guard)
Block of wood only used to bring VTR up closer to vertical for photos but I appreciate the input. What year CBR1000RR and which "front stopper" do you mean, on the bracket bolted to the engine or on the arm itself?
Block of wood only used to bring VTR up closer to vertical for photos but I appreciate the input. What year CBR1000RR and which "front stopper" do you mean, on the bracket bolted to the engine or on the arm itself?
the year models that works for sure are 04 to 07 like the following: 06 07 CBR 1000 RR CBR1000 CBR1000RR Kickstand Sidestand Kick Stand Side | eBay
not sure about other years...
BTW, this particular price is a bit high, I got it for $19 on ebay including the whole assembly bracket and switch that you don't really need.
02-05-2013, 05:38 PM
#40
Senior Member
SuperBike
Join Date: Jul 2011
Location: South of Live Free or Die & North of Family Guy
Posts: 1,456
I suppose I should take some photos, I will try to take some tonight and post again, you need to shave a little material at the point of contact between the arm and bracket in the down position, if this making sense... I shaved from the actual arm just to keep the option of going back to the stock kick stand, but after using the CBR kick stand, I would never go back to the stock!!
the year models that works for sure are 04 to 07 like the following: 06 07 CBR 1000 RR CBR1000 CBR1000RR Kickstand Sidestand Kick Stand Side | eBay
not sure about other years...
BTW, this particular price is a bit high, I got it for $19 on ebay including the whole assembly bracket and switch that you don't really need.
02-05-2013, 07:39 PM
#41
Senior Member
Superstock
Thread Starter
Join Date: Jan 2012
Location: ABE PA
Posts: 423
Great pics guys thanks! Just gave me a few ideas for the future...
And skokievtr how did you mount those extra lights I see? Custom bracket or did the lights themselves come with a mounting bracket that could be manipulated into place? Always wanted additional lighting, but was at a loss for how to proceed...I notice when I lean into a curve in the dark I cant see squat ahead of me cause my beam leans too LOL
I assume those aux lights solve that problem?
02-05-2013, 09:10 PM
#42
Senior Member
SuperBike
Join Date: Jan 2007
Posts: 2,119
Great pics guys thanks! Just gave me a few ideas for the future...
And skokievtr how did you mount those extra lights I see? Custom bracket or did the lights themselves come with a mounting bracket that could be manipulated into place? Always wanted additional lighting, but was at a loss for how to proceed...I notice when I lean into a curve in the dark I cant see squat ahead of me cause my beam leans too LOL
I assume those aux lights solve that problem?
And skokievtr how did you mount those extra lights I see? Custom bracket or did the lights themselves come with a mounting bracket that could be manipulated into place? Always wanted additional lighting, but was at a loss for how to proceed...I notice when I lean into a curve in the dark I cant see squat ahead of me cause my beam leans too LOL
I assume those aux lights solve that problem?
02-06-2013, 06:01 PM
#43
Senior Member
Superstock
Thread Starter
Join Date: Jan 2012
Location: ABE PA
Posts: 423
Hmmm...10awg seems overkill LOL but cool man! It doesn't affect air flow/cooling over the radiators? From what I've read those air dams are functional to flow over the side-mount radiators...but I suppose its trivial, really.
02-06-2013, 06:14 PM
#44
Senior Member
SuperSport
Join Date: Mar 2010
Location: Asheville, North Carolina
Posts: 949
Hey, Bandit, Ya can't tell my brother....
Got the footpegs on my brothers bike.. The four pins in each, and the 50mm screws really worked well. Even jumped some railroad tracks, Just to feel for flexs.. Even with standing on the pegs on the landing...
The set of Jap'junk just need back-wood engineering(or whatever ya'll call it)
Got the footpegs on my brothers bike.. The four pins in each, and the 50mm screws really worked well. Even jumped some railroad tracks, Just to feel for flexs.. Even with standing on the pegs on the landing...
The set of Jap'junk just need back-wood engineering(or whatever ya'll call it)
02-07-2013, 09:25 AM
#45
Senior Member
SuperBike
Join Date: Jan 2007
Posts: 2,119
The scoops & ducts do NOTHING. The rads cool from inside-out, high pressure to low pressure. Check which way the fan blows and where the heat goes. The ducts are there for looks...
And 1971, without meaning to be PC, me thinks you have your manufacturing origins a bit off. Also, sound engineering is often ruined by poor execution and visa versa.
Last edited by skokievtr; 02-07-2013 at 09:27 AM.
02-07-2013, 10:15 AM
#46
Banned
MotoGP

Join Date: Aug 2007
Location: Lake View Terrace, CA
Posts: 5,942
02-07-2013, 01:36 PM
#47
Senior Member
Superstock
Thread Starter
Join Date: Jan 2012
Location: ABE PA
Posts: 423
Yeah, figured as much, concerning the radiators...
And I found these on fleabay: 3 LED Aux lights
There from another Asian nation, but electrical things are what their GOOD at over there LOL so I hold higher hopes than machined parts after this whole foot peg debacle LOL
And I found these on fleabay: 3 LED Aux lights
There from another Asian nation, but electrical things are what their GOOD at over there LOL so I hold higher hopes than machined parts after this whole foot peg debacle LOL
02-07-2013, 04:07 PM
#48
Senior Member
SuperBike
Join Date: Jan 2007
Posts: 2,119
Interesting and probably light weight with what appear to be good connectors, and it seems possible to mount them to the end of a square tube.
however, I have found tht even Cree emitters provide feeble illumination and that is based on testing 10w units. 3 x 5w adds volume but not brightness. My 50w halogens provide about 3,300~4,000 lumens EACH, compared to about 850 for this PAIR of LED. Hella makes a small but not as light weight set of lights under their "Optilux" line called the 962's that use 55w H3 halogens that will rock your world compared to any but the recent & very expensive LED motorcycle driving lights. Your mounts will have to be sturdier but the Optilux 962 at about $40 for the complete kit are the best, smallest of such units I've found out there.
however, I have found tht even Cree emitters provide feeble illumination and that is based on testing 10w units. 3 x 5w adds volume but not brightness. My 50w halogens provide about 3,300~4,000 lumens EACH, compared to about 850 for this PAIR of LED. Hella makes a small but not as light weight set of lights under their "Optilux" line called the 962's that use 55w H3 halogens that will rock your world compared to any but the recent & very expensive LED motorcycle driving lights. Your mounts will have to be sturdier but the Optilux 962 at about $40 for the complete kit are the best, smallest of such units I've found out there.
Yeah, figured as much, concerning the radiators...
And I found these on fleabay: 3 LED Aux lights
There from another Asian nation, but electrical things are what their GOOD at over there LOL so I hold higher hopes than machined parts after this whole foot peg debacle LOL
And I found these on fleabay: 3 LED Aux lights
There from another Asian nation, but electrical things are what their GOOD at over there LOL so I hold higher hopes than machined parts after this whole foot peg debacle LOL
02-08-2013, 02:02 PM
#50
Out of my mind, back in 5
MotoGP

Join Date: Nov 2006
Location: Skurup, Sweden
Posts: 6,109
Interesting and probably light weight with what appear to be good connectors, and it seems possible to mount them to the end of a square tube.
however, I have found tht even Cree emitters provide feeble illumination and that is based on testing 10w units. 3 x 5w adds volume but not brightness. My 50w halogens provide about 3,300~4,000 lumens EACH, compared to about 850 for this PAIR of LED. Hella makes a small but not as light weight set of lights under their "Optilux" line called the 962's that use 55w H3 halogens that will rock your world compared to any but the recent & very expensive LED motorcycle driving lights. Your mounts will have to be sturdier but the Optilux 962 at about $40 for the complete kit are the best, smallest of such units I've found out there.
however, I have found tht even Cree emitters provide feeble illumination and that is based on testing 10w units. 3 x 5w adds volume but not brightness. My 50w halogens provide about 3,300~4,000 lumens EACH, compared to about 850 for this PAIR of LED. Hella makes a small but not as light weight set of lights under their "Optilux" line called the 962's that use 55w H3 halogens that will rock your world compared to any but the recent & very expensive LED motorcycle driving lights. Your mounts will have to be sturdier but the Optilux 962 at about $40 for the complete kit are the best, smallest of such units I've found out there.
And with the stock H4 in the crappy oem reflector giving you ~1000 Lumens or so, you are at a total of ~5000 Lumens, so you got me beat by a country mile, as my HID projector puts out around 3200 Lumens...
But, I'm kind of tempted to put in two HID projectors, both dual beams, giving me a total of ~6400 Lumens... Haven't quite worked it out though...
02-08-2013, 02:11 PM
#51
Senior Member
Superstock
Thread Starter
Join Date: Jan 2012
Location: ABE PA
Posts: 423
Meh, I did some research on those 962's...heard they weren't that bright, have a bunch of ballast, relays and such to hide, and get hot as heck...LED's seem to be the clear alternative.
I sent an email to the guys selling those lights I found. If they give me a deal on shipping I'll purchase them and do another write up/real world report.
I sent an email to the guys selling those lights I found. If they give me a deal on shipping I'll purchase them and do another write up/real world report.
02-08-2013, 03:18 PM
#52
Out of my mind, back in 5
MotoGP
Join Date: Nov 2006
Location: Skurup, Sweden
Posts: 6,109
Meh, I did some research on those 962's...heard they weren't that bright, have a bunch of ballast, relays and such to hide, and get hot as heck...LED's seem to be the clear alternative.
I sent an email to the guys selling those lights I found. If they give me a deal on shipping I'll purchase them and do another write up/real world report.
I sent an email to the guys selling those lights I found. If they give me a deal on shipping I'll purchase them and do another write up/real world report.
As stock halogen lights, they are very, very good and at a reasonable price... No ballasts, nothing stupid... What you see is what you get... And at around 1500-2000 Lumens per light, in a tight and focused beam, a pair of them will get you very good light... Se my post above, skokievtr should have more usable light output with his than I have with a properly set up HID projector...
If you want REAL and usable light, forget about those LED's and either get a HID projector retrofitted into the stock headlight housing, or put a harness and relay in there to give the stock bulb the correct power and put a pair of those 962's on like discussed... Trust me, they aren't getting any hotter than any other halogen light... Ie not comfortable to hold on to, but that's normal... With an illegal HID coversion in them, they are bright as hell when looking at them, blinding, prone to overheating and gives less usable light than before... Plus you got to hide the ballasts...
Or, if you want, buy Hella's newer versions with a HID bulb... It has the same drawbacks with a ballast to hide, but with a correct lense and house for the HID bulb, it's bright as hell, but not blinding...
Last edited by Tweety; 02-08-2013 at 03:25 PM.
02-11-2013, 11:53 AM
#53
Senior Member
Superstock
Thread Starter
Join Date: Jan 2012
Location: ABE PA
Posts: 423
Good info Tweey, thanks! And your right, they were just cheapy's labeled as Hella.
But personally I'm cheaper than dirt LOL so I'm trying out a full DIY setup using some LED bicycle lights I found...Though not that same model last posted. Ones Im trying have only @ a 1.5" diameter...which will hide nicely inside the front air dams...I plan on getting them and testing them out on a running 12V system...if they pass muster I'll buy another one and wire them in parallel with a generic on/off handlebar mount switch and cross my fingers. Then I gotta jury rig a mount somehow...I'm confidant
I'll do another thread when I get em.
02-11-2013, 12:44 PM
#54
Senior Member
SuperBike
Join Date: Jan 2007
Posts: 2,119
skokievtr, hate to contradict you my friend, but since the technical spec for a H3 Halogen bulb at 12V is around 1500 Lumens in Hella's reference reflector, I doubt you are getting 4000 Lumens, as that would make the reflector and lense in those more than twice as effective as Hella's own reference... I'd say it's probably reasonable that you get ~4000 Lumens for the pair though...
And with the stock H4 in the crappy oem reflector giving you ~1000 Lumens or so, you are at a total of ~5000 Lumens, so you got me beat by a country mile, as my HID projector puts out around 3200 Lumens...
But, I'm kind of tempted to put in two HID projectors, both dual beams, giving me a total of ~6400 Lumens... Haven't quite worked it out though...
With my upgraded VR-R and HD wiring harnesses I'm getting max power to all my lighting and have reduced draw with LED in position, brake & turn lighting to compensate for the higher headlight-driving light amperage. This is a must given the OEM alternator is only producing 280w at 5k rpm. I still can run my heated vest and grips but not too long (or on high) with the twin 50's firing. I also am running a Osram 70/65w H4 (<b>Osram Rallye 70/65w +50 H4 bulb</b>) in the headlight; I recommend them highly and they're on sale now and may buy 2 more! BTW, I have a Kissan headlight modulator (Headlight Modulator) in my HD headlight wiring system that functions on high-beam. I also highly recommend them for 3 very important reasons (that more than offset the nurd-geek factor):
1. HLM (which I've run for 20 years) have saved my bacon more times than I can count! You WILL be seen AND noticed! 2. Cagers often will actually move over and let you by mistaking you for an emergency vehicle. Usually they do so safely but not always. 3. Police think you are a law abiding, safety conscious motorcyclist (especially since I often wear a "super see-me" vest) and almost always (knock on plastic) give you a pass if you are a mph few over (though I also run a radar detector)!
Last edited by skokievtr; 02-11-2013 at 12:48 PM.
04-16-2013, 11:05 AM
#55
Junior Member
Squid

Join Date: Aug 2011
Location: Silver Spring, MD
Posts: 4
I hope this setup works, I imagine it will be more than adequate. What I'm worried about now it the pivot joint itself failing at the point with the (now) least amount of thread. Daytona Bike Week will tell I suppose. But here's hopin! Cheers guys thanks for all the input!
And of course I'll do ANOTHER follow up after my return In late March, tell you guys how they held up.
And of course I'll do ANOTHER follow up after my return In late March, tell you guys how they held up.
As a mechanical engineer the failure of the footpeg that you have shown has me a little concerned. You are right that the weak link is now the other fastener with the small amount of thread engagement. I would be surprised if that joint doesn't fail like the other.

Thread
Thread Starter
Forum
Replies
Last Post
Bandit400man
General Discussion
35
11-25-2012 03:12 PM
viperkillertt
Classifieds
0
05-05-2006 07:42 AM


