
Disabled pair now bike won't start

Thread Starter
Senior Member
Back Marker
Joined: Feb 2010
Posts: 182
From: Western PA

Disabled pair now bike won't start
I'm really hoping someone has an answer to this. I disabled the pair check valves as described in greg's article. It's probably worth mentioning that when I took off the tank the vaccum tube that hooked into the tank was cracked. I replaced the 2" section of hose that runs from the tank and pushes onto the tube. When I started the bike it idled terribly then stalled. So I changed pair back to stock. Fired it up, would only run under full choke and then died. Haven't been able to start it since. Is it something with the vaccum tube? Any ideas? Thanks

Thread Starter
Senior Member
Back Marker
Joined: Feb 2010
Posts: 182
From: Western PA
No. Don't think it's pvlir. It's my first time pulling the tank on the bike since I got it back from the shop, maybe they screwed something up. There's only 4 hoses and it seemed like it would be hard to screw it up. But I hope that's what happened, would defintely be the most hassle free fix. Will double check in the morning. I didn't hook it to the petcock valve or anything. I hooked it on the far right on that small nipple. Are there more than one place that hose will fit? Given the drastic difference in size compared to the others it couldn't go anywhere else. Any thoughts?
After looking in the shop manual I noticed there are s total of 5 hoses to be removed. I only removed 4. Can't remember how many needed pulled when I had the tank off to shim the needles. But I am certain that I didn't have any cracked hoses. Perhaps when the shop was doing the dyno work they screwed something up then rigged it just to get by?
After looking in the shop manual I noticed there are s total of 5 hoses to be removed. I only removed 4. Can't remember how many needed pulled when I had the tank off to shim the needles. But I am certain that I didn't have any cracked hoses. Perhaps when the shop was doing the dyno work they screwed something up then rigged it just to get by?
Last edited by steve29; Apr 7, 2010 at 08:37 PM. Reason: Add info
Thread Starter
Senior Member
Back Marker
Joined: Feb 2010
Posts: 182
From: Western PA
On this vaccum tube, is the proper setup like this?
From the tank runs an approximately 2" small diameter piece of hose that pushes onto s white nipple on the larger diameter vaccum tube. Sound right? Or, is this some cheap fix done by the previous owner.
From the tank runs an approximately 2" small diameter piece of hose that pushes onto s white nipple on the larger diameter vaccum tube. Sound right? Or, is this some cheap fix done by the previous owner.

Senior Member
Superstock
Joined: Aug 2009
Posts: 380
From: Warrenton Virginia
bad ugly fix. ad cant be that large diameter where it meets the fitting on the rear cylinder head. That's probably the drain/vent line and you probably put the vacuum line on the vent. easy check pull both put your finger over both, crank the bike and see which one produces vacuum. also I assume you plugged the air box and such after de pairing?
Thread Starter
Senior Member
Back Marker
Joined: Feb 2010
Posts: 182
From: Western PA
No I didn't plug the air box. I was under the impression that I didn't have to unless I was actually removing the system. All I did was flip the reed stoppers. So I guess it sounds like the hose I described is just pieced together poorly? Does that mean I have too replace that entire vaccum tube? I can't even tell where it goes. It runs on the left side paralell to the left fuel line the up to the front. Then it turns right and i lose track of it.
Thread Starter
Senior Member
Back Marker
Joined: Feb 2010
Posts: 182
From: Western PA
Maybe I'm being confusing. I'm not even sure I'm calling these tubes by the right name. I just pulled them off and remembered where they went, or so I thought. Didn't really pay too much attention cuz I did it before with no problem. Little overconfident I suppose. I'll take s good long look tomorrow and try to provide you guys with some more coherent descriptions. Sorry
Senior Member
Superstock
Joined: Aug 2009
Posts: 380
From: Warrenton Virginia
ok here goes. there are two lines of similar color and diameter coming off two different fittings under the tank one comes off a fitting that is actually on the tank and next to a much larger one, this is the overflow drain for if there is to much gas in your tank (iirc). the other fitting is the furthest rearward nipple on the petcock this is the one that should have the vacuum line. The vacuum line get's it's vacuum from the rear head. There is a fitting on the rear head near the intake port that is about the same size as the nipple on the rear of the petcock. your vacuum line should run between these two points with no leaks. Unless your modified line runs all the way back to the rear cylinder and then necks back down to the original diameter then the modified line is the drain line and belongs on the small nipple on the tank that is located right next to the large nipple on the tank (I think it's the vent, they come in pairs). Once your sure you have the vacuum and drain lines correct check other stuff like is the gas turned on (turn cc when looking from front) and check to make sure carbs have gas. hope this helps, let me know if you need anything clarified
Thread Starter
Senior Member
Back Marker
Joined: Feb 2010
Posts: 182
From: Western PA
Thanks a lot. That should be very helpful. I'll post pics if I get screwed up. The more i think about it, the more I think somehow the shop guys screwed something up since i last had the tank off and rigged it then neglected to tell me. Regarding the pair, do I need to do anything else since I just flipped the reed stoppers?

Senior Member
SuperSport
Joined: Feb 2010
Posts: 667
From: NY State
Thread Starter
Senior Member
Back Marker
Joined: Feb 2010
Posts: 182
From: Western PA
You guys were very helpful. That's exactly what I did. God I feel dumb. Thanks for putting up with the newbie. Haha. Quick side note though, the bike ran like crap with the reed stoppers flipped. Had to change it back. Could that be because it was dyno tuned with PAIR functioning? Any ideas? Guess I should yank it entirely. Thanks again

Banned
MotoGP
Joined: Aug 2007
Posts: 5,942
From: Lake View Terrace, CA
You guys were very helpful. That's exactly what I did. God I feel dumb. Thanks for putting up with the newbie. Haha. Quick side note though, the bike ran like crap with the reed stoppers flipped. Had to change it back. Could that be because it was dyno tuned with PAIR functioning? Any ideas? Guess I should yank it entirely. Thanks again
No worries...... it happens to everyone. Hell I'm dealing with the fact that I ordered the wrong steering head bearings.... You would thing with the different triple i would remember but noooooo...... lol
If the dyno tuner had a EGA hooked up while the pair was still operational you will be set up very rich. The dyno tuner should have know this...... then again it shouldn't be running all that well with it functioning. So it is kind of strange. Have you tried it now that you have the lines routed correctly?
Thread Starter
Senior Member
Back Marker
Joined: Feb 2010
Posts: 182
From: Western PA
Sure did. It would stumble below 4k rpm in first and it sounded terrible. I'm kind of confused. Maybe it's the tuning. I'll scan my dyno sheet onto my computer and attach it to a post, it shows my air/fuel ratio.
Thread Starter
Senior Member
Back Marker
Joined: Feb 2010
Posts: 182
From: Western PA
They did say it was too rich and they shimmed the needles down one washer. Should have just kept everything the same, but I wasn't totally confident in my work and thought maybe they could tweak it. Arghh!
Banned
MotoGP
Joined: Aug 2007
Posts: 5,942
From: Lake View Terrace, CA
So this was done with the pair system operational?
Well first it makes things tougher when they shift gears like that. A straight 3rd gear pull is easier to work with but anyways. Right now it has a real big lean dip and then if the pair is functioning looks rich the rest of the way.
The first curve actually looks better to me. I would say the pilot screws needed to be turned in a little bit. It would be much easier if the pair was disabled because that adds such a big variable and who knows how much air the system actually pumps and does it stay linear through the rev range.
Also you don't tune this bike for top end power (like a I4). Keep it on the rich side and tune for bottom end and mid-range for the best set up.
Banned
MotoGP
Joined: Aug 2007
Posts: 5,942
From: Lake View Terrace, CA
Sorry but yes. With the pair hooked up there is no way of knowing what your A\F ratio really is.
Like I stated, the guys at the Dyno should have know this. Maybe you can get them to give you a free run or at least cut you a major break,.... (I've tried to put this nicely a few times but hell I'm just an old Marine......) as they did a **** poor job and maybe they should learn how to use their equipment as how the hell can you adjust the mixture when something is blowing air directly into the exhaust?

Like I stated, the guys at the Dyno should have know this. Maybe you can get them to give you a free run or at least cut you a major break,.... (I've tried to put this nicely a few times but hell I'm just an old Marine......) as they did a **** poor job and maybe they should learn how to use their equipment as how the hell can you adjust the mixture when something is blowing air directly into the exhaust?
Thread Starter
Senior Member
Back Marker
Joined: Feb 2010
Posts: 182
From: Western PA
Well got the pair ripped out today with the help of s forum member who lives near me. Seemed to help some. Guess I'll badger the shop for more time on the dyno since they screwed me. Or turn those pilot screws in and go by the seat of the pants method.
Senior Member
MotoGP
Joined: Aug 2006
Posts: 2,934
From: altoona, pa
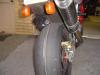
Hey Steve, does this look familiar. We should have had these up when we were doing it. Nice job on the pics here.
https://www.superhawkforum.com/forum...ad.php?t=20918
let me know when you check the air mixture>
https://www.superhawkforum.com/forum...ad.php?t=20918
let me know when you check the air mixture>
Last edited by nath981; Apr 12, 2010 at 04:30 AM.
Thread Starter
Senior Member
Back Marker
Joined: Feb 2010
Posts: 182
From: Western PA
Yes Nathan, pics were helpful. That's exactly how we did it, so no issues there. That leaves 2 possibilities; needles, or pilot screws. Will try pilot screws first since I have the tool to do it. I'll let you know how it turns out. Anybody else with thoughts on this, or am i oversimplifying here on what I need to check.

Out of my mind, back in 5
MotoGP
Joined: Nov 2006
Posts: 6,109
From: Skurup, Sweden
Well... Without knowing what main jets and pilot jets are in there and what needles at what clip/washers anything you do is a shot in the dark really...
I never tried tuning things with a bag over my head... Mayhap I should try it?!
 J/K...
I never tried tuning things with a bag over my head... Mayhap I should try it?!
J/K...
Thread Starter
Senior Member
Back Marker
Joined: Feb 2010
Posts: 182
From: Western PA
Well. Originially the pilot jets were 48s and the needles were shimmed up .40. Being new to carb work/not trusting the quality of my work, I had it put on the dyno to check my mixture. Long story short, they talked me into stage one jetting. So whatever comes in s dynojet stage one kit is what I have in there. A few posts above I posted my dyno sheet. Bike runs great except under very small throttle openings, where it will sometimes kind of stumble then I will feel s clunk under the tank. Shop that tuned it said that is the pair check valve closing, however I yanked the system yesterday. Problem still persists. Tried running with small amount of choke at the conditions I normally have the issue, no difference. That tells me it's not due to lean mixture. Sound right? Just trying to narrow down what I have to check. I've had it with the shop that tuned it. So I wanna get this right myself. Thanks guys.
Out of my mind, back in 5
MotoGP
Joined: Nov 2006
Posts: 6,109
From: Skurup, Sweden
I'm pretty certain they did like all shop mechanics... Tuned it like an IL4... Cuz that's how bikes are sposed to be tuned!... Jackasses...
That gives you a screaming top end and a decent middle and a big hole in the bottom end... A VTR is sposed to be tuned with a mild top end, a big fat middle and an only slightly softer bottom... Then you get fun, fun, fun...
Thread Starter
Senior Member
Back Marker
Joined: Feb 2010
Posts: 182
From: Western PA
+1
I'm pretty certain they did like all shop mechanics... Tuned it like an IL4... Cuz that's how bikes are sposed to be tuned!... Jackasses...
That gives you a screaming top end and a decent middle and a big hole in the bottom end... A VTR is sposed to be tuned with a mild top end, a big fat middle and an only slightly softer bottom... Then you get fun, fun, fun...


