
PAIR removal how-to


Thread Starter
Brooks' Cycle Centre'
Back Marker
Joined: Dec 2007
Posts: 166
From: Centreville, VA

PAIR removal how-to
Thanks to Hawkrider and his SuperHawk996.net site that turned me on to this. Ever since I put my Scorpions on my bike, I have had some afterburn issues on deceleration and engine braking. I'm not sure if it was getting worse, or it was just getting on my nerves more. Anyway, I saw on Hawkrider's site that this may be caused by the pair sysytem. There is a very good write-up on his site, but not many pictures. So, I hope this will help someone out. Pretty simple operation. You don't have to take out the whole thing, but I did because I am, as Hawkrider put it, one of those people that "wants to lose every .05 ounces of weight off the bike because it'll make you .00001 seconds quicker in the quarter mile, but you can still feel the increased acceleration by the seat of the pants, plus it makes the bike handle sooooo much better". So, here it is.... Enjoy!
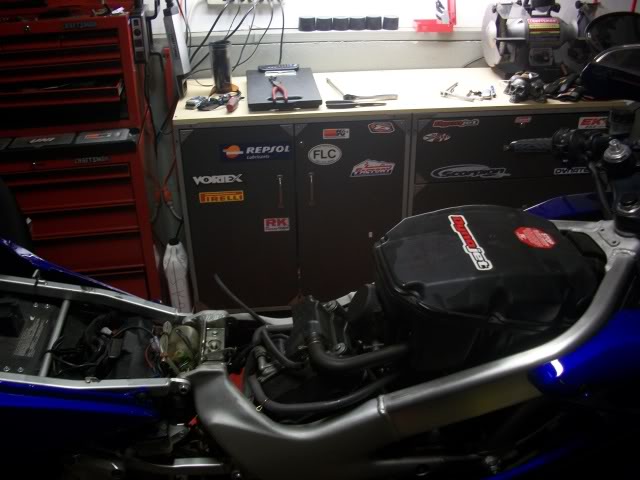
First, take off the tank... Or not, depending on your preference.
Take out the stacks (large one in the rear)
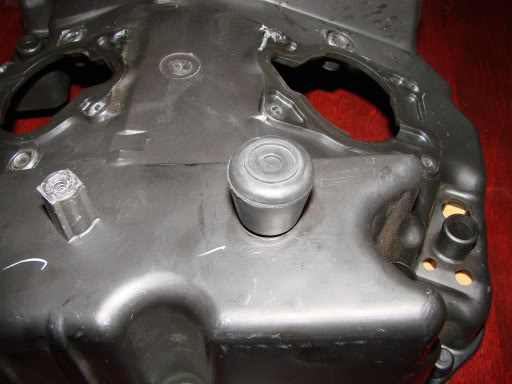
Go ahead and plug the airbox hole.
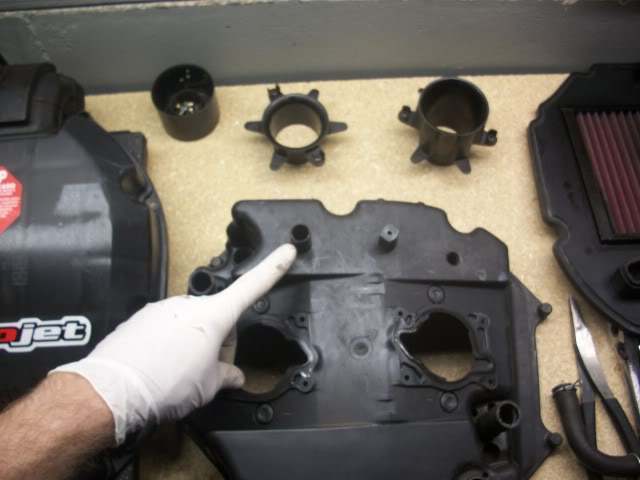
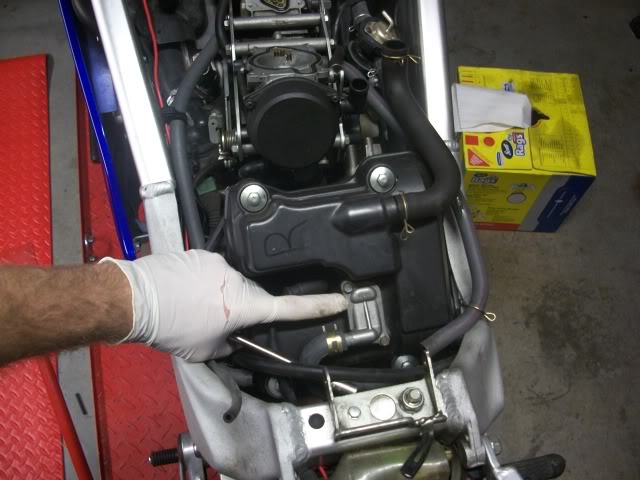
This is the PAIR. Rip it out.
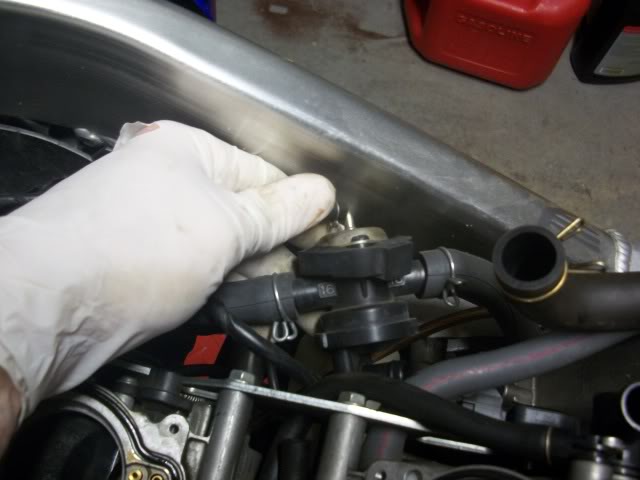
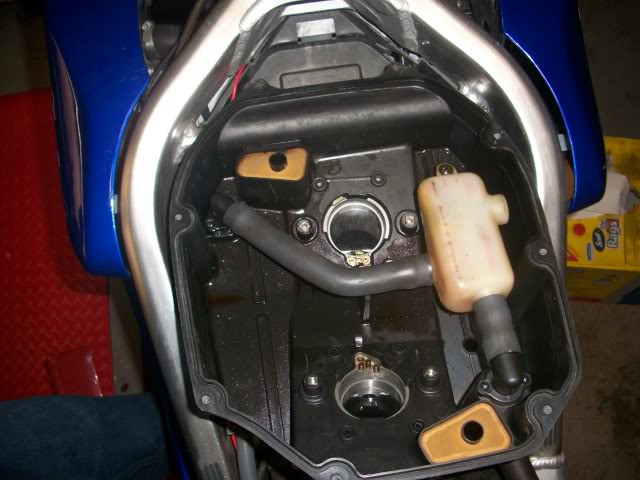
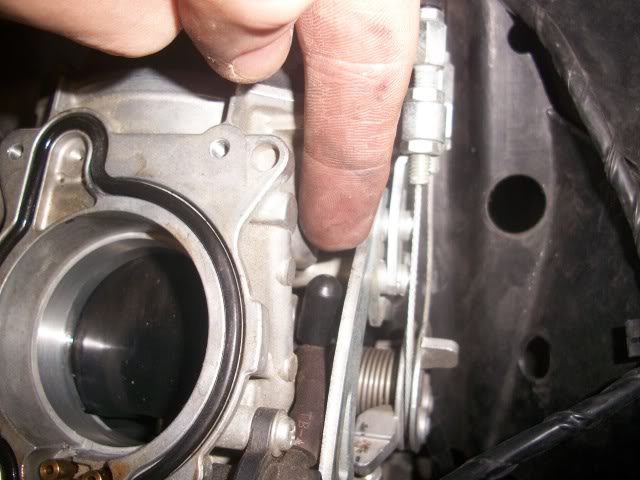
This is where the tube enters your head in which contains the "Reed". It's just two 8mm Bolt. Take it out.
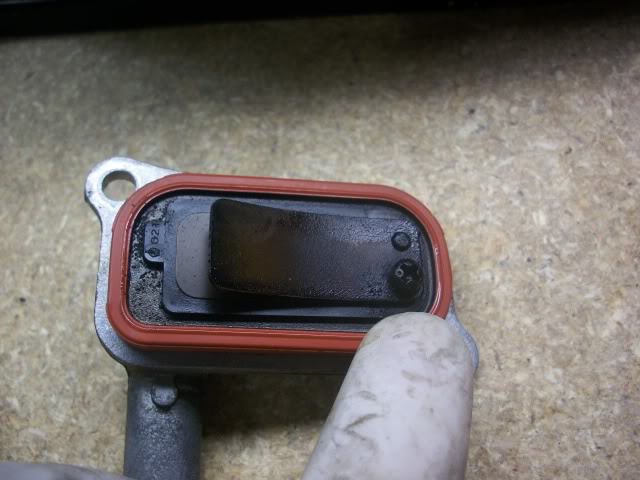
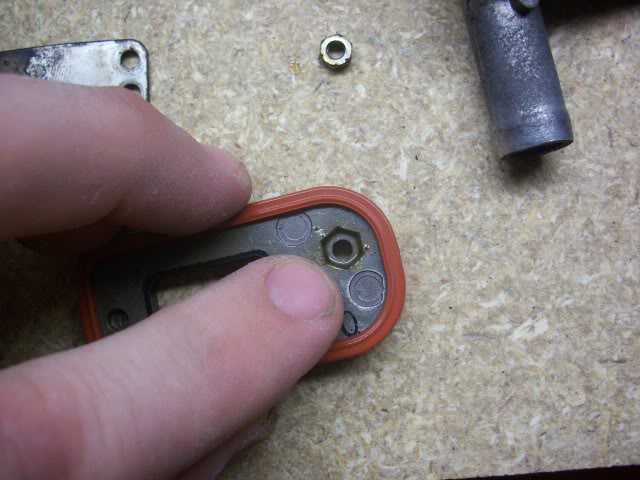
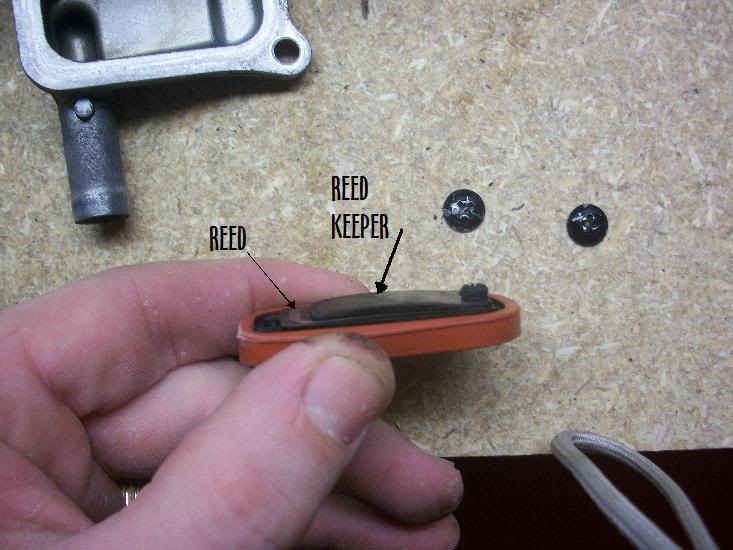
Here is the reed with the screw that holds the reed and the reed keeper. Take out the screw and flip upsidedown the reed keeper. This will keep the reed from opening. Then put it back on your head and cap off the opening. Repeat this process for the front cylinder.

Here's the opening on the carbs that you need to plug. Cap it off.
And that's it. Just put the bike back together. if you have not already, you can take this oppurtunity to re-route your carb breather tubes.
First, take off the tank... Or not, depending on your preference.
Take out the stacks (large one in the rear)
Go ahead and plug the airbox hole.
This is the PAIR. Rip it out.
This is where the tube enters your head in which contains the "Reed". It's just two 8mm Bolt. Take it out.
Here is the reed with the screw that holds the reed and the reed keeper. Take out the screw and flip upsidedown the reed keeper. This will keep the reed from opening. Then put it back on your head and cap off the opening. Repeat this process for the front cylinder.
Here's the opening on the carbs that you need to plug. Cap it off.
And that's it. Just put the bike back together. if you have not already, you can take this oppurtunity to re-route your carb breather tubes.
Thread Starter
Brooks' Cycle Centre'
Back Marker
Joined: Dec 2007
Posts: 166
From: Centreville, VA

Senior Member
Back Marker
Joined: Oct 2009
Posts: 143
From: Newport, RI
Excellent write-up and photos - thanks for taking the effort.
A couple questions if you don't mind...
1) Where did you source the caps/plugs you used?
2) The flipped over reed looks to me like it is always open - there is a visible gap in the side-view picture. Are we sure that's kosher?
A couple questions if you don't mind...
1) Where did you source the caps/plugs you used?
2) The flipped over reed looks to me like it is always open - there is a visible gap in the side-view picture. Are we sure that's kosher?

Senior Member
Back Marker
Joined: Sep 2007
Posts: 153
From: Vancouver, WA
Yea, those reeds should be sitting flush against the mount they are attached to as far as I know. I remember when was playing around with removing the PAIR on mine and flipping the reeds over - they sat flush.
I also want to note the rubber caps used to plug off the T'fitting's on the carbs. I bring this up because I used one very similar on the front cylinder carb' sync' point, where I have a piece of metal tubing threaded, tightended in and then had one of these rubber caps on it that I got from a local hardware store (For those of you in the area, it was Parkrose Hardware here in Vancouver off of 164th.).
So I had this cap on the front carb' sync point and noticed after awhile that it had developed cracks and was leaking air into the intake stream of my front cylinder - so - might want to double check those rubber fittings your using are rated for engine temp' environments. If you start getting odd behavior down the road, after you've put all your hard work back together and are scratching your head over it all, remember to go back in and check these out down the road perhaps.
Just wanted to pass along a good lead in case she starts acting odd on you one day and don't know where to start looking.
Thread Starter
Brooks' Cycle Centre'
Back Marker
Joined: Dec 2007
Posts: 166
From: Centreville, VA
Excellent write-up and photos - thanks for taking the effort.
A couple questions if you don't mind...
1) Where did you source the caps/plugs you used?
2) The flipped over reed looks to me like it is always open - there is a visible gap in the side-view picture. Are we sure that's kosher?
A couple questions if you don't mind...
1) Where did you source the caps/plugs you used?
2) The flipped over reed looks to me like it is always open - there is a visible gap in the side-view picture. Are we sure that's kosher?
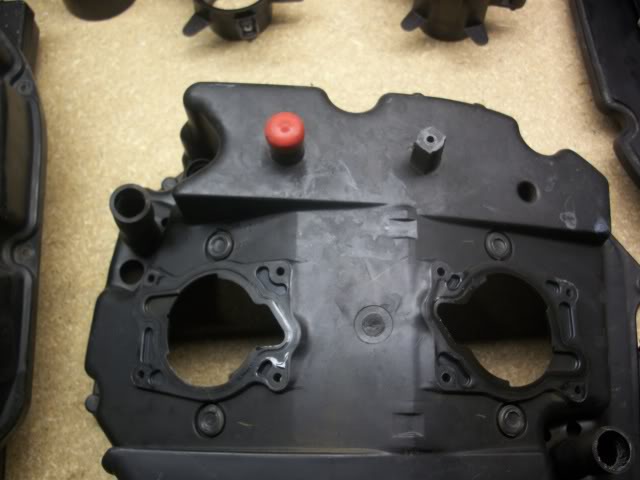
2) The reed is locked down by the 'reed keeper'. The gap that you see is not the reed, but the reed keeper. I did this view so people would see what it looks like when you flip over the reed keeper.
Like This:
I could ride in
SuperBike
Joined: Sep 2007
Posts: 1,729
From: Dayton, TN
both of y'all; as long as we've bought the aftermarket plate kit, no worries as to sealing? gaskets, rtv, etc? looks as to be Stainless Steel, but no mention of the cap of carb tubes in the instructions off the ebay site...
Thread Starter
Brooks' Cycle Centre'
Back Marker
Joined: Dec 2007
Posts: 166
From: Centreville, VA
UPDATE
I took my bike out last night after the quick job that I did on the pair valves. Damn, what a difference. I have no more backfiring or afterburn and if I'm not mistaken, I feel like she's smoother on the acceleration, too.

Banned
MotoGP
Joined: Aug 2007
Posts: 5,942
From: Lake View Terrace, CA
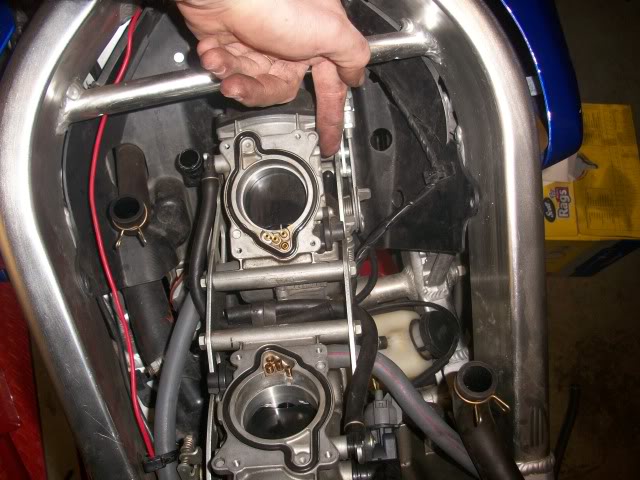
Good write up but on another note, in this pic it looks like you have a hot lead running through the same clamp that holds the fuel line to the front carb. While it just might be the angle of the photo that makes it look that way. Even if it is in the same clip, you might never have a problem, but do you really want to take that chance?

Thread Starter
Brooks' Cycle Centre'
Back Marker
Joined: Dec 2007
Posts: 166
From: Centreville, VA
Good write up but on another note, in this pic it looks like you have a hot lead running through the same clamp that holds the fuel line to the front carb. While it just might be the angle of the photo that makes it look that way. Even if it is in the same clip, you might never have a problem, but do you really want to take that chance?

Senior Member
MotoGP
Joined: Sep 2006
Posts: 4,138
From: Austin, Tx
It won't be the devices that draw the lethal current. It will most likely be rain. The red wire glows, the black tube starts to leak, next thing you know you have a fireball in your jock. It gets bad quick after this.
Thread Starter
Brooks' Cycle Centre'
Back Marker
Joined: Dec 2007
Posts: 166
From: Centreville, VA


Thread Starter
Brooks' Cycle Centre'
Back Marker
Joined: Dec 2007
Posts: 166
From: Centreville, VA
Banned
MotoGP
Joined: Aug 2007
Posts: 5,942
From: Lake View Terrace, CA
Electricity and gas don't mix too well, but only when heat and/or spark is involved. My cellphone and gps don't draw enough power to heat it up to the point to be worried. On another note, gas is very flammable, but there is a common misconception that anything will set it off. Try dropping a lit cigarette into gas sometime. It will only extinguish the smoke. Also, think about 'in-tank' eletrical devices such as pumps and level gauges. The CH53 and CH46 has an entire cluster of wires worked around fuel lines. Even airplanes run electrical wires through gas tanks. These things work for years with little to no worry of any danger.
Now for your examples of "in-tank" devices, you list applications but you don't say anything about the mandatory requirements for operating electrical equipment in a flammable environment. Do we really need to cover double grounding, spark less motors, isolation and insulation here?
I also wonder how you can compare your set up - a fuel line and a hot lead held against the edges of the same hard plastic clamp less than .25" away from ground - to the wiring of an aircraft?
In short, yes there may be some weird situation where something rubs bad one way at the same area that rubs the fuel line and a spark is emitted at the same time that the fuel line ruptures setting my bike ablaze. But no, I'm not worried about it. For the time being I'll keep worrying about lightning strikes, and Harley winning world moto GP.
I pointed out a potential safety issue. The chances of anything ever happening are slim but I always think in worst case scenarios when it comes to bikes.
I might not have said anything except you did post a "How To" thread and have stated your credentials as owning a motorcycle shop. Even though the wiring in question had nothing to do with the modification you were talking about, I felt it had to be pointed out.
The reason for this is the people utilizing the information you posted are generally inexperienced at motorcycle modification and\or maintenance. Which could lead to someone thinking there must be no possible problems with running an accessory power lead through the fuel line clamp as you ran yours that way.
Myself, I take every precaution possible (yes maybe even to the point of over kill) to make sure my ride doesn't end like this

Cheers,
Mike
Last edited by 8541Hawk; Dec 27, 2009 at 02:40 PM.
Thread Starter
Brooks' Cycle Centre'
Back Marker
Joined: Dec 2007
Posts: 166
From: Centreville, VA
Well attention to detail can make the difference between making it home or being a smoking hole in the ground.
Well I do find your reply more than a bit condescending but I will address your points. True fuel and electricity don't mix well at all but you should list all three legs of the fire triangle. As for you explaining the properties of gasoline to me, do you really think I don't know that?
Now for your examples of "in-tank" devices, you list applications but you don't say anything about the mandatory requirements for operating electrical equipment in a flammable environment. Do we really need to cover double grounding, spark less motors, isolation and insulation here?
I also wonder how you can compare your set up - a fuel line and a hot lead held against the edges of the same hard plastic clamp less than .25" away from ground - to the wiring of an aircraft?
Sorry if you feel like I'm trying to bust your ***** or give you a hard time. Your post was a nice addition for the list members looking for information on how to do some of there own work.
I pointed out a potential safety issue. The chances of anything ever happening are slim but I always think in worst case scenarios when it comes to bikes.
I might not have said anything except you did post a "How To" thread and have stated your credentials as owning a motorcycle shop. Even though the wiring in question had nothing to do with the modification you were talking about, I felt it had to be pointed out.
The reason for this is the people utilizing the information you posted are generally inexperienced at motorcycle modification and\or maintenance. Which could lead to someone thinking there must be no possible problems with running an accessory power lead through the fuel line clamp as you ran yours that way.
Myself, I take every precaution possible (yes maybe even to the point of over kill) to make sure my ride doesn't end like this
Attachment 7886
Cheers,
Mike
Well, thank you for the concern of the ill-informed. Insulation and a fuse, I believe will suffice.

Senior Member
SuperSport
Joined: Feb 2010
Posts: 667
From: NY State
I just went through this procedure - this write up is excellent. Thank you SuperChicken...
You can order block off plates here:
https://www.superhawkforum.com/forum...ad.php?t=18515
you can also order plates from ebay, the plates themselves are ok (althoug the holes are too small and need to be enlarged), and the included hardware is incorrect, plus they are more expensive.
A perfect, heavy duty cap for the air-box hole is a 5/8" rubber chair leg tip that you can buy at Lowes, Home Depot, or any hardware store. Put some RTV silicone in it first to ensure the seal. I do not think that you need to worry abou this cracking.
Last edited by residentg; Mar 22, 2010 at 02:36 AM.
Senior Member
Back Marker
Joined: Jan 2009
Posts: 224
From: Hills of Kentucky
For my vac plugs, I purchased them at Autozone and there were several different sizes in a container. They'll always be a need for such things. I like the chair leg tip, also.  Good thinking. As far as the Cali bikes, the smog crap is not bad to take off. The write up on Superhawk's site is what I used. It just takes a little time and it's well worth removing all that so you can just get in there and be able to work around the motor.


Member
Squid
Joined: Mar 2010
Posts: 73
From: Ozark, MO
Should the tank breather be removed with the PAIR removal? I ask because the SH I just purchased has had the PAIR removed but there is no tank breather. Will it being removed have any negative affects on carb synch?
what does the inside of your airboxe look like with a PAIR removal. Mine looks WAY diffrent that all of youras which has me concerned
Thanks in advance
what does the inside of your airboxe look like with a PAIR removal. Mine looks WAY diffrent that all of youras which has me concerned
Thanks in advance
Banned
MotoGP
Joined: Aug 2007
Posts: 5,942
From: Lake View Terrace, CA
You might believe that there is no issue there but if you are wrong the results could be very, very bad.......I guess that's why you have liability insurance....
So once again, good write up and I'm sure you helped out some folks but like all of us, it is possible for you to make a mistake or miss a safety related item.
Sorry you can't accept that or you feel it's some sort of personal attack.
Carry on
Banned
MotoGP
Joined: Aug 2007
Posts: 5,942
From: Lake View Terrace, CA
Should the tank breather be removed with the PAIR removal? I ask because the SH I just purchased has had the PAIR removed but there is no tank breather. Will it being removed have any negative affects on carb synch?
what does the inside of your airboxe look like with a PAIR removal. Mine looks WAY diffrent that all of youras which has me concerned
Thanks in advance
what does the inside of your airboxe look like with a PAIR removal. Mine looks WAY diffrent that all of youras which has me concerned
Thanks in advance
Also the inside of the airbox should remain unchanged.
Banned
MotoGP
Joined: Aug 2007
Posts: 5,942
From: Lake View Terrace, CA
On Ca bikes you have (if I remember correctly) 2 more vacuum ports to plug on the carbs and a bit more hoses to remove but it is pretty straight forward. Also there is a vacuum fitting on the front head that the 49 state bikes don't have. This one you leave a 6" or so capped line connected to so it is easy to do your carb sync.


