When you click on links to various merchants on this site and make a purchase, this can result in this site earning a commission. Affiliate programs and affiliations include, but are not limited to, the eBay Partner Network.
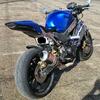
I've transformed my bike. The SuperHawk is all I'll ever need.
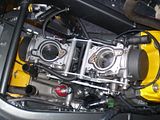
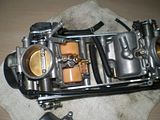
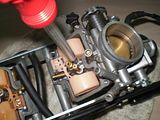
I took 8541Hawk's instructions to heart and set the bike up. It had been running poorly with lots of sputtering as it got on the slide (part throttle & 4k RPM). I hated it. Pulled the carbs and ultrasonic cleaned them. The HarborFreight unit is a godsend. Absolutely would not live without one. Krud Kutter is my cleaner of choice but water does a good job too. It's down to the bubbles anyway. Afterwards I rinse them in clean water (hot if possible) and then blow out the passages with compressed air. Then I follow that up with WD40 and blow the passages out again. This is to displace the water and leave a protective, lubricating film.
My setup:
2 Brothers slip-ons
Piar-ectomy
Carb heat delete
K&N filter (PO, I don't much care for it)
487 Ohm TPS
48 Pilot jets
178 Main (front)
180 Main (rear)
OEM needles & springs
* Front shimmed 0.030
* Rear shimmed 0.040
Front slide has one hole
Mixture screws
* Front out 2 1/4 turns
* Rear out 2 1/2 turns
Elevation 830 feet above sea level
I still have to sync the carbs
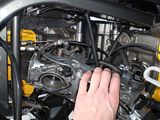
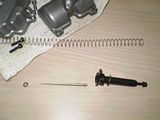
I was very careful not to have any vacuum leaks. All of the seals are new. All of the O-rings are new. All of the 1/8" vacuum hose is new. The slides are OEM but I put some Permatex Form-A-Gasket on the grooved land. This stuff says it resists gasoline and doesn't harden. It cleans up nicely with GoofOff. The amount I put in the land turned the square gap into a U-shaped trough where it just barely made the aluminum on the bottom not visible. Almost no squeeze out when clamped and it took a few minutes to apply going about half an inch at a time (apply, wipe with finger, apply, wipe with finger). At the end the stuff had already started to tack up. It held my slide diaphragms in place when putting the spring and cover on. I disassembled both covers the next day because I was looking for where I had failed to put the spring washer over the needle holder (pocket parts) and they didn't move. I did the same thing on the float bowls and it held the gasket in place nicely. I've done nothing but abuse the intake boots as I've taken off and put back on the carburetors about 12 times in the past 2 weeks chasing my fueling issues. They seem to be doing fine. I just make sure to clamp them down.
Some things I discovered during my rebuild.
lf you want new O-rings for all the little bits, you need:
JIS B 2401 standard
S3 (2.5mm ID x 1.5mm CS)
x4 Aircut brass jet
x2 Mixture screw
S4 (3.5mm ID x 1.5mm CS)
or 5-190 (3.35mm ID x 1.78mm CS)
x2 Aircut diaphragm
S8 (7.5mm ID x 1.5mm CS)
x2 Bowl breather ports
S12.5 (12mm ID x 2mm CS)
x2 Needle holder
S16 (15.5mm ID x 1.5mm CS)
x2 Slide diaphragm breather ports
None of this is confirmed but I measured all of the 'rod' and 'cylinder' dimensions. I then calculated the percent squish. The ones that are marginal are the slide diaphragm breather ports (dust control only) and the aircut diaphragm (very light squish). In the case of the aircut diaphragm the Parker number should provide a better seal but probably isn't necessary. This place has excellent prices:
Now the other trick is that I ordered the wrong version of the 180 size main jet. Dennis Kirk doesn't have the 6mm round head ones. So I got an 8mm round head in my shipment. Dang... sort of. The diameter of the Keihin jets are in 100ths of a millimeter. So, a 180 main jet has a diameter of 0.070 inches. This is exactly the size of a #50 drill. Said drill fit the wrong 180 main jet I had ordered. So, I drilled out the 175 main jet to get my 180. I did this by hand, no drill motor. This let me feel the progress and I ended up with a jet that had a slightly tighter fit than the OEM one. I have this jet installed and it appears to be working excellent.
The pilot jets were another matter. I did order and received the right Series 21 Keihin jets. This let me test the diameter of the orifice. The math says it should be 0.019 inches. I found a needle that was just under this size and it fit perfectly. So what to do with the old jets? I took that very needle used for testing the orifice size and drilled out the 45's to make a pair of 48's. What I did was rough up the end of the needle at the taper and up the shank some. Then I spun the needle in the jet until it passed through the jet. This really is a drilling/reaming action. Don't try hardening the needle by heating to red hot and then quenching, they'll break off in the jet (#experience).
If you have any skepticism about my method, I assure you the science is sound. The orifice diameter is all that matters for metering fuel. Gasoline is an incompressible fluid so the mass flow through the hole is determined by the pressure difference across it. The taper on either side is nice but only to avoid turbulence on the low pressure side messing with the applied vacuum. Both of the modified jets have tapers that were maintained but ended at a bigger diameter. The vacuum generated for the main jet is done by the size of the effective orifice of the needle in the emulsion tube. The pilot jet gets its vacuum signal from built in passages within the carburetor body and the amount of throttle blade opening.
The needle shims were also home grown. The standard #4 washer is 0.020 inches thick. I taped some fine grit sandpaper to my counter top (flat) and rubbed two washers down to 0.015 inches thick. My thinking was that if I needed to come up to 0.035 inches on the front I could swap out a sanded washer for a standard one. I was working with the premise of a minimum shim of 0.030 inches on the front.
Given all of the above, my results are fantastic. The bike had a Dynojet kit installed by the previous owner and it never performed as well as it does now. The needle looks a lot like the OEM profile and measures as closely as I could do so as exactly the same. Then it had a 180 front and a 185 rear main with 45's for pilot. The mixture screws seemed to be at 2 1/2 turns out. I may (likely) have disrupted the carb setup this spring when I disassembled them the first time this year and would never have discovered the glory that is this tune. The truth is that I probably put it together with front and back parts swapped. I was very careful this time. I thought it ran well last year but this is better. It runs great. I may dink around with the mixture screws a little (say 1/4 turn richer) but maybe not.
I have almost the exact same setup; I agree that it works quite well. Also, of utmost importance...at a gas station by me they sell ethanol free 91 octane. That fuel is the sweet spot as far I'm concerned. It runs very well on ethanol free if you can get it.
just an fyi..
the front carb slide opens sooner causing it to run richer because the front cylinder naturally runs leaner than the rear due to it catching more air than the rear cylinder and running much cooler. that was honda's way of compensating for a lean condition on the front cylinder
I have now tried pretty much every single combination with setting up the carbs, different jet sizes, lift hole filling and drilling more holes, needle height etc. Best setup for my bike witch work 100% correct in seat to pants dyno have been simple
175 and 178 mains
stock needles with only stock 0,5mm shims
48 pilots
mixture screws boht 2 turns out
boht slides 1 hole filled and the other hole drilled to 3mm.
So pretty much stock setup other than slide raise on boht slides have been slowed just a bit. at least for my bike stock setup was good, only problem was slides were lifting too fast, with boht slides with 1 stock hole it was too slow and caused problems.
i have noticed that when tempature drops under 6 celsius, needles need to be raised 0,5mm, but in summer stock height is just correct.
Ok, so I decided to document the process... Too much time on my hands, waiting for other parts to come in, liking pictures because words are for panzies, call it what you want but here it is, carb setup � la Mike:
Replacing the #45 pilot jets with #48 (waiting on these parts to come in- Keihin Series 21 jets, correct?)
Alright, I'm guessing that most people who have dug into their carbs this is old news to, and there's a good probability that you shouldn't do things the way that I do, but figured I'd post it up b/c I had a camera anyway.
Mike, thanks a bunch- the explanations all helped, and were spot on in understanding level for someone as inexperienced as me.
Once I get a chance to fire this up, I'm excited to fine tune it. Funny, all of my carb and fuel "mods" entail going back to stock from what the PO installed. I feel like I'm upgrading "yeah, I loaded it with an OEM filter and uninstalled a FactoryPro Kit. Pretty sweet stuff, eh!?"
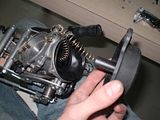
I'm trying to yank the carbs on my 1999 Superhawk, and they feel like they are set in concrete! Heating the intake connectors doesn't seem to help. Any suggestions?
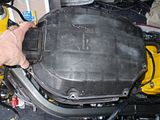
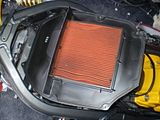
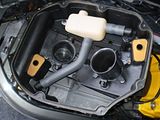
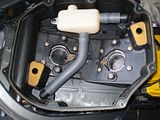
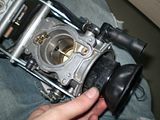
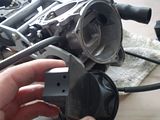
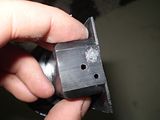
By the way, when I pulled out the air filter, I found that the previous owner had installed something "odd" (see photos). The letters "FC" are the only identification on the device. Only two tubes go into the device. Nothing comes out, and there's nothing on Google that helps me identify this item.
Any help would be appreciated.
I'm trying to yank the carbs on my 1999 Superhawk, and they feel like they are set in concrete! Heating the intake connectors doesn't seem to help. Any suggestions?
By the way, when I pulled out the air filter, I found that the previous owner had installed something "odd" (see photos). The letters "FC" are the only identification on the device. Only two tubes go into the device. Nothing comes out, and there's nothing on Google that helps me identify this item.
Any help would be appreciated.
I replied to your other post, that's a flo commander.
As far as removing those carbs, the boots have become hard and that's holding them in place. It can be a wrestling match but carefully pry on strong locations and they will eventually come free. Warming those should help as will some spray lube. Be very careful removing your chokes from the carb. Very prone to breakage.
Thank you for the info. I will Google it today. As far as the chokes, the rear is already snapped off at the threaded plastic ell. I can't see the front because of the location. I'm hoping I don't have to pry too hard.
Thank you for the info. I will Google it today. As far as the chokes, the rear is already snapped off at the threaded plastic ell. I can't see the front because of the location. I'm hoping I don't have to pry too hard.