
Trimming Hawk's Rear Fender


Thread Starter
Junior Member
Squid
Joined: Jan 2007
Posts: 25

Trimming Hawk's Rear Fender
Just purchased a nice 1999 (Yellow) shawk. Awesome bike. Who cares about the lousy range per tank of gas when you have this much fun riding a sport bike. Anyway, the stock rear fender is kind of ridiculous, very big, very long, and very ugly. I want to trim it down and make the rear end look more sporty. For those of you who have done this previously....I need your help. I'm not sure I want to retain the license plate light either so "options" are also appreciated. Need advise on how to set up a template and what tools to use to give it a "clean" cut line. Will of course have to remount the license plate. Thanks for all the help!!!
JP
Sonoma
JP
Sonoma

evil man of nothing
MotoGP
Joined: Jan 2006
Posts: 4,523
From: Boynton Beach, FL
First off thanks for taking the time to want to do it right. I've seen so many bikes out there, and new ones too, that looked like someone got drunk and cut it off with a chainsaw. I've done a few and was real happy with the way they turned out (and so were my friends I did it for too). I think once I used a ruler and a pencil to make the lines I wanted. Another time I made some tape lines. Either way works great and can be adjusted easily for perfection. Then a SHARP blade (X-acto or stanley/craftsman utility knife) and a steady hand. (You can also use a straight edge for the sides and the rear if you're not confident in freehanding it, although you will need to join the cuts). You don't have to cut all the way through the first time. Be patient and go over your cut a couple times and it will come out perfect. Don't be afraid to change blades-the sharper the better. You can also make any finish "adjustments" if you need to with either the blade or with a small sander like a mouse. If you want to keep the license plate light I've moved it up as far as it will go. It's nice because it still gives it a "stock" look without that hideous (but functional) mudflap. Now how much you want to cut off is up to personal preference and whether or not you want to keep the light and the signals. But remember it's easier to trim it several times than to hack it all off at once and then decide you went too far. You may even want to cut off say an inch for practice before moving on. Good luck.

Senior Member
Superstock
Joined: Jun 2006
Posts: 358
a hack saw and a sander work good too... i moved the light up and cut all the flap off in back and the sides are clear up past the blinker spots. looks good, almost looks like an undertail from a ways away. but im actually fixing and getting ready to install an undertail in the near future, complete with custom aluminum tag bracket and LED lights for about everything. pics will be up when im somewhere closer to done. unless sumone wants a how to on fixing an reshaping plastic.

Senior Member
SuperBike
Joined: Dec 2005
Posts: 1,689
From: South Lake Tahoe, CA, USA

I moved the light up, then cut a straight line below the turn signal mount all the way around. It looked good to me. I kept the stock turn signals for their visibility, until I got my exhaust system and they wouldn't work any more. I like visible turn signals.

Administrator

World Champion
Joined: Dec 2004
Posts: 105,287
From: Fulton, MO
Personally, I have the Comp Werkes FE kit. I have not done the following procedure myself because the CW retains the light, but some have used a Dremel to cut a small square out of the bottom of the taillight. Then you get some flat clear plastic and cut it the same as the hole. Superglue or epoxy it back together and voila, you have a license plate light. The Euro bikes have this as standard, though I think the whole bottom portion of the taillight is clear.
Member
Squid
Joined: Feb 2006
Posts: 62
From: Burton, Michigan
I cut mine with the tape method using a cutoff wheel. As far as the hideous light, I got rid of it, but still keep my plate lit at night. I cut an approximately 1.5" by 4" section out of the bottom of my taillight, and make a clear plastic bottom for it, attached with short screws and sealed with silicone. No ugly license plate light and the plate is still illuminated.

evil man of nothing
MotoGP
Joined: Jan 2006
Posts: 4,523
From: Boynton Beach, FL
yeah I liked the razor knife the best because if you have a steady hand you get a PERFECT factory looking edge, whereas once you start using a saw, a dremel, or a sander the edge gets rough and looks like it's been cut because the fender is such soft plastic. Just my 2 cents, but then again I can get kinda **** with this stuff...

Senior Member
MotoGP
Joined: Sep 2006
Posts: 4,138
From: Austin, Tx
I used one of these. While I was waiting for parts to get here I went off the the rear of my bike and the stupid "big nose" license plate light. I'm going down there to work a couple hours so I'll shoot some pictures. It's quite a mess but until I find an undertail that I really like for hundreds of dollars, God bless Dremel!
http://www.cyclegear.com/spgm.cfm?L1...em=DEN_30301_G
http://www.cyclegear.com/spgm.cfm?L1...em=DEN_30301_G

Senior Member
MotoGP
Joined: Sep 2006
Posts: 4,138
From: Austin, Tx
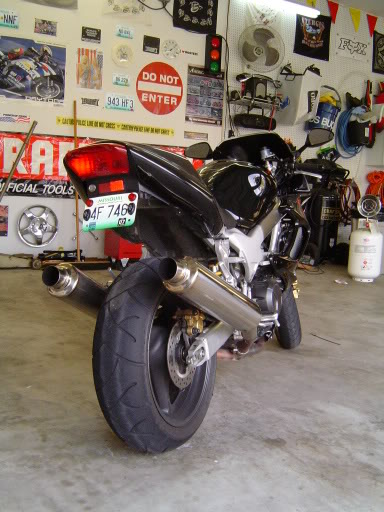
That much AND that ugly! This started with a half-wit idea of relocating the stock signals. Went to **** after that . . .First pic is the finished product and unless it's at night you can't see the old stock signals (which are now running lights) under the bike. The second shot is what it looks like at night. The old stockers give sort of an orange glow to the whole rear of the bike. This is shown with the old pipes which are now gone. The third pic is the finished product showing the flushmount turn signals, the old stock signals - now running lights, the little bullet for the plate and the raised position of the LP. The next shot was taken with almost all the lights off in the shop and then rebalanced from there so I couldn't see what I was focusing on but it is valuable to show how all the lights work together. As it turns out, the new hi-mounts will block the view of the old stock signals from the side but fall below the flush mounts. The last picture is why we are in there in the first place!
Once the stock signals were moved, the mounting holes were augered out with a Dremel and the flushmounts were glued in. When you remove the old LP light fixture there are two holes - one for the wire and one for the bolt/stud/screw for the light. The hole for the screw is the same size as the bullet light so I just threaded it into the hole. The other one I just left alone. Once I had the bullet in place I moved the plate up as high as I could and drilled new holes for it.
Even Jesse Jackson would like this repair because it's got the whole rainbow in there!

Senior Member
Back Marker
Joined: Jul 2006
Posts: 223
From: Las Vegas, NV
As far as placement. I did not re-use the light at all. You can use the existing license plate as a guide. I slid the plate right up under the reflector and then used a grease pencil and drew a straight line long the bottom of the plate and then made some nice radius curves up to and behind where the blinkers mount up. This way you can secure the plate with four bolts.
KC-10ENG
KC-10ENG

Thread Starter
Junior Member
Squid
Joined: Jan 2007
Posts: 25
Rear Fender Trimming Completed!!!!
Thanks for all the help and comments. I trimmed the rear fender down today and I am VERY pleased with the "new look"!!!! I used a pencil and drew a line across the back 7" up from the bottom of the fender. Where the line hit the curved edges, I draw two more lines (one per side) to just below where the side lights are situated (approx. 3/8" below on each side). The side lines angled up to give a better profile. I used a pair of sharp tin snips with 2" long shear blades and cut along the lines I penciled. The snips went through the plastic like "BUDDER!" The cuts were made slow and very even. I used a fine flat rasp to smooth off the edges and then used a 80 grit sandpaper lightly which worked great to smooth out the cut edges. I then used a black dye by RITE which I applied with Q-tips to the cut edges because there were some spots that were grayish-white in color from the plastic being compressed with the tin snip cuttings. I let the dye sit 30 minutes (soak in) and reapplied a second coat carefully not to get it on anything other than the cut surfaces. The cut edges are now straight and smooth and black like the rest of the shortened fender. I opted NOT to reinstall the tail running light and cut the wires inside the tail light housing. I also own and ride a CBR600 which was modified in the same way and I really like the look without the running light. I pulled the tail light wires through to the compartment under the seat and wrapped them with a rubber band neatly and placed the bundle behind the tool kit. I wrapped the wire ends with electrical tape so there would be no grounding. I started the bike and checked all lights, turn signals, brake light, and running lights....AOK!!! I drilled two holes from penciled marks for the license plate and its stock holder and bolted the license plate onto the shorted rear fender. I kept the stock rear turn signals (I may buy/install shortened stocks later). The profile is now VERY sporty looking and especially from the side profile where you can now clearly see both exhaust cans (I have Vance & Hines S4 Titanium exhausts). The profile from the rear also looks very clean and the exhaust cans and rear tire now stand out much more pronounced. I have to admit, it was easier than I thought but all the help I received from the forum gave me enough good ideas that I felt very comfortable doing it and it turned out AWESOME!!! Thanks again for all the help. This forum rocks when it comes to getting questions asked and finding out how to do mod's to the Shawk. I love the new look....even my wife and kids noticed the difference and say it looks FASTER.....I like that!!! Thanks again to everyone who took the time to throw in their two cents. Ride safe!!!
Senior Member
Back Marker
Joined: Jul 2006
Posts: 223
From: Las Vegas, NV
Hey GPZ,
Sounds like it turned out very well. As far as the turn signals go, I removed 2" <(guess) spacer on the factory signals and used the same screw that separates the two halves and then screwed the shorter signals back the the factort mounting locations. You will have to use a washer of some sort on the smaller screw. What is cool is that this is a FREE mod and can be reversed if you do not like it.
Sounds like it turned out very well. As far as the turn signals go, I removed 2" <(guess) spacer on the factory signals and used the same screw that separates the two halves and then screwed the shorter signals back the the factort mounting locations. You will have to use a washer of some sort on the smaller screw. What is cool is that this is a FREE mod and can be reversed if you do not like it.
Member
Squid
Joined: Aug 2009
Posts: 38
Here goes nothing. I am going to give this mod a try as the license plate flap is the only ugly part of this bike. Will need the plate light as lots of riders getting hassled up here regarding the light even when the riders were stopped during the day.
If I bung it up I will look for an undertail but I like to keep bikes as stock looking as possible.
If I bung it up I will look for an undertail but I like to keep bikes as stock looking as possible.

Out of my mind, back in 5
MotoGP
Joined: Nov 2006
Posts: 6,109
From: Skurup, Sweden
An option is to remove part of the red plastic in the bottom of the rear light and replacing with clear plastic... Then you can remove the bulky one... Or just buy a European rear light as they are already like that from stock...
(I know, I'm from Sweden...)
(I know, I'm from Sweden...)

Remember stock is BAD!
SuperSport
SuperSport
Joined: Jun 2004
Posts: 760
From: Jacksonville FL
For what its worth years ago I found a light that is 1" or 1 1/2 long by 1/4 in widde. It has 4 white LEDS in it. Works great for a plate light and its a LOT smaller than the stock light. I would imagine you can find it at some stealerships or even an auto parts store.

Thread
Thread Starter
Forum
Replies
Last Post
Phaedrus
Classifieds
3
Nov 17, 2008 07:37 AM
cliby
Modifications - Cosmetic
10
Apr 6, 2008 08:58 AM


