
Boyesen X-Wing?


Thread Starter
Senior Member
MotoGP
Joined: Apr 2005
Posts: 5,631
From: Montreal

Hi Greg,
assuming you are referring to the original purpose for this thread (X-Wing) and not the tangent (coolant bottle), then there is a bit of news to report since my last post. I donated my original X-Wing to my bud Jack Flash and went to work creating a second-gen H wing (two horizontal wings, one vertical; the first hor. is at halfway point, the second is a little below halfway up from it), the idea being to create a second intermediate size venturi (as I seldom open the throttle wide open this creates an additional higher speed venturi for me to use). Same result (ie. works). Something else I did was use a punch to make dimples in all surfaces (the idea being to reduce boundary layers which impede airflow, same as a golf ball). Everything has worked as expected and they'll be staying in. The only downside is that my soldering skills are not world-class so the joints are a but sloppier than ideal, but I have filed and sanded them down as much as possible.
cheers
P.S. I have another promising project coming on-line soon (still in the intake tract area)....


Rex Kramer-Thrill Seeker
SuperBike
Joined: Jan 2011
Posts: 2,312
From: Brookfield, WI
Speaking of which, Jason (Wolverine) just PM'd me about me asking to clean up this thread and get the coolant bottle posts moved to the coolant bottle thread. I just need to give him the post #'s to move.
Rex Kramer-Thrill Seeker
SuperBike
Joined: Jan 2011
Posts: 2,312
From: Brookfield, WI
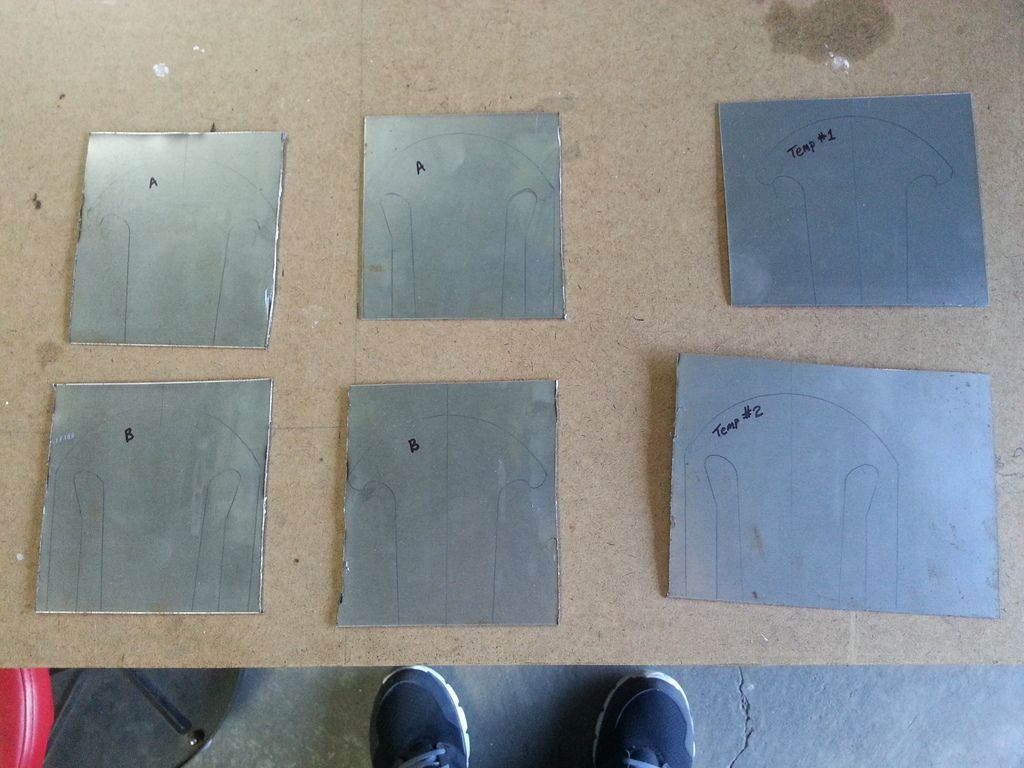
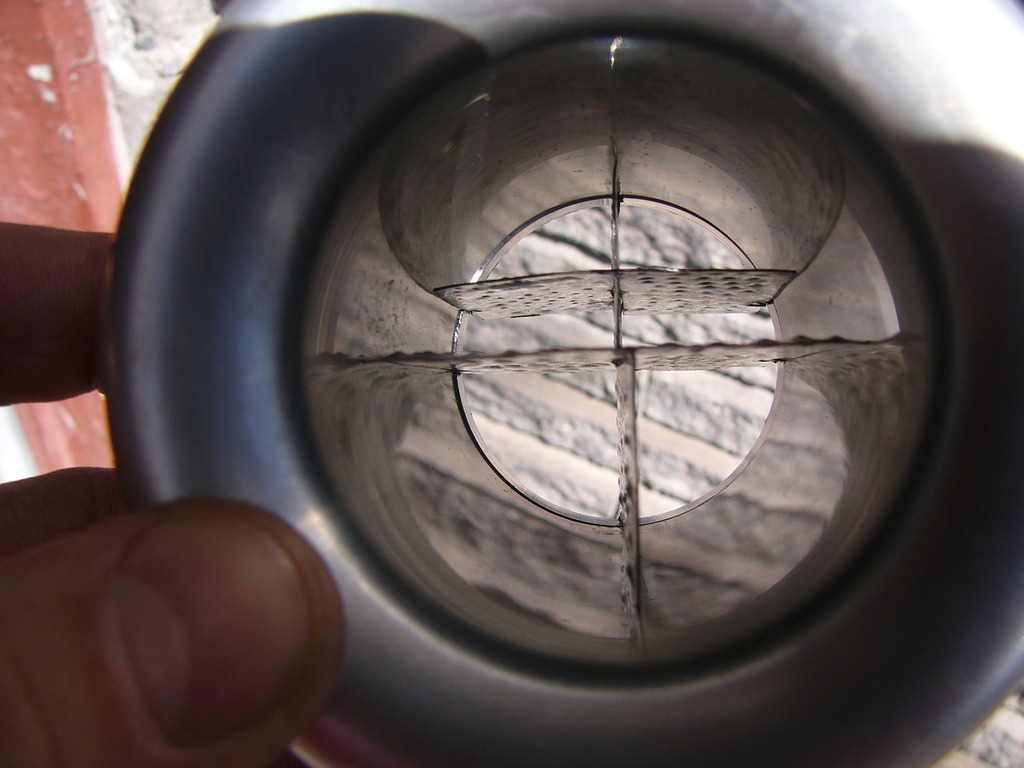
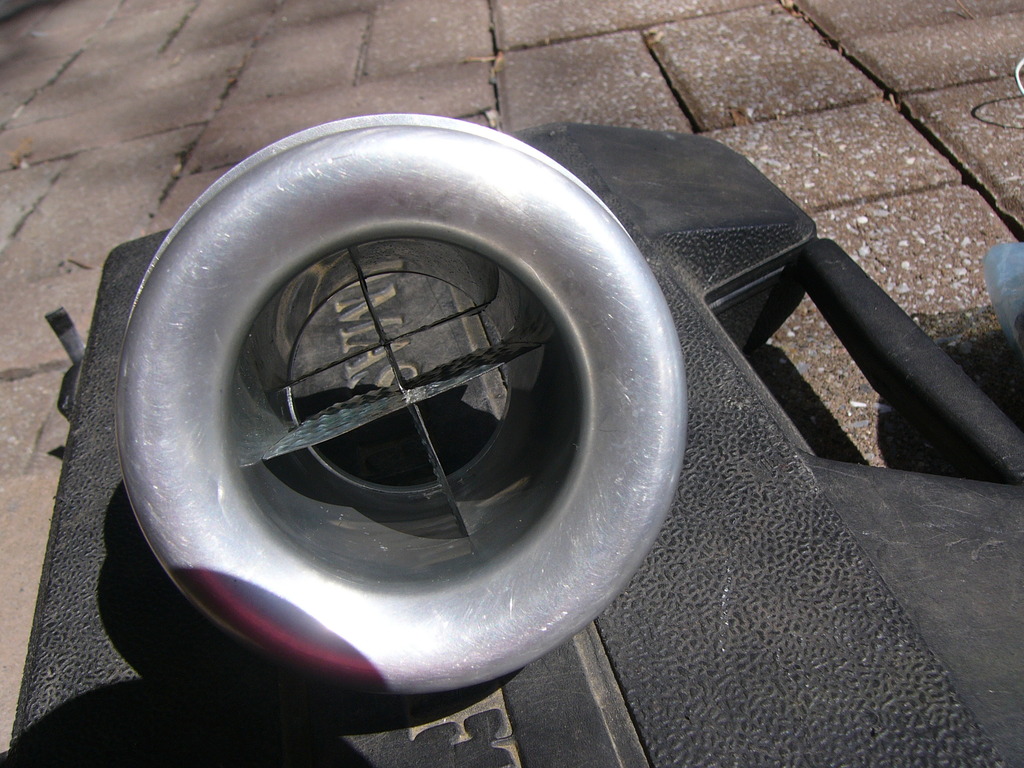
X-Wing 2.0 for the aluminum veloctiy stacks
I don't like how my first ones came out. I will admit, I kind of rushed the process and it didn't look very good. So, I wanted to make some better ones.
Since the mold I took the first time got thrown out, I had to make another one and figured I would show you guys how I make these.
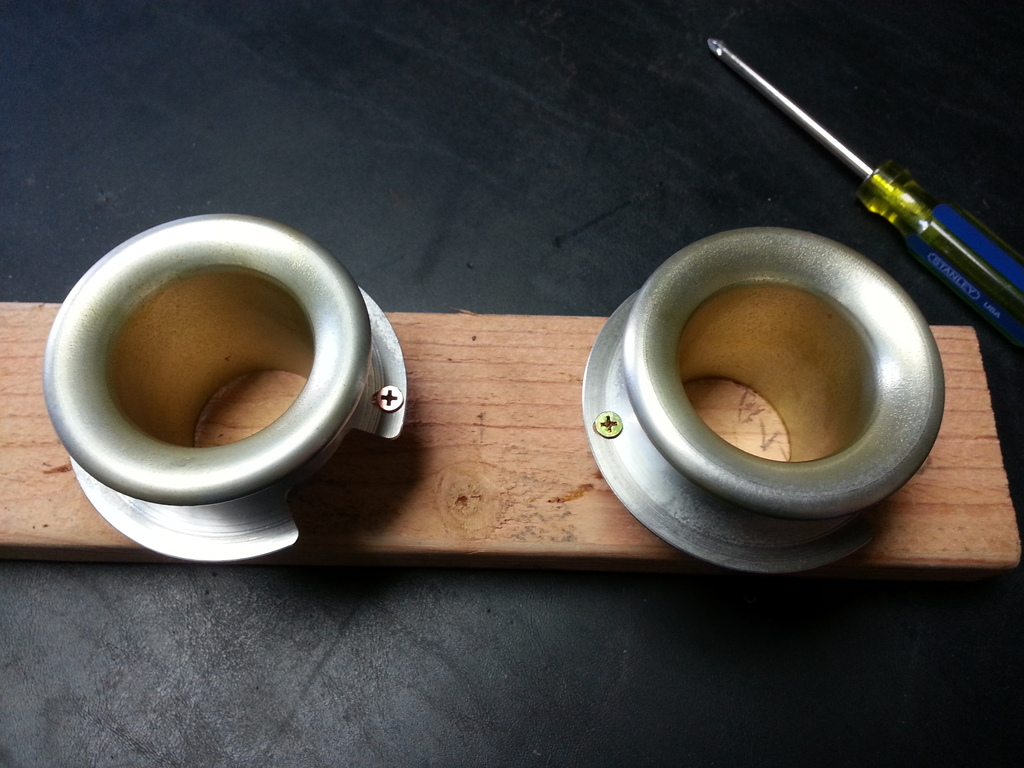
I don't like how my first ones came out. I will admit, I kind of rushed the process and it didn't look very good. So, I wanted to make some better ones.
Since the mold I took the first time got thrown out, I had to make another one and figured I would show you guys how I make these.


Last edited by CruxGNZ; Mar 10, 2015 at 03:36 PM.
Thread Starter
Senior Member
MotoGP
Joined: Apr 2005
Posts: 5,631
From: Montreal
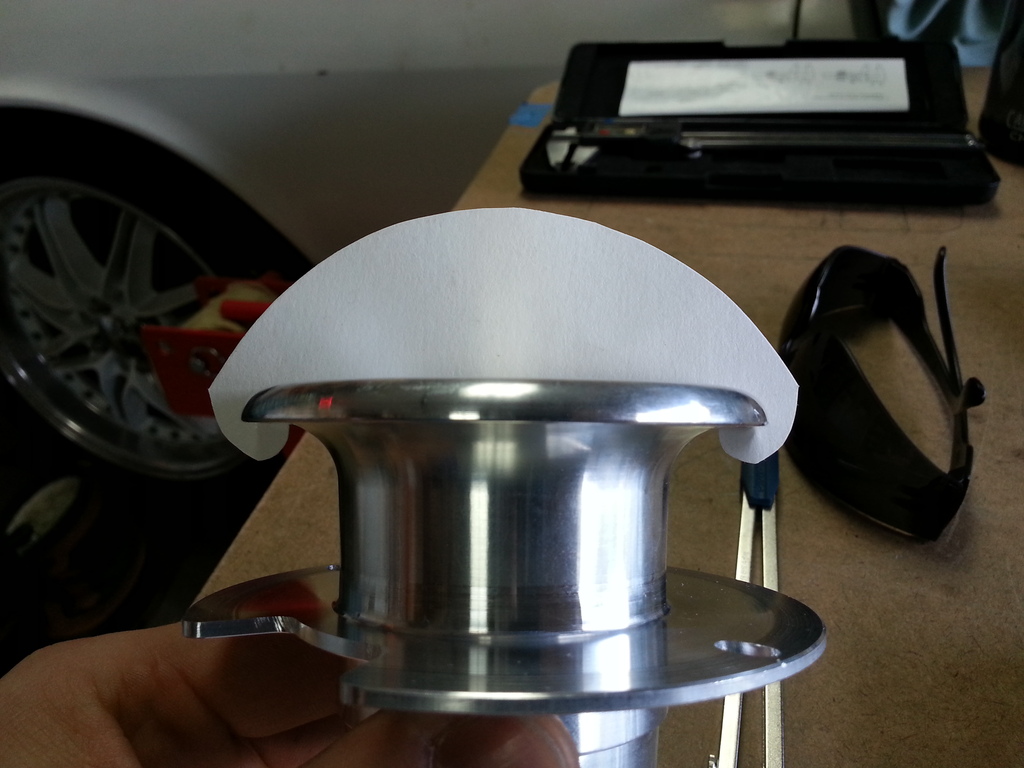
I went with a simpler method: the stacks have a 6 degree taper, so I measured the internal diameter at the bottom and used trig to make a cardboard/paper profile (which I then test fit in the stack; perfect fit). I then used this as a pattern to cut and fab the sheet metal (cut a bit oversize and file down to size).....
Rex Kramer-Thrill Seeker
SuperBike
Joined: Jan 2011
Posts: 2,312
From: Brookfield, WI
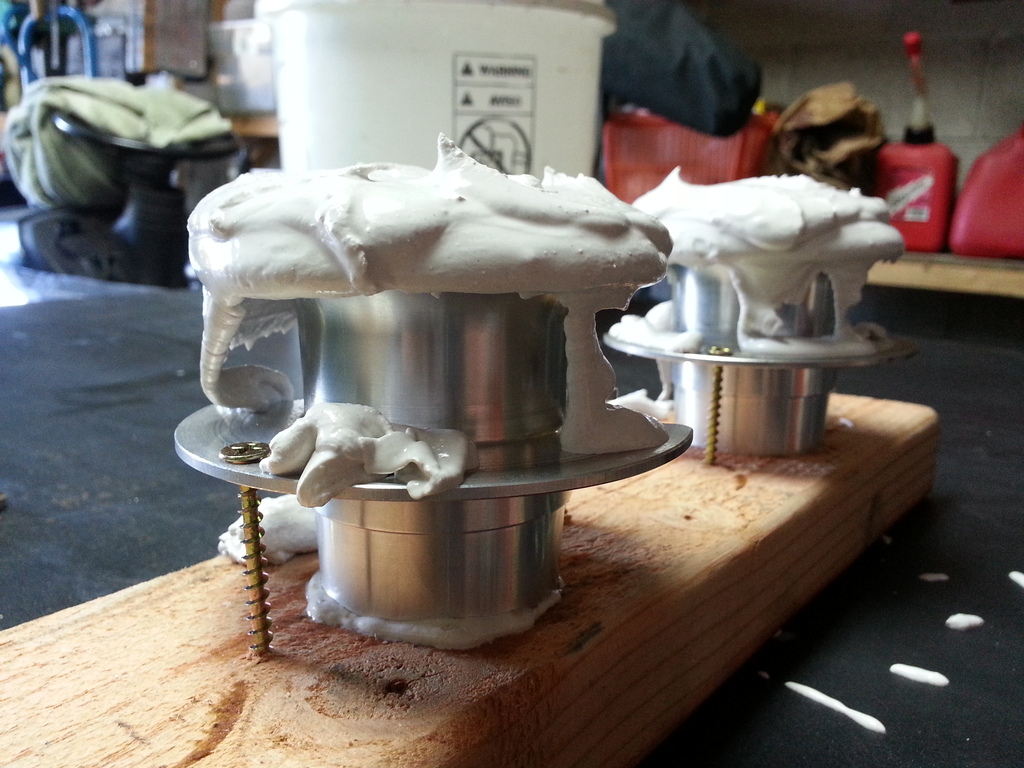
I suck at math, so this is me using K.I.S.S.
I have all this stuff laying around and is simple for me to do.
1. Wax the stack
2. Mix drywall mud and pour into stack
3. When dry, use compressed air to pop mold out
4. Cut the mold in half and viola! Perfect to trace onto a piece of metal
I did both stacks, because last time, when I was cutting a mold it cracked and crumbled apart.

Senior Member
SuperSport
Joined: Apr 2014
Posts: 932
From: Auckland, new Zealand
I suck at math, so this is me using K.I.S.S.
I have all this stuff laying around and is simple for me to do.
1. Wax the stack
2. Mix drywall mud and pour into stack
3. When dry, use compressed air to pop mold out
4. Cut the mold in half and viola! Perfect to trace onto a piece of metal
I did both stacks, because last time, when I was cutting a mold it cracked and crumbled apart.
I have all this stuff laying around and is simple for me to do.
1. Wax the stack
2. Mix drywall mud and pour into stack
3. When dry, use compressed air to pop mold out
4. Cut the mold in half and viola! Perfect to trace onto a piece of metal
I did both stacks, because last time, when I was cutting a mold it cracked and crumbled apart.
Dibs?
Rex Kramer-Thrill Seeker
SuperBike
Joined: Jan 2011
Posts: 2,312
From: Brookfield, WI
I wouldn't mind, but I honestly can't promise anything. My work schedule is really crazy. Either I'm working 100+ hours a week or I have a few days off. It's very random. I'm finishing up a FIL mod lid for a fellow member and it took me almost three months to find the time.
Once I make my new template, then making the actuall X-Wing isn't that hard. I braze the pieces together. I have an idea for this next X-Wing. To fasten it, I won't be using any screws. It will have a little piece that, once in place, will bend under the lip of the velocity stack holding it in place. In theory it works, but we will see if it stays in place and doesn't vibrate and rotate. If not, I'll go back to fastening it like V1.0, with the two velocity stack screws.
Once I make my new template, then making the actuall X-Wing isn't that hard. I braze the pieces together. I have an idea for this next X-Wing. To fasten it, I won't be using any screws. It will have a little piece that, once in place, will bend under the lip of the velocity stack holding it in place. In theory it works, but we will see if it stays in place and doesn't vibrate and rotate. If not, I'll go back to fastening it like V1.0, with the two velocity stack screws.
Rex Kramer-Thrill Seeker
SuperBike
Joined: Jan 2011
Posts: 2,312
From: Brookfield, WI
I'm putting little tabs under the lip of the velocity stack to hold the X-Wing in place. We will see how well this works. Bend them out, slide the X-Wing in, bend them back. If it fails at holding it in place, then I can simply weld tabs on to use the velocity stack screws to hold it in place.

Rex Kramer-Thrill Seeker
SuperBike
Joined: Jan 2011
Posts: 2,312
From: Brookfield, WI
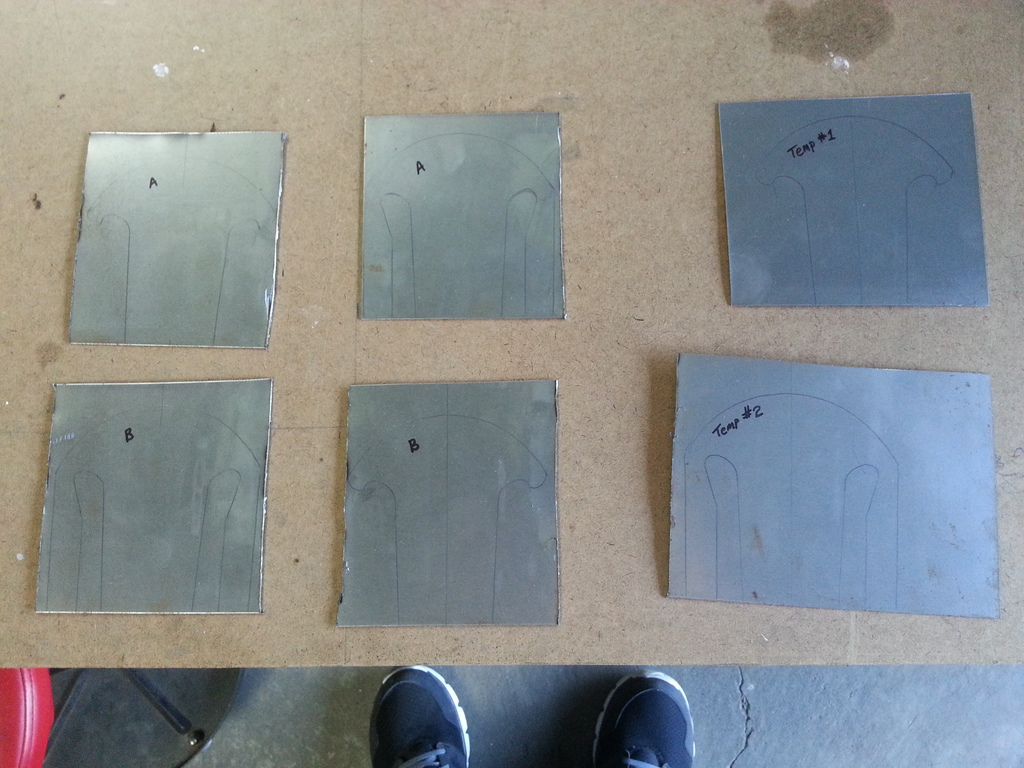
I had some time today to continue work on version 2.0 and got around to tracing the template on some metal. Why six? Two are templates for, you know, just in case.
Cutting 'em out, brazing 'em together and paint tomorrow.
For a couple reasons, I decided against having the little piece of metal under the lip holding the X-Wing in place. I instead opted for the X-Wing to mount to the screw that fastens the velocity stack to the airbox.
Cutting 'em out, brazing 'em together and paint tomorrow.
For a couple reasons, I decided against having the little piece of metal under the lip holding the X-Wing in place. I instead opted for the X-Wing to mount to the screw that fastens the velocity stack to the airbox.

Senior Member
SuperSport
Joined: Apr 2014
Posts: 932
From: Auckland, new Zealand
I had some time today to continue work on version 2.0 and got around to tracing the template on some metal. Why six? Two are templates for, you know, just in case.
Cutting 'em out, brazing 'em together and paint tomorrow.
For a couple reasons, I decided against having the little piece of metal under the lip holding the X-Wing in place. I instead opted for the X-Wing to mount to the screw that fastens the velocity stack to the airbox.
Cutting 'em out, brazing 'em together and paint tomorrow.
For a couple reasons, I decided against having the little piece of metal under the lip holding the X-Wing in place. I instead opted for the X-Wing to mount to the screw that fastens the velocity stack to the airbox.

Rex Kramer-Thrill Seeker
SuperBike
Joined: Jan 2011
Posts: 2,312
From: Brookfield, WI
Well, I do have my two templates  If I have the time man, if I have the time...
Working on them right now, so more pictures later tonight.
Please do! I have an idea of what your H-Wing might look like and a picture would be awesome.
I cannot wait to hear what those carbs do to your bike Micky! Think you'll get them installed and take 'er out for a spin yet today?
Working on them right now, so more pictures later tonight.
I cannot wait to hear what those carbs do to your bike Micky! Think you'll get them installed and take 'er out for a spin yet today?
Rex Kramer-Thrill Seeker
SuperBike
Joined: Jan 2011
Posts: 2,312
From: Brookfield, WI
Ah...so that's what you did! Okay, I see now. I wasn't sure if the taper of the velocity stack would be sufficient enough to hold the X-Wing in place. This is why I opted for the little pieces of metal that extend down to the velocity stack mounting screws and not the piece of metal that I would bend under the lip of the velocity stack. Besides, once painted, you bend it in place and the paint would flake off. Dumb thought on my part.
Your H-Wing doesn't bounce around or rotate at all? If so, this will simplify my design. After all, the less we have inside our airbox, the better.
Even the X-Wing I made for the stock velocity stacks had a piece of metal extending down to the velocity stack mounting screw. This could be simplified as well.
EDIT: Heck, we should see if our buddy Jack Flash's connection could CNC us up some velocity stacks with an integrated X or H-Wing
Last edited by CruxGNZ; Apr 12, 2015 at 04:16 PM. Reason: Jack Flash
Thread Starter
Senior Member
MotoGP
Joined: Apr 2005
Posts: 5,631
From: Montreal
the part you don't see is that the wings extend beyond the bottom of the stack slightly (about 7mm) and have little tabs that stick out on the edges. I bend the tabs in to slide them inside the stack, then bend them back out once the wing is seated. I then cut a piece of 48mm id tubing (cut to 7mm, unsurprisingly) and cut some slots (width of a hack saw blade) which then slide over the protruding tabs. Once everything is tightened down, nothing moves. Simple and effective.

Thread
Thread Starter
Forum
Replies
Last Post


