
easy diy rearsets link????

Thread Starter
Senior Member
MotoGP
Joined: Aug 2006
Posts: 2,934
From: altoona, pa

easy diy rearsets link????
homemade rearsets> I saw web pics somewhere showing how to rotate your footpegs slightly counterclockwise as I describe below. I did this to mine mod last month and it's amazingly easy and costs nub. If anyone has seen the pics please put the link up so that trinc and others can see this mod at a glance. I
1)all you have to do is losen the swingarm bolt and remove the other two bolts on each side. losen the lock nuts on shifter are and lengthen a few turns.
2)Rotate the losened foot control and move it slightly counterclockwise. figure how far up you want your pegs because they go up more than back--mine went back an inch and up an inch and 1/2. The bottom of my peg is almost level with the top of the swingarm, so you might want less.
3)cut some small rectangular pieces of aluminum, hold one behind each bolt as you rotate it back and mark the holes you will drill. Use longer bolts to attach, then do the rear one that attaches to the muffler brace.
4) do other side to match and tighten up swingarm bolt and lock nuts on shifter. adjust rear brake and that's it.
Thanks, Nathan

Thread Starter
Senior Member
MotoGP
Joined: Aug 2006
Posts: 2,934
From: altoona, pa

Senior Member
SuperBike
Joined: Aug 2005
Posts: 1,864
From: Fort Wayne, IN
I'm not sure that I like the idea of having the lower mount disconnected. I push a lot on the pegs when cornering and I'm pretty sure that over time I would move them. Any thoughts of putting a strip of material in there as a link between the bracket and the stock mounting point? At least then you would have some stability.
Personally, with the increased rear ride height that I'm running I never drag the pegs, not even on the track. Of course, those curb feelers are long gone! I've not really felt the need to adjust the peg position.
Personally, with the increased rear ride height that I'm running I never drag the pegs, not even on the track. Of course, those curb feelers are long gone! I've not really felt the need to adjust the peg position.
Thread Starter
Senior Member
MotoGP
Joined: Aug 2006
Posts: 2,934
From: altoona, pa
I'm not sure that I like the idea of having the lower mount disconnected. I push a lot on the pegs when cornering and I'm pretty sure that over time I would move them. Any thoughts of putting a strip of material in there as a link between the bracket and the stock mounting point? At least then you would have some stability.
Personally, with the increased rear ride height that I'm running I never drag the pegs, not even on the track. Of course, those curb feelers are long gone! I've not really felt the need to adjust the peg position.
Personally, with the increased rear ride height that I'm running I never drag the pegs, not even on the track. Of course, those curb feelers are long gone! I've not really felt the need to adjust the peg position.
If you feel comfortable where yours are, and your not grounding on turns, then there is no need to change. I have always felt not quite right and compensated by using the ***** of my feet on the pegs and then moving my feet forward to shift and brake. I've become used to moving my feet back and forth, but now i don't need to. I was always on the lookout for used rearsets because I wanted to spend the little money I have for more important things like tires and gas.
thanks, nathan
Senior Member
SuperBike
Joined: Aug 2005
Posts: 1,864
From: Fort Wayne, IN
Actually, that's how you are supposed to do it (when riding hard anyway). If you don't have your inside foot back with your toes on the peg then you are asking for trouble. During the racing schools we call that riding "duck footed" and will get you pulled into the pits for talking to!


Thread Starter
Senior Member
MotoGP
Joined: Aug 2006
Posts: 2,934
From: altoona, pa
[QUOTE=JamieDaugherty;197716]I'm not sure that I like the idea of having the lower mount disconnected. I push a lot on the pegs when cornering and I'm pretty sure that over time I would move them. Any thoughts of putting a strip of material in there as a link between the bracket and the stock mounting point? At least then you would have some stability.
you must have missed #3:
3)cut some small rectangular pieces of aluminum, hold one behind each bolt as you rotate it back and mark the holes you will drill. Use longer bolts to attach, then do the rear one that attaches to the muffler brace.
Check trinc's peg pic in the mod section, kickstand too short, #48 post. Trinc has racetech springs, front not lowered, 6mm spacer rear shock, and mashes his pegs regularly.
thanks, Nathan
you must have missed #3:
3)cut some small rectangular pieces of aluminum, hold one behind each bolt as you rotate it back and mark the holes you will drill. Use longer bolts to attach, then do the rear one that attaches to the muffler brace.
thanks, Nathan
Thread Starter
Senior Member
MotoGP
Joined: Aug 2006
Posts: 2,934
From: altoona, pa
QUOTE=JamieDaugherty;197746]Actually, that's how you are supposed to do it (when riding hard anyway). If you don't have your inside foot back with your toes on the peg then you are asking for trouble. During the racing schools we call that riding "duck footed" and will get you pulled into the pits for talking to![/QUOTE]
I don't know about the foot positioning you're learning at training school, and I also don't question the validity thereof, but I do know that I'm all over my bike like an octopus keeping things doing what I want them to do when I'm gettin with the program. I'm not saying I know it all, but I know what gets me around turns fast and I feel confident in my techniques because they work for me. I think the schools are good, but i value my own experiences, judgement, and techniques more in that I have evaluated these over many years under many conditions and made them my own. I also do like to do some duck footing(pointing my foot in the direction of the turn and opening my hip and facing toward.....) for U-turns and other instances where turning radius is short and slow.
Relative to the rearset positioning, it is more comfortable for me on my hawk (OEM bar configuration) and this is probably a function of ergonomics particular to my body size. If you don't feel the need to move your pegs, then you should abide by your judgement.
thanks, Nathan
Thread Starter
Senior Member
MotoGP
Joined: Aug 2006
Posts: 2,934
From: altoona, pa
nice job on the custom rearsets. Look good and sturdy. are you going to make these for sale? will you post pics when they're complete with foot controls. The positioning is the same as mine in terms of being level with the top of the swing arm and look close to the same rearward( 0ne inch back and one and half inches up).
thanks,
nathan
thanks,
nathan
Senior Member
SuperBike
Joined: Aug 2005
Posts: 1,864
From: Fort Wayne, IN
Wow, I sure did! Sorry about that....

Senior Member
SuperBike
Joined: Oct 2008
Posts: 1,033
nice job on the custom rearsets. Look good and sturdy. are you going to make these for sale? will you post pics when they're complete with foot controls. The positioning is the same as mine in terms of being level with the top of the swing arm and look close to the same rearward( 0ne inch back and one and half inches up).
thanks,
nathan
thanks,
nathan
The design will be a little more refined than these though.
They are the stock length, but they will be infinitely adjustable up and down.

Senior Member
SuperBike
Joined: Aug 2009
Posts: 1,978
From: thorold ontario
bringing this up from the dead, im about to go and cut the metal and figure out what size hardware i need. you said to adjust the rear brake, when you turn the rear set up does the lever for the rear brake go with it or does it stay in place and you need to adjust it down a little? or does it go with the rear set and apply rear brake pressure in the process?
Senior Member
SuperBike
Joined: Aug 2009
Posts: 1,978
From: thorold ontario
well the right side was a breeze, had it installed in about 10 minutes and thats with some washer shimming, the left hand side is a bit more of a pain as there isnt a spacer to remove and im using a 3/8 inch piece of aluminum. so i think i may have to take a bit drill bit and put a countersunk hole into opposite ends to make it fit. other than that i sat on the bike, its slightly higher but doesnt seem to be that much more uncomfortable, i figured it would be. but its noticeably higher against the swing arm 
Senior Member
SuperBike
Joined: Aug 2009
Posts: 1,978
From: thorold ontario
got it sorted out. i loosened the swing arm bolt and pushed it through a little to loosen the left hand hand rear set, then i tightened up the bolts for the spacer, tightened up the swingarm bolt again and she fit like a glove. i had to adjust the shifter a little as the boot from the joint was touching. other than that i left the brake lever where it was, its fine where it is for me and now the shifter is adjusted and feels better than before. but holy hell is it sloppy. i think im gonna save my pennys and buy a shifter from jaime over the winter.
thanks for the write up nath.
also a couple pics to add to this post, i got lazy and didnt feel like grinding down the edges
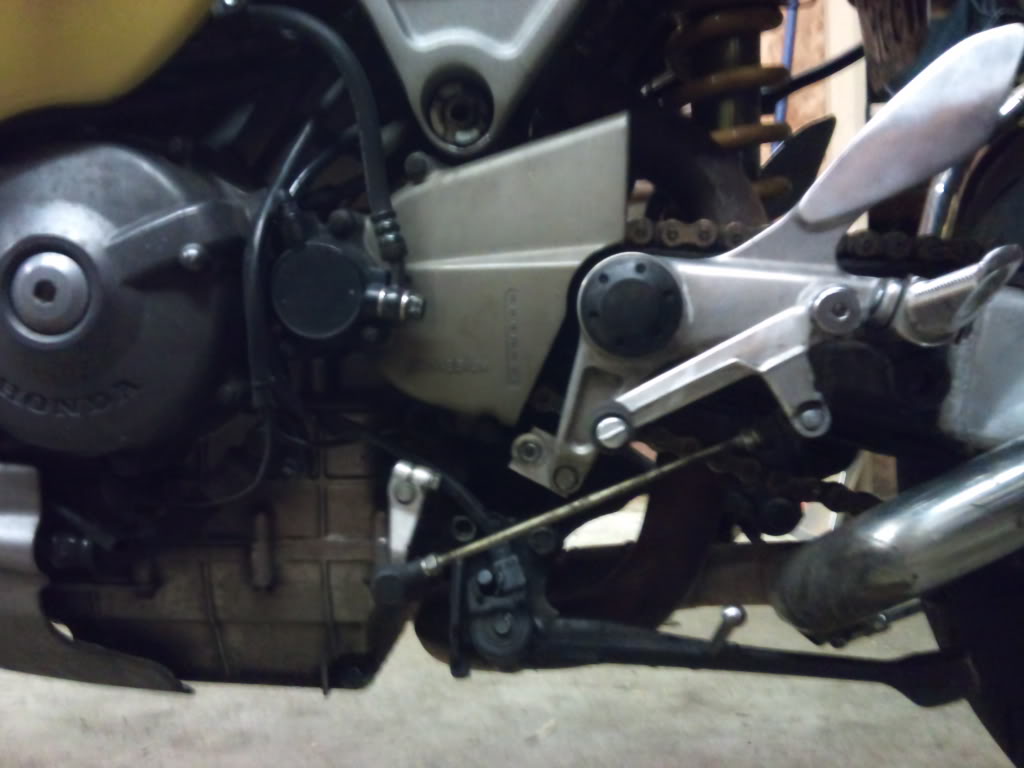
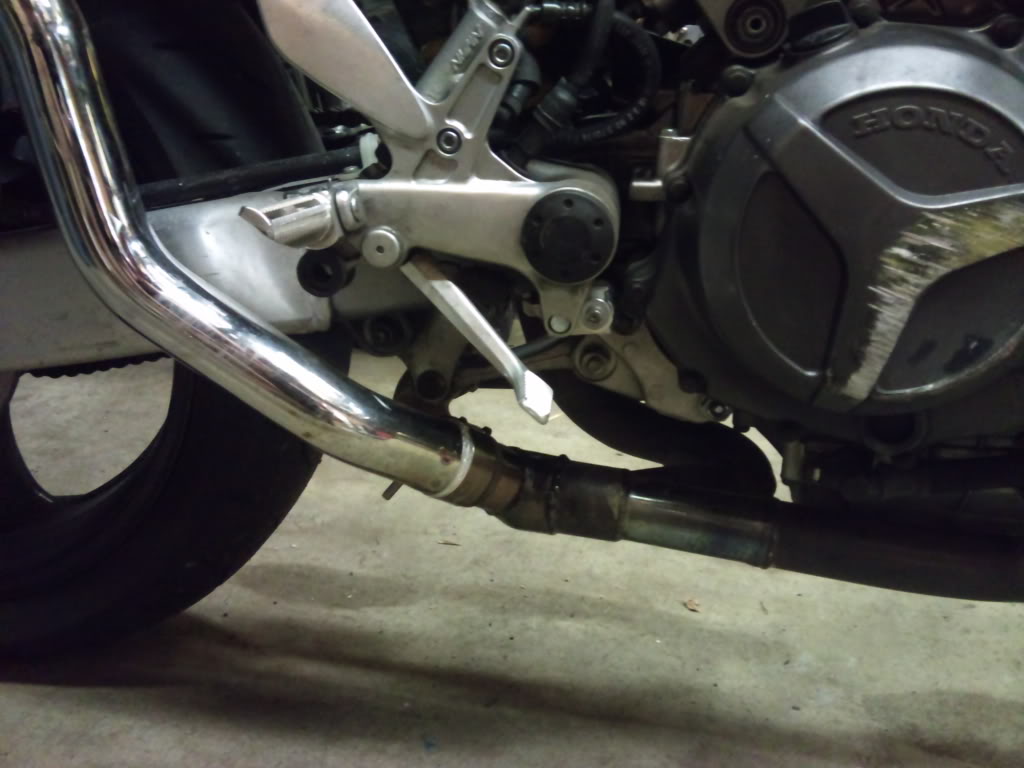
thanks for the write up nath.
also a couple pics to add to this post, i got lazy and didnt feel like grinding down the edges
Thread Starter
Senior Member
MotoGP
Joined: Aug 2006
Posts: 2,934
From: altoona, pa
with 1" back and about 1.5" up ,the pegs end up about level with the upper edge of the swingarm. Not uncomfortable, but you may need to adjust your clip-ons a little for ergonomic preference; e.g.,I removed the little wire clip on the fork tops and moved them up to the fork tops, and also ground off the little nubs and pulled them back a bit.
Senior Member
SuperBike
Joined: Aug 2009
Posts: 1,978
From: thorold ontario
nope its the same length as the brake side brace. i made one and then copied it over to the other side. it looks like its sitting at more of an angle but when you look at the rear set against the swing arm theyre both sitting even. ill take he for a spin tomorrow and see how it feels. sitting on it it feels very even.
Thread Starter
Senior Member
MotoGP
Joined: Aug 2006
Posts: 2,934
From: altoona, pa
nope its the same length as the brake side brace. i made one and then copied it over to the other side. it looks like its sitting at more of an angle but when you look at the rear set against the swing arm theyre both sitting even. ill take he for a spin tomorrow and see how it feels. sitting on it it feels very even.
Senior Member
SuperBike
Joined: Aug 2009
Posts: 1,978
From: thorold ontario
Oh. Yeah man I made two exact copies. Traced one off the other. The shifter side I used a big bit to counter sink the holes so that it would sit flush. other thank that everything looks like it lines up tight and feels solid when I bounce on it
Senior Member
SuperBike
Joined: Aug 2009
Posts: 1,978
From: thorold ontario
Hahaha well it depends on the hole I guess. lol.
I think another reason it looks off is because the spacer is sitting on a slight angle on the shifter side. but its good. and if it breaks hopefully I'm not on it. lol
I think another reason it looks off is because the spacer is sitting on a slight angle on the shifter side. but its good. and if it breaks hopefully I'm not on it. lol

Out of my mind, back in 5
MotoGP
Joined: Nov 2006
Posts: 6,109
From: Skurup, Sweden
got it sorted out. i loosened the swing arm bolt and pushed it through a little to loosen the left hand hand rear set, then i tightened up the bolts for the spacer, tightened up the swingarm bolt again and she fit like a glove. i had to adjust the shifter a little as the boot from the joint was touching. other than that i left the brake lever where it was, its fine where it is for me and now the shifter is adjusted and feels better than before. but holy hell is it sloppy. i think im gonna save my pennys and buy a shifter from jaime over the winter.
One, you are putting a load on the sides of the bearings, since you are pressing things together not completely flat...
Two, the plate for the rearsets acts as part of a mechanical seal for the bearings, preventing crap from getting to the bearings, this is now not that tight...
Three, that piece is cast aluminium... It's very strong in some ways and scarily brittle in other... With that somewhat uneven load on it, it's entirely possible that it will snap och crack pretty easily... And the danger is that it's not the footpeg, it's the mount for the swingarm...
My suggestion is to dismount it, file the permanent spacer down, and if you ever feel like going back to stock, stick a shim there instead... That's just them mechanical engineer in me that's talking... No need to listen if you don't want too...


