
Single Sided Swingarm (SSS) conversion - how to


Thread Starter
Escape Reality
SuperSport
Joined: Jun 2006
Posts: 612
From: KANATA, KANADA

Single Sided Swingarm (SSS) conversion - how to
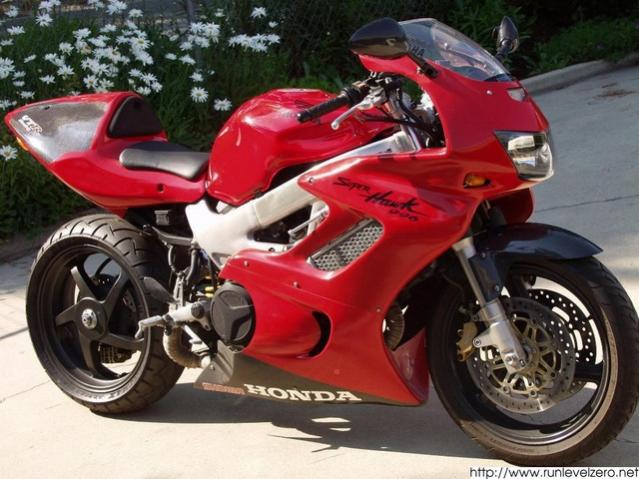
This is a Single Sided Swingarm (SSS) project conversion for the Superhawk/VTR/Firestorm that I began almost about a year ago. With all projects, I took a long time to get started but here I am half way through it and want to share with you all. I am going to detail my experience and hopefully can help those who want to tackle this challenge.
Before I begin, I would like to send a big shout out to Brian L and Beau S (captainchaos). Brian wrote to me about his conversion and gave me the confidence to tackle it myself. Here is his post on the forum. Please email him for additional information. He is extremely helpful. Beau was kind enough to forward to me his unused header, a critical piece which you shall see below. Without their help, this project would not have been able to be where it is today.
What you will need:

Major Motorcycle Parts:
1 - VFR 800 rear swing arm. VFR 750 swingarm will NOT work because the mounting scheme is completely different. I used a 1999 VFR 800 unit.
1 - VFR rear brakes assembly
1 – VFR rear wheel
2 – VTR header. These headers will be dissected in order to fabricate the exhaust. If you have an exhaust tube bender, then it would be better to fabricate from scratch. For my project, I used existing header and played lego to complete the job.
Before you begin, make sure there is a way to suspend the VTR so that way you can work on the rear end.
Step 1:
Remove the rear wheel


Step 2:
Remove the swingarm by removing the pivot bolt
Remove the rear sets and get it out of the way
Remove the rear brake assembly
Detach the lower shock assembly bolt


Notice that the shock is mounted slightly to the right and not in the center? This mounting scheme is to clear the exhaust header. By mounting the VFR SSS, the shock must be moved 47.5mm (see note) to the left. This will position the shock directly in the middle of the exhaust and new exhaust header must be fabricated to overcome this obstacle. Detailed below.
Note: Slowhawk is doing the fab as well and according to his set-up, the distance is 55 mm. It appears that based on the two differing numbers, I can only attribute the variation to manufacturing tolerances.
Step: 3
Remove the header and remove the shock and mount the VFR SSS in place of the original swingarm. Shim the swingarm mounting point so that the rear sprocket will be aligned with the front ones. The thickness is 5mm with inner diameter 20mm and outer 30mm. This is essentially a washer that fit between the right engine mount point and the swingarm. Alternatively, the inner ring of the original arm can replace the VFR unit after trimming to the required length. I chose to go with the washer method.
Note: Please see the exchanges below. I have verified using the string method to determined the shimming of the swingarm does not result in misalignment with the front wheel and. Again, this differs from Slowhawk's set-up but it falls within Brian L's fab.
Note: The VFR Swingarm chain guard should be removed at this point because it will interfere with the front sprocket cover of the VTR. This can be trimmed when things are complete or new hugger mounted.


Step 4: (Linkage Plate and dog bone)
The shock linkage plate and the done bone must be fabricated. I am going to post Brian’s drawing along with the dog bone. This is required since the VTR dog bone cannot be used.


Step 5:
Remount the stock shock to the SSS swingarm and rotate the shock to the top so the location for the new shock mounting hole can be drill. This new hole is 47.5mm (see note above regarding variation)on center from the original hole (this might vary a little given manufacturing tolerances). The key is to ensure that the shock is at 90 degree to the road and not bind. The top mounting point on the frame is made of thick aluminum. Take care to drill through. Since there is already a hole there from the plate where the tank hinge is mounted, care must be taken when drilling this new hole. Take your time. Use a small drill bit and slowly increase in size till a new 10mm hole is created.

Step 6:
Mount the shock to this new point. At this point, tighten things down to see if there is any adjustments that needs to be made to avoid binding of the shock and the movement of the swingarm.
Step 7:
Lower the VTR so there is load on the suspension. This is so that the next step, fabrication of the exhaust can be made while taking in consideration Suspension travel.
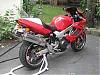
Step 8: (Fabrication of the new exhaust header)
As mentioned earlier, I used two headers in order to fabricate mine. The result is a 2 into 1 Exhaust system. This part of the conversion is the most difficult since it must be done from scratch. If you have access to a pneumatic tube bender, I would suggest to fabricate from scratch. For me I went the old cut, align and weld scenario.
This is the result:


As you can see there are 8 joints but it can be done. If you are fabricating new header, note that in order for the rear exhaust to fit, there should be a junction. This is important since you will not be able to mount the header without it. The clearance between the components will be very tight.
There were a lot of cutting, tacking, fitting and re adjusting to make the whole thing work. Constant removal and remounting of the shock and front header was needed. Patient is the key here.


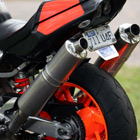
Once I finished routing the exhaust, I had to figure a way for the muffler to be mounted. I ended up with a center mount option using the right muffler from a Kawasaki Z1000. I had thought about using the R1 Dual unit but ended up with this for a unique look. Below was the original plan but with the SSS, the dual exhaust would not work to my satisfaction.
Original Fighter concept:


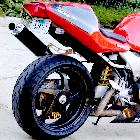
Kawi Exhaust and fabricated mount:


After installing the Exhaust, I noticed that the clearance between the rear tire and the exhaust was a little too close. I had to raise the rear up using an aluminum spacer. There will likely need for tweaking of the front end for balance handling after wards as a result.
https://www.superhawkforum.com/forum...ad.php?t=23422
Before I begin, I would like to send a big shout out to Brian L and Beau S (captainchaos). Brian wrote to me about his conversion and gave me the confidence to tackle it myself. Here is his post on the forum. Please email him for additional information. He is extremely helpful. Beau was kind enough to forward to me his unused header, a critical piece which you shall see below. Without their help, this project would not have been able to be where it is today.
What you will need:

Major Motorcycle Parts:
1 - VFR 800 rear swing arm. VFR 750 swingarm will NOT work because the mounting scheme is completely different. I used a 1999 VFR 800 unit.
1 - VFR rear brakes assembly
1 – VFR rear wheel
2 – VTR header. These headers will be dissected in order to fabricate the exhaust. If you have an exhaust tube bender, then it would be better to fabricate from scratch. For my project, I used existing header and played lego to complete the job.
Before you begin, make sure there is a way to suspend the VTR so that way you can work on the rear end.
Step 1:
Remove the rear wheel


Step 2:
Remove the swingarm by removing the pivot bolt
Remove the rear sets and get it out of the way
Remove the rear brake assembly
Detach the lower shock assembly bolt


Notice that the shock is mounted slightly to the right and not in the center? This mounting scheme is to clear the exhaust header. By mounting the VFR SSS, the shock must be moved 47.5mm (see note) to the left. This will position the shock directly in the middle of the exhaust and new exhaust header must be fabricated to overcome this obstacle. Detailed below.
Note: Slowhawk is doing the fab as well and according to his set-up, the distance is 55 mm. It appears that based on the two differing numbers, I can only attribute the variation to manufacturing tolerances.
Step: 3
Remove the header and remove the shock and mount the VFR SSS in place of the original swingarm. Shim the swingarm mounting point so that the rear sprocket will be aligned with the front ones. The thickness is 5mm with inner diameter 20mm and outer 30mm. This is essentially a washer that fit between the right engine mount point and the swingarm. Alternatively, the inner ring of the original arm can replace the VFR unit after trimming to the required length. I chose to go with the washer method.
Note: Please see the exchanges below. I have verified using the string method to determined the shimming of the swingarm does not result in misalignment with the front wheel and. Again, this differs from Slowhawk's set-up but it falls within Brian L's fab.
Note: The VFR Swingarm chain guard should be removed at this point because it will interfere with the front sprocket cover of the VTR. This can be trimmed when things are complete or new hugger mounted.


Step 4: (Linkage Plate and dog bone)
The shock linkage plate and the done bone must be fabricated. I am going to post Brian’s drawing along with the dog bone. This is required since the VTR dog bone cannot be used.


Step 5:
Remount the stock shock to the SSS swingarm and rotate the shock to the top so the location for the new shock mounting hole can be drill. This new hole is 47.5mm (see note above regarding variation)on center from the original hole (this might vary a little given manufacturing tolerances). The key is to ensure that the shock is at 90 degree to the road and not bind. The top mounting point on the frame is made of thick aluminum. Take care to drill through. Since there is already a hole there from the plate where the tank hinge is mounted, care must be taken when drilling this new hole. Take your time. Use a small drill bit and slowly increase in size till a new 10mm hole is created.

Step 6:
Mount the shock to this new point. At this point, tighten things down to see if there is any adjustments that needs to be made to avoid binding of the shock and the movement of the swingarm.
Step 7:
Lower the VTR so there is load on the suspension. This is so that the next step, fabrication of the exhaust can be made while taking in consideration Suspension travel.
Step 8: (Fabrication of the new exhaust header)
As mentioned earlier, I used two headers in order to fabricate mine. The result is a 2 into 1 Exhaust system. This part of the conversion is the most difficult since it must be done from scratch. If you have access to a pneumatic tube bender, I would suggest to fabricate from scratch. For me I went the old cut, align and weld scenario.
This is the result:


As you can see there are 8 joints but it can be done. If you are fabricating new header, note that in order for the rear exhaust to fit, there should be a junction. This is important since you will not be able to mount the header without it. The clearance between the components will be very tight.
There were a lot of cutting, tacking, fitting and re adjusting to make the whole thing work. Constant removal and remounting of the shock and front header was needed. Patient is the key here.


Once I finished routing the exhaust, I had to figure a way for the muffler to be mounted. I ended up with a center mount option using the right muffler from a Kawasaki Z1000. I had thought about using the R1 Dual unit but ended up with this for a unique look. Below was the original plan but with the SSS, the dual exhaust would not work to my satisfaction.
Original Fighter concept:


Kawi Exhaust and fabricated mount:


After installing the Exhaust, I noticed that the clearance between the rear tire and the exhaust was a little too close. I had to raise the rear up using an aluminum spacer. There will likely need for tweaking of the front end for balance handling after wards as a result.
https://www.superhawkforum.com/forum...ad.php?t=23422
Last edited by calitoz; Aug 8, 2010 at 08:52 AM. Reason: added completed project link

Senior Member
SuperSport
Joined: Jun 2004
Posts: 818
From: Thornwood, NY
Calitoz...
Have you checked the wheel alignment yet? I'm doing the same conversion, and found I had to move the arm over to left a bit more than you did line up the wheels/rims, which offset the sprocket about 5mm outboard (to the left). I found my shock needed to be mounted approx 55mm from the stock location with this setup.
Just curious if there is that much fluctuation between bikes/arms or one of us is off a bit.
J.
Thread Starter
Escape Reality
SuperSport
Joined: Jun 2006
Posts: 612
From: KANATA, KANADA
Calitoz...
Have you checked the wheel alignment yet? I'm doing the same conversion, and found I had to move the arm over to left a bit more than you did line up the wheels/rims, which offset the sprocket about 5mm outboard (to the left). I found my shock needed to be mounted approx 55mm from the stock location with this setup.
Just curious if there is that much fluctuation between bikes/arms or one of us is off a bit.
J.
Have you checked the wheel alignment yet? I'm doing the same conversion, and found I had to move the arm over to left a bit more than you did line up the wheels/rims, which offset the sprocket about 5mm outboard (to the left). I found my shock needed to be mounted approx 55mm from the stock location with this setup.
Just curious if there is that much fluctuation between bikes/arms or one of us is off a bit.
J.
As mentioned above in the original post, manufacturing tolerances needs to be consider since I too, had different measurement per Brian's original fabrication.
Last edited by calitoz; Apr 27, 2008 at 10:34 AM.
Senior Member
SuperSport
Joined: Jun 2004
Posts: 818
From: Thornwood, NY
By left I mean sprocket side (looking from rear of bike forward).
I'd check your alignment front to rear rim. I thought I had everything right at first, and being scared to drill my frame, checked agian, and then found out I was off about 10mm to the right/brake side after checking the alignment.
From everything I read on others who have done this swap (as well as my measurments), you have to line the wheels up, which will put the rear sprocket outboard to the left of the front sprocket... then you'll need to shim the front sprocket about 5mm to line it up to the rear OR machine the rear sprocket and/or rear carrier to get the chain back in line. I haven't delt with this yet, as I just have the arm bolted up with the shock and linkages in place. My plan is to go to a 520 chain, which will bring the chain in a bit, and shim the front with an old sprocket machined down to the correct thickness lining things up.
Do a search for user name: Alan - he did this swap as well, and I've PM'd him a few times about this issue... he's been very helpful.
J.


Thread Starter
Escape Reality
SuperSport
Joined: Jun 2006
Posts: 612
From: KANATA, KANADA
By left I mean sprocket side (looking from rear of bike forward).
I'd check your alignment front to rear rim. I thought I had everything right at first, and being scared to drill my frame, checked agian, and then found out I was off about 10mm to the right/brake side after checking the alignment.
From everything I read on others who have done this swap (as well as my measurments), you have to line the wheels up, which will put the rear sprocket outboard to the left of the front sprocket... then you'll need to shim the front sprocket about 5mm to line it up to the rear OR machine the rear sprocket and/or rear carrier to get the chain back in line. I haven't delt with this yet, as I just have the arm bolted up with the shock and linkages in place. My plan is to go to a 520 chain, which will bring the chain in a bit, and shim the front with an old sprocket machined down to the correct thickness lining things up.
Do a search for user name: Alan - he did this swap as well, and I've PM'd him a few times about this issue... he's been very helpful.
J.
I'd check your alignment front to rear rim. I thought I had everything right at first, and being scared to drill my frame, checked agian, and then found out I was off about 10mm to the right/brake side after checking the alignment.
From everything I read on others who have done this swap (as well as my measurments), you have to line the wheels up, which will put the rear sprocket outboard to the left of the front sprocket... then you'll need to shim the front sprocket about 5mm to line it up to the rear OR machine the rear sprocket and/or rear carrier to get the chain back in line. I haven't delt with this yet, as I just have the arm bolted up with the shock and linkages in place. My plan is to go to a 520 chain, which will bring the chain in a bit, and shim the front with an old sprocket machined down to the correct thickness lining things up.
Do a search for user name: Alan - he did this swap as well, and I've PM'd him a few times about this issue... he's been very helpful.
J.
Are you saying my original 47.5mm is correct or on your bike 55mm is the final move?
Exactly when you reference about the sprocket and as I indicate, I have no way to confirm exact alignment of the front wheel to the rear with any definitive confirmation unless a special jig is fabricated. Visually, it looks good. My shimming was to offset the sprocket. You have just discover the 5mm difference.
I suppose there is the argument for shimming the sprocket rather than the swingarm and it appears to be the correct solution if the alignment of the rim to the front is off. I am not sure 5mm alignment from center makes that much difference. As you probably aware, the shimming of the front sprocket will be a lot harder to do comparatively to simply adding washers to the mounting of the swingarm, hence I went with my solution.
My conversion is no where near the optimum as I am limited with typical tools that majority of us have. I took that into consideration when trying to do this how to. We all do not have access to pipe bender, machining lathe, etc...Please continue to add to this post as your perspective is VERY valuable.
Last edited by calitoz; Apr 27, 2008 at 05:46 PM.
Senior Member
SuperSport
Joined: Jun 2004
Posts: 818
From: Thornwood, NY
Calitoz,
I agree it's easier if the sprockets align, but I'd think having the wheels off center line of each other would be asking for trouble. I believe you should be closer to the 55mm measurement than you are... as this is almost exactley were Alan ended up as well on his swap. (I didn't just shim it to meet his mark, I kept measuring the wheel alignment until I got them straight, then measured where the shock should be after that)
I checked alignment with no tires, but rims mounted up which is a bit easier than if you have tires... but look at how it's done on this link (below)... all you will need is some string and tape... although I found using 2 bricks to tie the string too in the front to hold the line tight while you measure the distance on both sides of the front wheel will help... if you don't have friends!!!
J.
http://www.motorcyclistonline.com/ho...els/index.html
Moderator
MotoGP
Joined: Dec 2004
Posts: 2,553
From: South Texas
Thread Starter
Escape Reality
SuperSport
Joined: Jun 2006
Posts: 612
From: KANATA, KANADA
Calitoz,
I agree it's easier if the sprockets align, but I'd think having the wheels off center line of each other would be asking for trouble. I believe you should be closer to the 55mm measurement than you are... as this is almost exactley were Alan ended up as well on his swap. (I didn't just shim it to meet his mark, I kept measuring the wheel alignment until I got them straight, then measured where the shock should be after that)
I checked alignment with no tires, but rims mounted up which is a bit easier than if you have tires... but look at how it's done on this link (below)... all you will need is some string and tape... although I found using 2 bricks to tie the string too in the front to hold the line tight while you measure the distance on both sides of the front wheel will help... if you don't have friends!!!
J.
http://www.motorcyclistonline.com/ho...els/index.html
I agree it's easier if the sprockets align, but I'd think having the wheels off center line of each other would be asking for trouble. I believe you should be closer to the 55mm measurement than you are... as this is almost exactley were Alan ended up as well on his swap. (I didn't just shim it to meet his mark, I kept measuring the wheel alignment until I got them straight, then measured where the shock should be after that)
I checked alignment with no tires, but rims mounted up which is a bit easier than if you have tires... but look at how it's done on this link (below)... all you will need is some string and tape... although I found using 2 bricks to tie the string too in the front to hold the line tight while you measure the distance on both sides of the front wheel will help... if you don't have friends!!!
J.
http://www.motorcyclistonline.com/ho...els/index.html
Will check this weekend to confirm and let you know. FYI - Brian's fab had the same issue but according to him his alignment is correct. He shimmed like I did. Thanks for the link
Thread Starter
Escape Reality
SuperSport
Joined: Jun 2006
Posts: 612
From: KANATA, KANADA
Calitoz,
I agree it's easier if the sprockets align, but I'd think having the wheels off center line of each other would be asking for trouble. I believe you should be closer to the 55mm measurement than you are... as this is almost exactley were Alan ended up as well on his swap. (I didn't just shim it to meet his mark, I kept measuring the wheel alignment until I got them straight, then measured where the shock should be after that)
I checked alignment with no tires, but rims mounted up which is a bit easier than if you have tires... but look at how it's done on this link (below)... all you will need is some string and tape... although I found using 2 bricks to tie the string too in the front to hold the line tight while you measure the distance on both sides of the front wheel will help... if you don't have friends!!!
J.
http://www.motorcyclistonline.com/ho...els/index.html
I agree it's easier if the sprockets align, but I'd think having the wheels off center line of each other would be asking for trouble. I believe you should be closer to the 55mm measurement than you are... as this is almost exactley were Alan ended up as well on his swap. (I didn't just shim it to meet his mark, I kept measuring the wheel alignment until I got them straight, then measured where the shock should be after that)
I checked alignment with no tires, but rims mounted up which is a bit easier than if you have tires... but look at how it's done on this link (below)... all you will need is some string and tape... although I found using 2 bricks to tie the string too in the front to hold the line tight while you measure the distance on both sides of the front wheel will help... if you don't have friends!!!
J.
http://www.motorcyclistonline.com/ho...els/index.html
I have verified as suggested and according to my set-up, it is appears to be in alignment. At most, it is +/- 1 mm. This is by using the string method as you suggested.

Senior Member
MotoGP
Joined: Mar 2007
Posts: 3,132
From: Phoenix, AZ
Yes it does affect handling, you will turn in more easily one direction than the other, but so long as both wheels point straight forward when going straight there won't be any other major weirdness.

Junior Member
Squid
Joined: Apr 2008
Posts: 7
From: Ireland
Bill
Member
Squid
Joined: Feb 2005
Posts: 53
From: Monterey, CA

Hi all...I'm still alive, I just sold the SSSuperHawk to Eric in VA earlier in the year. I can try and answer any questions you might have if you email me at:
blight1@comcast.net
I did the SSS conversion several years ago, but still have a pretty good memory of the job. I just bought a new Triumph Thruxton 900 for my Hawk replacement. It's been fun tinkering with it....NO, I'm not gonna do a SSS on it!!
Here are some pics:
http://www2.snapfish.com/thumbnailsh...1/t_=131463741
Cheers, B. Light


Thread Starter
Escape Reality
SuperSport
Joined: Jun 2006
Posts: 612
From: KANATA, KANADA


Out of my mind, back in 5
MotoGP
Joined: Nov 2006
Posts: 6,109
From: Skurup, Sweden

ole dirty bastard
SuperSport
Joined: Jul 2004
Posts: 976
From: my house


