
Spiegler brake line install problem


Thread Starter
Senior Member
Back Marker
Joined: May 2007
Posts: 141
From: Phoenix, formerly Dallas

I ordered Spiegler Stainless brake lines for my 03 SH. My options were:
VTR 1000 F 97 - only alt. 2-line Front 2 S-HN0131 $109.95
Or
VTR 1000 F 97 - orig. w/ manifold Front 3 S-HN0132 $174.95
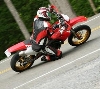
Of course I bought the less expensive 2-line set. They do NOT look correct. I basically received two lines with the banjo "O" at each end. The BIKE shows the "O" at the end that bolts to the caliper, but the section where the lines meet (above the tire near the steering head) appear to be a monoblock/single unit.
Did I order the wrong set?
VTR 1000 F 97 - only alt. 2-line Front 2 S-HN0131 $109.95
Or
VTR 1000 F 97 - orig. w/ manifold Front 3 S-HN0132 $174.95
Of course I bought the less expensive 2-line set. They do NOT look correct. I basically received two lines with the banjo "O" at each end. The BIKE shows the "O" at the end that bolts to the caliper, but the section where the lines meet (above the tire near the steering head) appear to be a monoblock/single unit.
Did I order the wrong set?

Senior Member
SuperBike
Joined: Jul 2004
Posts: 1,015

I ordered Spiegler Stainless brake lines for my 03 SH. My options were:
VTR 1000 F 97 - only alt. 2-line Front 2 S-HN0131 $109.95
Or
VTR 1000 F 97 - orig. w/ manifold Front 3 S-HN0132 $174.95
Of course I bought the less expensive 2-line set. They do NOT look correct. I basically received two lines with the banjo "O" at each end. The BIKE shows the "O" at the end that bolts to the caliper, but the section where the lines meet (above the tire near the steering head) appear to be a monoblock/single unit.
Did I order the wrong set?
Both line should completely replace the stock line from the master cylinder to the calipers. Otherwords, each new line runs from a caliper to the master cylinder and a longer banjo bolt (provided in the kit) bolts both lines to the master cylinder at one time.

Senior Member
MotoGP
Joined: Sep 2006
Posts: 4,138
From: Austin, Tx
And the lines are within millemeters of being switched from one side to the other. I did this update recently and had to do it twice because I did not think they were that close. 
I am constantly reminded that this not a '67 Corvette but a Swiss watch - that also happens to go a hundred miles per hour in a very short amount of time.
It's a relic but it's the fastest f+ching relic on the planet!
I am constantly reminded that this not a '67 Corvette but a Swiss watch - that also happens to go a hundred miles per hour in a very short amount of time.
It's a relic but it's the fastest f+ching relic on the planet!
Thread Starter
Senior Member
Back Marker
Joined: May 2007
Posts: 141
From: Phoenix, formerly Dallas
Wow. Seems kind of like a slight Jerry Rig. I guess I'm just extra paranoid on front breaks. I only use my rear brakes on occasion just to make sure I don't forget how it works.
I too noticed one line was slightly longer than the other. Any memory as to which side (sitting on the bike) is the longer of the two?
Great advice! Thanks!
I too noticed one line was slightly longer than the other. Any memory as to which side (sitting on the bike) is the longer of the two?
Great advice! Thanks!

Administrator

World Champion
Joined: Dec 2004
Posts: 105,287
From: Fulton, MO
I cut the rubber grommets off the stock lines and use them in the brackets on the front fender. They are a little loose around an aftermarket line but they are retained nonetheless. The grommets are glued on. I just cut lengthwise with a razor blade and slowly remove it from the stock line.
Senior Member
SuperBike
Joined: Jul 2004
Posts: 1,015
You should notice a big difference in brake feel
If you have difficulty getting all of the air out after bleeding the new lines, you might have to cover the painted surfices up for protection and bleed the brake lines at the upper banjo bolt. Air can get trapped there as it is the highest point in the whole system other than the resevoir.
Thread Starter
Senior Member
Back Marker
Joined: May 2007
Posts: 141
From: Phoenix, formerly Dallas
Well, I got it done. WAY firmer at the lever. The little plastic holding block intended to hold the line in a vice so you can twist the end is a POS. I tightened it, but the line still slipped...tried to tighten more and the thing started to mangle. It made me cringe and I was very, very careful...but I used curved pliers to twist. Worked, and didn't seem to crush the aluminum at all, but was definitely the high blood pressure moment of the job, that and spilling the brake fluid bottle.
I just put the aluminum end in a soft wood vice just to hold it, and turned the fitting with the (errr...pliers).
Where the two line ends are held on by the longer aluminum bolt...I used an aluminum washer on each end, but had two left over. I put one washer BETWEEN the two ends (banjos?). I put in two but it made the spacing look iffy, so went back to one. I snugged everything and pulled hard on the lever, checked for leaks and all looks good. I somehow locked myself out of my tool box...doesn't have a key lock. I'll have to crack that safe in the morning so I can use my torque wrenche for the aluminum bolt.
I really appreciate the advice. Couldn't have started without the help! I'll ride it and see what happens in slow turns, fork compression etc. then tackle keeping the lines in their proper place. Definitely made a huge difference.
Thread Starter
Senior Member
Back Marker
Joined: May 2007
Posts: 141
From: Phoenix, formerly Dallas
Yep. I'm glad I had the wood-jawed vice. Brake lines aren't somewhere want to cut much from, even weight. I was a bicycle mechanic in college and learned the hard way...the right way to work with aluminum.
Thanks again.
Thanks again.

Thread
Thread Starter
Forum
Replies
Last Post


