
Super Blink's Super Build Thread....


Senior Member
MotoGP
Joined: Jul 2010
Posts: 3,871
From: Phoenix, AZ

I'll be damned if there's nothing but a hole in both my slides, no screw anywhere. I take the three or four off the top of the diaphragm cover (black cover) and there's the diaphragm seated into a groove. Pop the diaphragm out of the groove and the whole slide comes out. In the middle of the slide where you're pulling a screw from is just a hole for me. Or is it a hole with a screw at the bottom of it? Sure hope so or i've got a messed up set of carbs.
The others said it, but the sole purpose for threading a screw into this hole is to pull the insert out of the slide. You were having trouble getting the needle out of the slide? This is how you do it, starting from the beginning:
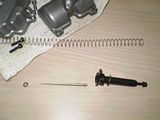
1) Remove the three screws from the cover, and it comes out along with the long slide spring.
2) Remove slide and diaphram assembly.
3) Take one of these three screws that you just removed. Screw it into the open hole in the middle using only your fingers. This is the hole that you are worried about not having a screw on yours. No screwdriver needs to be involved.
4) Grab the screw and pull on it with your fingers. It may take some wiggling, but the center of the slide will come out, and the needle will be underneath it. The piece that comes out looks like this (you can see the screw is still in it on the right):

5) Remove the screw, never to be used again until you put the cover back on. Again, the whole reason for this is to pull the center out of the slide without damaging it so that you have access to the needle. Keep track of your pieces, as there will be a washer, needle, and small spring underneath the center of the slide.
Last edited by 7moore7; Feb 20, 2011 at 01:26 PM.

Thread Starter
Banned
Back Marker
Joined: Jan 2011
Posts: 156
It's just a hole for me too...
The others said it, but the sole purpose for threading a screw into this hole is to pull the insert out of the slide. You were having trouble getting the needle out of the slide? This is how you do it, starting from the beginning:
1) Remove the three screws from the cover, and it comes out along with the long slide spring.
2) Remove slide and diaphram assembly.
3) Take one of these three screws that you just removed. Screw it into the open hole in the middle using only your fingers. This is the hole that you are worried about not having a screw on yours. No screwdriver needs to be involved.
4) Grab the screw and pull on it with your fingers. It may take some wiggling, but the center of the slide will come out, and the needle will be underneath it. The piece that comes out looks like this (you can see the screw is still in it on the right):
5) Remove the screw, never to be used again until you put the cover back on. Again, the whole reason for this is to pull the center out of the slide without damaging it so that you have access to the needle. Keep track of your pieces, as there will be a washer, needle, and small spring underneath the center of the slide.
Senior Member
MotoGP
Joined: Jul 2010
Posts: 3,871
From: Phoenix, AZ
Excellent. Thanks. I get now get it but have to wait until wed to try. So the next question, a replacement neddle for the bent one? My two options are what, go with another oem needle and shim as instructed in other threads or buy an aftermarket kit which which also includes new needles that also allow for adjustment... I suppose i should just go the cheapest route and call it a day when it runs again....
And, as I just found out this morning, the needles are slightly different in front and back, so make sure you get the right one!
Thread Starter
Banned
Back Marker
Joined: Jan 2011
Posts: 156
Hey guys, which carb is the front carb in this shot?
http://www.hondapartsline.com/fiche_...2001&fveh=4080
I'm guessing it's the carb pictured on the right hand side of the adjustable screen and the rear carb being the one pictured on the left but want to get someone's opinion, maybe it's clear and i'm not seeing it....
Nevermind, found it... For future reference it's the very blatant arrow pointing in a direction with "front" written under it! lmfao, I'm such a newb
Last edited by SuperBlink; Feb 21, 2011 at 02:57 PM.
Senior Member
MotoGP
Joined: Aug 2006
Posts: 2,934
From: altoona, pa
Hey guys, which carb is the front carb in this shot?
http://www.hondapartsline.com/fiche_...2001&fveh=4080
I'm guessing it's the carb pictured on the right hand side of the adjustable screen and the rear carb being the one pictured on the left but want to get someone's opinion, maybe it's clear and i'm not seeing it....
Nevermind, found it... For future reference it's the very blatant arrow pointing in a direction with "front" written under it! lmfao, I'm such a newb
http://www.hondapartsline.com/fiche_...2001&fveh=4080
I'm guessing it's the carb pictured on the right hand side of the adjustable screen and the rear carb being the one pictured on the left but want to get someone's opinion, maybe it's clear and i'm not seeing it....
Nevermind, found it... For future reference it's the very blatant arrow pointing in a direction with "front" written under it! lmfao, I'm such a newb
Thread Starter
Banned
Back Marker
Joined: Jan 2011
Posts: 156
Alright guys, a bit of an update... My learning curve is pretty steep and the addition of me not wanting to mess anything up as I go along and therefore, I go at a snails pace... Currently, it took the whole class to get the radiator off, oil cooler moved and the front valve cover off for the cct change to the ape manuals... Next Sat I should get the CCT's installed and the radiator installed. I'm thinking the rear is going to go much more quickly than the first. The sat after that I plan to rebuild the carbs, and hopefully get a chance to install them, top off the coolant and get the bike back up and running. The front end comes in tomorrow! All I have to say about that is, **** YES! Anyhow, what's up with the damn spark plugs on this bike? What's the magical socket that actually fits the space provided by honda and the spark plug? I'm having an issue getting an 18mm into the space. I suppose I should look at the manual, but I'm off to class so it'll have to wait, maybe one of you has the answer at your fingertips and can help a guy out? I'd like to get that plug out either tonight or wed night at the intro class and see if I can't sneak into the installation without the teacher throwing a fit? Anyhow, need to relese the pressure in there so I can get it to TDC... Thanks guys,
super Blink
super Blink

Senior Member
MotoGP
Joined: Jul 2010
Posts: 3,871
From: Phoenix, AZ
Alright guys, a bit of an update... My learning curve is pretty steep and the addition of me not wanting to mess anything up as I go along and therefore, I go at a snails pace... Currently, it took the whole class to get the radiator off, oil cooler moved and the front valve cover off for the cct change to the ape manuals... Next Sat I should get the CCT's installed and the radiator installed. I'm thinking the rear is going to go much more quickly than the first. The sat after that I plan to rebuild the carbs, and hopefully get a chance to install them, top off the coolant and get the bike back up and running. The front end comes in tomorrow! All I have to say about that is, **** YES!
Yep, the rear should be faster than the front... although as soon as you plan for this something else will set you back so take your time and have fun getting your hands dirty. Keep to it

Senior Member
MotoGP
Joined: Jul 2010
Posts: 3,871
From: Phoenix, AZ
Twice the speed, half as much time, I dunno. How fast did you do it? 4 hours. Half that would be 2 hours, so in that instance it would work....
Half as slow?

Thread Starter
Banned
Back Marker
Joined: Jan 2011
Posts: 156
Took me a whole day to do my CCT's b/c of my newness to the bike and being cautious (not to mention dropping a screw down the cam chain hole!). Not only will you be able to get in there half as fast next time, you will be able to do other jobs faster as the tools/processes become more familiar.
Yep, the rear should be faster than the front... although as soon as you plan for this something else will set you back so take your time and have fun getting your hands dirty. Keep to it
Yep, the rear should be faster than the front... although as soon as you plan for this something else will set you back so take your time and have fun getting your hands dirty. Keep to it
Totally having fun with it though, should have mentioned that also... Didn't mean to sound like I had sand in the ******...
Thread Starter
Banned
Back Marker
Joined: Jan 2011
Posts: 156
Alright guys, the front end came in, albeit short a few parts (i.e. hardware) and horribly handled by ups (i.e. holes in the box and box literally falling apart, filing claim with ups, process started: / ) but all in all I feel like I got a decent deal on the parts. Included was the forks, triples, bearings, calipers, rotors, front wheel and front axle. The parts that came with it that I'll be selling are as follows, 954rr speedo/tach, 954rr rear caliper, rear master cylinder, gas cap with key and trunk and ignition set....
So, here's what I have for a list on the front end of parts I still need. If you see something that's missing, please let a brother know!
Clip ons
Levers
Bar ends
1/6th oor 1/4 turn kit (comes with throttle tube?)
D3 grips
Hardware kit to mount rotors and calipers
Probably new rotors (sell oem's)
ebc brake pads
steering damper
front tire to match new rear on bike....
frame sliders, swing arm spools, fork spools...
I'm sure I'm missing a few things here and there. At this point the goal is just to have the bike running in 1.5 months time....
Thread Starter
Banned
Back Marker
Joined: Jan 2011
Posts: 156
Hey guys, this week was both good and bad, though the bad could have been MUCH MUCH worse. I dropped and retreived a 10mm socket down the front cylinder head, lucky for me it was resting on the left side of the cam chain and I was able to get it with a magnet. Next, I read the torque specs wrong (in neuton meters rather than ft lbs) and over torqued the bolt on the front of the cam chain guide, then proceeded to back out my first broken bolt with a ball peen and tiny pick....
On the plus side, I finally got the front APE in and I did it right! No chain skipping or anything. So I guess a $.10 bolt being over torqued isn't that horrible! Kudos to my teacher for making me take the valve cover off a second time to re-torque the 3 cam chain guide bolts, it's the only reason I found the broken head. Wouldn't have been good for me motor had I missed a sheered off bolt head in my top end... The back should go much more quickly now that I have an idea of what it takes and am more familiar with the vaccum lines and getting that front valve cover on and off... Hope to order my carb parts this week, and have it back running a week from wed. Then on to the fork swap!
On the plus side, I finally got the front APE in and I did it right! No chain skipping or anything. So I guess a $.10 bolt being over torqued isn't that horrible! Kudos to my teacher for making me take the valve cover off a second time to re-torque the 3 cam chain guide bolts, it's the only reason I found the broken head. Wouldn't have been good for me motor had I missed a sheered off bolt head in my top end... The back should go much more quickly now that I have an idea of what it takes and am more familiar with the vaccum lines and getting that front valve cover on and off... Hope to order my carb parts this week, and have it back running a week from wed. Then on to the fork swap!

Out of my mind, back in 5
MotoGP
Joined: Nov 2006
Posts: 6,109
From: Skurup, Sweden
Well... One thing I hope you learned from that... Read torque spec... Think... Re-read and think again... Re-read and think a third time...
If the first reply of three is different and the other two are the same, pick up a tool... If not, bonk head on wall and repeat until you either need to sit down or you get correct answers...
Only after that you pick up a tool and crank down on it... Some bolts aren't easy to get out, and some will damage other stuff before breaking...
Senior Member
MotoGP
Joined: Aug 2006
Posts: 2,934
From: altoona, pa
 busted!
Out of my mind, back in 5
MotoGP
Joined: Nov 2006
Posts: 6,109
From: Skurup, Sweden
Yeah, I was a bit overactive...
 Just a little mind you, my brother managed to up the score by quite literaly jumping of a 4 story building with a homemade parachute, re-wiring the house powergrid at the age of three (Yes, there were sparks...
") ) and more... And he lived to tell the tale...
) and more... And he lived to tell the tale... So for every succesful try there was at least one failure, or aborted attempt in the beginning... Now, with age and wisdom (Yeah, as if!) I'm down to one failure/abort in three, or there about...
Also, I have been taking apart stuff since 1979, so subsequently I have needed to put some of them back together...
Senior Member
MotoGP
Joined: Jul 2010
Posts: 3,871
From: Phoenix, AZ
Those Nm and ft/lbs are tricky! Been there... never again... (I hope!)
Senior Member
MotoGP
Joined: Aug 2006
Posts: 2,934
From: altoona, pa
Well... Considering that my OCMD is the direct result of my overactive brain and what at least my parents at early age feared was ADHD it might not be too strange...
Yeah, I was a bit overactive... Just a little mind you, my brother managed to up the score by quite literaly jumping of a 4 story building with a homemade parachute, re-wiring the house powergrid at the age of three (Yes, there were sparks... ) and more... And he lived to tell the tale...
So for every succesful try there was at least one failure, or aborted attempt in the beginning... Now, with age and wisdom (Yeah, as if!) I'm down to one failure/abort in three, or there about...
Also, I have been taking apart stuff since 1979, so subsequently I have needed to put some of them back together...
Yeah, I was a bit overactive...
Just a little mind you, my brother managed to up the score by quite literaly jumping of a 4 story building with a homemade parachute, re-wiring the house powergrid at the age of three (Yes, there were sparks... ) and more... And he lived to tell the tale... So for every succesful try there was at least one failure, or aborted attempt in the beginning... Now, with age and wisdom (Yeah, as if!) I'm down to one failure/abort in three, or there about...
Also, I have been taking apart stuff since 1979, so subsequently I have needed to put some of them back together...
Well anyway, whatever happens, you can always blame it on good genes, how bout it!
broken bolts: if you ever break one off in a difficult to access location and spend two days getting it out, you remember that PIA every time you put a wrench on a bolt that doesn't look and act like it should.
Thread Starter
Banned
Back Marker
Joined: Jan 2011
Posts: 156
Hey guys, I ran into somewhat of a problem last night doing the rear CCT conversion. I think the guy that wrote up the tutorial on the cct changing actually got something pretty major wrong. He said in the write up that FT is TDC for the Front cylinder and that RT was TDC for the Rear, however, he did his rear first using the RT at TDC and subsequently had that picture of a maladjusted chain to post. I did my front first and the FT mark was TDC for that cylinder, however, I ran into the same thing he did when I lined up RT for TDC on the Rear cylinder. My teacher advised that we try to rotate the crank since I explained it only jumped a sprocket or two, however that didn't work! Now I've got a maladjusted chain without any tension on it. My question is this, how do I get the rear cylinder back to tdc and then what's the procedure for getting the chain and cams realigned so that the bike fires up properly timed when I put it back together?
I have class again on Sat and I've ordered about $600 worth of the $`1800 worth of parts remaining for this stage of my build. That'll put all new fluids in the bike, complete the fork sawp (with severely upgraded vs oem 954rr braking system), carb rebuild, street fighter conversion, cct swap out, chain and sprocket replacement... The parts I ordered will allow me to get the bike running again (finish CCT's and carb rebuild/install) and also put my new front end together (I got all new seals, bearings, dust seals for forks and wheel, caliper bolts, rotor bolts, galfer lines and pads, wave rotors, ect ect....) The next parts order will allow me to button up the front end, i.e. clipons, grips, ect... and the final order will allow me to finish the street figher conversion. I'm about a week behind at this point and to finish on time, will need to be done with the CCT's this Sat and hopefully into rebuilding the carbs too, if there's time. Basically, I need help with realigning my chain and cam sprockets, other than that the cct's are almost done, just need to put everything back together before starting the carb rebuild... Give ol Super BLink another hand with this cam chain guys!
Thanks again for all the help, I'll respond to the other comments a bit later, I've gotta run into class now! Thanks again!
Blink
Senior Member
MotoGP
Joined: Aug 2006
Posts: 2,934
From: altoona, pa
well, did you put a rod in the plug hole so that you can tell if you are at TDC accord. to piston position?
You need to watch the piston come up to the correct tdc and the cams will be either facing out (front) or facing in (rear, as in pic on the thread below). At this point, the markings on the CamChain sprockets need to be level with the edge of the head, that is, rear sprocket RE mark(Exhaust) pointed toward rear, forward sprocket RImark(Intake) facing forward. When the cam lobes are pointing out and the sprocket marks are facing opposite toward the outside, the timing is correct for that the rear cylinder.
https://www.superhawkforum.com/forum...+valves&page=7
Last edited by nath981; Mar 10, 2011 at 07:13 PM.
Senior Member
MotoGP
Joined: Jul 2010
Posts: 3,871
From: Phoenix, AZ
Hey guys, I ran into somewhat of a problem last night doing the rear CCT conversion. I think the guy that wrote up the tutorial on the cct changing actually got something pretty major wrong. He said in the write up that FT is TDC for the Front cylinder and that RT was TDC for the Rear, however, he did his rear first using the RT at TDC and subsequently had that picture of a maladjusted chain to post. I did my front first and the FT mark was TDC for that cylinder, however, I ran into the same thing he did when I lined up RT for TDC on the Rear cylinder. My teacher advised that we try to rotate the crank since I explained it only jumped a sprocket or two, however that didn't work! Now I've got a maladjusted chain without any tension on it. My question is this, how do I get the rear cylinder back to tdc and then what's the procedure for getting the chain and cams realigned so that the bike fires up properly timed when I put it back together?
I have class again on Sat and I've ordered about $600 worth of the $`1800 worth of parts remaining for this stage of my build. That'll put all new fluids in the bike, complete the fork sawp (with severely upgraded vs oem 954rr braking system), carb rebuild, street fighter conversion, cct swap out, chain and sprocket replacement... The parts I ordered will allow me to get the bike running again (finish CCT's and carb rebuild/install) and also put my new front end together (I got all new seals, bearings, dust seals for forks and wheel, caliper bolts, rotor bolts, galfer lines and pads, wave rotors, ect ect....) The next parts order will allow me to button up the front end, i.e. clipons, grips, ect... and the final order will allow me to finish the street figher conversion. I'm about a week behind at this point and to finish on time, will need to be done with the CCT's this Sat and hopefully into rebuilding the carbs too, if there's time. Basically, I need help with realigning my chain and cam sprockets, other than that the cct's are almost done, just need to put everything back together before starting the carb rebuild... Give ol Super BLink another hand with this cam chain guys!
Thanks again for all the help, I'll respond to the other comments a bit later, I've gotta run into class now! Thanks again!
Blink
I have class again on Sat and I've ordered about $600 worth of the $`1800 worth of parts remaining for this stage of my build. That'll put all new fluids in the bike, complete the fork sawp (with severely upgraded vs oem 954rr braking system), carb rebuild, street fighter conversion, cct swap out, chain and sprocket replacement... The parts I ordered will allow me to get the bike running again (finish CCT's and carb rebuild/install) and also put my new front end together (I got all new seals, bearings, dust seals for forks and wheel, caliper bolts, rotor bolts, galfer lines and pads, wave rotors, ect ect....) The next parts order will allow me to button up the front end, i.e. clipons, grips, ect... and the final order will allow me to finish the street figher conversion. I'm about a week behind at this point and to finish on time, will need to be done with the CCT's this Sat and hopefully into rebuilding the carbs too, if there's time. Basically, I need help with realigning my chain and cam sprockets, other than that the cct's are almost done, just need to put everything back together before starting the carb rebuild... Give ol Super BLink another hand with this cam chain guys!
Thanks again for all the help, I'll respond to the other comments a bit later, I've gotta run into class now! Thanks again!
Blink
It's not super hard to re-set the timing chain. With the chain guide taken off of the top and the CCT removed, you have enough slack to move the chain around on the sprockets. Set your alignment dead on the RT mark again, and then alight the two sprockets like they picture in the manual (I forget exactly what marks go where) but basically I took a straight edge and put it on top of the engine case so that I could get the marks on the sprockets straight.
Then pull the chain so it's tight on the side that's OPPOSITE the CCT. and put it over the sprockets. Now your timing is set. If the timing is off, the marks are noticeably not lined up with the top of the engine case and you can try again, but really it should happen on the first try. Then snug that CCT up so that there's a quarter inch play in between the two sprockets and put the guide on top.
Sorry for the lack of detail, but lining TDC up is a bit weird at first..
BTW this whole procedure is in the manual under the valve adjustment section as you have to remove the sprockets and the re-set the timing. It's a bit confusing in there, but there are pictures to follow along...
Thread Starter
Banned
Back Marker
Joined: Jan 2011
Posts: 156
Right on guys, it seems I was one rotation off, the re and ri marks on the sprockets were lined up but they were lined up on the inside of the head, not facing outward like I had them on the front cylinder.... That makes a whole lot of sense actually, since I just rotated the crank backwards a half turn to the rt mark rather than coming forward a whole rotation to the rt mark which would have put the re and ri marks to the required outside edge of the head...
Right on, I knew it was a fixable thing and wasnt horribly complicated to fix, that said, you all are an invaluable resource, Moore buddy, you especially mang! Starting to get really excited about the first major part of the build being complete in about a month and a half, I'm sure without you all, it wouldn't be getting done!
Right on, I knew it was a fixable thing and wasnt horribly complicated to fix, that said, you all are an invaluable resource, Moore buddy, you especially mang! Starting to get really excited about the first major part of the build being complete in about a month and a half, I'm sure without you all, it wouldn't be getting done!
Thread Starter
Banned
Back Marker
Joined: Jan 2011
Posts: 156
Alright guys, didn't make it to class today as my check was delayed and therefore I couldn't pick my parts up until this after, after my class was over.... Anyhow, got a box full of goodies to play with so I'll keep you up to date as things go along...
I have to start thinking now about the clipons that I'll be using and need some input in this area from you guys... Specifically, anyone running 954 fork please chime in here... As I understand it at this point the forks are a little shorter than the VTR forks? Whether they are or aren't shorter I'm starting to think a little about dropping the front end a bit for improved handling... Any thoughts on this? How much to drop it, do I drop it at all? If i do drop it, do I mount the cipons on top or below the upper triple? Will it turn in more quickly if i drop it? If I drop the front and eventually put one of Jaimies F4i rear shocks on it with 6mm of rise built into it, and I have the front dropped is that too dramatic of a geometry change? As always guys, thanks for all the help!
I have to start thinking now about the clipons that I'll be using and need some input in this area from you guys... Specifically, anyone running 954 fork please chime in here... As I understand it at this point the forks are a little shorter than the VTR forks? Whether they are or aren't shorter I'm starting to think a little about dropping the front end a bit for improved handling... Any thoughts on this? How much to drop it, do I drop it at all? If i do drop it, do I mount the cipons on top or below the upper triple? Will it turn in more quickly if i drop it? If I drop the front and eventually put one of Jaimies F4i rear shocks on it with 6mm of rise built into it, and I have the front dropped is that too dramatic of a geometry change? As always guys, thanks for all the help!

Senior Member
MotoGP
Joined: Mar 2007
Posts: 3,132
From: Phoenix, AZ
If you drop the front enough to put the clipons above the triple you will be dropping it quite a lot. Mine have about 11mm showing above the triple and with that are at about stock. If I recall correctly, the clipons need about 30mm to grip so you'd be dropping it 20mm (2cm, or almost a full inch) past stock.. I am not sure how much you can drop the front before it gets to be too much.
I know dropping the front without raising the back makes it really easy to drag the pipes though, as they are already pretty easy to drag.
I know dropping the front without raising the back makes it really easy to drag the pipes though, as they are already pretty easy to drag.
Thread Starter
Banned
Back Marker
Joined: Jan 2011
Posts: 156
Thanks man... I'm a bit concerned that if i get clipon's with no rise in them and end up having to mount them below the triple that the riding position will become almost unmanageable, but I'm coming up short on options with this one situation of the build... Guess I'll just have to play around with it until I get it to where I'm comfortable and the bike handles beautifully...
Senior Member
MotoGP
Joined: Aug 2006
Posts: 2,934
From: altoona, pa
Thanks man... I'm a bit concerned that if i get clipon's with no rise in them and end up having to mount them below the triple that the riding position will become almost unmanageable, but I'm coming up short on options with this one situation of the build... Guess I'll just have to play around with it until I get it to where I'm comfortable and the bike handles beautifully...


