
Latest OCMD project: modded airbox lid


Rex Kramer-Thrill Seeker
SuperBike
Joined: Jan 2011
Posts: 2,312
From: Brookfield, WI

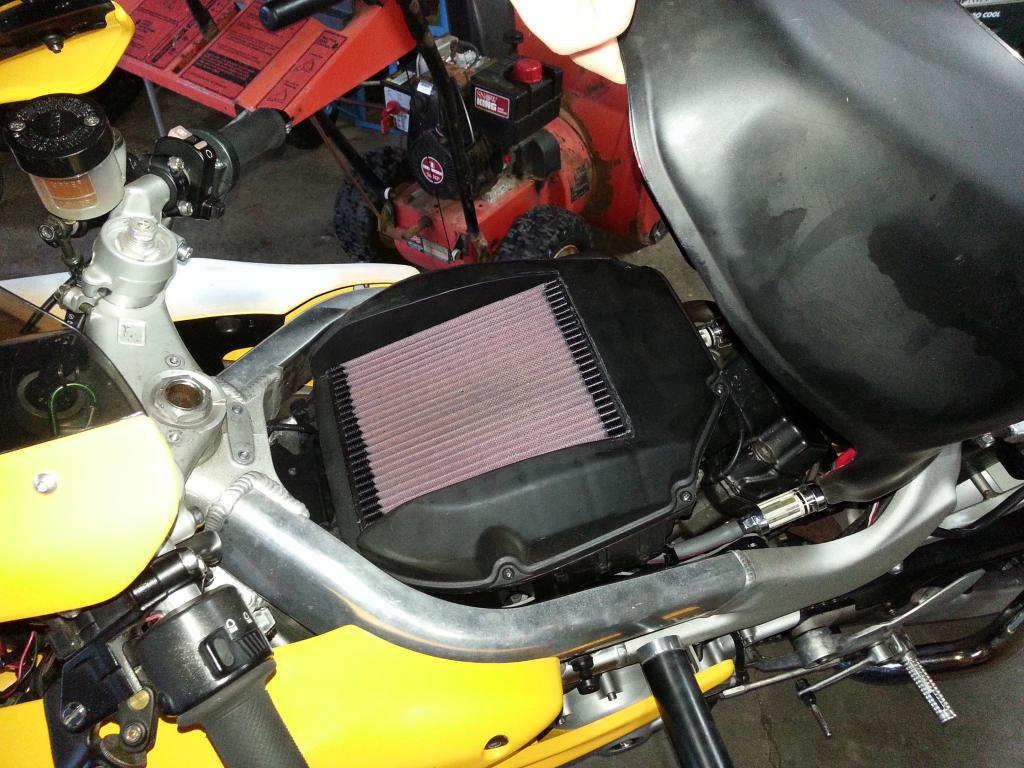
I just realized that I never posted up the finished lid. Here's my F.I.L. mod with it all painted (mostly. I missed a spot) and ready to install. As I'm writing this, my mailman, er...maillady, just came to the door witht a delivery. I got my junction box for my Veypor gauage! Anyways, here's what it looks like:
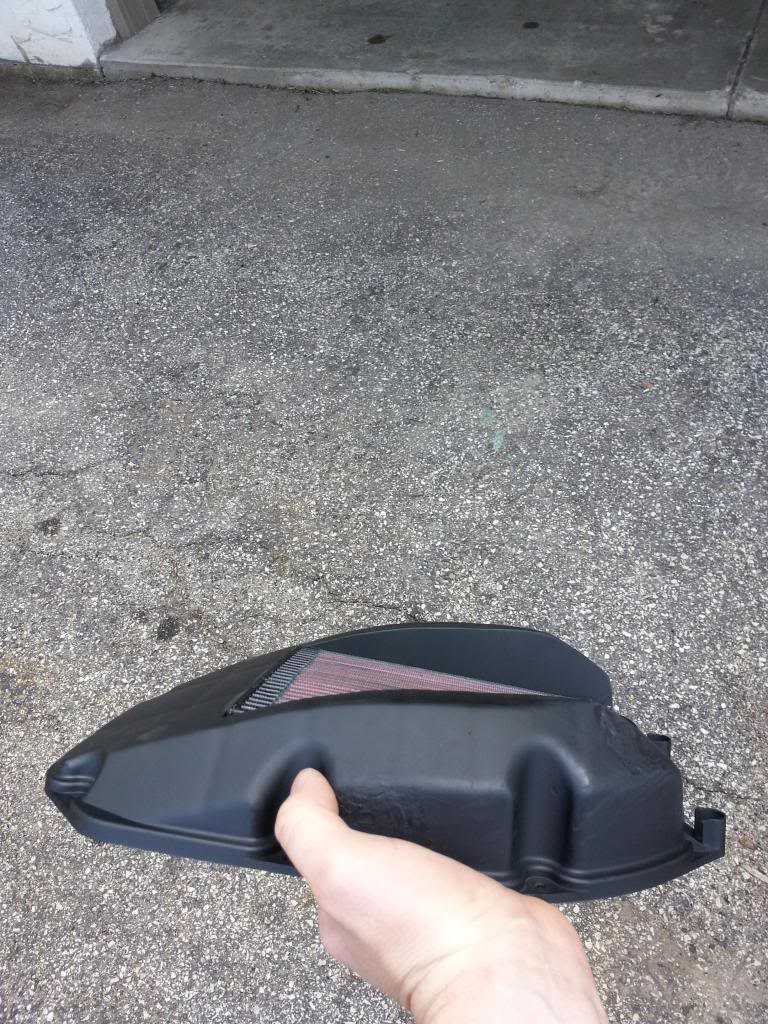
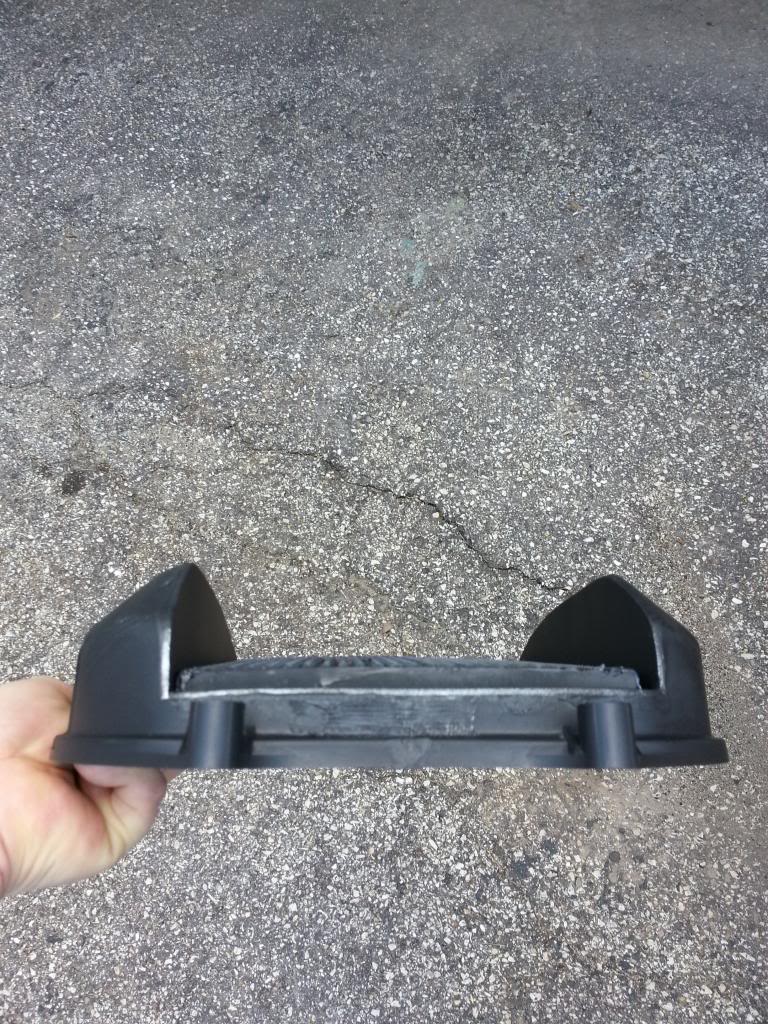
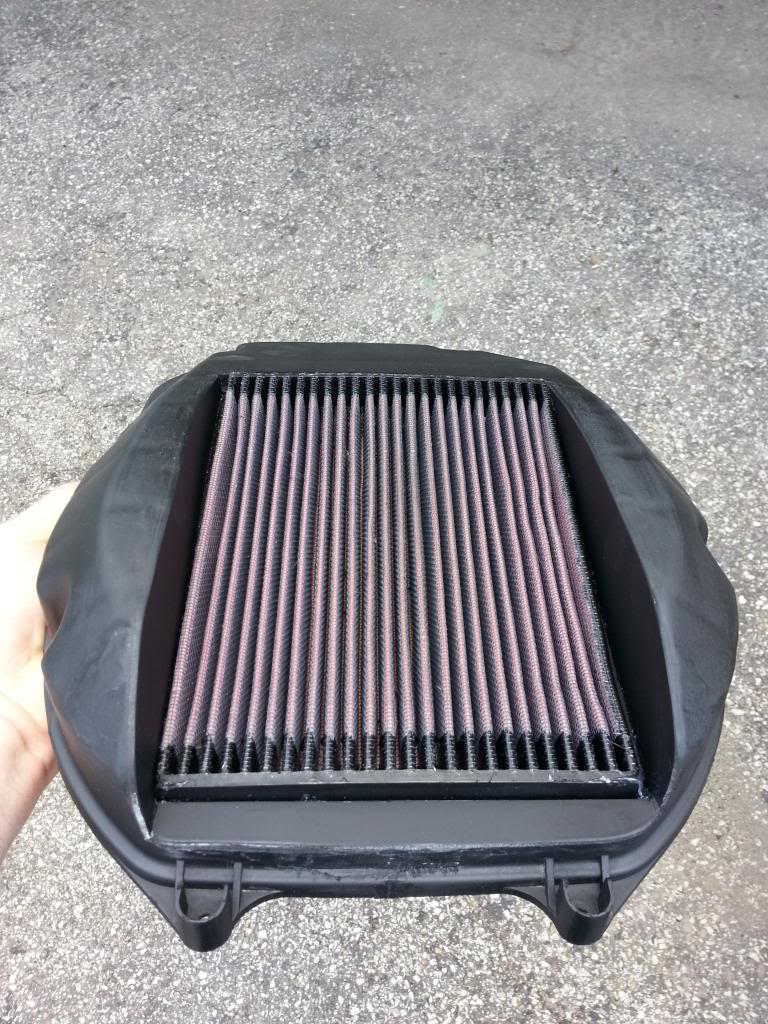
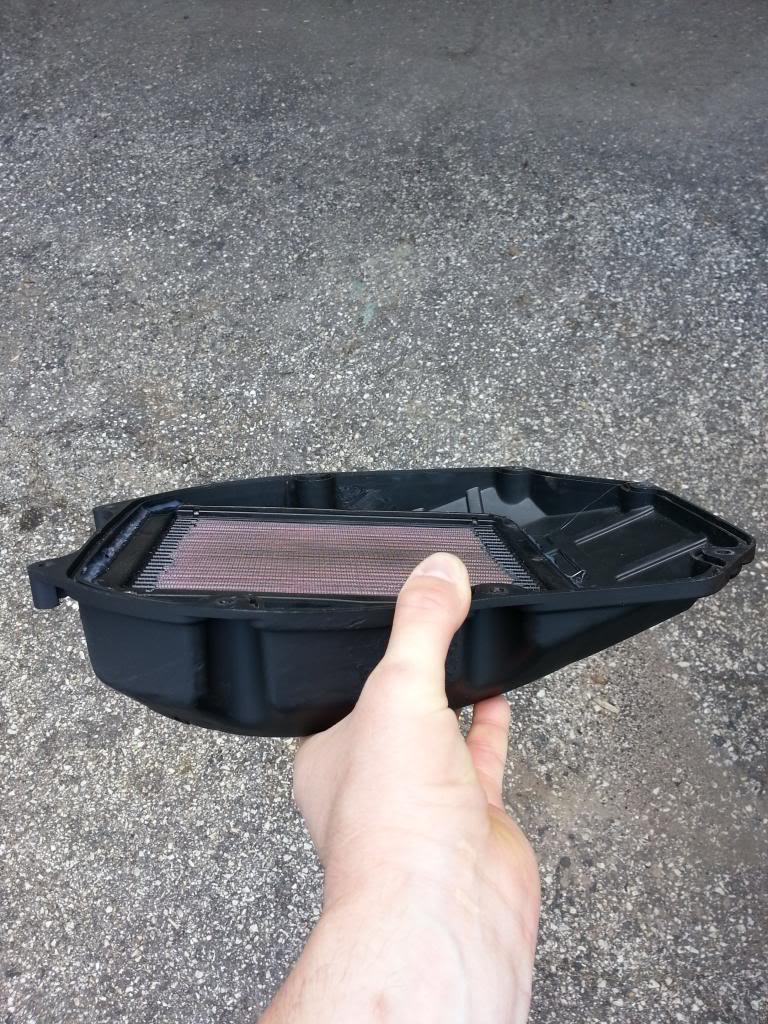
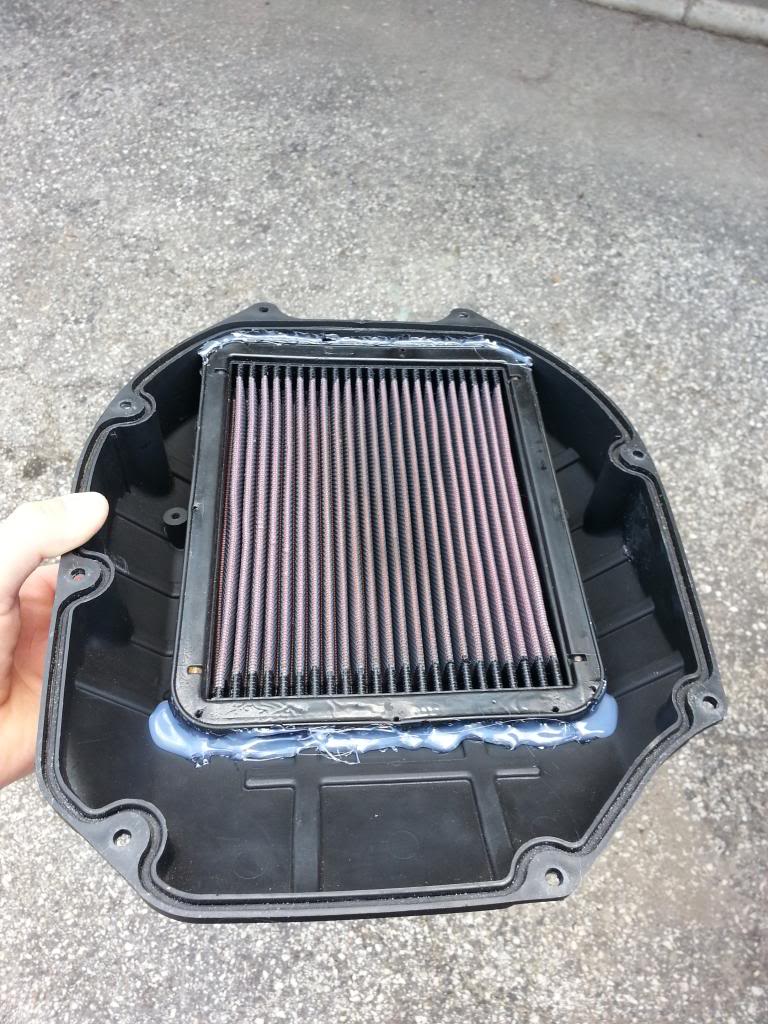
NZspokes, if you are curious what was involved to make this, there is a lot of plastic welding (or plastic epoxy. Whatever you're comfortable with), high strength hot glue, and RTV sealant.
NZspokes, if you are curious what was involved to make this, there is a lot of plastic welding (or plastic epoxy. Whatever you're comfortable with), high strength hot glue, and RTV sealant.

Senior Member
SuperSport
Joined: Apr 2014
Posts: 932
From: Auckland, new Zealand
On a side note, do you guys run the airbox seals? All the photos ive seen of airboxes they are not there.
Rex Kramer-Thrill Seeker
SuperBike
Joined: Jan 2011
Posts: 2,312
From: Brookfield, WI
Wow thats nicely done. Have you ridden with it yet? That is pretty much what Im thinking of doing apart from my filter element is much smaller being the Superhawk one.
On a side note, do you guys run the airbox seals? All the photos ive seen of airboxes they are not there.
On a side note, do you guys run the airbox seals? All the photos ive seen of airboxes they are not there.
Here's something you can try if you are positive you don't have a airbox seal and you don't want to buy an OEM one.
-Clean the groove of the lower airbox.
-Lay a small bead of RTV sealant inside the lower airbox groove.
-Place some Glad Cling Wrap over the entire lower airbox
-Place the lid gently on top of the airbox (don't push it home) and leave it
-Let the RTV dry
-Lift the lid off and pull up the Glad Cling Wrap
You now have a new seal that looks like factory.
If you want to skip a bunch of steps, and you are good at applying RTV, you can just put a small bead inside the lower groove and let that dry. It won't look like factory, but it will still seal pretty good. So, you got options
As for the F.I.L. mod, I have not ridden with it as of yet. mikstr has and he has had great results!
I'm doing a bunch of testing on another thread, which requires the stock airbox. So, once all that testing stuff is done, then I will put my new lid on with a gutted airbox and set the carbs accordingly. Should result in better performance
Senior Member
SuperSport
Joined: Apr 2014
Posts: 932
From: Auckland, new Zealand
Airbox seal? Of course! They are very hard to see in pictures, since they are set inside that groove of the lower half of the airbox. Plus the seal is black in color, so that makes it harder to spot.
Here's something you can try if you are positive you don't have a airbox seal and you don't want to buy an OEM one.
-Clean the groove of the lower airbox.
-Lay a small bead of RTV sealant inside the lower airbox groove.
-Place some Glad Cling Wrap over the entire lower airbox
-Place the lid gently on top of the airbox (don't push it home) and leave it
-Let the RTV dry
-Lift the lid off and pull up the Glad Cling Wrap
You now have a new seal that looks like factory.
If you want to skip a bunch of steps, and you are good at applying RTV, you can just put a small bead inside the lower groove and let that dry. It won't look like factory, but it will still seal pretty good. So, you got options
As for the F.I.L. mod, I have not ridden with it as of yet. mikstr has and he has had great results!
I'm doing a bunch of testing on another thread, which requires the stock airbox. So, once all that testing stuff is done, then I will put my new lid on with a gutted airbox and set the carbs accordingly. Should result in better performance

They were really hard to fit and the tank wouldnt go down as normal.
Guess I just created the dual seal airbox mod. Im gunna run with it.
Mainly as I dont have time to reverse it.

Rex Kramer-Thrill Seeker
SuperBike
Joined: Jan 2011
Posts: 2,312
From: Brookfield, WI
Still haven't installed mine. I haven't finished using the stock airbox with the X-Wing testing yet. It's going to be another month or so before I start playing with mine and tuning the carbs to it.
Have you made yours yet?
Have you made yours yet?
Senior Member
SuperSport
Joined: Apr 2014
Posts: 932
From: Auckland, new Zealand
Im planning a long time in advance.

Thread Starter
Senior Member
MotoGP
Joined: Apr 2005
Posts: 5,631
From: Montreal
Well, I finally got my jetting sorted (arrived at after about a dozen incremental changes). I am currently running the "Gen II" (the one with the rectangular filter element directly over the stacks). My final settings are the following:
pilots: 40 (not a misprint.... yes, 40s; tried 48s, 45s, 42s along the way...)
fuel screws: F - 5/8 out, R - 7/8 out
needles: HRC rich, 3rd clip, shims: F - 0.003", R- 0.010"
mains (DJ): 170 F, 175 R
springs: DJ
It now (finally!!!!!!) runs clean across the board (clean from 2000 rpm) with no flatspots whatsoever. Power and response are most impressive, very linear and immediate. Before anyone asks, no dyno testing has been done, likely none for the foreseeable future. However, having spent over 200,000 kms on the bike (and a lot of time tuning it through numerous iterations), I have a pretty good idea of how it runs, and it has never run as well as it does now. It runs much better (stronger, more responsive) than when it dynoed 122hp and 77 lb-ft...... Fuel mileage is pretty good too (was at 5.1L/100 km last time I checked)
FWIW, in switching back and forth between the Gen I (with large triangular Z1000 filter at front) and the Gen II, the Gen I needs leaner fuel screw settings. I should note too that I am running the high-level link pipes on my Akra full system (this, too, requires leaner fuel screws than the low/std mount link pipes). The engine seems to pull stronger at low and mids with high pipes (right smack where I ride most of the time). I may get around to giving the Gen I another try, but having taken the carbs apart many, many times since the spring, I now just want to ride and enjoy it for a while.
cheers

Rex Kramer-Thrill Seeker
SuperBike
Joined: Jan 2011
Posts: 2,312
From: Brookfield, WI
Micky, just saw this. That is awesome you spent the time to get it dialed in. I am very suprised to see such small pilots.
I already have DJ springs installed, (DJ) 170F 175R mains and 50 pilots. I just need different pilots and some tweaking with the fuel screws to try and get my setup to work.
Thank you for doing the leg work for those that want to follow. I know every bike is different (especially yours with the mods in your signature), but at least we have something to get us in the ballpark.
Thread Starter
Senior Member
MotoGP
Joined: Apr 2005
Posts: 5,631
From: Montreal
After settling on the settings listed above with the "Gen II" lid, I noticed a slight tendency to burble at 7-8K when winding it out... so I decided that may be a golden opportunity to give the original Gen I a try. Lo and behold, I leaned out the fuel screws slightly, backed off the Flo-Commander screw an extra half-turn and it runs puuuuuuuuuuuurfect (everywhere). I never dreamed it would run so well from just this mod. Going through the many jetting changes to get here were somewhat of a pain, but I learned along the way (have a better practical understanding of the effects of the various fueling circuits, and better at doing diagnosis work when it's not right) and am a better tuner now as a result.
The greatest satisfaction (apart from the thrill of acceleration every time I twist the throttle) is the reward of success
The greatest satisfaction (apart from the thrill of acceleration every time I twist the throttle) is the reward of success

European Member
Back Marker
Joined: Mar 2013
Posts: 194
From: Netherlands
I still cant wrap my head around 40 pilot jets
as said before, all the mods your running like higher compression etc. etc.
arent you worried your running to lean ? and comprising your longevity ?
i dont now how your plugs look like.....
as said before, all the mods your running like higher compression etc. etc.
arent you worried your running to lean ? and comprising your longevity ?
i dont now how your plugs look like.....
Thread Starter
Senior Member
MotoGP
Joined: Apr 2005
Posts: 5,631
From: Montreal
I used a very incremental approach to get to the 40 pilots (started with 48s!!!!!). It simply would not run correctly until I got to the 40s. My testing method for the pilots was to get it into 4th gear and roll on the gas at 3k rpm...... it bucked and farted all the way through the larger pilot sizes, and only now will it pick up revs cleanly with no hesitation or stutter. While I appreciate your concern (and have to admit I felt the same way initially), the seat of the pants is the ultimate judge. I have tried numerous mods and carb settings over the years (marriage of OCMD and over 200,000 km ridden on this particular VTR) and it has never run this well. Engine temps are spot-on, fuel consumption is too (5L/100km for normal highway riding). Exhaust pipe was sooty before, now is ok. I am somewhat stumped too.... but the signs are all there, and I suspect a dyno run (will happen at some point) will confirm that the jetting is right on the money...... (FWIW, I went through the same process last year when I modded a filter (raised the element) and a subsequent dyno run showed I was spot-on with my reading of the engine's behaviour, so I am quite confident this time around......) I am always on the lookout for subtle surging and hiccups (evidence of improper jetting, be it rich or lean) and there is nothing untoward going on at the moment...... it's all good (really, really good!)

Banned
MotoGP
Joined: Aug 2007
Posts: 5,942
From: Lake View Terrace, CA
The whole pilot jet quandary is actually quite simple in its answer.
It is due to running the HRC "rich" needles which fatten up the mid-range.
This affects the pilot circuit, causing it to run richer also.
So if you are trying this set up with stock needles or any of the other aftermarket needles (as the HRC bits are completely different than the other needles available) I would doubt that you would need to go as lean on the pilot circuit.
With that good job Micky and glad you got it all dialed in
Senior Member
SuperSport
Joined: Apr 2014
Posts: 932
From: Auckland, new Zealand
Mine will be with stock needles, will see where it takes me.

Senior Member
Superstock
Joined: May 2012
Posts: 397
From: UK
It is due to running the HRC "rich" needles which fatten up the mid-range.
This affects the pilot circuit, causing it to run richer also.
This affects the pilot circuit, causing it to run richer also.
What people have to remember is that no two bikes/setup's are the same and it is no good literally copying anyone elses exact settings. Yeh one can get a good base starting point, but at the end of the day there are no shortcuts and one has to understand how things work and interact with each other. I have no doubt that Mik's cam profile setup has an effect on this too.
(:-})
European Member
Back Marker
Joined: Mar 2013
Posts: 194
From: Netherlands
") more fuel consumption
more fuel consumptionand mikstr you must be very happy that its finally dialed in
cant imagine how many times you changed jets, even with power tools
its a pain
Rex Kramer-Thrill Seeker
SuperBike
Joined: Jan 2011
Posts: 2,312
From: Brookfield, WI
I just threw on my lid for the heck of it.
I changed the setup to 50 pilots
Dyno Jet mains
180F
185R
Factory Pro needles set in the middle.
Playing with the fuel screws, I started at 1.75 turns each. I ended up at 3 turns out front 3.25 turns out in the rear. The more I turned out the fuel screws the better it got. I wanted to turn them out more, but just didn't want to unscrew them any further. How far can you turn them out? How many turns is too much?
Now, with this new setup, my steady cruising (at 3K-4K RPM's) is not smooth.
Tuning advice? Was thinking of raising the needles one position.
Last edited by CruxGNZ; Aug 24, 2014 at 09:23 AM.
Thread Starter
Senior Member
MotoGP
Joined: Apr 2005
Posts: 5,631
From: Montreal
sounds like pilots/fuel screws are ok then. Go up one clip position (full position (0.034" on my HRC needles anyhow) may be a bit much though, ideally, I would try shims first... like @ 0.018" and 0.025 in rear as a starting point)..... good luck... it'll be worth it when it's done, trust me
Rex Kramer-Thrill Seeker
SuperBike
Joined: Jan 2011
Posts: 2,312
From: Brookfield, WI
I have a GPR4 steering stabilizer on the bike, which doesn't allow me to raise the tank.
However....thinking about it... if I did want to raise the tank, I would need longer bolts for the front of the tank and make some spacers for underneath and taller spacers for the GPR4 to mount to. I think it might just be that simple. I'm off to Ace Hardware! Thanks for getting the gears turning!
Rex Kramer-Thrill Seeker
SuperBike
Joined: Jan 2011
Posts: 2,312
From: Brookfield, WI
After the Ace Hardware run, it was just that sumple to raise my tank. I need to cut the spacers to length, but it will work!
I've got 'er down to 35 minutes to pull the carbs and make whatever changes necessary and put 'em back on, ready to ride. Not pulling the tank off really helps shorten the procedure.
I wanted to take 'er for a spin with the needles richer, but it was like 97% humidity this evening and I was sweating my nards off. Hopefully, I'll get to check out the new changes tomorrow.
Rex Kramer-Thrill Seeker
SuperBike
Joined: Jan 2011
Posts: 2,312
From: Brookfield, WI
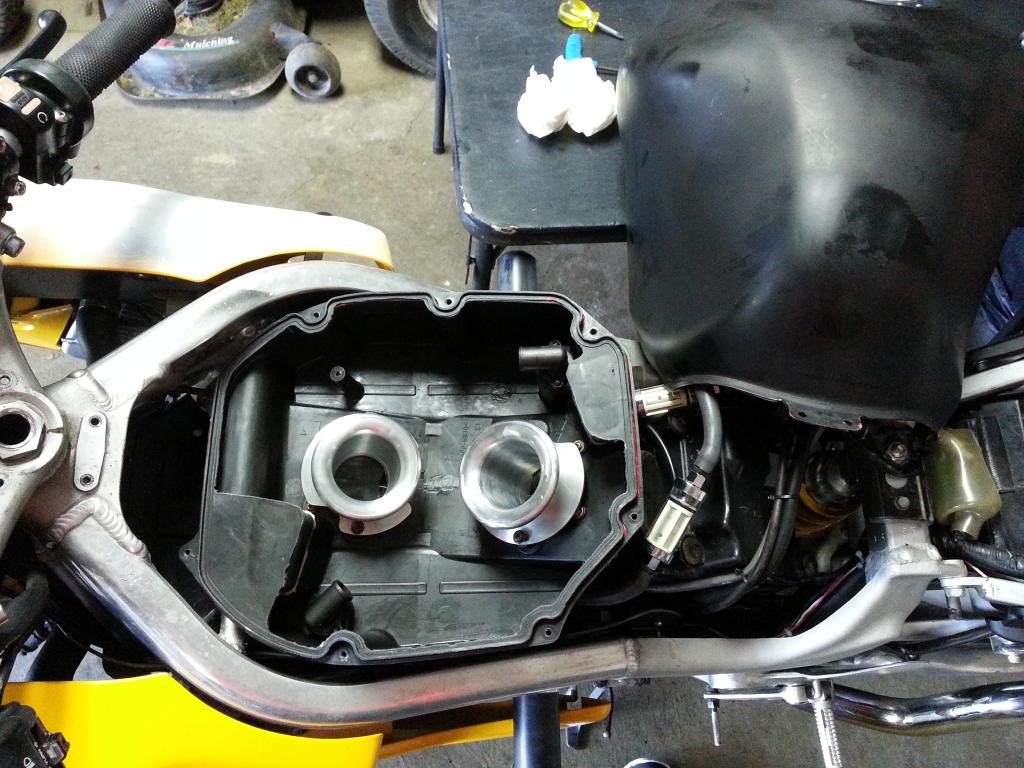
I removed it only from the airbox for now. I do have individual filters for each valve cover. Just need the time to install them.
I got a half hour today to take the bike out with the new carb settings I did last week. It's been killing me not knowing how the changes I made affected the bike!
Changes were, F.P. needles raised one position (they were set in the middle postition prior). At idle, the RPM's were +-200. While cruising, there was no surging and it was normal again. However, when I gave 'er full throttle at low & mid RPM's power was almost instant, BUT 6,500RPM's and up, the bike was sputtering, almost cutting out while still increasing the RPM's. I adjusted the fuel screws out to 3.5F & 3.75R. It got better, more crisp all around, but it was still sputtering a little, not as much, but a little at 6,500RPM's +
How far can I safely turn out the fuel screws?
I'm at 50 pilots now. I think I need larger pilots, correct?
From JetsRus, I have Keihin pilots from 40 up to 50. Never thought I would ever need anything larger than 50 pilots. At least they're cheap.
One thing I forgot to mention, with this large filter right over both velocity stacks, when I am at full throttle, the noise coming from under the tank is simply AWESOME! With the new Jardine's creating a symphony behind me and now this...I just love it man! Sounds and feels like a new bike. Now, if I can only find time to paint this ugly beast, the sound will match it's looks


