
Finally got the JE High Compression pistons put in


Thread Starter
Senior Member
SuperSport
Joined: Apr 2013
Posts: 834
From: Thousand Oaks, CA

Finally got the JE High Compression pistons put in
i got the STD bore JE 11.5:1 pistons on ebay a few months back. its been torture having them perched on my workbench begging me to put them in. it was a bit of a gamble getting the std bore's because i never measured my bores before i bought them. i lucked out and my bores were well within spec and really good shape overall. they were each slightly more out of round at the top where the bore is unsupported but still plenty within tolerance.
i was going to do a full engine rebuild. split the cases, all new bearings, seals, etc... but decided that with less than 30,000 miles on my engine, and everything operating really well, i didnt need to spend the money for a full rebuild right now.
so i went the "cheater" route. now i know everyone wont agree and im going to catch alot of flack for doing it this way, but its tried and true by many members here and often done in other engines. its similar to how i use to rebuild my dirt bikes. like i said i know people are going to loose their minds about not doing it completley "by the book" but in all reality i did it all exactly how the book says, just without disturbing all the bearings and possibly having to cut the engine out of the frame due to the front bolts very commonly seizing. ive got to give credit to tony.mon over on the VTR1000.org board for turning me onto this method. very knowledgeable guy on VTR engines.
Heres how it went basically:
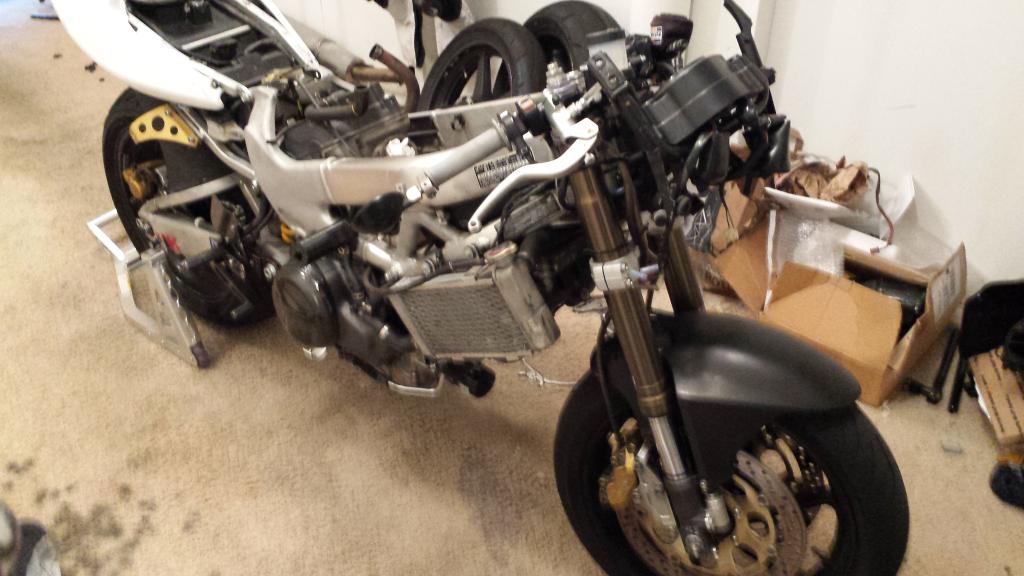
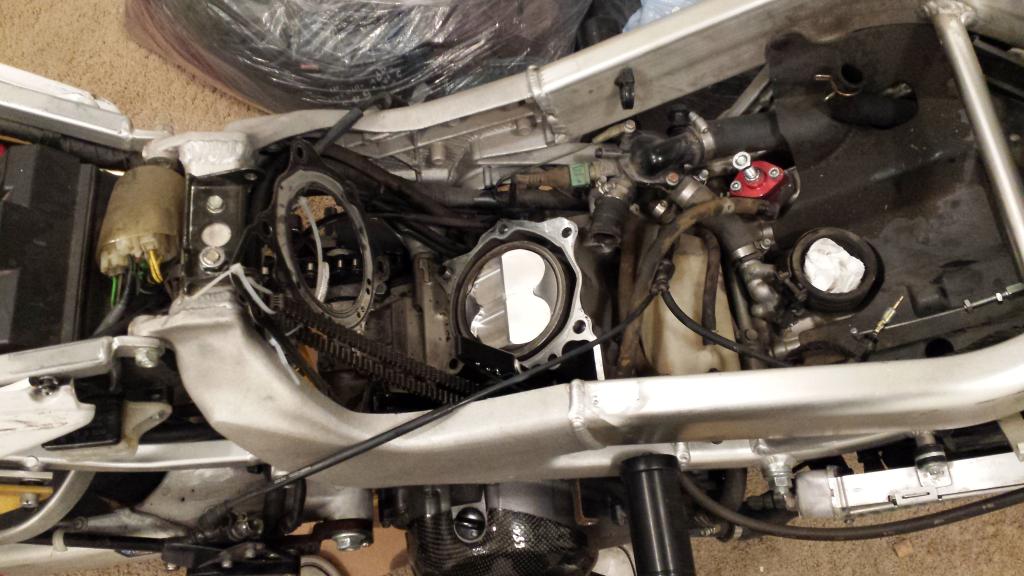
1. strip the fairings, tank, airbox, carbs, rads, oil cooler, and anything else that would get in the way of the job.
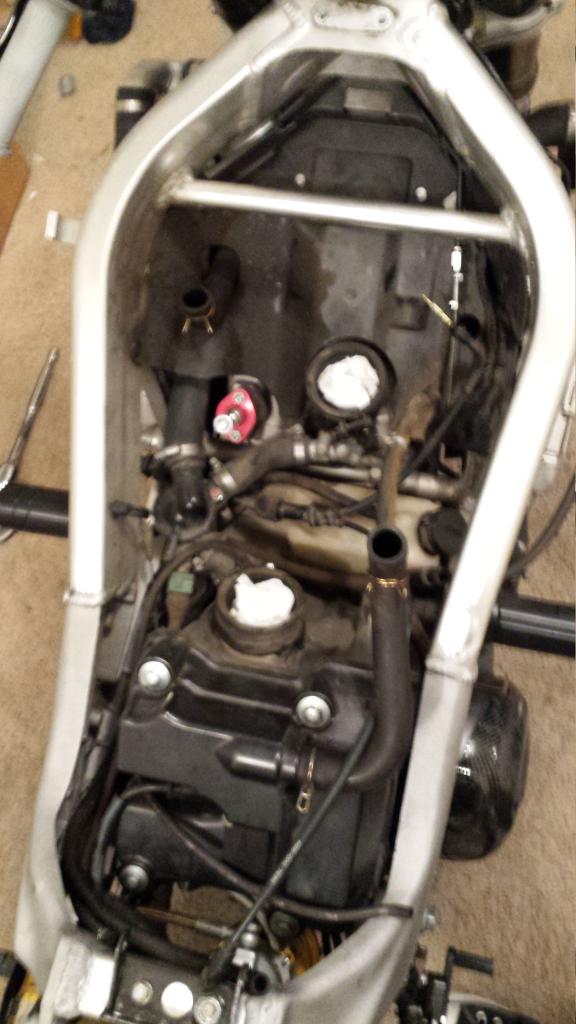
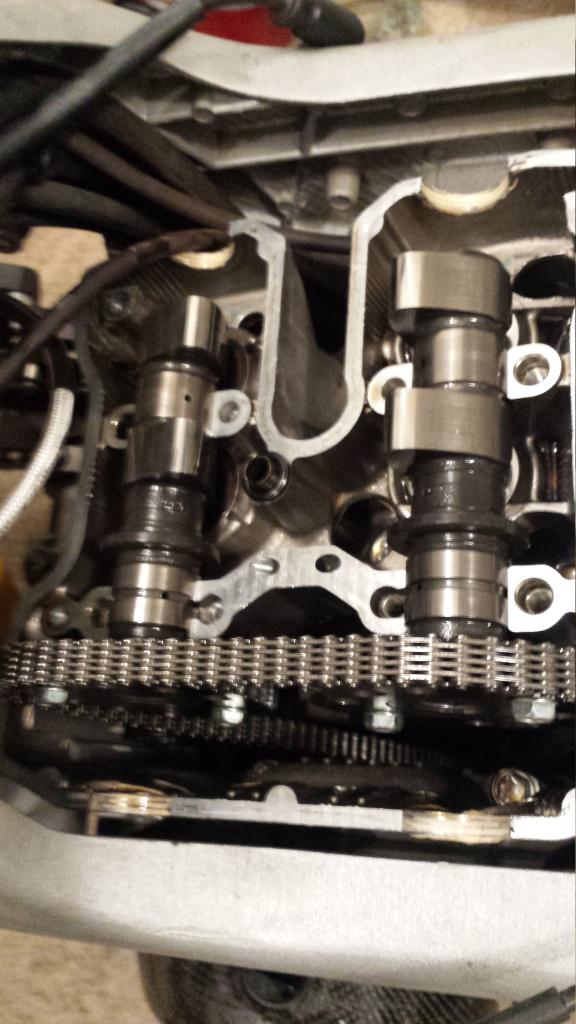
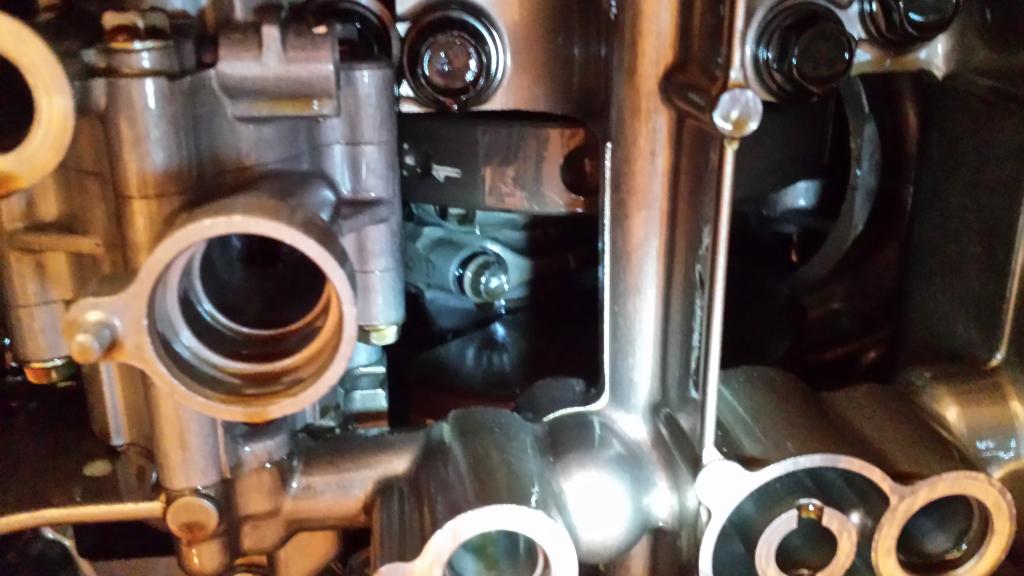
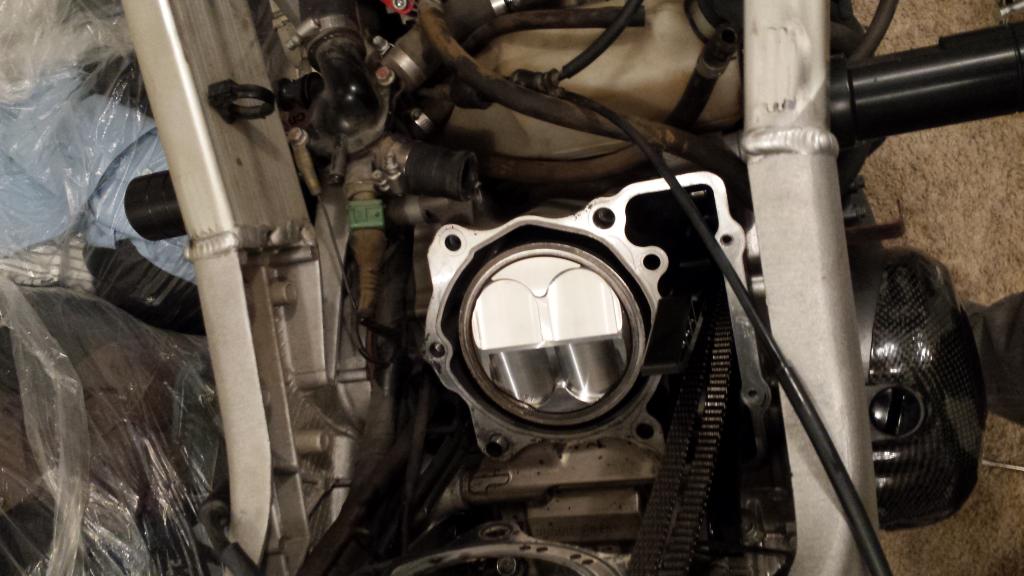
2.get rear cylinder to TDC and remove valve cover, cam shafts, and then all the cylinder head bolts.
3.remove oil pan and you have easy access to the connecting rod bolts for the rear cylinder. (you will need an elbow socket joint)
4. pop the piston and rod out the top
5.get front cylinder to TDC and remove valve cover, cam shafts, and then all the cylinder head bolts
6.undo the con rod bolts for the front cylinder (note: one of the bolts is pretty difficult to get to but it can be done with the right tools, it would be alot easier to remove the clutch and oil pump but i chose not to go the route and i was able to get it done)
7.pull the piston and con rod out of the top
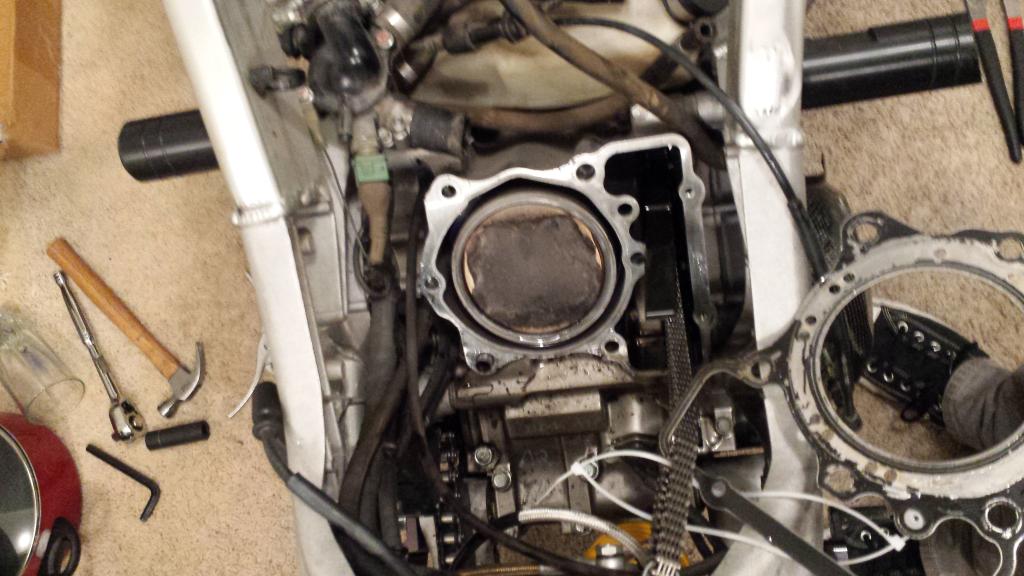
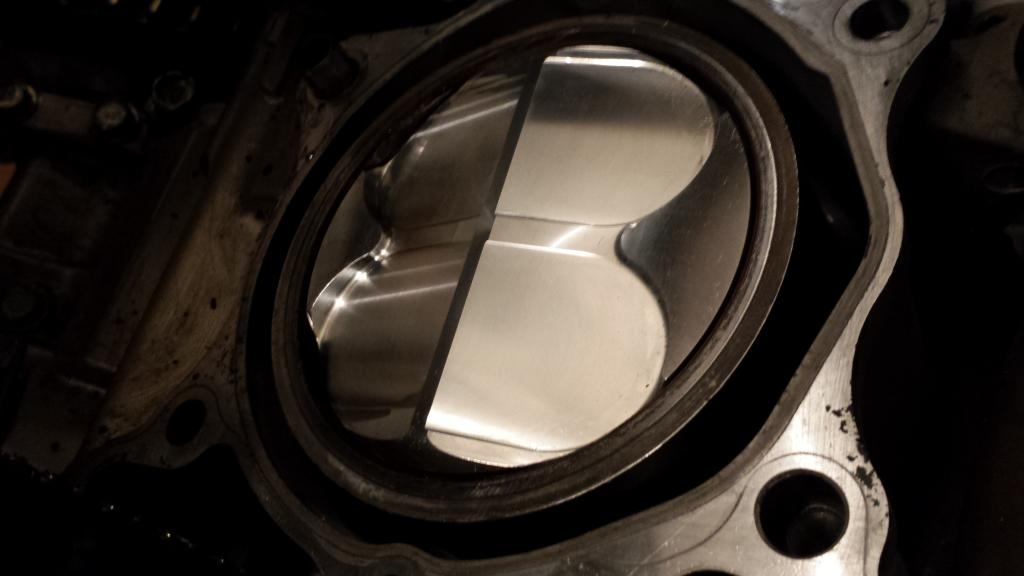
8.measure your bores and check tolerance, if all is well then lightly hone and wash really really REALLY well.
9.check the new piston ring gap in the newly honed bores and correct if need be.
10. put the front piston in and be sure to smear the gudgeon pin and its bore and small and big end bores of the con rod with 50/50 mix of moly grease and clean engine oil (note: it takes A LOT of patience to get one of the con rod bolts on and torqued if you dont remove the clutch and oil pump, i did it without removing them but i was very very carful not to strip and and get a good torque reading)
11.replace head gasket, and then front cylinder head and cams etc...
12. go back to rear cylinder TDC, and install rear piston making sure to measure ring gap as well as adding the moly oil.
13. replace rear head gasket and then the cylinder head, cams, etc...
14. replace the carbs, airbox, tank, rads, oil cooler, fairings, etc....
and your done!!
just took her out to "break her in" and she feels great. very smooth. much smoother than before. i was taking it easy and not getting above 6K RPM while making sure to load the engine both ways (accel and decel) to seat the rings properly. cant comment on HP yet as i was being just breaking it in but i will report more when i really get things going in 1-200 more miles after an oil and filter change. but so far im loving them!
i will say that the whole job was pretty pricey when you add in the pistons, gaskets, seals, bolts, special tools, etc...
i did it because im never going to sell the VTR and i knew i would want them eventually plus rumor has it that JE is going to stop producing VTR pistons pretty soon as they just arnt selling to many of them, so i wanted to get them before they are gone.
overall job was a good one! probably about 12-16 hours total of work. slow process but not one you can get sloppy with (although some will argue that my entire method was sloppy)
once its all broken in ill go have her dyno'd. ive read of people gainging about 7hp (cant remember the added torque they were getting) from only adding JE pistons. so we shall see once i get the bike to the dyno.
now i just need to balance the carbs.


i was going to do a full engine rebuild. split the cases, all new bearings, seals, etc... but decided that with less than 30,000 miles on my engine, and everything operating really well, i didnt need to spend the money for a full rebuild right now.
so i went the "cheater" route. now i know everyone wont agree and im going to catch alot of flack for doing it this way, but its tried and true by many members here and often done in other engines. its similar to how i use to rebuild my dirt bikes. like i said i know people are going to loose their minds about not doing it completley "by the book" but in all reality i did it all exactly how the book says, just without disturbing all the bearings and possibly having to cut the engine out of the frame due to the front bolts very commonly seizing. ive got to give credit to tony.mon over on the VTR1000.org board for turning me onto this method. very knowledgeable guy on VTR engines.
Heres how it went basically:
1. strip the fairings, tank, airbox, carbs, rads, oil cooler, and anything else that would get in the way of the job.
2.get rear cylinder to TDC and remove valve cover, cam shafts, and then all the cylinder head bolts.
3.remove oil pan and you have easy access to the connecting rod bolts for the rear cylinder. (you will need an elbow socket joint)
4. pop the piston and rod out the top
5.get front cylinder to TDC and remove valve cover, cam shafts, and then all the cylinder head bolts
6.undo the con rod bolts for the front cylinder (note: one of the bolts is pretty difficult to get to but it can be done with the right tools, it would be alot easier to remove the clutch and oil pump but i chose not to go the route and i was able to get it done)
7.pull the piston and con rod out of the top
8.measure your bores and check tolerance, if all is well then lightly hone and wash really really REALLY well.
9.check the new piston ring gap in the newly honed bores and correct if need be.
10. put the front piston in and be sure to smear the gudgeon pin and its bore and small and big end bores of the con rod with 50/50 mix of moly grease and clean engine oil (note: it takes A LOT of patience to get one of the con rod bolts on and torqued if you dont remove the clutch and oil pump, i did it without removing them but i was very very carful not to strip and and get a good torque reading)
11.replace head gasket, and then front cylinder head and cams etc...
12. go back to rear cylinder TDC, and install rear piston making sure to measure ring gap as well as adding the moly oil.
13. replace rear head gasket and then the cylinder head, cams, etc...
14. replace the carbs, airbox, tank, rads, oil cooler, fairings, etc....
and your done!!
just took her out to "break her in" and she feels great. very smooth. much smoother than before. i was taking it easy and not getting above 6K RPM while making sure to load the engine both ways (accel and decel) to seat the rings properly. cant comment on HP yet as i was being just breaking it in but i will report more when i really get things going in 1-200 more miles after an oil and filter change. but so far im loving them!
i will say that the whole job was pretty pricey when you add in the pistons, gaskets, seals, bolts, special tools, etc...
i did it because im never going to sell the VTR and i knew i would want them eventually plus rumor has it that JE is going to stop producing VTR pistons pretty soon as they just arnt selling to many of them, so i wanted to get them before they are gone.
overall job was a good one! probably about 12-16 hours total of work. slow process but not one you can get sloppy with (although some will argue that my entire method was sloppy)
once its all broken in ill go have her dyno'd. ive read of people gainging about 7hp (cant remember the added torque they were getting) from only adding JE pistons. so we shall see once i get the bike to the dyno.
now i just need to balance the carbs.


Senior Member
Back Marker
Joined: Apr 2011
Posts: 201
They wouldn't have such a tough time selling them if the sold oversize slugs in sets of two, rather than 4. Not many people will take the risk of putting std. bore slugs in an engine like you did(and there is nothing wrong with that provided the engine is within specs). That leaves the majority of guys with an extra set of pistons wondering what to do with them. I get why they do it, because some corporate bean counter said "we need to sell them in sets of 4 to make a profit." Uh, hello stupid, our bikes only take two pistons! If you don't sell any of them, you'll make zero profit.
Thread Starter
Senior Member
SuperSport
Joined: Apr 2013
Posts: 834
From: Thousand Oaks, CA
thanks Mik!!
msethhunter, ive never understood that either. its not like its some custom big bore piston or anything. its a standard service part, OS piston. but in all reality if you need OS pistons for your CBR then you need 4 pistons so maybe there just isnt enough profit for it to be worth it if they custom made 2 at a time.
if you look on JE's website, they do offer OS pistons for other bikes. for some bikes they only offer STD bore and .25 OS. other bikes they only offer OS pistons and no STD bores at all. its very weird to be in the piston market and not have std, .25, and .5 OS as standard for all bikes.
i will say that it would be really easy to sell the other 2 OS pistons on here. you just have to be willing to invest the money out of pocket up front. unless you can find someone to pay you in advance.

Senior Member
Back Marker
Joined: Nov 2013
Posts: 171
From: Los Angeles, CA
That looks awesome! I'd be interested in hearing what the overall cost was (only if you're willing to provide it of course)
They look so new and shiny its almost a crime to run on them (NOT)
Interesting to hear how much smoother it s
They look so new and shiny its almost a crime to run on them (NOT)
Interesting to hear how much smoother it s
Thread Starter
Senior Member
SuperSport
Joined: Apr 2013
Posts: 834
From: Thousand Oaks, CA
Cost was
$250 for the pistons which can with pins and circlips.
$200for gaskets, big end bolts, rings, etc...
$60-75 for 2 new oil filters and 8 quarts of oil (you need to change the oil after 2-300 miles on new engine parts
$50ish for quality coolant
$20 for posting ring compressor
$60 for honing related equipment and wash
Add in shipping and tax on all that.
Probably around an $700 job. Considering I got quoted $900 in labor only, not including all the gaskets and other needed parts, to bring just the engine out of the frame to a shop I think I did pretty good. Probably saved about $1000 + dollars.
And yea the smoothness really threw me off. It idles perfectly still now. Can't wait to really open it up once its broken in.

Administrator
MotoGP
Joined: Apr 2006
Posts: 4,402
From: Kempner, TX
".remove oil pan and you have easy access to the connecting rod bolts for the rear cylinder. (you will need an elbow socket joint)"
How did you torque down the rod bolts?
"8.measure your bores and check tolerance, if all is well then lightly hone and wash really really REALLY well."
How did you keep the debris and contaminants, contaminated lube during the honing from getting in the motor?
How did you torque down the rod bolts?
"8.measure your bores and check tolerance, if all is well then lightly hone and wash really really REALLY well."
How did you keep the debris and contaminants, contaminated lube during the honing from getting in the motor?
Last edited by E.Marquez; Jul 10, 2014 at 12:22 PM.
Administrator
MotoGP
Joined: Apr 2006
Posts: 4,402
From: Kempner, TX
Comparing apples to apples//// So you doing the job both ways.. Not you doing it at home the short cut way, vs paying a shop to do it the other way....
What do you think you saved $$ wise by doing it this way? vs pulling the motor and splitting the case
Assuming the rare occurrence of the motor mount bolt seizing did not happen.. I've only dropped 4 VTR engines, so not an expert by any means... but none of them had any issues with motor mount bolts seizing...
I see it on off road bikes a lot,,, where mud and water crossings are common... but not on street bikes much,,, ok, ever.
Looks like the only addition hard cost of pulling the motor and splitting the case would have been one side case cover gasket?
???
And NO this is not a flame for your way... just looking to understand all options, pluses and detractors.
Thanks
Last edited by E.Marquez; Jul 10, 2014 at 12:28 PM.
Thread Starter
Senior Member
SuperSport
Joined: Apr 2013
Posts: 834
From: Thousand Oaks, CA
Its easy for the rear cylinder. You "need" an elbow joint but its practically a straight line to both of those bolts. Its the front cylinder that's tricky and really its only one bolt on the front where the elbow joint is bent to about 20 degrees off of straight.
Due to torsion spring type twisting of the extension Plus the bend in the elbow joimt , the torque wrench is conpletley off on that bolt. There is some math involved to compensate for this and getting the torque in the ballpark and then once you get the first torque spec, you turn it 120 degrees further which is easy to figure out even with the bend in the elbow joint.
Like I said it would be a lot simpler to pull the clutch and oil pump. Then you would have a practically straight shot to all 4 bolts. But the downside is you have that much more to dis and re assemble.
Administrator
MotoGP
Joined: Apr 2006
Posts: 4,402
From: Kempner, TX
Its easy for the rear cylinder. You "need" an elbow joint but its practically a straight line to both of those bolts. Its the front cylinder that's tricky and really its only one bolt on the front where the elbow joint is bent to about 20 degrees off of straight.
Due to torsion spring type twisting of the extension Plus the bend in the elbow joimt , the torque wrench is conpletley off on that bolt. There is some math involved to compensate for this and getting the torque in the ballpark and then once you get the first torque spec, you turn it 120 degrees further which is easy to figure out even with the bend in the elbow joint.
Like I said it would be a lot simpler to pull the clutch and oil pump. Then you would have a practically straight shot to all 4 bolts. But the downside is you have that much more to dis and re assemble.
Due to torsion spring type twisting of the extension Plus the bend in the elbow joimt , the torque wrench is conpletley off on that bolt. There is some math involved to compensate for this and getting the torque in the ballpark and then once you get the first torque spec, you turn it 120 degrees further which is easy to figure out even with the bend in the elbow joint.
Like I said it would be a lot simpler to pull the clutch and oil pump. Then you would have a practically straight shot to all 4 bolts. But the downside is you have that much more to dis and re assemble.
I bet it works out fine
I was afraid rod bolts were going to be an issue doing it this way.... and not being able to properly torque them down is a show stopper for me..
Thanks for the explanation.
EDIT ADD:
Instead of a swivel u joint... can you reach the fastener with a crows foot and extension??
The extension does not in itself change the tq reading.. and the crows foot has a simple calculation to adjust TQ reading..
M1 = M2 x L1 / L2
M1 is the torque setting of the wrench.
M2 is the actual torque applied to the nut
L1 is the normal length of the wrench
L2 is the extended length of the wrench (Length of wrench + length of adapter)
Last edited by E.Marquez; Jul 10, 2014 at 12:41 PM.
Thread Starter
Senior Member
SuperSport
Joined: Apr 2013
Posts: 834
From: Thousand Oaks, CA
I don't have any 12 point crows feet. Never even seen them. Anyways I was confident in the final torque on all 4 bolts. If I wasn't confident in it, I would have taken the clutch and oil pump off. I'd rather do that then blow my engine. But again I felt pretty confident in the final torque so I didn't need to.
All the big end bolts were MUCH easier to put on then pull off. Especially the front cylinder.
All the big end bolts were MUCH easier to put on then pull off. Especially the front cylinder.
Thread Starter
Senior Member
SuperSport
Joined: Apr 2013
Posts: 834
From: Thousand Oaks, CA
Comparing apples to apples//// So you doing the job both ways.. Not you doing it at home the short cut way, vs paying a shop to do it the other way....
What do you think you saved $$ wise by doing it this way? vs pulling the motor and splitting the case
Assuming the rare occurrence of the motor mount bolt seizing did not happen.. I've only dropped 4 VTR engines, so not an expert by any means... but none of them had any issues with motor mount bolts seizing...
I see it on off road bikes a lot,,, where mud and water crossings are common... but not on street bikes much,,, ok, ever.
Looks like the only addition hard cost of pulling the motor and splitting the case would have been one side case cover gasket?
???
And NO this is not a flame for your way... just looking to understand all options, pluses and detractors.
Thanks
like i said i know this method is "controversial" and not for everyone. i happen to know you are very meticulous in your projects as am i. id rather spend the extra time and money to do things right than short cut it and loose in the long run.
having said that, there isnt anything about this method that "skips" any major part of doing it the "right" way. the only potential dowside is not torqueing down the big end bolt on the front cylinder correctly if you dont pay attention and take your time. and as i stated, if you pull the clutch and oil pump, then its a complete non issue. but as i said i was confident in my torqueing of the bolts (we shall see down the road if thats true)
really the reasoning was because i am by no means an engine builder. ive pulled apart a couple engines and done smilar work in other bikes but not an expert by all means. so the method was to leave as little room for error as possible. plus why disturb bearings that are still good? if i split the cases id replace all the bearings and go through the gearbox since im in there anyways. but why? theres no cause for suspicion that anything was malfunctioning. id also want to replace my clutch plates well i had it off. probably replace the oil pump and maybe put in an electric water pump while im in there anyways. you see how that can add up.
so why not leave it all alone and essentially do the proper prep work to the bores and rings and call it a day.
like i said it comes down to personal choice. if you dont feel confident in this method, by all means split cases and do it by the book. now like i said i know some people wont like this method but i think youd have to be pretty out there to say its "wrong". its just not the conventional way of doing things.
as far as the debris from honing... an oil soaked rag down in the bore, then LOTS and LOTS of flushing. then a quick oil pan off oil change after the first start up and ill do another oil change in about 200 miles.
Last edited by jscobey; Jul 10, 2014 at 05:35 PM.
Administrator
MotoGP
Joined: Apr 2006
Posts: 4,402
From: Kempner, TX
like i said i know this method is "controversial" and not for everyone. i happen to know you are very meticulous in your projects as am i. id rather spend the extra time and money to do things right than short cut it and loose in the long run.
having said that, there isnt anything about this method that "skips" any major part of doing it the "right" way. the only potential dowside is not torqueing down the big end bolt on the front cylinder correctly if you dont pay attention and take your time. and as i stated, if you pull the clutch and oil pump, then its a complete non issue. but as i said i was confident in my torqueing of the bolts (we shall see down the road if thats true)
really the reasoning was because i am by no means an engine builder. ive pulled apart a couple engines and done smilar work in other bikes but not an expert by all means. so the method was to leave as little room for error as possible. plus why disturb bearings that are still good? if i split the cases id replace all the bearings and go through the gearbox since im in there anyways. but why? theres no cause for suspicion that anything was malfunctioning. id also want to replace my clutch plates well i had it off. probably replace the oil pump and maybe put in an electric water pump while im in there anyways. you see how that can add up.
so why not leave it all alone and essentially do the proper prep work to the bores and rings and call it a day.
like i said it comes down to personal choice. if you dont feel confident in this method, by all means split cases and do it by the book. now like i said i know some people wont like this method but i think youd have to be pretty out there to say its "wrong". its just not the conventional way of doing things.
as far as the debris from honing... an oil soaked rag down in the bore, then LOTS and LOTS of flushing. then a quick oil pan off oil change after the first start up and ill do another oil change in about 200 miles.

I was just interested for myself and others how you made it work.
Yes, I have 6 and 12 point crows feet, mine are snap on, others make them as well Im sure
Search Results
So the extra cost you would have incurred had you removed the motor and split the cases are main bearings and a gasket.....
Fair enough.....
Thanks for the insight.
Senior Member
SuperSport
Joined: Apr 2014
Posts: 932
From: Auckland, new Zealand
Ive rebuilt the odd motor. I cant see anything wrong with this. He has taken the steps which I would if doing it this way. I have done far worse track side to keep a motor going.
Personally I would have cleaned up the heads and given them a little skim. And a valve job. Maybe cams.
Love to see the dyno results.
Harder to turn over now with a bit more compression?
Personally I would have cleaned up the heads and given them a little skim. And a valve job. Maybe cams.
Love to see the dyno results.
Harder to turn over now with a bit more compression?
Thread Starter
Senior Member
SuperSport
Joined: Apr 2013
Posts: 834
From: Thousand Oaks, CA
anyone got insight into what the compression test should yeild with JE's?
and Erik, in the spirit of sharing info for others to see in the future, so they can make a sound decision on how they want to do their pistons. what are the benefits of splitting the cases? as in what does pulling the motor and completely disassembling get you that this method does not?
i can only think of 2 drawbacks. one is the torque spec on the one big end bolt. which is easily over come with some inginuity OR remvoing the clutch and oil pump for much better access. and 2 is the debris from honing covering everything in your engine which if you put a rag in the bore and flush afterwards A LOT!!!! you can pretty much be sure it wont be a problem.
any other potential downsides to using this method?
Administrator
MotoGP
Joined: Apr 2006
Posts: 4,402
From: Kempner, TX
anyone got insight into what the compression test should yeild with JE's?
and Erik, in the spirit of sharing info for others to see in the future, so they can make a sound decision on how they want to do their pistons. what are the benefits of splitting the cases? as in what does pulling the motor and completely disassembling get you that this method does not?
i can only think of 2 drawbacks. one is the torque spec on the one big end bolt. which is easily over come with some inginuity OR remvoing the clutch and oil pump for much better access. and 2 is the debris from honing covering everything in your engine which if you put a rag in the bore and flush afterwards A LOT!!!! you can pretty much be sure it wont be a problem.
any other potential downsides to using this method?
and Erik, in the spirit of sharing info for others to see in the future, so they can make a sound decision on how they want to do their pistons. what are the benefits of splitting the cases? as in what does pulling the motor and completely disassembling get you that this method does not?
i can only think of 2 drawbacks. one is the torque spec on the one big end bolt. which is easily over come with some inginuity OR remvoing the clutch and oil pump for much better access. and 2 is the debris from honing covering everything in your engine which if you put a rag in the bore and flush afterwards A LOT!!!! you can pretty much be sure it wont be a problem.
any other potential downsides to using this method?
The chances of getting grit and debris in bearings, between bushings and a shaft are high with honing in place.. While flushing copious amounts of solvent or lube might get it all, its not certain..And it takes only ONE speck of hone material ( silicon carbide, aluminum oxide, boron carbide or whatever your ball hone was made of) to cut through the hard chrome on a bearing ball or roller... The bearing then disintegrates while in use.
At the cost in $$ and time to do what you did, I would not want to invest that much and not go through the rest of the motor and transmission.. Knowing that when I hit the starter button in a few days.. I have a true rebuilt motor, one that is as good or better in longevity, durability and performance as the new motor when it came off the assembly line.
As already discussed, the less then better way you were required to torque critical fasteners.. did you get um good enough ?? Probable did..Chances are good, because you really thought through your process.. You will be fine.
But I've lost to motors on probables,, so for myself, I just wont go there.. And for those I do work for.. No way can i send out a product with a probable.
Lastly.. You said you measured and found the cylinders to be good enough to reuse with a light hone..... And id be very interested in seeing what you get for a leak down test in a few hundred miles..
If you're at or below 3%... then you are getting all the cylinder sealing one can expect from this motor. If your above 3% leakage, where is it going... and what are you losing in performance and longevity.?
BUT... a fresh bore, sized correctly to a new pistons (or better yet, fresh bore and nikasil plated, then sized to new pistons) will likely result in better sealing, more compression and performance, longer lasting results... Again,,it's about getting the most from the work put in for me.. or for the customer paying for the job.
In the end.. you did it yourself at home...saved a ton of coin, and it's running well.... You should be proud of that and enjoy knowing you did it yourself... You got results your happy with and really, thats all that matters.
Last edited by E.Marquez; Jul 11, 2014 at 04:34 PM.

Thread
Thread Starter
Forum
Replies
Last Post
barncat
Technical Discussion
17
Aug 20, 2012 07:46 AM
superchickencornermonster
Modifications - Performance
7
Mar 29, 2011 12:07 AM
DameDiggler
Modifications - Performance
12
Mar 25, 2005 01:37 PM


