
I don't often work, upgrade my own bike..


Thread Starter
Administrator
MotoGP
Joined: Apr 2006
Posts: 4,402
From: Kempner, TX

I don't often work, upgrade my own bike..
I don't often work, upgrade my own bike, mostly someone else's
But today it's mine
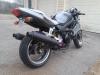
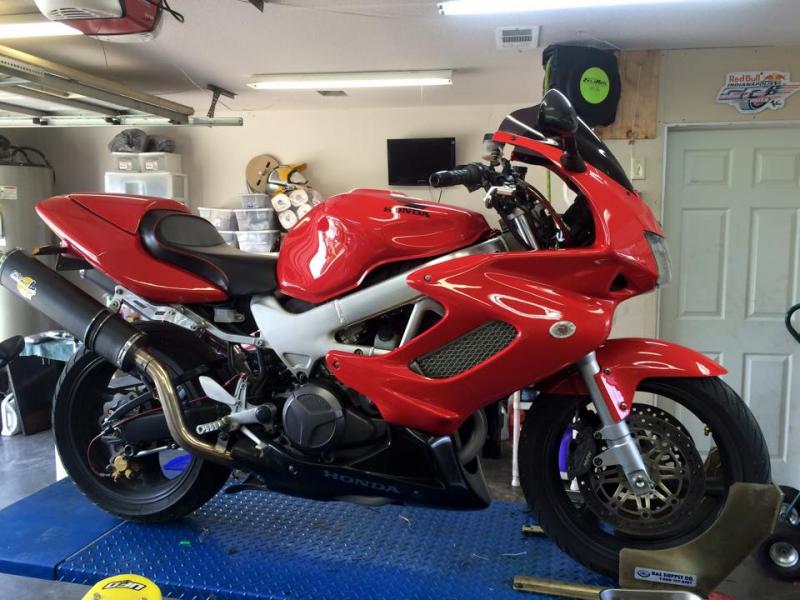
All new paint, all plastics, tank, new graphics.
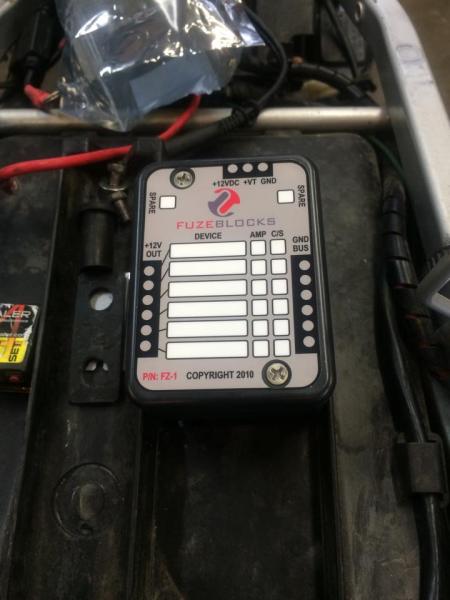
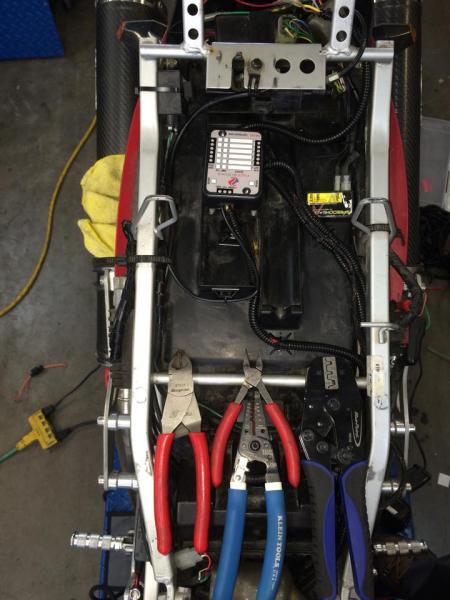
FZ1 Fuse block install
Ceramic coated headers
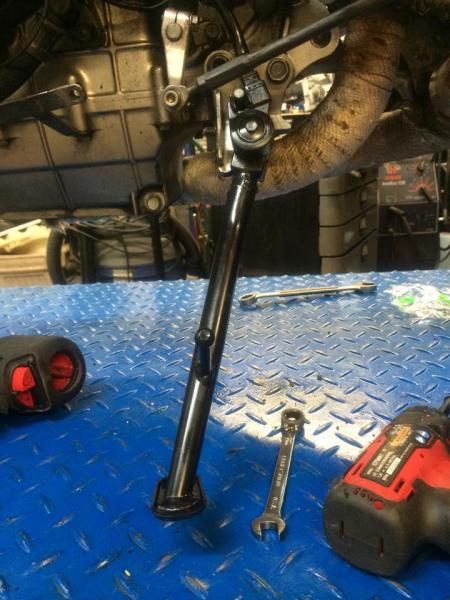
New side stand to get rid of the gangster lean due to suspension build that raised the rear 10mm
Mirror extenders so I can see something in them other then my elbows
Digital clocks to be molded into the dash
Some assembly required
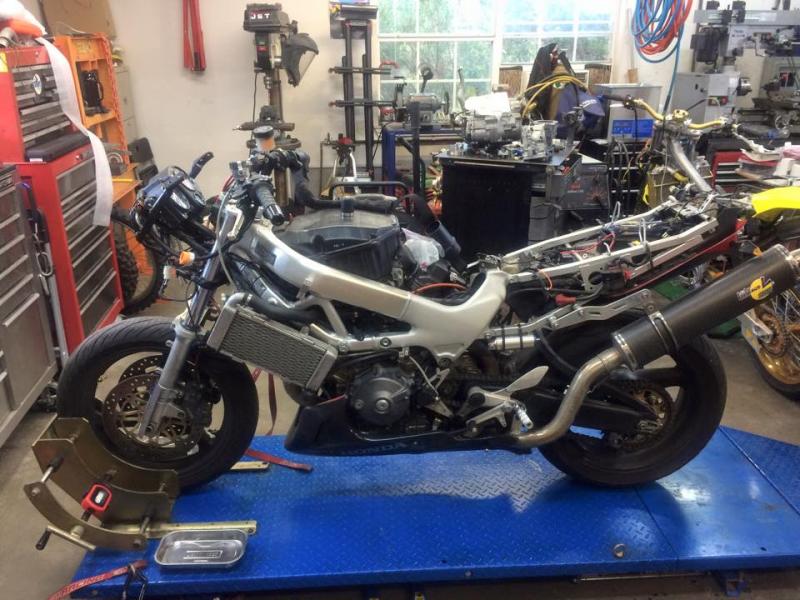
Fresh paint, Italian Red and graphics
https://www.superhawkforum.com/forum...1&d=1432249901
Headers ceramic coated by Polydyne in Texas .. DO NOT RECOMMEND THIS COMPANY .... Not even a little.
Not happy with the customer service of the shop that did the coating but the work seems ok
Nice new side stand,,, some mod required as it has a different bend then the straight OEM one.. But it will be nice to not have the bike leaning over so far.
Another FZ1 Fuseblock install.. this is about a dozen now I've done.. I reallllllly like this product...
But today it's mine
All new paint, all plastics, tank, new graphics.
FZ1 Fuse block install
Ceramic coated headers
New side stand to get rid of the gangster lean due to suspension build that raised the rear 10mm
Mirror extenders so I can see something in them other then my elbows
Digital clocks to be molded into the dash
Some assembly required
Fresh paint, Italian Red and graphics
https://www.superhawkforum.com/forum...1&d=1432249901
Headers ceramic coated by Polydyne in Texas .. DO NOT RECOMMEND THIS COMPANY .... Not even a little.
Not happy with the customer service of the shop that did the coating but the work seems ok
Nice new side stand,,, some mod required as it has a different bend then the straight OEM one.. But it will be nice to not have the bike leaning over so far.
Another FZ1 Fuseblock install.. this is about a dozen now I've done.. I reallllllly like this product...
Thread Starter
Administrator
MotoGP
Joined: Apr 2006
Posts: 4,402
From: Kempner, TX
The dash on the 1998 is a bit dated. Though mine has a brand new cover just a few months ago so looks fresh at least...... having no clock thought gets old.. I tried a simple solution of using a digital watch., but found finding the buttons at night with gloves on not really workable, and the digits size is a bit small.
So ordered up two different 12v digital clocks, one is red led in a
black housing. The other blue LED in a clear housing.
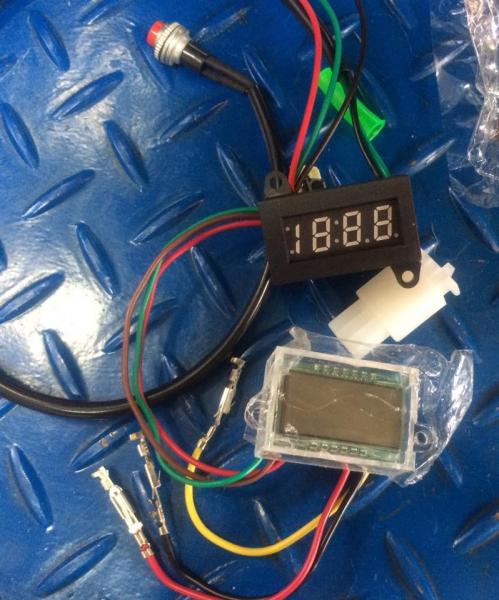
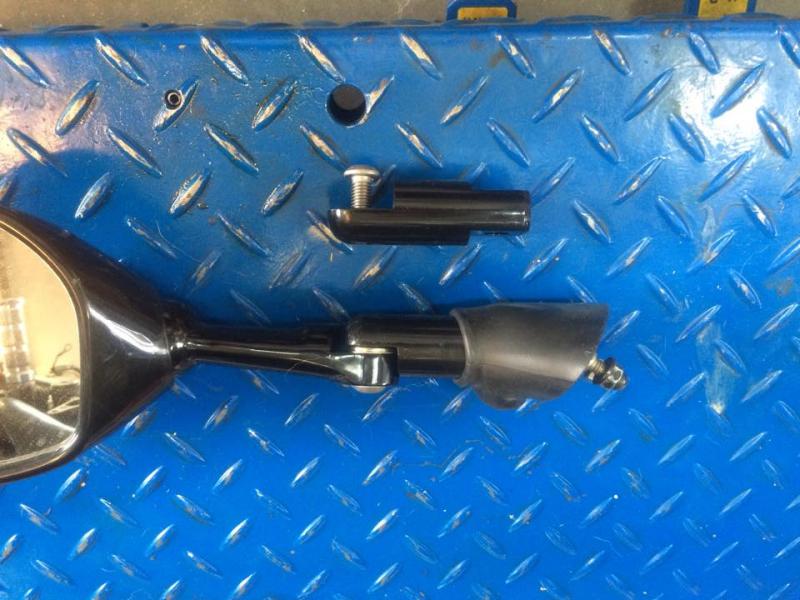
While I have nice looking elbows I have grown tired of seeing only them in my mirrors. There is a chap in the UK that makes extenders for this bike so i had him send me a set.
Side stand on last night, removed the bracket and spring, tossed in the sonic tank for a bit while I worked on the headers,,, then installed the stand...
So ordered up two different 12v digital clocks, one is red led in a
black housing. The other blue LED in a clear housing.
While I have nice looking elbows I have grown tired of seeing only them in my mirrors. There is a chap in the UK that makes extenders for this bike so i had him send me a set.
Side stand on last night, removed the bracket and spring, tossed in the sonic tank for a bit while I worked on the headers,,, then installed the stand...
Thread Starter
Administrator
MotoGP
Joined: Apr 2006
Posts: 4,402
From: Kempner, TX
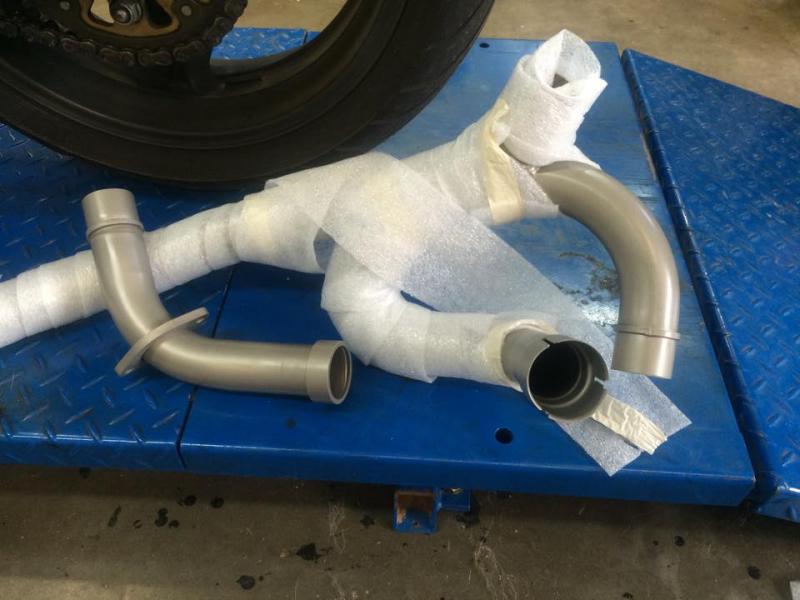
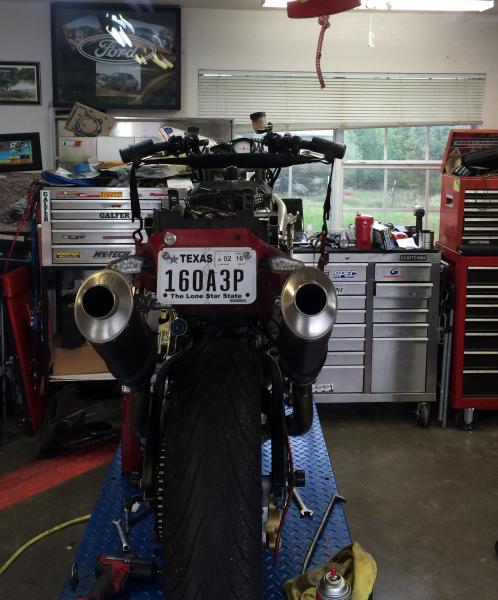
Headers went on as do most after market exhaust systems using other then supplied in designed hangers and different band headers (OEM ceramic coated in this case with Leo Vince carbon cans, stainless steel high mount link pipes, mounted in a mid high location so they run parallel to the tail piece body line.
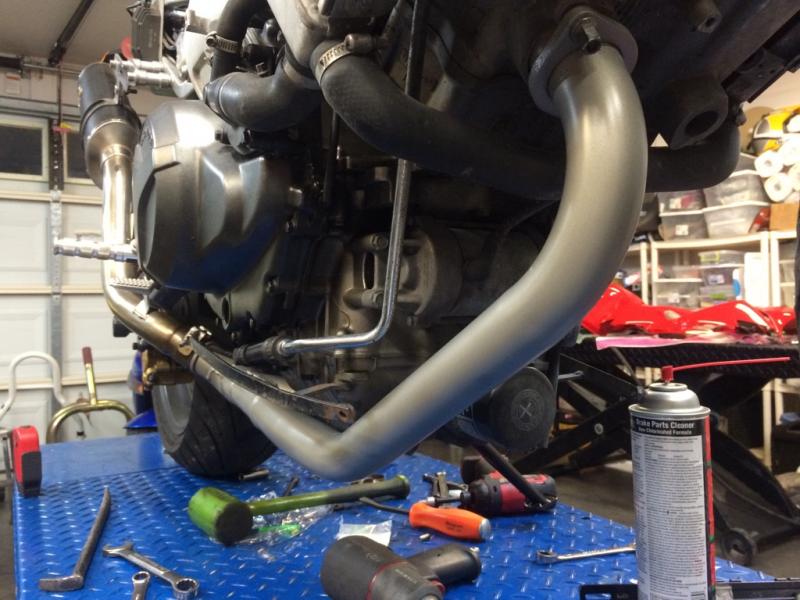
Hangers are a temp deal... one has a crack do to previous owners bending them to fit how they wanted...and for me, the hold the can too far forward in both looks and lack rigid attachment.

Im making some trellis style mounts that will drop down from the sub frame and attach to the can just about mid way front to rear.. using 8mm thin wall co-molly tubing for the legs of the mount and a 10mm short section for the attachment point of the hanger to can..
Hangers are a temp deal... one has a crack do to previous owners bending them to fit how they wanted...and for me, the hold the can too far forward in both looks and lack rigid attachment.
Im making some trellis style mounts that will drop down from the sub frame and attach to the can just about mid way front to rear.. using 8mm thin wall co-molly tubing for the legs of the mount and a 10mm short section for the attachment point of the hanger to can..


Thread Starter
Administrator
MotoGP
Joined: Apr 2006
Posts: 4,402
From: Kempner, TX

I've used the PC8 from Eastern Beaver and this one, like the FZ1 better. more compact install, all circuits are switch/non switched capable.
More compact. But there is a down side if it apply to your needs.. the FZ1 is smaller, more compact and only has 6 circuits,.. and limited somewhat in wattage capacity.
From the company FAQ
How much current can the FZ-1 handle?
This isn't as straight forward as you might think.
The FZ-1 has two separate current paths. One is for constant power and the other goes through the relay for switched power. Each circuit can handle up to 10A (120W). The total amperage used via the relay (switched power) should not exceed 30A (360W).
The total amperage on the constant side should not exceed 30A (360W).
The total amperage for the entire FZ-1 should not exceed 30A (360W).
I've spoken to the small company owner / designer after I was introduced to this fuse block..and before I started installing them on customers bikes. We spoke about the realistic durability of the uni in rugged use, high heat, dusty environment, it's "weather resistance" for use in wet climes or occasional torrential downpour.
It needs to be mounted securely and not be bouncing around... it has to be mounted in a location that it does not get submerged, or directly sprayed with water (so under the seat, behind the fairing, under the fuel tank.) We chatted about the choice of a board mounted relay vice plugged replaceable.. 1: they simple chose a great quality relay for this application... and second, in R&D testing and now years of actual use, they are not seeing any failures note worth.. so the choice just works. IF the relay should fail, the rider can just ,move a fuse position and power the needed device in non switched mode till they get home. The relay can be de-soldiered and replaced as it is a commonly available item and the replacement procedures common as well fro anyone that works with a soldiering iron and boards mounted components/.
Last edited by E.Marquez; May 22, 2015 at 06:34 AM.


Senior Member
Superstock
Joined: Mar 2015
Posts: 409
From: Central CA
I don't often work, but when I do, it's on a Superhawk.

Nice shop you have there!
Many of us would love access to such a place.
Keep up the cool upgrades.

Nice shop you have there!
Many of us would love access to such a place.
Keep up the cool upgrades.
Last edited by Hangfly; May 22, 2015 at 11:01 AM.

Thread Starter
Administrator
MotoGP
Joined: Apr 2006
Posts: 4,402
From: Kempner, TX
Though inside ceramic coating is not what most think it is.. Not the same even coating as outside unless you are having a very high tech and expensive process done (by expansive consider it 5 or more times what you were quoted for the "standard" job). Inside coating uses a LOT of ceramic materiel with a ton of waste.. cut open headers from the top brand name ceramic coaters and be surprised at what you find after you were given claims of "Coated inside and out"..
What you will find is the first few inches of inside coated... and thats all. .

Thread Starter
Administrator
MotoGP
Joined: Apr 2006
Posts: 4,402
From: Kempner, TX
Went looking for a tool
Hunted for ten minutes
Decided enough was enough time
For a build and reorganization
Made another stand for my top box added two shelves for "cased" tools and added a single drawer full width 5" deep mid chest

Never enough room for tools...
but it'll do for tonight.
Finished tool chest stand, recognized tools...cleaned shop.. ready to start again in the morning.
Hunted for ten minutes
Decided enough was enough time
For a build and reorganization
Made another stand for my top box added two shelves for "cased" tools and added a single drawer full width 5" deep mid chest
Never enough room for tools...
but it'll do for tonight.
Finished tool chest stand, recognized tools...cleaned shop.. ready to start again in the morning.
Senior Member
SuperBike
Joined: Feb 2007
Posts: 1,252
From: boston
Yea I have to do the same thing... been working on my bike nonstop in all my free time and not doing a damn bit of cleaning (besides picking up the empties  ) place is a mess and Im wasting too much time looking for things...
Shop looks great BTW
Shop looks great BTW
Thread Starter
Administrator
MotoGP
Joined: Apr 2006
Posts: 4,402
From: Kempner, TX
Done (for now, kind of, maybe)
Done, almost, kind of, for now
")
The cheap digital clock was a failure one arrived dead, the other died in less than an hour on the road. Still like the idea so will search out something else to try.
Still need to build the exhaust hangers ..have the smaller chromoly tubing I'm going to use... but the 10mm OD stuff did not show up yet.

Side stand needed some additional MOD as it was hitting the ex mid pipe in the up position, bit of weld, then dressed up and shot with some black enamel fixed that up.
Looking to add a carbon fiber "dash" grafted onto the OEM dash cover held in place with the three mounting bolts used now.
Then will flush mount the clock, gear position selector and Koso voltage gauge.


Member
Squid
Joined: Jun 2015
Posts: 42
From: Mid West
I totally dig that you went through everything for yourself, it's so easy to say that you're going to "Get to that", and next thing you know, you just don't have enogh time in the day...
It looks really, REALLY good E..!
It looks really, REALLY good E..!

Thread
Thread Starter
Forum
Replies
Last Post
marmaladedad
Rider's Gear
124
Aug 4, 2011 12:40 PM
pigwings
Racing
10
Nov 27, 2009 10:37 AM
j shizzy wizzy
RANT!
24
Jun 21, 2009 05:38 PM


