
CCT fail, head replace


Thread Starter
Member
Squid
Joined: Aug 2012
Posts: 68

CCT fail, head replace
matt365 suggested that I post my build to help Others. so here it goes.
I bought the bike last week, Guy said he was JRA (just riding along) and it quit. he took it to his mechanic who quoted him $700 for the repair. it had been dropped about 3 years before and honestly looking pretty rough.
I bought it at 9pm dark out so it wsa hard to see, mistake 1! but as I looked I seen non stock exhost, seat, fender eliminator but I wasn't sure until i googled what I was really seeing.
Exhaust are TwoBrothers C5 titanium.. there marked from the drop on one side and the other is dented (lightly) from just being treated rough. The Seat is a Sargaent, the brake lines are steel braided. tire hugger and fender eliminator.
Someone put some time and money into this.. it wasn't the guy I bought it off of as he new nothing about bikes.. it's been treated rough for a few years and as it fell apart it was taped back together.. so lots of work. but I got it for a good price so lets see what I can do!
Dead motor I startted here:
checking the timing. Procedure: Align -FT of the fly wheel with the mark on the case the front cams should be in the air (valves closed) and FI (front intake) FE (Front exast) lined with the head where the valve cover fits..
Found: 3 teeth out on both intake and exhaust valves. not looking good..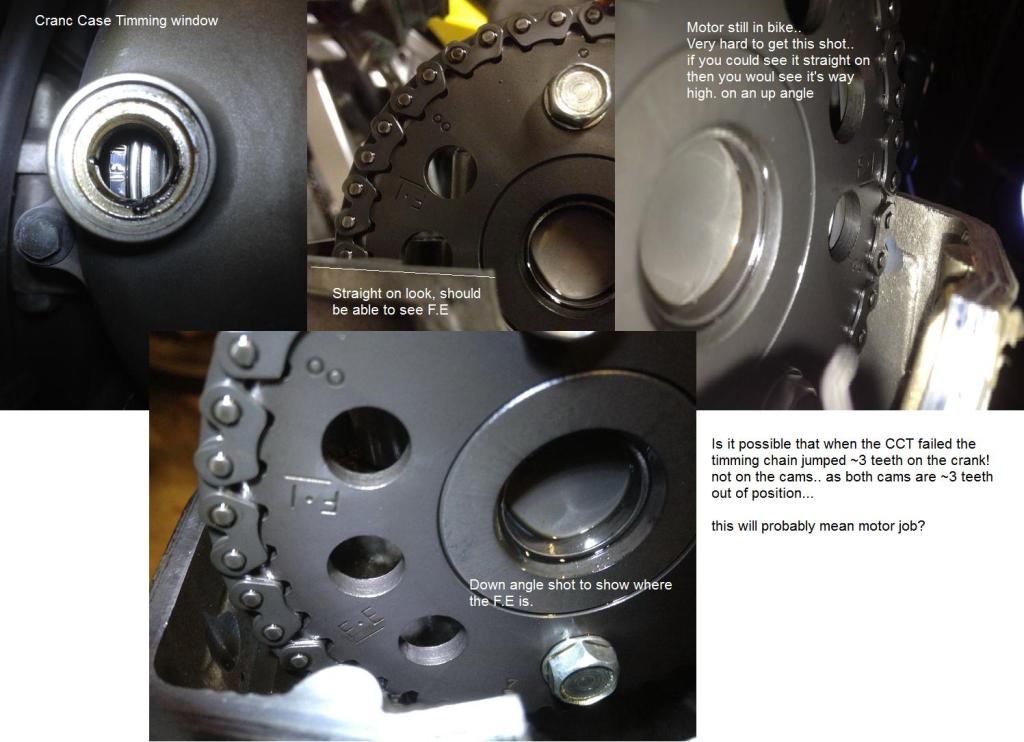
Put the timing back in place, used a little loctite to hold the old CCT in place to test compression..
Compression test: rear cyclinder hit 140 real quick. no covers means oil is being pumped so I stopped rolling quick.. next the front cyclinder.. not so lucky.. a Big ZERO!! nothing nota.. time to tear down..
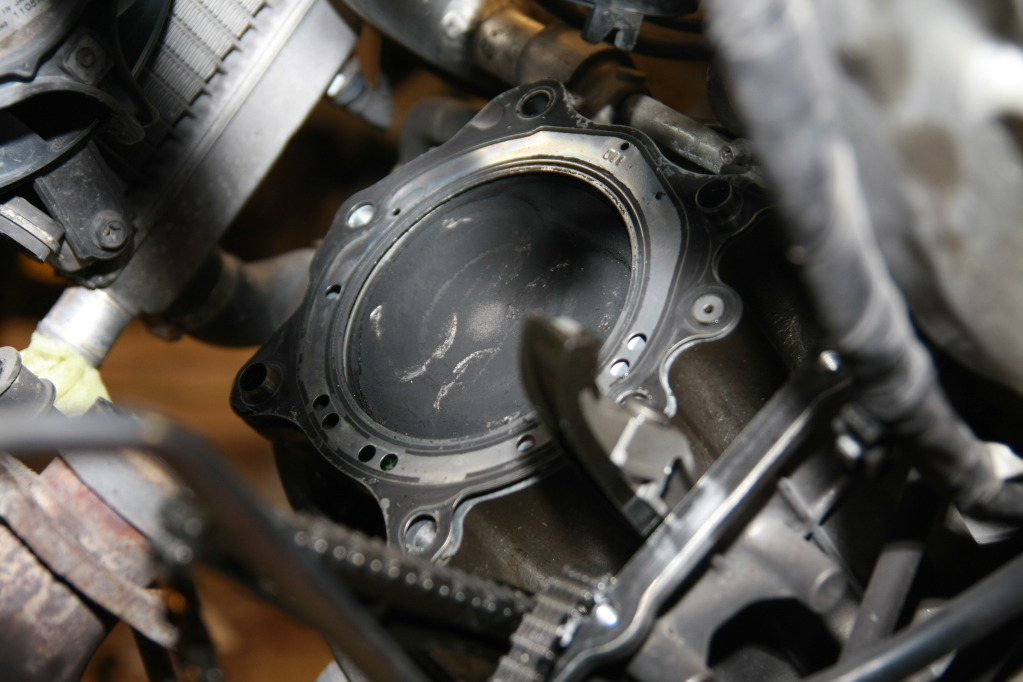
Tear down: You don't need to remove the motor just take off all the fairings and one rad (left), (drain rad coolent). Note: the cams have to come out to get at the head bolts.
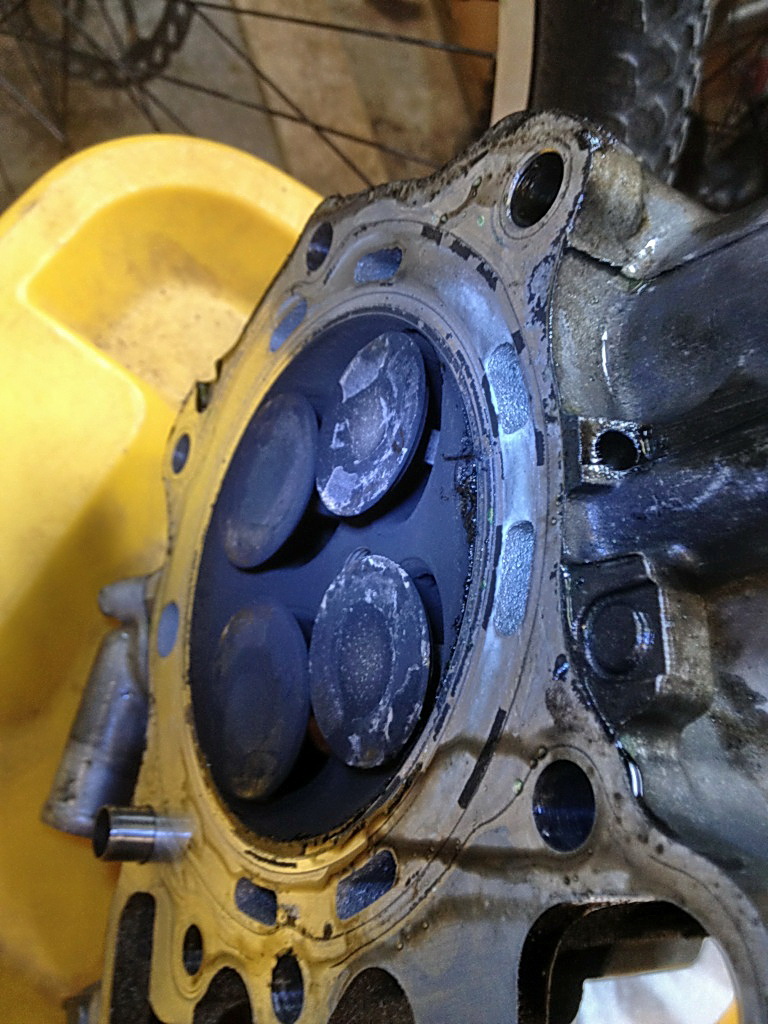
Found: All 4 valves hit the piston
 ..
..
the piston looks good.. I rolled it all the way down and inspected the sleaves, they were perfectly smoth no lines no marks.. perfect! so good news there.
you can see where the valves hit in hte pic above
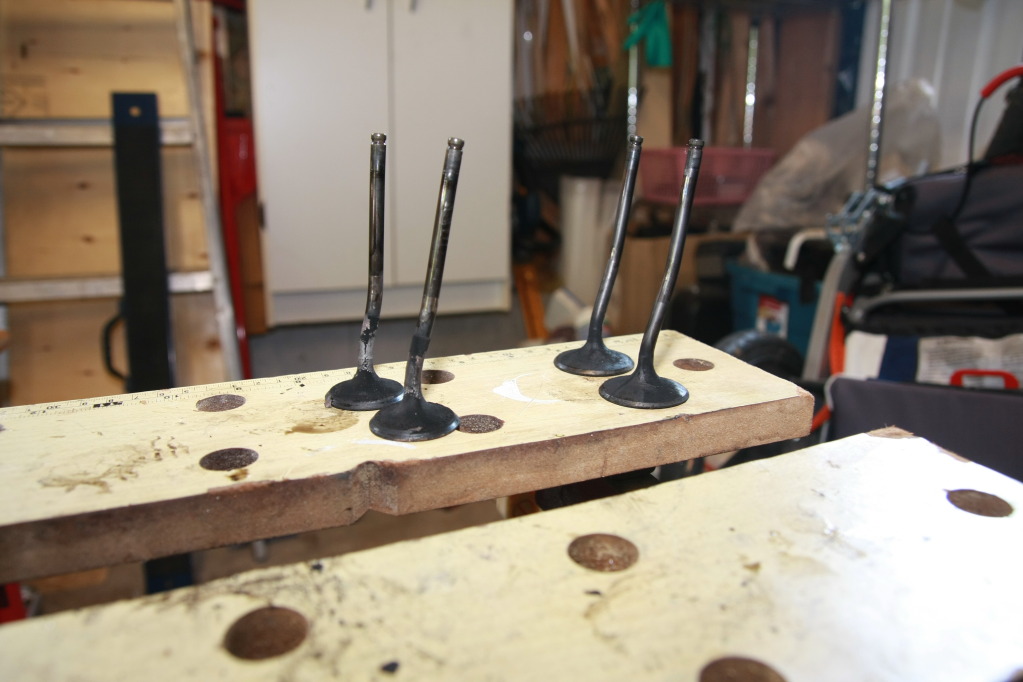
Remove the valves, I had no tool to do this. so first I used a large deep socket and hit it with a hammer nocking the valve keepers loose and releaseing the spring.. well I got two of them that way. the other two would not come.. so I used a large "C" clamp one side on the head of the valve one side on a large socket so I could press the spring not the valve, press down and release.. after a couple tries the other two came. but the valves still didn't come out.. vice grips twist and pull.. finaly got them out.
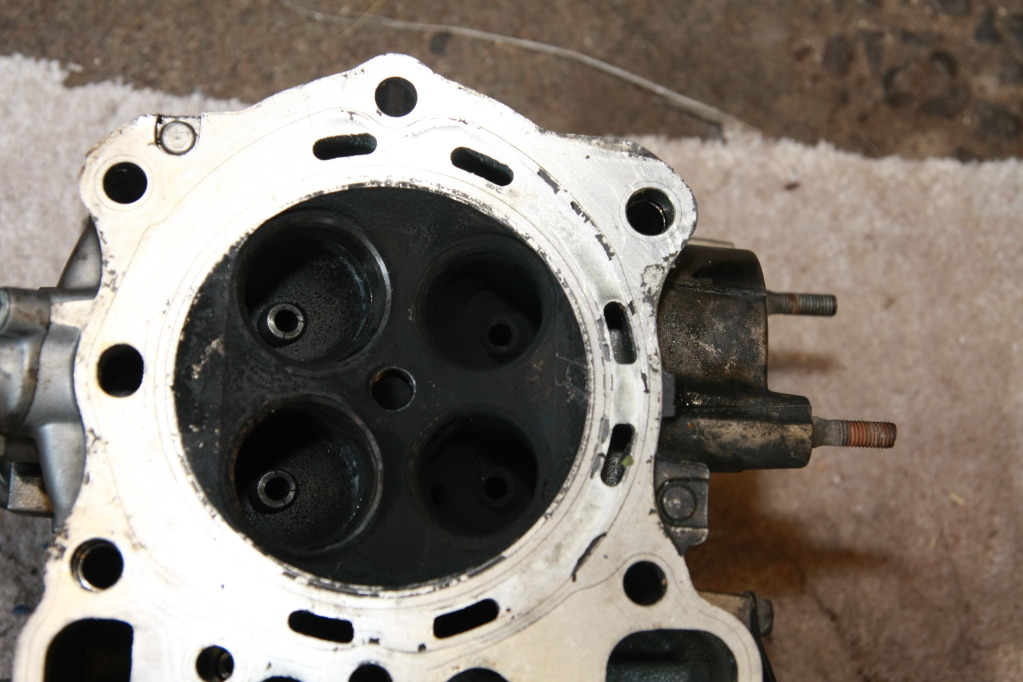
found.. Damaged guides.. you can see the cracks in the picture and the face there not round any more!
Ok.. now it just got real! Called DAD.. he was a mechanic for 40 years, tought me what I know.. I asked how do I replace the guides.. he said don't know, never did it.. a used head with valves would be cheaper.
I called a local small shop asked how much to do guides.. said he didn't want to do it.. cheaper to buy heads.. called the dealer.. they could do the head with new valves for $700-$800
So used sounded good- I hit pay dirt real quick.. $200 for two heads, one front, one back.
what to look for: if you can look at the heads, take a look at the cams no scoring no lines or marks, roll easy with valves closed, I couldn't open the valves by hand. so couldn't test that. I poured some gas in the head (on the valve side) and watched for a minute to see if valves were sealing well.. seemed to be no leaks.. or very slow if any.. so I said I'll take em!
thats all for now.. I'll keep updating as I go
I bought the bike last week, Guy said he was JRA (just riding along) and it quit. he took it to his mechanic who quoted him $700 for the repair. it had been dropped about 3 years before and honestly looking pretty rough.
I bought it at 9pm dark out so it wsa hard to see, mistake 1! but as I looked I seen non stock exhost, seat, fender eliminator but I wasn't sure until i googled what I was really seeing.
Exhaust are TwoBrothers C5 titanium.. there marked from the drop on one side and the other is dented (lightly) from just being treated rough. The Seat is a Sargaent, the brake lines are steel braided. tire hugger and fender eliminator.
Someone put some time and money into this.. it wasn't the guy I bought it off of as he new nothing about bikes.. it's been treated rough for a few years and as it fell apart it was taped back together.. so lots of work. but I got it for a good price so lets see what I can do!
Dead motor I startted here:
checking the timing. Procedure: Align -FT of the fly wheel with the mark on the case the front cams should be in the air (valves closed) and FI (front intake) FE (Front exast) lined with the head where the valve cover fits..
Found: 3 teeth out on both intake and exhaust valves. not looking good..
Put the timing back in place, used a little loctite to hold the old CCT in place to test compression..
Compression test: rear cyclinder hit 140 real quick. no covers means oil is being pumped so I stopped rolling quick.. next the front cyclinder.. not so lucky.. a Big ZERO!! nothing nota.. time to tear down..
Tear down: You don't need to remove the motor just take off all the fairings and one rad (left), (drain rad coolent). Note: the cams have to come out to get at the head bolts.
Found: All 4 valves hit the piston
.. the piston looks good.. I rolled it all the way down and inspected the sleaves, they were perfectly smoth no lines no marks.. perfect! so good news there.
you can see where the valves hit in hte pic above
Remove the valves, I had no tool to do this. so first I used a large deep socket and hit it with a hammer nocking the valve keepers loose and releaseing the spring.. well I got two of them that way. the other two would not come.. so I used a large "C" clamp one side on the head of the valve one side on a large socket so I could press the spring not the valve, press down and release.. after a couple tries the other two came. but the valves still didn't come out.. vice grips twist and pull.. finaly got them out.
found.. Damaged guides.. you can see the cracks in the picture and the face there not round any more!
Ok.. now it just got real! Called DAD.. he was a mechanic for 40 years, tought me what I know.. I asked how do I replace the guides.. he said don't know, never did it.. a used head with valves would be cheaper.
I called a local small shop asked how much to do guides.. said he didn't want to do it.. cheaper to buy heads.. called the dealer.. they could do the head with new valves for $700-$800
So used sounded good- I hit pay dirt real quick.. $200 for two heads, one front, one back.
what to look for: if you can look at the heads, take a look at the cams no scoring no lines or marks, roll easy with valves closed, I couldn't open the valves by hand. so couldn't test that. I poured some gas in the head (on the valve side) and watched for a minute to see if valves were sealing well.. seemed to be no leaks.. or very slow if any.. so I said I'll take em!
thats all for now.. I'll keep updating as I go
Last edited by Renderw; Aug 15, 2012 at 05:54 PM.

Senior Member
MotoGP
Joined: Jul 2010
Posts: 3,871
From: Phoenix, AZ
Good writeup so far... but $700 to replace valves and guides? With a head that's already been removed? That seems way over the top to me... Was that with parts and seating the faces and everything?


Senior Member
SuperBike
Joined: Oct 2007
Posts: 1,082
From: Menifee, CA
I think he meant that was the price for a new head and vavles, haven't check with Ron Ayers but sounds about right comin from a stealership..
Thread Starter
Member
Squid
Joined: Aug 2012
Posts: 68
$700 was- I give them the used head and they rebuild it for me give new gaskets to put it together, may have included taxes can't remember as that was to much for my budget. kanata Honda.. go to the dealer pay the big bucks  Great guys though they really know there stuff, the one guy owns a VTR so we had a long chat..talked about chainging the sprockets said the front end will come up in 3rd upto about 130km/h.. wow.. or maybe not wow to you guys.. for me I have never riden the bike, so time will tell
Thread Starter
Member
Squid
Joined: Aug 2012
Posts: 68
Head gasket came in yesterday, always need a new head gasket I'm told. Timing was the trickiest part but the manual does a good job of explaining it.
What I did.
I had zip tied the rear chain as I did a CCT mod and had removed the rear CCT. I used a carpenters pencil as a stick, shoved it in The CCT hole and pusehd it tight, then used my fingernail tight agianst the CCT port and pushed my nail into the wood to mark it,. If I set the CCT to this length then it woud be "Tight", I set the CCT to ~1/8 of an inch shorter then the mark on my pencil, put the CCT in and checked the slack, I wanted the chain to jiggle but no shake up and down and that's what I had, so I put locktight (red permanent) on all moving parts of my CCT mod. (gear lead screw, top bolt (screw driver tipped), and the set screw.
You can see my CCT mod here:https://www.superhawkforum.com/forum...w-i-did-29002/
With the Rear CCT installed I removed the zip ties and Rolled the motor back and forth, check chain tention.. if good go to next head.. 1,1/4 turns (if memory serves), I did what the manual said. the piston was at T.D.C so if I had rolled it right then it was on compression stroke and I was ready to install the head,
Head went on with no problem.
step by step
take new head, spray lubricant down intake and exhaust port to lube valve seats (head had been sitting), Removed cam covers, put a small amount of oil on the cams (I used 5-40 synthetic, It’s what I run in my bikes) both on the cam lobes and on the journals (the part that spins is the journals), tighten cam covers back to spec and using feeler gauges check tolerance (Clearance between valve bucket and cam), NOTE: in most cases you find the space too short, this is because the valves hammer there way into the head over time leaving less space between the valve and the cam. This causes the valves to stay open longer then they should, loss of compression. If there bad you have to remove the bucket (shiny 1” cap you see under the cam lobes) under that there is a small spacer you need to swap this out - check manual)
Mine where good so soldier on!
Remove cams - the head bolts are under the cams. (NOTE: they are not the same don’t mix them, same goes for all parts in the head (the buckets are the only thing that may be safe to swap, but I try not to unless one is damaged, then there is no choice),
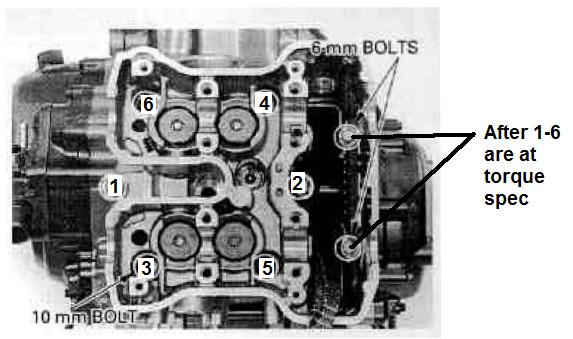
Put new gasket in, I just used the guide pins to hold the gasket in place, next the head went in and tightened down. Tighten in a specific order and go around 3 or 4 times until spec is met, you want to bring the head down even and gentle as not to warp it.
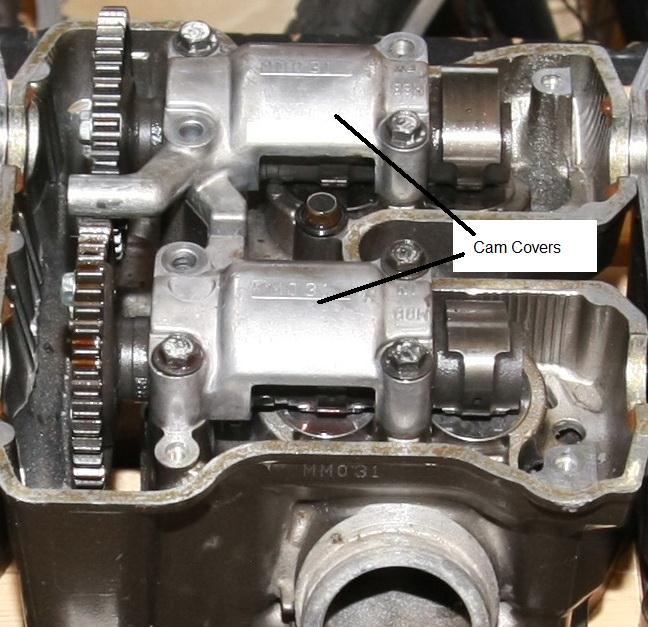
Insert cams- put the cams back in and rotate them so F.I. and F.E. are in the proper location (lined up with the head facing out), install chain I left the cam bolts loose as I found this easier.. then install cam covers (see pic above) and tightened bolts to spec, again do it in a criss cross pattern in a several steps to ensure nothing warps.
As above measure and set your CCT and install in front head.. I rotate the crack left and right to make sure the chain is moving well and I can feel the slack, and double check that my timing marks are aligned, FT in the site window and F.I. and F.E. on the cams, if everything is good then your done!
I do a compression test now to make sure everything is working.. I used a little WD40 down the spark plug hole to give a better test, Proper way is to run the motor to temperature and remove plugs then test.. so don’t expect to get 164 that the books say.. basically if your over 100 you should be fine.. it means the valves are sealing and the piston is compressing. And that’s all we are shooting for here. NOTE: the valve covers are off = oil is being pumped.. don’t go to long or you will have a mess to clean up. NOTE.. first test I did it with no lube! And I hit 60psi.. I used the WD40 down the piston, down the exhaust port and down the intake port (shot thought the carbs) as I stated above do this first, don't make my mistake, I hit 120 on first rotation and it was climbing.. but oil was being pumped so I stopped..
That’s about it for the hard part.. I used a little gasket sealer on the top valve covers, reinstalled the covers breather box and all the hoses.. New plugs are on order and UNFORTUNETLY a crank case breather hose is missing!! I bought the bike in a box, it seems I wasn’t given everything.. I hope to have the bike road worthy by the weekend.
UPDATE: I'll start at the end -I changed the plugs and all is good now
so I fired up the other day and things were... well rough.. back firing not revving up nothing good.. I pulled the front plug it was soaked in gas and the compression was 110.. I panicked.. made some calls found out you can't do pressure test with a wet cylinder.. pulled the rear plug did a compression test there found about 135, went to the front again and found 133! so that was good! turned out my plug in the front just wasn't firing.. tried another old plug and it ran well for about 2min then started acting up again.. bought two new plugs and it's running much better now.
time to put all the panels back on.. figure out why the lights aren’t working right.. fuel gauge is dead, rear mufflers are rubbing the frame.. ya lots of work yet.. but the motor is running! that's a big one!
What I did.
I had zip tied the rear chain as I did a CCT mod and had removed the rear CCT. I used a carpenters pencil as a stick, shoved it in The CCT hole and pusehd it tight, then used my fingernail tight agianst the CCT port and pushed my nail into the wood to mark it,. If I set the CCT to this length then it woud be "Tight", I set the CCT to ~1/8 of an inch shorter then the mark on my pencil, put the CCT in and checked the slack, I wanted the chain to jiggle but no shake up and down and that's what I had, so I put locktight (red permanent) on all moving parts of my CCT mod. (gear lead screw, top bolt (screw driver tipped), and the set screw.
You can see my CCT mod here:https://www.superhawkforum.com/forum...w-i-did-29002/
With the Rear CCT installed I removed the zip ties and Rolled the motor back and forth, check chain tention.. if good go to next head.. 1,1/4 turns (if memory serves), I did what the manual said. the piston was at T.D.C so if I had rolled it right then it was on compression stroke and I was ready to install the head,
Head went on with no problem.
step by step
take new head, spray lubricant down intake and exhaust port to lube valve seats (head had been sitting), Removed cam covers, put a small amount of oil on the cams (I used 5-40 synthetic, It’s what I run in my bikes) both on the cam lobes and on the journals (the part that spins is the journals), tighten cam covers back to spec and using feeler gauges check tolerance (Clearance between valve bucket and cam), NOTE: in most cases you find the space too short, this is because the valves hammer there way into the head over time leaving less space between the valve and the cam. This causes the valves to stay open longer then they should, loss of compression. If there bad you have to remove the bucket (shiny 1” cap you see under the cam lobes) under that there is a small spacer you need to swap this out - check manual)
Mine where good so soldier on!
Remove cams - the head bolts are under the cams. (NOTE: they are not the same don’t mix them, same goes for all parts in the head (the buckets are the only thing that may be safe to swap, but I try not to unless one is damaged, then there is no choice),
Put new gasket in, I just used the guide pins to hold the gasket in place, next the head went in and tightened down. Tighten in a specific order and go around 3 or 4 times until spec is met, you want to bring the head down even and gentle as not to warp it.
Insert cams- put the cams back in and rotate them so F.I. and F.E. are in the proper location (lined up with the head facing out), install chain I left the cam bolts loose as I found this easier.. then install cam covers (see pic above) and tightened bolts to spec, again do it in a criss cross pattern in a several steps to ensure nothing warps.
As above measure and set your CCT and install in front head.. I rotate the crack left and right to make sure the chain is moving well and I can feel the slack, and double check that my timing marks are aligned, FT in the site window and F.I. and F.E. on the cams, if everything is good then your done!
I do a compression test now to make sure everything is working.. I used a little WD40 down the spark plug hole to give a better test, Proper way is to run the motor to temperature and remove plugs then test.. so don’t expect to get 164 that the books say.. basically if your over 100 you should be fine.. it means the valves are sealing and the piston is compressing. And that’s all we are shooting for here. NOTE: the valve covers are off = oil is being pumped.. don’t go to long or you will have a mess to clean up. NOTE.. first test I did it with no lube! And I hit 60psi.. I used the WD40 down the piston, down the exhaust port and down the intake port (shot thought the carbs) as I stated above do this first, don't make my mistake, I hit 120 on first rotation and it was climbing.. but oil was being pumped so I stopped..
That’s about it for the hard part.. I used a little gasket sealer on the top valve covers, reinstalled the covers breather box and all the hoses.. New plugs are on order and UNFORTUNETLY a crank case breather hose is missing!! I bought the bike in a box, it seems I wasn’t given everything.. I hope to have the bike road worthy by the weekend.
UPDATE: I'll start at the end -I changed the plugs and all is good now
so I fired up the other day and things were... well rough.. back firing not revving up nothing good.. I pulled the front plug it was soaked in gas and the compression was 110.. I panicked.. made some calls found out you can't do pressure test with a wet cylinder.. pulled the rear plug did a compression test there found about 135, went to the front again and found 133! so that was good! turned out my plug in the front just wasn't firing.. tried another old plug and it ran well for about 2min then started acting up again.. bought two new plugs and it's running much better now.
time to put all the panels back on.. figure out why the lights aren’t working right.. fuel gauge is dead, rear mufflers are rubbing the frame.. ya lots of work yet.. but the motor is running! that's a big one!
Last edited by Renderw; Aug 24, 2012 at 02:03 PM.
Thread Starter
Member
Squid
Joined: Aug 2012
Posts: 68
Update. Bike still not up and running. It's smoking bad and the cards are dumping fuel so fast it can stop the the firing. I tried to ride it and it justkept cutting out. I opened the throttle up to clear the gas and it went from one cylinder to two and I nearly flipped. It. Scared the shi7 out of me.
Plan
I'll start with the carbs tear off and clean. I'm still optimistic that the smoke will clear out after some road time. I'm guessing the rubber seals on the valves are dried up after sitting so long.
Anyone know if you can safely add seal swell to engine oil? Maybe just add some shock oil for a 100 miles or something and then change the oil?
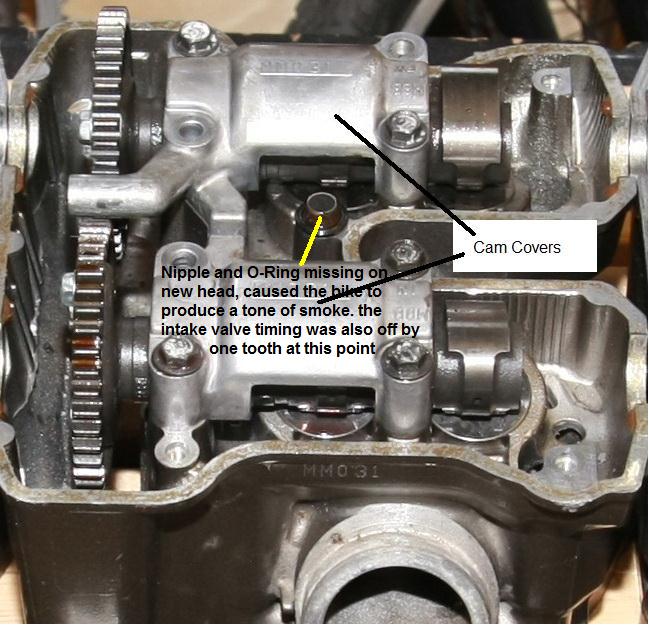
UPDATE! the smoke has cleared.. by not just by running it.. it seems the used head I bought was missing a small pipe in the middle of the head that has a O-Ring around hit.. once installed.. the smoke cleared up
Plan
I'll start with the carbs tear off and clean. I'm still optimistic that the smoke will clear out after some road time. I'm guessing the rubber seals on the valves are dried up after sitting so long.
Anyone know if you can safely add seal swell to engine oil? Maybe just add some shock oil for a 100 miles or something and then change the oil?
UPDATE! the smoke has cleared.. by not just by running it.. it seems the used head I bought was missing a small pipe in the middle of the head that has a O-Ring around hit.. once installed.. the smoke cleared up
Last edited by Renderw; Sep 25, 2012 at 12:02 PM.

the boss
SuperBike
SuperBike
Joined: Mar 2010
Posts: 1,182
From: largo,fl
is there fuel leaking out of the rear or front or both exhaust.
did you put the vacuum line on the back and not the bottom of the petcock.
it is possible the petcock diaphragm is broken and that is why so much fuel is going thru them so fast.
also,since you will have carbs out,check diaphragm and such.
check your oil for gas in it,if there is gas in it,it is either the petcock or something torn in the carbs.
Member
Squid
Joined: Jan 2012
Posts: 38
From: Vancouver, WA
I just replaced all 4 valves and valve seals on the rear cylinder for the same reasom cct failed valves hit piston and bent, the seats were fine replaced valves and valve seals. Only costs$280 with buying a used cct for $40. Its back together and running bit it seems off. I have a post about it. My question is since you were working with the front cylinder the cam markes were "fi" and "fe" so for the rear cylinder are they suppose to be "re" and "ri"?


Former Superchicken Owner
SuperBike
Joined: Sep 2008
Posts: 1,607
From: Ft. Worth, TX
Thread Starter
Member
Squid
Joined: Aug 2012
Posts: 68
yes R.i and R.e.. when timing chian is aligned in the timing chain windows the Ri and Re should be parallel, inline, with top of the head where the valve cover fits on.
1. make sure you rotated the engin in the proper direction so that the chain is tight and there is no back lash
2. a small amount of error is allowed, if you were to test by say moving a cam by one tooth you would see the error is huge! so if you paid attention at all it's hard to be out by one tooth.. someone it does happen though..
I rotated the motor a couple times and checked every time. before I put the valve cover back on

Thread
Thread Starter
Forum
Replies
Last Post
BiggDaddyKool
Technical Discussion
29
Jun 7, 2007 03:52 PM


