
Little help/needle shim


Thread Starter
Senior Member
Superstock
Joined: Apr 2009
Posts: 395
From: Columbus, OH

Little help/needle shim
No need to remove the carbs correct? Did a search but cant locate an exact thread on what to remove (besides the obvious-tank ect..) to shim the stock needles. Got a flat spot after putting on the devils. Thanks guys.
Senior Member
Superstock
Joined: Oct 2008
Posts: 388
From: Muskego,WI
there is no real technical need to remove the carbs, it does make the project easier though (front cylinder espically)
to do this project -
prop the tank up with a prop rod
take the airbox off.
loosen the carb boots
remove the front and rear choke connections (be careful)
remove the throttle cable screws (2)
remove the carb coolant lines
wiggle the carbs and they should come right off
remove the screws on the diaphram
use one screw and screw into the needle holder and take a pliers and yank it out...
shim under the exisitng carb washer
reverse to reinstall.
I would shim it .040 and see if that helps.

Thread Starter
Senior Member
Superstock
Joined: Apr 2009
Posts: 395
From: Columbus, OH
Cool. Thanks. Of course my wife has inevitably lost my fitting that goes in the cylinder head for the carb sync so i just had to order a new one. Which puts me on hold for a damn week Called every Honda dealer known to man in my area and not one has it. Sure. Why would they? Thanks for the info guys.

Senior Member
MotoGP
Joined: Mar 2007
Posts: 3,132
From: Phoenix, AZ
Cool. Thanks. Of course my wife has inevitably lost my fitting that goes in the cylinder head for the carb sync so i just had to order a new one. Which puts me on hold for a damn week Called every Honda dealer known to man in my area and not one has it. Sure. Why would they? Thanks for the info guys.
Thread Starter
Senior Member
Superstock
Joined: Apr 2009
Posts: 395
From: Columbus, OH
Lazn, that was the plan as i just got it in the mail a few days ago! I never even got to use it. I was in the process of getting all the bits and pieces together to leave it in and when i went to get it to make sure i got the right size tubing to fit on the fitting sadly it was gone Not sure what size T's and tubing to get.

2nd mouse gets the cheese
SuperBike
Joined: Jan 2008
Posts: 1,697
From: Beaverton, OR
also you only need to pop the front carb out of the boot you can leave coolant lines throttle cable choke cable all connected. You only need an inch or two to get to the third screw that hold the cover on.

Banned
MotoGP
Joined: Aug 2007
Posts: 5,942
From: Lake View Terrace, CA
Well as it's a carb thread, you know i have to comment......
First, while it is possible to shim the needles with out removing the carbs, it might be easier for you to get the diaphragms re-installed with them on the bench.
As for the shimming itself, there are two set ups you can use. The one I prefer is shimming the needles up .040" and installing a #48 pilot jet. The other option is going up .060" and stay with the #45 pilot, which works ok but not as well as the first set up IMHO.
Also when you remove the needles, there will be a thin steel washer under each needle. Remove the washer from the front carb and leave it in place on the rear. It's an HRC set up tip that does help.
Then there are the washers themselves. Some will say to run brass or whatever, I run the steel washers. My reasoning is that when I installed the HRC kit on my bike all the parts were factory Keihin as the are all part of the Honda family. Anyways the shims the Keihin supplied were steel, so I don't see why there would be any issue running them and the do seem to be more consistent in thickness.
That leaves the one step that will cause you problems until you get the hang of it. Installing the diaphragms can be a challenge but there are a couple of tricks to make things a bit easier.
First you need to find something to hold the slide part of the way open. To do this, after you remove the needle from the slide put the diaphragm in the down position and reinstall it in the carb. The find something to put in the carb throat to to stop it when the diaphragm just rests in the sealing groove. Then reassemble then slide and install it making sure the needle drops into the needle jet and use the spacer to hold it up.
Then to install the slide spring is tricky...... it is quite long. So what you do is take a long screw driver, put the spring on the shaft of the screw driver. Then put the end of the screw driver in the cap and push the spring down, holding it in with your thumb while you remove the screw driver.
Then put it into position and slide your thumb out of the way and the spring should drop into place around the needle holder. This might take a try or two until you get the hang of it.
At that point push the cap down until it seals and reinstall the 3 screws holding it. Then you need to check to make sure the diaphragm is seated properly. to do this push the slide all the way up and let it go. You should hear air being forced out as it opens and pulled back in as it closes. Also the slide should close slowly, if it just drops closed or you don't hear the air being moved (try it before you disassemble them to find out what it should sound and look like) then the diaphragm is pinched or torn and you need to pull it apart and try again.
Sorry for the long answer but hope it all goes well for you.
Cheers,
Mike
Thread Starter
Senior Member
Superstock
Joined: Apr 2009
Posts: 395
From: Columbus, OH
Geez! Theres alot more to it than just 1,2,3! I think i can handle it though. Patience and thorough research will help. Thanks Mike for the detailed info. - One more Mike, The thin steel washer you mentioned, is that the existing shim or something else? I have read mixed reviews in my searches about leaving in the old and taking them out.
Last edited by dshakes; May 21, 2010 at 03:20 PM. Reason: More questions!!
Banned
MotoGP
Joined: Aug 2007
Posts: 5,942
From: Lake View Terrace, CA
Geez! Theres alot more to it than just 1,2,3! I think i can handle it though. Patience and thorough research will help. Thanks Mike for the detailed info. - One more Mike, The thin steel washer you mentioned, is that the existing shim or something else? I have read mixed reviews in my searches about leaving in the old and taking them out.

Senior Member
MotoGP
Joined: Aug 2007
Posts: 2,547
From: Way Out West
It has been a few years but as I remember, I couldn't get at the front vacuum chamber (that cross brace is in the way) without loosening the bands and pulling the carbs up. Didn't need to remove them from the bike, didn't need to disconnect anything from the carbs themselves. Just pull them up to clear that cross piece. When you're done you do need to sync them tho.

Senior Member
SuperSport
Joined: Feb 2010
Posts: 667
From: NY State
stainless steel washers tend to be thinner and more consistant in thinkness, at least the ones in my local hardware store are. if you get two that are close, put the thicker one in the rear carb

Bytes
Back Marker
Joined: Dec 2009
Posts: 105
From: This side of hell
Just as an FYI i bought a digital micrometer from Harbour Freight last year to take some measurements on the crank and cam of 76 BMW 2002 I am rebuilding. It was only $20 and was right on with my machinists measurements. It would be perfect for measuring the thickness of a washer.
Thread Starter
Senior Member
Superstock
Joined: Apr 2009
Posts: 395
From: Columbus, OH
So i just shimmed the rear needle and when putting the holder back in im not sure if its right. Forgot to check it before i took it apart like a doofus. How much play should the needle have in the holder when you press the bottom of it up? I put the holder back into slide and at first i pressed until it clicked and the needle had little play to it. So ipulled it back out and noticed the groove for the o-ring and pressed it in again until i felt the o-ring seat(i think). Now the needle has about an 1/8in. of play give or take? What do you guys think? Also, holy hell that spring is long!!!
Senior Member
SuperSport
Joined: Feb 2010
Posts: 667
From: NY State
There should not be any play at all. The needle is held in place with a small spring. There is no o-ring on the needle. The only o-ring that i can think of is in the pilot adjustment screw(s).
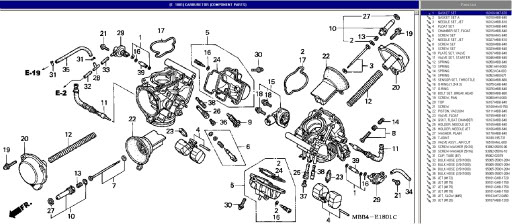
Take a look at the fiche items 7 and 10. The additional washers should be placed under item 7's washer. Note the spring item 13, it needs to be there.
Take a look at the fiche items 7 and 10. The additional washers should be placed under item 7's washer. Note the spring item 13, it needs to be there.
Thread Starter
Senior Member
Superstock
Joined: Apr 2009
Posts: 395
From: Columbus, OH
Residentg,
I assembled just as you described. Shim placement, spring in and everything. The o-ring is located on item 10 put on before #27 goes on. 27 i believe is a metal washer. When i assembled the first time i slid 10 into 22 and then pressed on the bottom of the needle and it would not depress very much at all. Maybe a 16th of an inch or a 32nd even? The second time it depressed around an 8th or so again give or take on these numbers. Have to make sure and check the front one when i pull it next. By the way, radio shack washer fit perfect
I assembled just as you described. Shim placement, spring in and everything. The o-ring is located on item 10 put on before #27 goes on. 27 i believe is a metal washer. When i assembled the first time i slid 10 into 22 and then pressed on the bottom of the needle and it would not depress very much at all. Maybe a 16th of an inch or a 32nd even? The second time it depressed around an 8th or so again give or take on these numbers. Have to make sure and check the front one when i pull it next. By the way, radio shack washer fit perfect
Senior Member
SuperSport
Joined: Feb 2010
Posts: 667
From: NY State
OK, I just did mine and I can't remember if I had an o-ring. I will look next time. You should not have any "free" play, the spring will allow up and down needle movement, but the needle should immediately "spring" back into place. The OP of my bike did not install one of the retaining springs, so my needle was flopping around about 1/4". Make sure that the spring is seated properly too.
Thread Starter
Senior Member
Superstock
Joined: Apr 2009
Posts: 395
From: Columbus, OH
Oh it doesnt have any free play, its the amount of up and down movement i am questioning. There is no side to side play or "slop" in the needle. I was curious about the range of up and down motion. Oh yeah, just read some of the "adjusting chain" thread. HILARIOUS! Maybe i should yell and cuss and then you will tell me!!!
(Just kidding)
(Just kidding

Thread
Thread Starter
Forum
Replies
Last Post
snowman666
Technical Discussion
8
Dec 7, 2008 08:31 PM
ClevelandSuperhawkRumble
General Discussion
7
Mar 25, 2005 01:27 PM


