
Swingarm brace install + Underslung caliper mount


Senior Member
SuperBike
Joined: Mar 2012
Posts: 1,544
From: New South Wales Australia

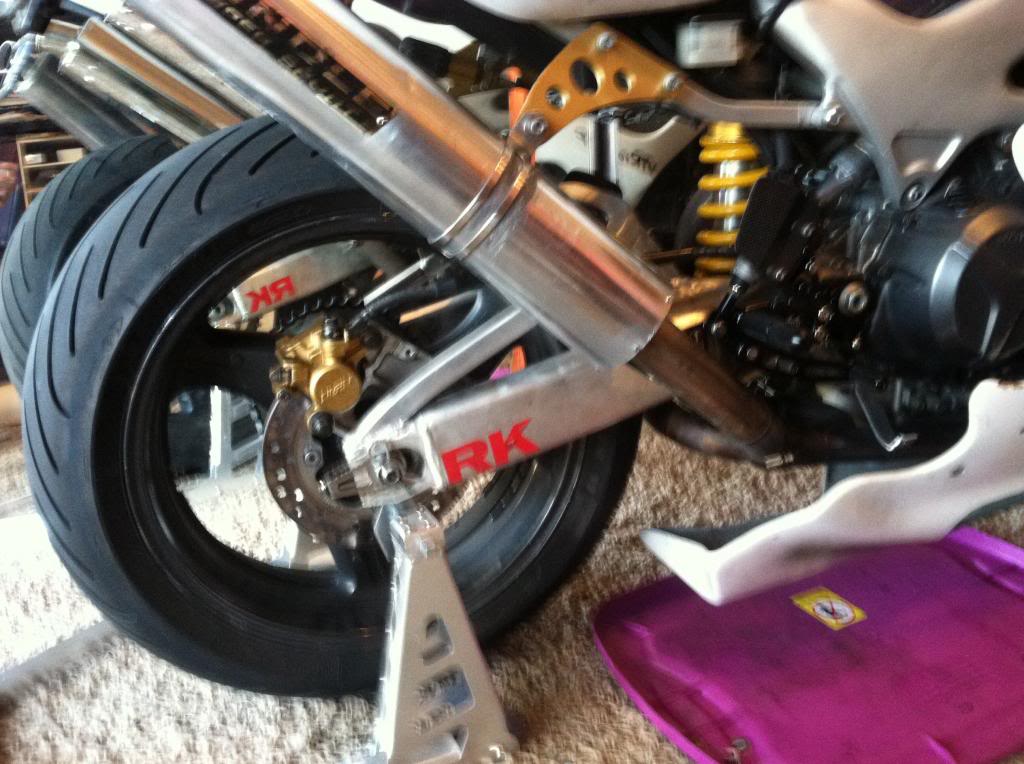
If the brake hose was black it wouldn't stand out so much.
Whichever way you look at it, it is way cool and unique.
Great work all round, now ride it and tell us what you think!
Whichever way you look at it, it is way cool and unique.
Great work all round, now ride it and tell us what you think!


Senior Member
Back Marker
Joined: Jul 2010
Posts: 189
From: Winnipeg,MB,Canada
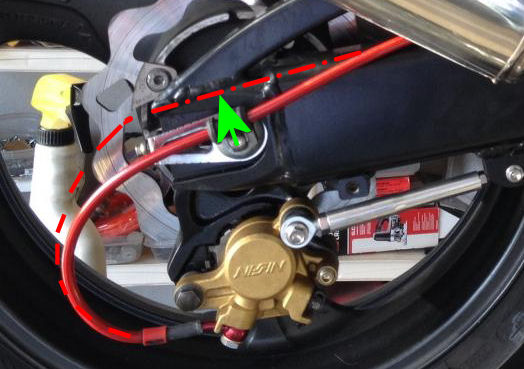
Just looking at this pic and wondering....is there enough room to flip the banjo fitting on the caliper to the angle goes up instead of down? It seems like it would give a cleaner look with less line hanging out back but thats just my 2 cents....regardless, it looks killer. Nice work!

Thread Starter
Administrator
MotoGP
Joined: Apr 2006
Posts: 4,402
From: Kempner, TX
Just looking at this pic and wondering....is there enough room to flip the banjo fitting on the caliper to the angle goes up instead oof down? It seems like it would give a cleaner look with less line hanging out back but thats just my 2 cents....regardless, it looks killer. Nice work!
Thread Starter
Administrator
MotoGP
Joined: Apr 2006
Posts: 4,402
From: Kempner, TX
Well 1st 40 miles as shake down deemed a success.. No issues at all ...
No real opinion on change in feel with the brace as I as just cruising to rack up some shake down miles.
No real opinion on change in feel with the brace as I as just cruising to rack up some shake down miles.
Thread Starter
Administrator
MotoGP
Joined: Apr 2006
Posts: 4,402
From: Kempner, TX
Thread Starter
Administrator
MotoGP
Joined: Apr 2006
Posts: 4,402
From: Kempner, TX
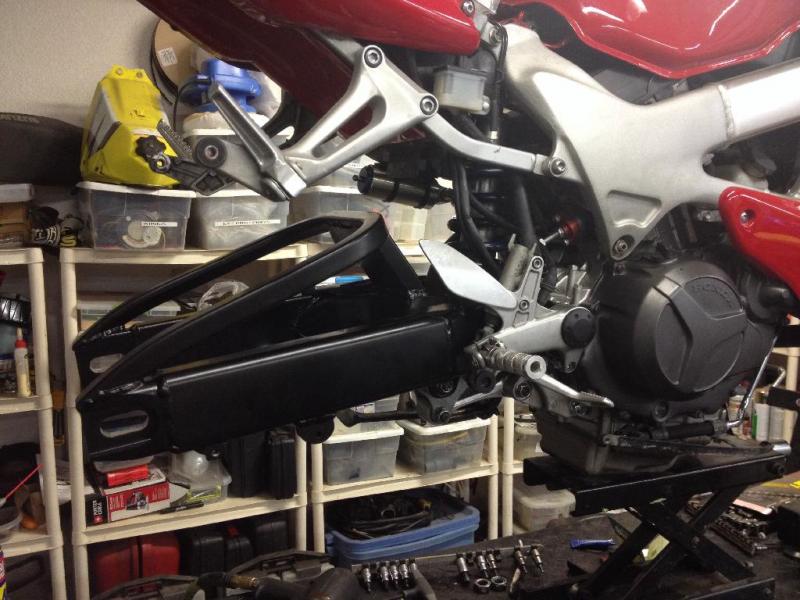
Back on the lift tonight... I'll do a good look to make sure all is well... lots went on this work session.. head light to rear wheel.
Class tomorrow so hard test ride on a known road Sunday
Thread Starter
Administrator
MotoGP
Joined: Apr 2006
Posts: 4,402
From: Kempner, TX
The one place I can say for sure it has made a difference (better) is when leaned over, rolling on some throttle past the apex heading for the exit, and the wheels roll over or though a dip, bump, hole in the pavement. That used to impart more flex and travel off line.
Other than that I don't "feel" a difference
But that one felt difference, plus the better looks, and updated appearance...I'm very ok with the outcome.
Last edited by E.Marquez; Mar 4, 2014 at 06:14 AM.

Senior Member
SuperSport
Joined: Apr 2013
Posts: 834
From: Thousand Oaks, CA
Kenmoore, your install is what i plan on doing.
Not planning on cutting the front leg box.. but was going to weld in the rear legs, and the sides and back of the front leg... as well as the left portion of the front box, then use a soft faced dead blow hammer to form the right front part of the box to conform to the shock relief area of the swing arm...then complete the weld.
How was yours done?
it seems to come out so perfectly with everyones lining up with the indent on the swinger.
just wanna make sure i understand all this so i get it right the first time.
Thread Starter
Administrator
MotoGP
Joined: Apr 2006
Posts: 4,402
From: Kempner, TX
I used a plastic shot filled 8lb dead blow hammer to gently form the lead edge to the aprox shape I wanted.
Senior Member
SuperSport
Joined: Apr 2013
Posts: 834
From: Thousand Oaks, CA
wow amazed you can get such a perfect fit from the swingers indent. i really woulda thought you would need heat. great to know so i dont sit there and melt my new brace ;]
Thread Starter
Administrator
MotoGP
Joined: Apr 2006
Posts: 4,402
From: Kempner, TX
While forming the front leg, I placed the back side on a block of wood covered in a rag.. and then gave the brace a few taps with the hammer, 2 seconds and it was located on the brace for another look, back to wood, few more taps.
The brace is thin enough it moves pretty easy...
Do the forming after the majority of the other fittings is done... to include the trimming of the center web in the front leg.
Once formed generally, you'll find a bit more trimming on the front leg, then form some more, little more trimming, form to final curve and do any final trimming.
At that point you should be done except for finishing for your planned coating process. .. Then weld, clean up again and finish for coating... and coat
Senior Member
SuperSport
Joined: Apr 2013
Posts: 834
From: Thousand Oaks, CA
One of the reasons I made a jig to locate the brace precisely at the same point quickly.
While forming the front leg, I placed the back side on a block of wood covered in a rag.. and then gave the brace a few taps with the hammer, 2 seconds and it was located on the brace for another look, back to wood, few more taps.
The brace is thin enough it moves pretty easy...
Do the forming after the majority of the other fittings is done... to include the trimming of the center web in the front leg.
Once formed generally, you'll find a bit more trimming on the front leg, then form some more, little more trimming, form to final curve and do any final trimming.
At that point you should be done except for finishing for your planned coating process. .. Then weld, clean up again and finish for coating... and coat
Senior Member
SuperSport
Joined: Apr 2013
Posts: 834
From: Thousand Oaks, CA
im sure im not the first to mention this, but couldnt you find a rear caliper from another bike that comes underslung and configure a bracket that would work? that way the banjo could point forward and the brake line could just go under the swingarm and straight into the caliper. i feel like this would give you better braking performance as well?
Thread Starter
Administrator
MotoGP
Joined: Apr 2006
Posts: 4,402
From: Kempner, TX
im sure im not the first to mention this, but couldnt you find a rear caliper from another bike that comes underslung and configure a bracket that would work? that way the banjo could point forward and the brake line could just go under the swingarm and straight into the caliper. i feel like this would give you better braking performance as well?
I started the project with a designe caliper for under mounting.. Just did not find one I liked
So modified the OEM bracket.
The break works great and only takes a few min to remoe from the mount and bleed.
The only reason to change at this point is looks.. It could be a cleaner install and look.... But I'm not really motivated at this point. If the parts fall into my lap I'll swap to a designed under mount caliper

Moderator
MotoGP
Joined: Jul 2007
Posts: 5,213
From: Gettysburg, Pa
Erik, were there any reservations when you selected black for the arm being that it is so close the case covers and wheels which aren't [the same]black?
I personally don't like seeing the clash and I'm really struggling with the decision on color if any. I'd like to coat it but I want the factory brushed aluminum appearance that matches the frame spars. How much of a challenge is it to coat the entire set-up minus the arm sides and brace bars (and how much would you charge )?
)?
I personally don't like seeing the clash and I'm really struggling with the decision on color if any. I'd like to coat it but I want the factory brushed aluminum appearance that matches the frame spars. How much of a challenge is it to coat the entire set-up minus the arm sides and brace bars (and how much would you charge
Senior Member
SuperSport
Joined: Apr 2013
Posts: 834
From: Thousand Oaks, CA
wolverine, i too pondered about what to do with the swinger in terms of color since i already had it all off. in the end i like the look of the brushed alum so i kept it as is. at one point i planned to do the frame, swinger, and sub frame black but one day i decided i like the alum better. convenient too because it was the much cheaper option ;] if your gonna do the swinger IMO the frame should be done. i never liked the swinger one color and frame another, no offense Erik!
every new bike has a satin black frame these days and i think the alum just looks right on the hawk. keeps it unique among the masses. plus it makes the graphite colored cases and wheels pop. just my opinion of course.
every new bike has a satin black frame these days and i think the alum just looks right on the hawk. keeps it unique among the masses. plus it makes the graphite colored cases and wheels pop. just my opinion of course.
Moderator
MotoGP
Joined: Jul 2007
Posts: 5,213
From: Gettysburg, Pa
Pics of said unpainted braced swinger please. Concern is with getting the area where the bead of weld was for the caliper brace back to factory brushed appearance. I'm wondering how pretty I can make it after the weld job, with out spending crazy hours to do so.
Senior Member
SuperSport
Joined: Apr 2013
Posts: 834
From: Thousand Oaks, CA
if your talking about the welded finger for the caliper bracket to slide onto, its only actually welded on the inside of the swinger, i dont think there is a bead on the top part that you can see with the swinger on the bike IIRC

Thread Starter
Administrator
MotoGP
Joined: Apr 2006
Posts: 4,402
From: Kempner, TX
I choose black..... because I ride more than I clean.
I choose satin black because it is more subdued than gloss black.
I choose satin black because it was an easy on hand color with job turn around in 3 hours.
I did not fret color choice much as I intend to open a powder coating business in the future and will strip and coat the damn thing as often as i feel like it
In hind sight, I'll redo the arm in two or more colors next time..
And no it is not hard for a decent powder coater to do multiple colors.

Well take off, eh.
SuperBike
Joined: Jun 2012
Posts: 1,206
From: QC, Canada
Lloydie, can you please get that measurement for us, if time allows. Better yet, if you have a pic of the 98-99 swing arm installed, even better. Or anyone else can chime in if they have info/pics.
Never thought of this. I guess to have the swing arm itself and the brace portion another colour, would probably be nice.
I'm a few months late with the asking of questions, but, I'm on the verge of spending the money to purchase a swing arm, and although I prefer the twin arm look, I don't want to find myself with an ugly duckling because I need to cut off a portion of the brace to fit onto the swing arm.

Thread Killer
SuperBike
Joined: Apr 2013
Posts: 2,093
From: Geneseo, IL
I have a 98/99 twin spar version 900rr swing arm I'm planning on using for the brace mod. The spars are boxed at the rear.
Tell me the specific measurements you would like and I'll try to get them tonight. I haven't cut the thing up yet, so I can't get you a wall thickness.
I do not intend to cut the front of the right spar down as I've seen done with this brace. I found these pics, and I intend to do mine in the same manner. Of course, now I can't find where i got the pics, but I think it was from a post on the VTR1000.org site.
Well take off, eh.
SuperBike
Joined: Jun 2012
Posts: 1,206
From: QC, Canada
Thanks Steve. The first pic has pretty much answered all of my questions as to how far they protrude into the shock bay if you wish.
As for the measurements, can you get me the width of the side of the spar ? The width from the front (as earlier pictured by Eric in this thread) is not important to me. :O)
As for the measurements, can you get me the width of the side of the spar ? The width from the front (as earlier pictured by Eric in this thread) is not important to me. :O)
Thread Killer
SuperBike
Joined: Apr 2013
Posts: 2,093
From: Geneseo, IL
Found the page: www.vtr1000.org • View topic - My Black Storm!!
OK, I'll get the width (front to back) of the spar leg.
Yes, in his mock-up pic, the spar leg protrudes forward, but in the finished product, it does not appear to do so nor has he cut down the front of the spar. Later in his thread, there is a pic that shows his tire was rubbing on the brace because he ran a higher profile tire and smaller sprocket, but you can see that the positioning of the brace was not the problem as it rubbed on the swing arm as well.
The brace stuff starts on the fifth page of his post.
In thedeatons's swing arm brace post, he clearly shows the relief thingy in the Superhawk swing arm for the rear shock is more than is needed where the brace contacts the swing arm. I know this version of the 900rr brace will work out or else I'm out, like, 30 bucks and then all hell's gonna break loose.
Last edited by VTR1000F; Sep 25, 2014 at 09:20 AM.
Thread Killer
SuperBike
Joined: Apr 2013
Posts: 2,093
From: Geneseo, IL
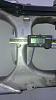
So, here are some pics of the twin spar version 900rr swinger. I have no idea if there are variations of this version or if they are all dimensionally the same for all years they looked like this.
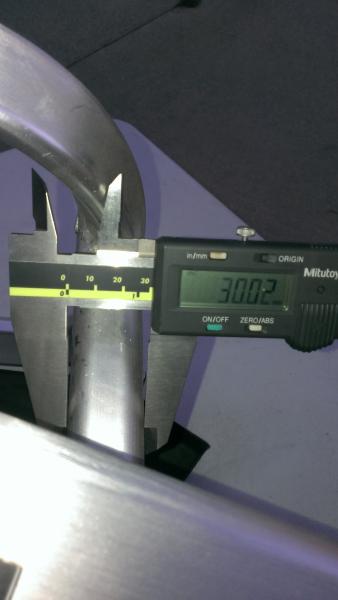
The width front-to-back or depth of the spar leg is 30mm:
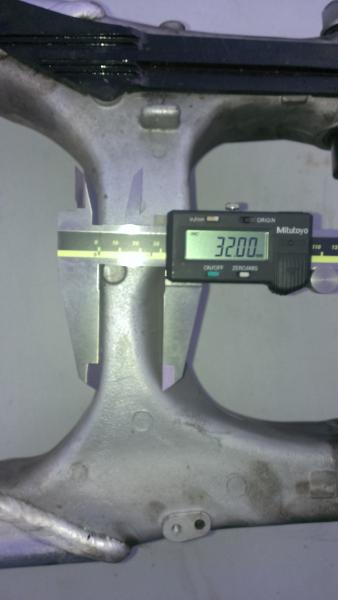
If the calipers are rotated parallel to the plane of the swinger, the width of the footprint where the spar meets the swinger is about 32mm. Here is showing 32mm at the approximate location the outside edge of the right spar will hit the SH swinger:
The width (side-to-side) of the spars is 120mm. The caliper is rotated off the part so the display may be read and the jaws look wider than the part, but they are not:

Here is 120mm approximately centered on the SH swinger:

Here is the SH swinger and the 900rr swinger side-by-side:

The width front-to-back or depth of the spar leg is 30mm:
If the calipers are rotated parallel to the plane of the swinger, the width of the footprint where the spar meets the swinger is about 32mm. Here is showing 32mm at the approximate location the outside edge of the right spar will hit the SH swinger:
The width (side-to-side) of the spars is 120mm. The caliper is rotated off the part so the display may be read and the jaws look wider than the part, but they are not:

Here is 120mm approximately centered on the SH swinger:

Here is the SH swinger and the 900rr swinger side-by-side:

Thread Starter
Administrator
MotoGP
Joined: Apr 2006
Posts: 4,402
From: Kempner, TX
Back to the drawing board.
Had a part failure today while teaching class.
The rear caliper bracket fractured.


It would appear two things are at issue.
I underestimated the amount of force generated and the thrust angle.
I removed too much material when I sectioned the OEM part.
New brake bracket needs to be found then MOD 2 coming up
Had a part failure today while teaching class.
The rear caliper bracket fractured.
It would appear two things are at issue.
I underestimated the amount of force generated and the thrust angle.
I removed too much material when I sectioned the OEM part.
New brake bracket needs to be found then MOD 2 coming up
Last edited by E.Marquez; Oct 30, 2014 at 11:17 PM.


