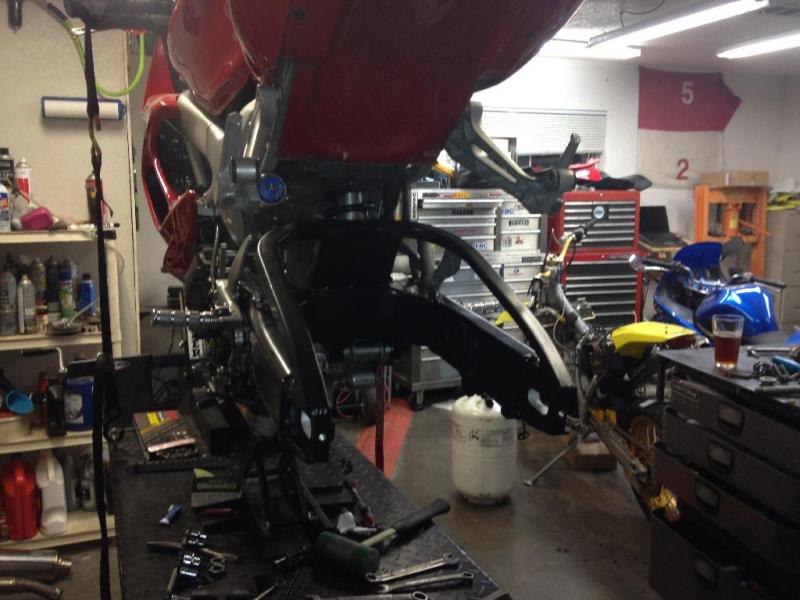
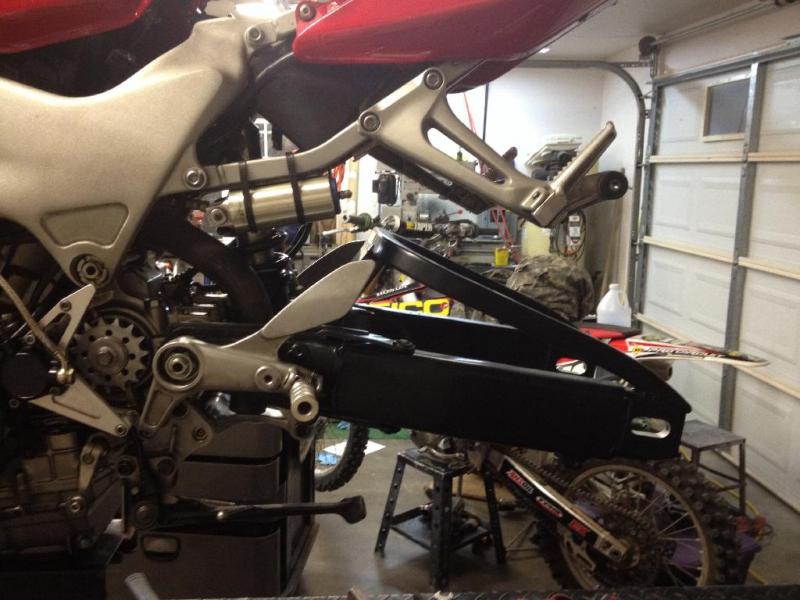
Swingarm brace install + Underslung caliper mount


 01-23-2014, 06:38 PM
#63
Administrator
MotoGP
Thread Starter

Join Date: Apr 2006
Location: Kempner, TX
Posts: 4,402
 01-24-2014, 06:36 AM
#65
Senior Member
MotoGP

Join Date: Jul 2010
Location: Phoenix, AZ
Posts: 3,869
James- you could consider grinding off the paint on the NISSIN letters on the caliper so the alloy shows through... takes like 20 minutes if you're being careful, but makes them look pretty cool IMO.
01-24-2014, 07:05 AM
#67
Administrator
MotoGP
Thread Starter
Join Date: Apr 2006
Location: Kempner, TX
Posts: 4,402
Im going with Satin black on the arm, OEM gold anodizing on the caliper, caliper bracket is satin black.. Strut is polished aluminum, lift bobbins are aluminum Hard anodized ......time will tell if I like the look....it's all just after thought for the ,most part... the swingarm brace IS the project.. well and then there is the side one of making new axle adjusters...
01-24-2014, 07:10 AM
#68
Senior Member
MotoGP
Join Date: Jul 2010
Location: Phoenix, AZ
Posts: 3,869
 01-24-2014, 07:16 AM
#70
Administrator
MotoGP
Thread Starter
Join Date: Apr 2006
Location: Kempner, TX
Posts: 4,402
And yes, the OEM ones look like something on a cheap department store bicycle
 ... Really Honda>>>> That was the best you could do?
Anyway......we will see what comes of my adjuster plan.
01-24-2014, 07:28 AM
#72
Administrator
MotoGP
Thread Starter
Join Date: Apr 2006
Location: Kempner, TX
Posts: 4,402
errr, no.
- I made a laser alignment tool for chain, sprocket and wheel alignment.
- Im working on making axle adjusters that do not look like crap
Not going to be something those that do not have, or have access to a lathe and mill can do I think.
01-24-2014, 07:29 AM
#73
Senior Member
MotoGP

Join Date: Apr 2005
Location: Montreal
Posts: 5,631
Well no axle adjuster is really even close to something I call precision.. for that I use a laser alignment tool... perfect wheel/axle/ chain alignment every time.
And yes, the OEM ones look like something on a cheap department store bicycle... Really Honda>>>> That was the best you could do?
Anyway......we will see what comes of my adjuster plan.
And yes, the OEM ones look like something on a cheap department store bicycle
... Really Honda>>>> That was the best you could do?Anyway......we will see what comes of my adjuster plan.
I got the stock unit powdercoated (HATE chrome on a sportbike, mine anyhow) and took all the slack out of them by adding washers between the adjuster bolt and the axle holder; works quite well now to be honest, though it still has a "Wal-Mart" look to it......
If we could get a design and agree on it, perhaps we could do a "group buy" of sorts..... Gl_s_r`s design requires a longer axle (actually uses a swingarm pivot shaft; same diameter, but slightly longer), so I may use the opportunity to get a titanium axle made (to match my front one)....... any (other) takers on that one?
Last edited by mikstr; 01-24-2014 at 07:34 AM.
01-24-2014, 07:41 AM
#74
Administrator
MotoGP
Thread Starter
Join Date: Apr 2006
Location: Kempner, TX
Posts: 4,402
J
If we could get a design and agree on it, perhaps we could do a "group buy" of sorts..... Gl_s_r`s design requires a longer axle (actually uses a swingarm pivot shaft; same diameter, but slightly longer), so I may use the opportunity to get a titanium axle made (to match my front one)....... any (other) takers on that one?
If we could get a design and agree on it, perhaps we could do a "group buy" of sorts..... Gl_s_r`s design requires a longer axle (actually uses a swingarm pivot shaft; same diameter, but slightly longer), so I may use the opportunity to get a titanium axle made (to match my front one)....... any (other) takers on that one?
But you do realize it's more than just a longer axle??
Custom spacers need to be made for both sides, and the caliper bracket has to be counter bored, and a spacer pressed in place to make his design work.
Makes it a long shot for most home wrenches... doable, but the subcontracting for outside work required likely makes it not financially reasonable for most.
01-24-2014, 08:28 AM
#75
Administrator
MotoGP
Thread Starter
Join Date: Apr 2006
Location: Kempner, TX
Posts: 4,402
01-24-2014, 08:33 AM
#76
Senior Member
MotoGP
Join Date: Apr 2005
Location: Montreal
Posts: 5,631
For sure Gl_s_r`s design is my inspiration..
But you do realize it's more than just a longer axle??
Custom spacers need to be made for both sides, and the caliper bracket has to be counter bored, and a spacer pressed in place to make his design work.
Makes it a long shot for most home wrenches... doable, but the subcontracting for outside work required likely makes it not financially reasonable for most.
01-24-2014, 08:39 AM
#77
Administrator
MotoGP
Thread Starter
Join Date: Apr 2006
Location: Kempner, TX
Posts: 4,402
Was aware of the spacers on the inside of the swinagarm on both sides (no big deal), was not for the rest, though I am not sure why all that stuff is needed to be honest (don`t plan to go with underslung caliper, just a less cheezy looking adjuster) , but alas... guess we`ll go a different route..... more than one way to skin a cat as they say......
You could do it with just spacers (replacement on left, extra one on right) and not fit the right one into the caliper bracket.. it would just be a less clean more wheel install complicated way.. .. but doable for sure.
So new spacers and the custom made adjusters "could" be done (installed) at the average home user level, if parts are outsourced, and your ok with the loose extra spacer on the right side.
Last edited by E.Marquez; 01-24-2014 at 08:42 AM.
01-24-2014, 08:57 AM
#78
Senior Member
MotoGP
Join Date: Apr 2005
Location: Montreal
Posts: 5,631
Underslung has nothing to do with this MOD idea...
You could do it with just spacers (replacement on left, extra one on right) and not fit the right one into the caliper bracket.. it would just be a less clean more wheel install complicated way.. .. but doable for sure.
So new spacers and the custom made adjusters "could" be done (installed) at the average home user level, if parts are outsourced, and your ok with the loose extra spacer on the right side.
01-24-2014, 09:05 AM
#79
Administrator
MotoGP
Thread Starter
Join Date: Apr 2006
Location: Kempner, TX
Posts: 4,402
01-25-2014, 03:41 PM
#80
Administrator
MotoGP
Thread Starter
Join Date: Apr 2006
Location: Kempner, TX
Posts: 4,402
Well not much accomplished today ... last two days and tomorrow Im stuck in a riding school,, so I can become a certified Training instructor.. Required to take the basic class with in 12 months of application  Ummm the basic course for me was 1984
  .. and the advanced and Sport bike course I do every year dont count ..
Anyway... found a package waiting on me after class today..
Core Moto came though in record time for a custom line end to end.
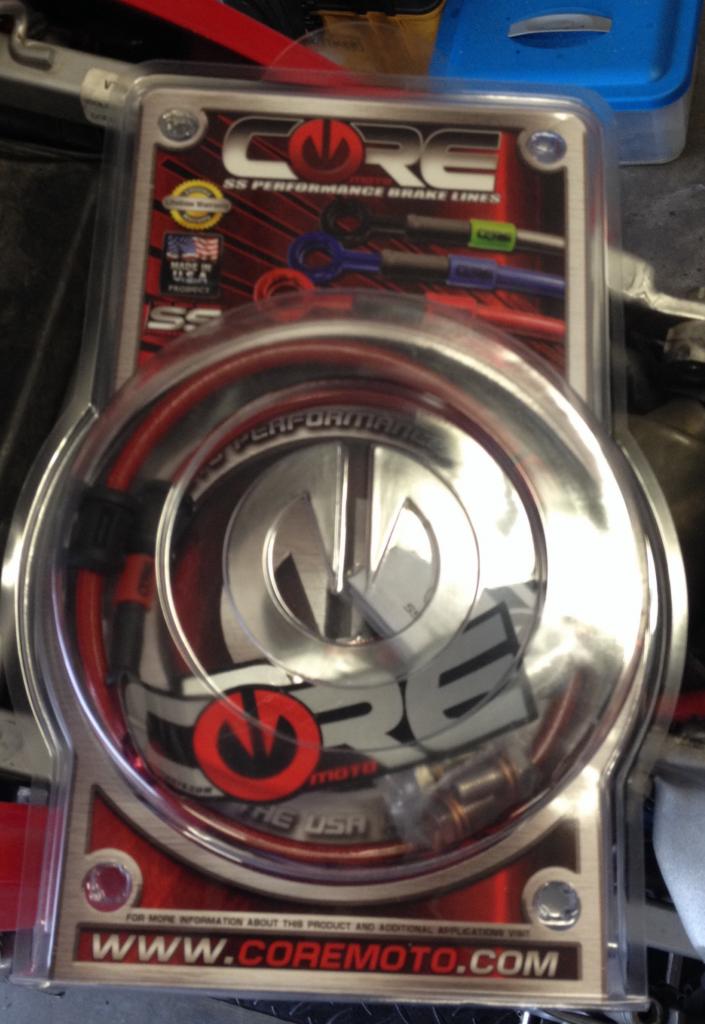
Powder Coat'er txt me today and said, in the oven, but not done till late tonight....
So not going to get it together in a late night session of wrenching so I can take it to class tomorrow..
But after class.... I will pick up parts.... and the finial build will take place...
..Anyway... found a package waiting on me after class today..
Core Moto came though in record time for a custom line end to end.


Powder Coat'er txt me today and said, in the oven, but not done till late tonight....
So not going to get it together in a late night session of wrenching so I can take it to class tomorrow..
But after class.... I will pick up parts.... and the finial build will take place...
01-27-2014, 04:57 AM
#81
Administrator
MotoGP
Thread Starter
Join Date: Apr 2006
Location: Kempner, TX
Posts: 4,402
Coming along nicely
Got done with class yesterday and picked up my freshly powder coated parts.
Just had to get started on installing them..
First up was cleaning the stray blast media out of the swing arm...
Had two or three piles about that big... Id have preferred the coater do that before spraying.. but as all the bolt holes and such are plugged with silicone plugs or taped over... the media INSIDE the part does not really effect a clean job on coating.
Then initial fitment check
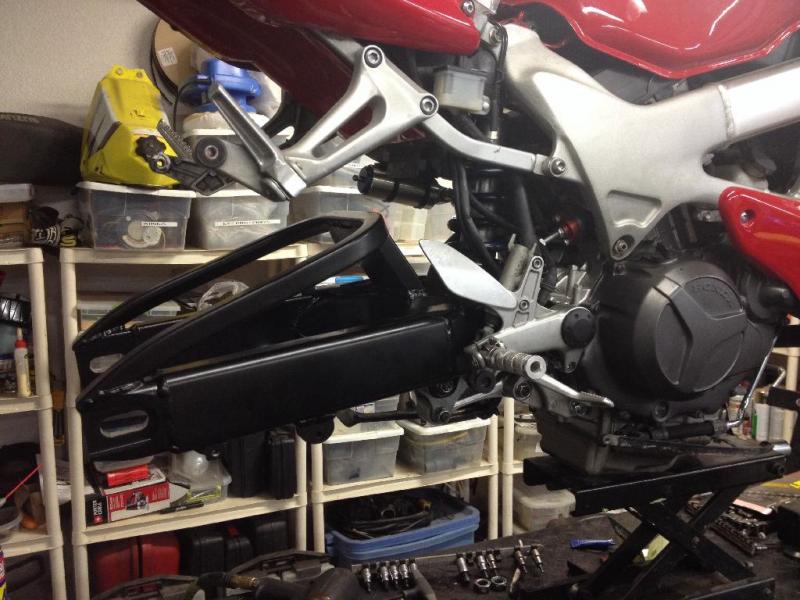
And one last one at the stopping point for the night

Made a bone head move,, and forgot to order a new rivet style chain master link,,, and fitting a endless chain in and through a swing arm with a brace is a bit tough")
But I'll get things buttoned up today and have the wife bring one home from work on Tuesday.
Just had to get started on installing them..
First up was cleaning the stray blast media out of the swing arm...
Had two or three piles about that big... Id have preferred the coater do that before spraying.. but as all the bolt holes and such are plugged with silicone plugs or taped over... the media INSIDE the part does not really effect a clean job on coating.
Then initial fitment check
And one last one at the stopping point for the night
Made a bone head move,, and forgot to order a new rivet style chain master link,,, and fitting a endless chain in and through a swing arm with a brace is a bit tough
But I'll get things buttoned up today and have the wife bring one home from work on Tuesday.
 01-27-2014, 03:26 PM
#83
Senior Member
MotoGP
Join Date: Jul 2010
Location: Phoenix, AZ
Posts: 3,869
You didn't have to foresight to lay it in there when you were welding, then clean all the flammables of and mask the whole thing off for powder coat so that it would come back ready to be installed?
01-27-2014, 03:38 PM
#84
Administrator
MotoGP
Thread Starter
Join Date: Apr 2006
Location: Kempner, TX
Posts: 4,402

I have clip type master links on hand,,, so it's not like it's keeping me from a test ride if I get it done.
Going back in the shop now to wrench a bit...
01-27-2014, 05:08 PM
#86
Administrator
MotoGP
Thread Starter
Join Date: Apr 2006
Location: Kempner, TX
Posts: 4,402
01-29-2014, 07:44 PM
#87
Administrator
MotoGP
Thread Starter
Join Date: Apr 2006
Location: Kempner, TX
Posts: 4,402
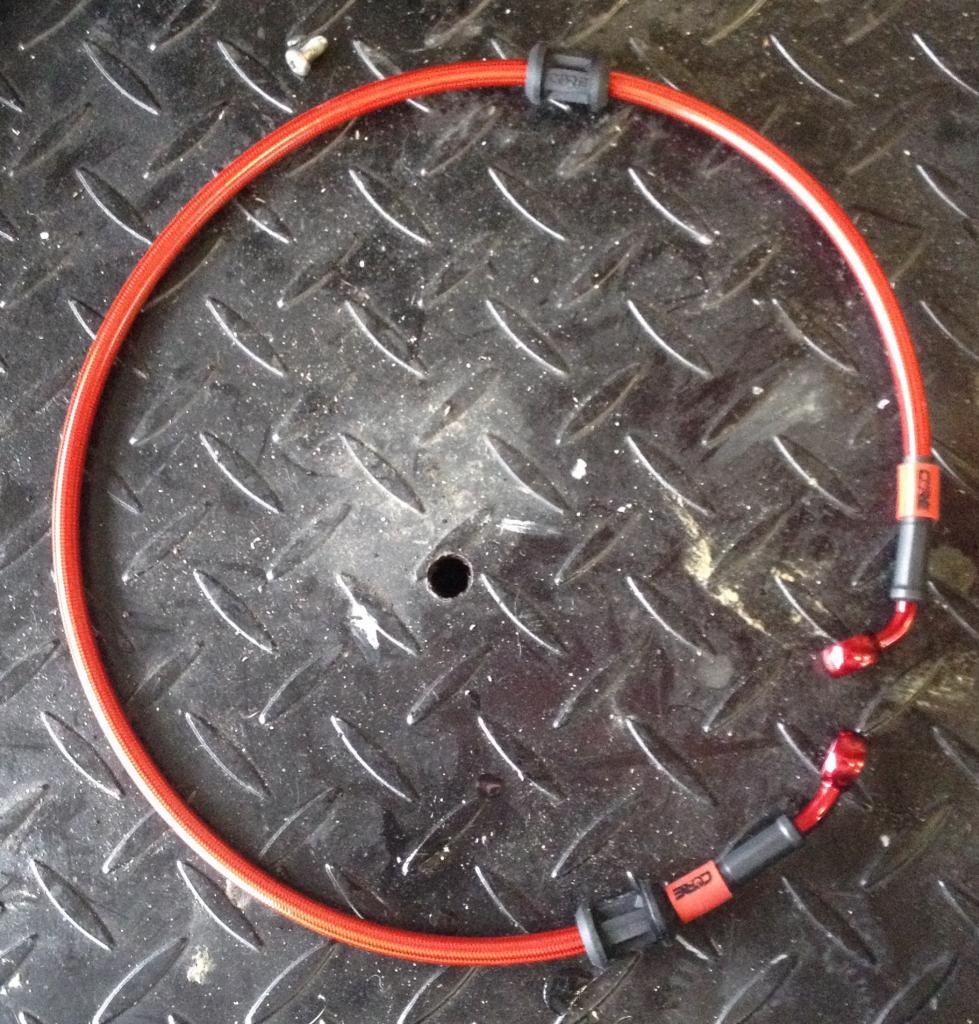
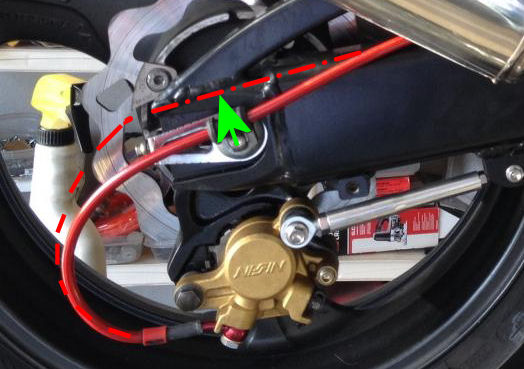
Been puzzling over brake line routing and attachment points.
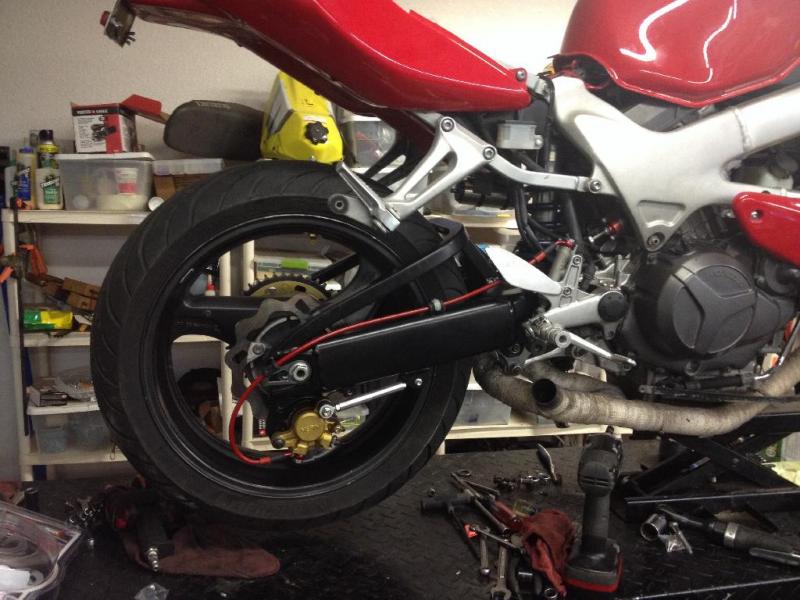
Did not like the white plastic clamps, and needed a second point more rearward than the factory location.
Decided on routing the line along the OEM route.. top of the swing arm, using the original forward swing arm point with a different clamp.

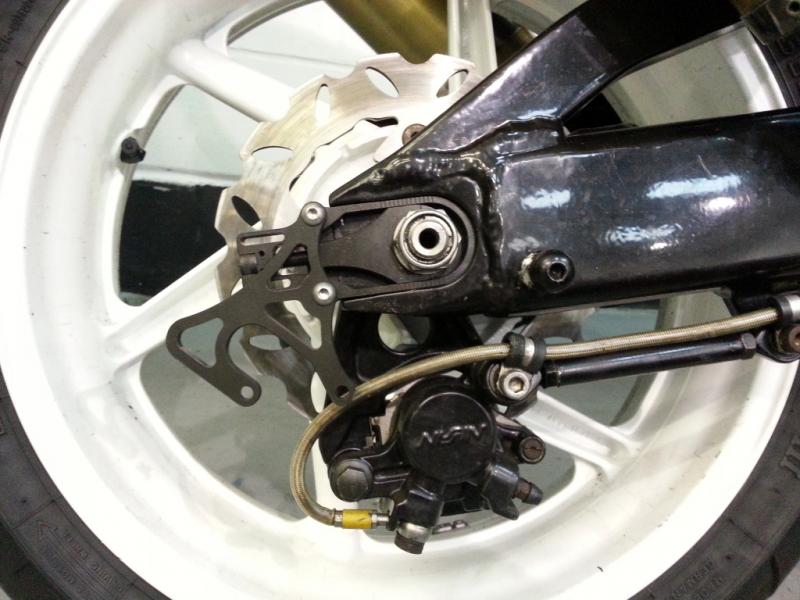
And then using the hollow center of the axle for a second attachment point.
Machined a bushing from 6061, threaded it and installed a Stainless steel thread insert for M6x1.0
Pressed into place and used some loctite retainer compound to help keep it there.

Button head socket screw in m6 x1.0 plus a back clamp finished it off
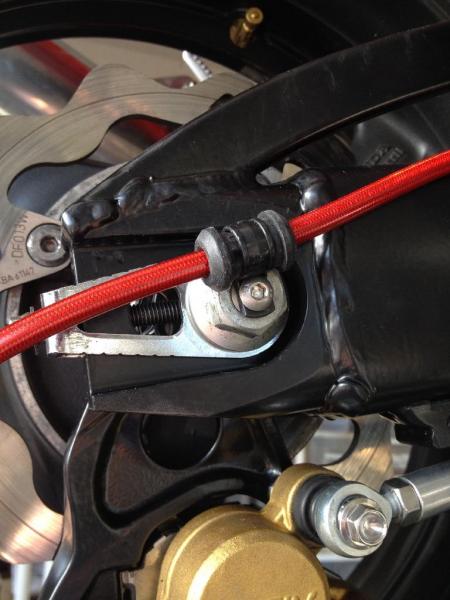
Not completely happy with it, but it'll do for now.
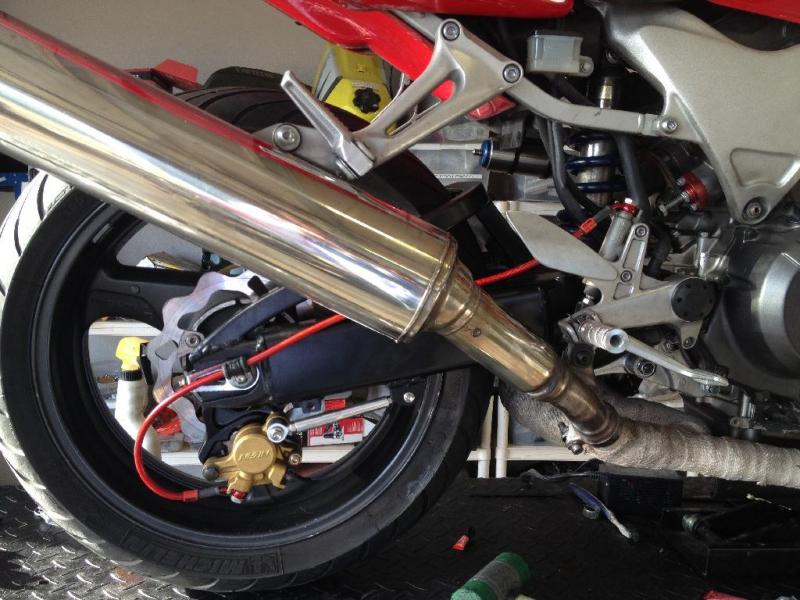
Removed the caliper, got the bleeder positioned at the top, and bleed the MC, banjo bolts, and then the caliper..... aided by the old rear disk stuffed in the pads to maintain brake pad position.. it was a quick work.
Did not like the white plastic clamps, and needed a second point more rearward than the factory location.
Decided on routing the line along the OEM route.. top of the swing arm, using the original forward swing arm point with a different clamp.
And then using the hollow center of the axle for a second attachment point.
Machined a bushing from 6061, threaded it and installed a Stainless steel thread insert for M6x1.0
Pressed into place and used some loctite retainer compound to help keep it there.
Button head socket screw in m6 x1.0 plus a back clamp finished it off
Not completely happy with it, but it'll do for now.
Removed the caliper, got the bleeder positioned at the top, and bleed the MC, banjo bolts, and then the caliper..... aided by the old rear disk stuffed in the pads to maintain brake pad position.. it was a quick work.
Last edited by E.Marquez; 01-29-2014 at 07:55 PM.
01-29-2014, 11:54 PM
#88
Rex Kramer-Thrill Seeker
SuperBike

Join Date: Jan 2011
Location: Brookfield, WI
Posts: 2,312
It looks good. Nice work fabing up that mount inside the axle. I thought you were going to hide most of the brake line, because in your previous pictures, it looked like there was a couple grommets on the brake line for running it through the brace or swingarm. Now I see what those rubber pieces were for. Still, it looks good.
Last edited by CruxGNZ; 01-29-2014 at 11:57 PM.
01-30-2014, 05:31 AM
#89
Administrator
MotoGP
Thread Starter
Join Date: Apr 2006
Location: Kempner, TX
Posts: 4,402
It looks good. Nice work fabing up that mount inside the axle. I thought you were going to hide most of the brake line, because in your previous pictures, it looked like there was a couple grommets on the brake line for running it through the brace or swingarm. Now I see what those rubber pieces were for. Still, it looks good.
Thank you..
The grommets are added when you have the line made.. CORE MOTO will add as many as you request based on your needs.
They are silicone and designed to protect the line when clamped.
I would not think boring holes in the swingarm or brace that are big enough to run a 10mm banjo fitting though, or even just the line and a grommet for protection is a good idea for structural integrity. Computer aided design and non destructive computer aided testing might show ways to do it.... but I don't have that capability.
Im sure guys with show bikes, or just no concern for structural integrity have done such.. to obtain the cleanest look...
But this project was to find the balance of both function and THEN a good look.
Another guy I know that did a similar mod.. ran the line under the swing arm...
But I do not like that tight bend on the far end of the line and the strain it places on the fitting/line connection.
The end game is a different caliper ... one that has the bleeder and in port on the top... so will save line revisions for that change.
01-30-2014, 05:59 AM
#90
Administrator
MotoGP
Thread Starter
Join Date: Apr 2006
Location: Kempner, TX
Posts: 4,402
CruxGNZ... gave me an idea though.. (blast you Sir.... )
I could still use the axle mount.... but make a longer clamp... extended farther away from the axle center line...
It might give the current brake line a better, errr line
I could still use the axle mount.... but make a longer clamp... extended farther away from the axle center line...
It might give the current brake line a better, errr line


