VTR1000 with a difference


Thread Starter
Senior Member
Back Marker
Joined: Sep 2009
Posts: 133
From: Liverpool, UK

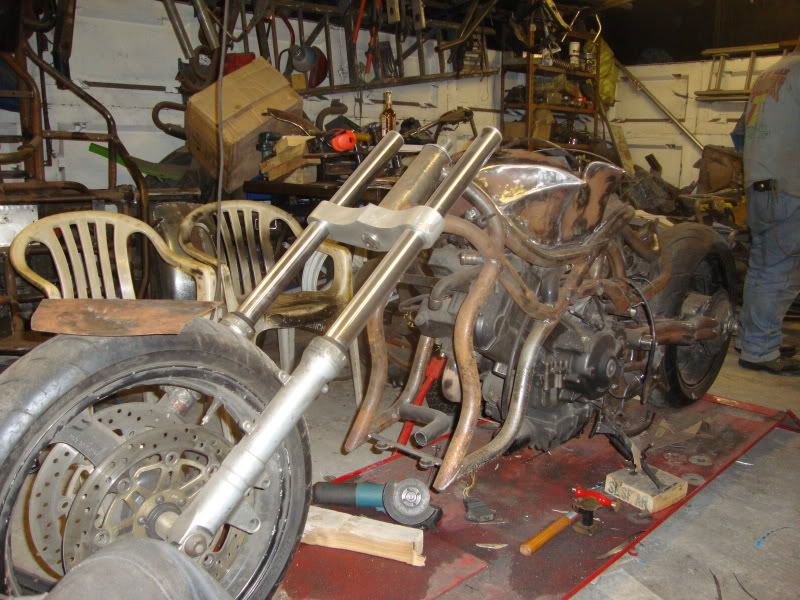
Got some good progress done today.
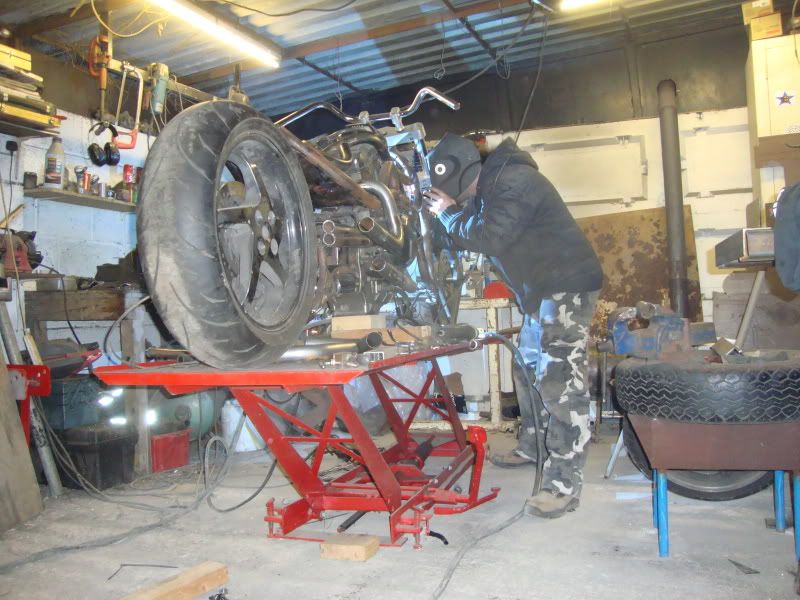
I decided that I hated the Battery tray in the swing arm. I think I may have been drunk when I made that cuz it looked ****.
I cut it out and once I had got the Shocks fitted properly on the new bushes, I made a new one which also carrys the CDI and Converter units.


I also got all of the Water pipes from the block to the Stat plumbed in under the Carbs, fitted a torque arm to the Rear caliper and started ploting where a few other electrical componets are going to live.


I decided that I hated the Battery tray in the swing arm. I think I may have been drunk when I made that cuz it looked ****.
I cut it out and once I had got the Shocks fitted properly on the new bushes, I made a new one which also carrys the CDI and Converter units.
I also got all of the Water pipes from the block to the Stat plumbed in under the Carbs, fitted a torque arm to the Rear caliper and started ploting where a few other electrical componets are going to live.


Thread Starter
Senior Member
Back Marker
Joined: Sep 2009
Posts: 133
From: Liverpool, UK
Listen, I need a favour from one of you guys/girls.
I took this bike apart in september and sold or gave away all of the bits I wasn't using.
The problem I have now is I am starting to forget how some of the bit went together.
 The job was only meant to take 2 months but I got carried away.
Can one of you tell me where the pipe coming out of the bottom of the header tank reconnects to the rest of the cooling system??

Senior Member
MotoGP
Joined: Mar 2007
Posts: 3,132
From: Phoenix, AZ
Full service manual is available here:
https://www.superhawkforum.com/forum...ad.php?t=11365
I am not sure exactly what you are asking about but that should help if someone else doesn't chime in with an answer first.
https://www.superhawkforum.com/forum...ad.php?t=11365
I am not sure exactly what you are asking about but that should help if someone else doesn't chime in with an answer first.
Thread Starter
Senior Member
Back Marker
Joined: Sep 2009
Posts: 133
From: Liverpool, UK
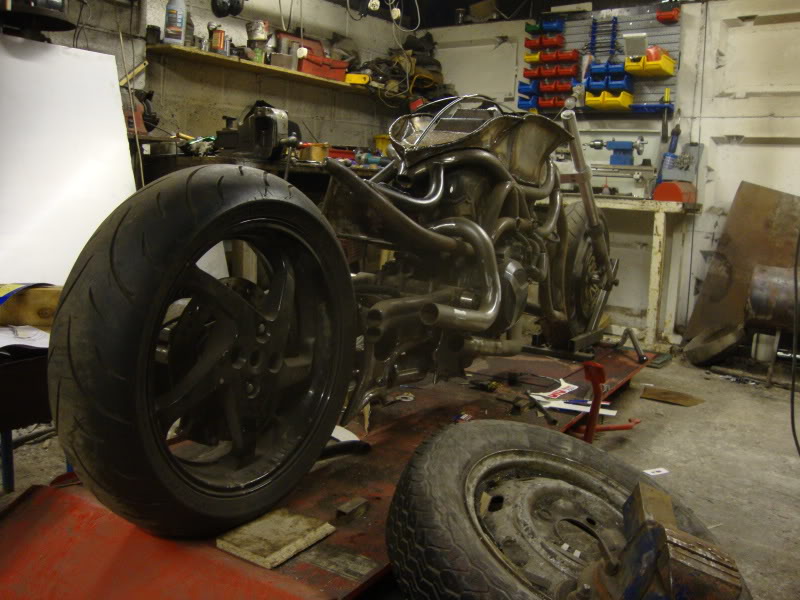
Made and fitted 2 more spigotts to run the water from the stat to the Rad through the Frame on the other side and fitted the ignition switch.
All small but time consuming jobs while I build myself up to making the Tank.


All small but time consuming jobs while I build myself up to making the Tank.

Senior Member
SuperSport
Joined: Jun 2005
Posts: 524

great build, even for somebody not into this type of bike.
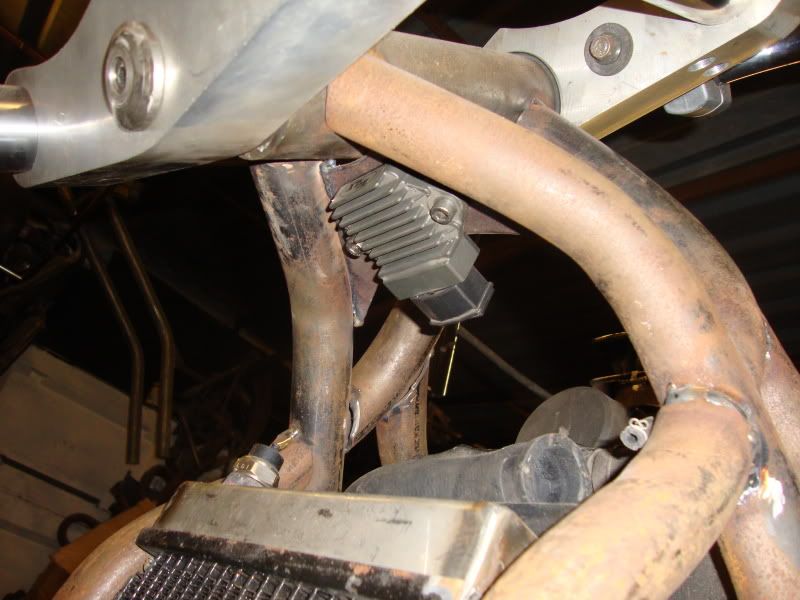
post 121 shows the fan switch at the very top of the radiator, that might give you some grief down the road. Fan switches don't work unless the are in contact with a liquid.
You might want to consider moving it lower on the rad or someplace else in the cooling system.
Kai Ju
post 121 shows the fan switch at the very top of the radiator, that might give you some grief down the road. Fan switches don't work unless the are in contact with a liquid.
You might want to consider moving it lower on the rad or someplace else in the cooling system.
Kai Ju

Senior Member
Superstock
Joined: May 2008
Posts: 347
From: S.Dak USA
Been following this thread from the start and I love it! Not really into chops,but thats only because they are tough to get around corners fast.I admire your skills,keep it up mate.Not bad for a scouser in a shed!
Thread Starter
Senior Member
Back Marker
Joined: Sep 2009
Posts: 133
From: Liverpool, UK
great build, even for somebody not into this type of bike.
post 121 shows the fan switch at the very top of the radiator, that might give you some grief down the road. Fan switches don't work unless the are in contact with a liquid.
You might want to consider moving it lower on the rad or someplace else in the cooling system.
Kai Ju
post 121 shows the fan switch at the very top of the radiator, that might give you some grief down the road. Fan switches don't work unless the are in contact with a liquid.
You might want to consider moving it lower on the rad or someplace else in the cooling system.
Kai Ju
Thread Starter
Senior Member
Back Marker
Joined: Sep 2009
Posts: 133
From: Liverpool, UK
I'll have to start a new thead for my new projects in the 'non VTR' section when I'm finished with this build. I like this forum, I've had some really good feedback which is a big help.

Senior Member
Back Marker
Joined: Nov 2009
Posts: 133
damn, looks good, i have always wanted to make a tubular frame for my 1k gix.... just never had the time to do so...
if your ever up for building a tubular frame for my gix, you lmk, ill make sure your time is well taken care of
props on the work, looks great!
if your ever up for building a tubular frame for my gix, you lmk, ill make sure your time is well taken care of
props on the work, looks great!
Thread Starter
Senior Member
Back Marker
Joined: Sep 2009
Posts: 133
From: Liverpool, UK
Sure, why not. I'm no good at working to plans though.
I tend to start off with all the best intensions then just making it up as I go along anyway so you'd just have to trust me.
I tend to start off with all the best intensions then just making it up as I go along anyway so you'd just have to trust me.
Senior Member
MotoGP
Joined: Aug 2006
Posts: 2,934
From: altoona, pa
keep up the good work trike.
Thread Starter
Senior Member
Back Marker
Joined: Sep 2009
Posts: 133
From: Liverpool, UK
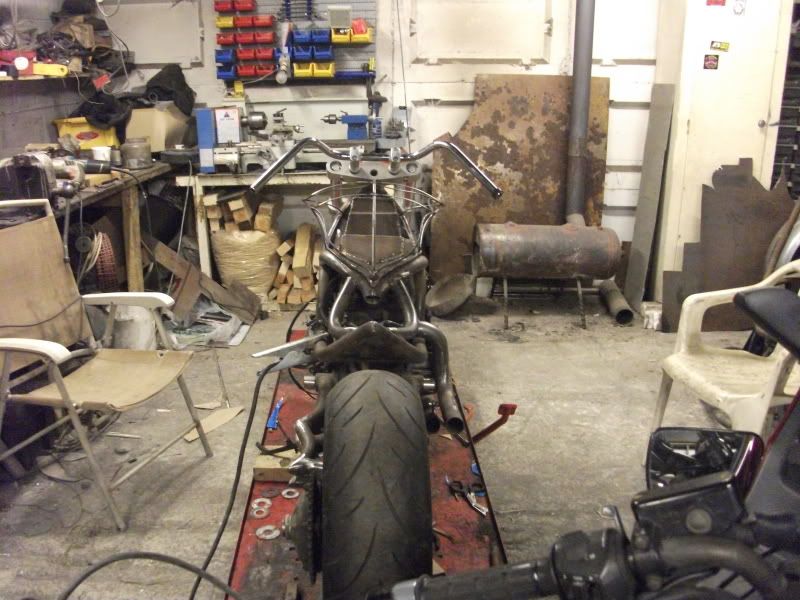
I did some re-working of the rear suspension on Satuarday.
Once I was happy it was going to work we got it off the Bench, called some friends, got some Kebabs and Beer and had a Shed Party.
The guy sat by me with the Beard is Crusty, he came to collect his GSXR Chop. A very happy man. Hope he gets it on the Road soon cuz I want a go.


Once I was happy it was going to work we got it off the Bench, called some friends, got some Kebabs and Beer and had a Shed Party.
The guy sat by me with the Beard is Crusty, he came to collect his GSXR Chop. A very happy man. Hope he gets it on the Road soon cuz I want a go.


Senior Member
MotoGP
Joined: Mar 2007
Posts: 3,132
From: Phoenix, AZ
Looks good!
My only hesitation would be that it looks like you have a huge amount of trail (like almost 12 inches! by my guesses off the pics). If you lessened the rake in the frame by a few degrees then added it back with the triples you would end up with a more manageable bike that looks the same. (normally you want a trail between 4 and 6.5 inches, less trail is very dangerous, more and it won't turn at anything over parking lot speeds)
http://www.rbracing-rsr.com/rakeandtrail.html
or http://www.rbracing-rsr.com/advchoppercalc.html
I could be way wrong with my guesses for your rake and fork lengths etc though.
Senior Member
Back Marker
Joined: Nov 2009
Posts: 133
hey as long as it worked, and by the looks of things, you can make it work well....
can you weld alum as well??
cause id want mine out of alum tubing for sure.... gotta keep the weight down
Senior Member
Back Marker
Joined: Nov 2009
Posts: 233
From: Oxnard, Ca
man that is looking pretty sweet nice to see it coming together. You are making me want to go buy an older bike and start cutting. Looks like a fun project. As for not sticking to plans I think that comes with the territory I have noticed nothing I do goes by plans...
Thread Starter
Senior Member
Back Marker
Joined: Sep 2009
Posts: 133
From: Liverpool, UK
Looks good!
My only hesitation would be that it looks like you have a huge amount of trail (like almost 12 inches! by my guesses off the pics). If you lessened the rake in the frame by a few degrees then added it back with the triples you would end up with a more manageable bike that looks the same. (normally you want a trail between 4 and 6.5 inches, less trail is very dangerous, more and it won't turn at anything over parking lot speeds)
http://www.rbracing-rsr.com/rakeandtrail.html
or http://www.rbracing-rsr.com/advchoppercalc.html
I could be way wrong with my guesses for your rake and fork lengths etc though.
My only hesitation would be that it looks like you have a huge amount of trail (like almost 12 inches! by my guesses off the pics). If you lessened the rake in the frame by a few degrees then added it back with the triples you would end up with a more manageable bike that looks the same. (normally you want a trail between 4 and 6.5 inches, less trail is very dangerous, more and it won't turn at anything over parking lot speeds)
http://www.rbracing-rsr.com/rakeandtrail.html
or http://www.rbracing-rsr.com/advchoppercalc.html
I could be way wrong with my guesses for your rake and fork lengths etc though.
I did it like this for the simple reason I hate raked yokes.
I like to see the headstock and stanchions to be in line. I will deal with any affects of that on the road.
Also a lot of the Trail can be adjusted out when I jack up the rear Shocks for any long distance rides. I built it with the shocks at their lowest setting purly for appearance.
Form over function as they say.
This time next year it could end up as a Street fighter anyway?? Depends on my mood.
This is certainly not the last chapter in the life of this bike.................


Thread Starter
Senior Member
Back Marker
Joined: Sep 2009
Posts: 133
From: Liverpool, UK
I spent the last few nights working on the base of the tank.
It took forever to join that 8mm bead to the rest of the base because it needed a fillet piece running done each side to make up
the difference in depth and get it around the shape of the frame tube.
Once that was done I welded the whole thing up, inside and out to give it a chance of sealing and adding a bit of strength.
Thread Starter
Senior Member
Back Marker
Joined: Sep 2009
Posts: 133
From: Liverpool, UK
Once I got the thing solid enough that it isn't going to distort with the rest of the welding, I made some brackets with
captive nuts for the frame and turned up some bosses to take counter sunk Allen bolts which will go right through the
Tank.

captive nuts for the frame and turned up some bosses to take counter sunk Allen bolts which will go right through the
Tank.
Thread Starter
Senior Member
Back Marker
Joined: Sep 2009
Posts: 133
From: Liverpool, UK
I got that lot finished tonight so spent the last hour having a go a beating the first piece of the outer skin.
I went for what I thought was the most difficult piece as it has quite a few different radius' to the curve and none
of them are on the same plane. (you can see it better on the left side in the picture above)
Eventually I got it to fit perfect and got all of the hammer rash out of it, so it won't need much Filler if any??
Can't wait to get back out there a make some more