
VFR tank mod in progress


Thread Starter
Senior Member
Back Marker
Joined: May 2005
Posts: 216
From: Seattle, WA

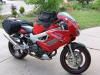
Completed! VFR tank mod!
Doing things slightly different, hoping to keep that extra capacity 
Tank was cheap off ebay, and as I'm painting at the end of my mods, didn't mind some scratches and dings. The red is a really good match, so if you aren't planning on painting, get a good one and you're all set.
With the top of the airbox removed, it will drop right onto the bike, no beating required (obviously more to it then this, but fine for now). The rear tab on the tank that others cut off (but warned of a weld and possible leakage) I bent down to follow the tank contour.
For starters, here's back to back stock tank vs VFR.
Stock:

VFR:

Stock:

VFR:

Most noticeable are the gap under the tank at the rear, and the height at the rear. Aside from that, it looks fairly stock and follows the lines well enough. Looks like a 'roided up Hawk if anything
Next up I'll shim under the front seat catch and seat rest points on the seat, and that should bring the seat up to the tank a bit better (need only .5" or so).
Tank was cheap off ebay, and as I'm painting at the end of my mods, didn't mind some scratches and dings. The red is a really good match, so if you aren't planning on painting, get a good one and you're all set.
With the top of the airbox removed, it will drop right onto the bike, no beating required (obviously more to it then this, but fine for now). The rear tab on the tank that others cut off (but warned of a weld and possible leakage) I bent down to follow the tank contour.
For starters, here's back to back stock tank vs VFR.
Stock:
VFR:
Stock:
VFR:
Most noticeable are the gap under the tank at the rear, and the height at the rear. Aside from that, it looks fairly stock and follows the lines well enough. Looks like a 'roided up Hawk if anything
Next up I'll shim under the front seat catch and seat rest points on the seat, and that should bring the seat up to the tank a bit better (need only .5" or so).
Last edited by mdbuehler; Apr 16, 2009 at 09:25 PM.

Senior Member
Back Marker
Joined: Jun 2007
Posts: 158

I really like the look of no gap between tank and frame! What's the difference in capacity between the vtr and vfr tanks?
________
Weed Vaporizers
________
Weed Vaporizers
Last edited by Malice; May 1, 2011 at 07:26 AM.
Thread Starter
Senior Member
Back Marker
Joined: May 2005
Posts: 216
From: Seattle, WA
Now that you point that out, I like that quite a bit too! The Hawk is 3.5 if I remember right, and the VFR is 5.8, so a gain of 2.3 gallons. That should be a very noticeable increase in range!
Just finished yoinking out the PAIR system and PCV, much simpler goings on under the tank now. Going to get started on the block-off for the VFR tanks fuel pump hole tomorrow. Sheet steel and a fat gasket should do the trick. Will get pics up as I move along!
Just finished yoinking out the PAIR system and PCV, much simpler goings on under the tank now. Going to get started on the block-off for the VFR tanks fuel pump hole tomorrow. Sheet steel and a fat gasket should do the trick. Will get pics up as I move along!
Last edited by mdbuehler; Apr 22, 2009 at 02:55 PM. Reason: had stock tank size wrong, the 98's are only 3.5
Thread Starter
Senior Member
Back Marker
Joined: May 2005
Posts: 216
From: Seattle, WA
To drop it straight on, I'd have to run without the top. I've heard several people say that won't work, but I've yet to hear what happens when you do (minor flat spot, or horribly unrideable, or just no gain?). When the rain goes away, I'll head out with the stock tank sans the airbox cover and see exactly what the story is.
If it runs OK with no top, this is really, really easy. I'm going with the assumption there's a problem if you don't, and will modify the box top (cutting away points of contact with the tank) then put compressable foam insulation on the underside of the tank in those areas so it will seal it back up and become part of the top when its fitted. This will alter the shape of the airbox top a little, but shouldn't be too extreme and I'm guessing the old girl will hardly notice
If it runs OK with no top, this is really, really easy. I'm going with the assumption there's a problem if you don't, and will modify the box top (cutting away points of contact with the tank) then put compressable foam insulation on the underside of the tank in those areas so it will seal it back up and become part of the top when its fitted. This will alter the shape of the airbox top a little, but shouldn't be too extreme and I'm guessing the old girl will hardly notice


Senior Member
SuperSport
Joined: Dec 2008
Posts: 507
From: Arizona
I agree. Im not sure how much room there is to work with and how much of a mod to the air box would be needed. I guess you could put a thin piece of styrofoam untop the airbox or on the air box without the lid then seat the tank to find where it make impressions until you have it seated all the way.


Thread Starter
Senior Member
Back Marker
Joined: May 2005
Posts: 216
From: Seattle, WA
Like the foam idea for impressions. I was going to use clay but was debating the pain of cleaning it up after. I'll just seat the tank, see where it hits, slice off a few mm from the airbox, and repeat.
The slowest going part is done (for me at least). As aluminum wasn't available at Lowes in sheets of any decent size, I went with steel instead for the fuel pump seal off plate. My cutting wheels don't get through that too quickly! On a side note, I tried the old stick-and-hotglue trick to pull the little dent on the tank (worked great on my old Hayabusa tank) and nearly dislocated my freaking arm pulling on the thing. What thickness of metal does Honda use on tanks?! LOL! Amazed the paint stayed attached too!!
Anyhow, here's the tank all cleaned up and ready to go:

The plan is take the big gas proof gasket on the left on first to cover the hole. The cork one follows (hole is recessed a bit from the level of the retention studs), then the smaller steel plate to apply pressure to the center, and the large metal plate to bolt it all in place and press the whole thing in. Once it works, the petcock will be mounted towards the center of the plate (just drilling a few holes for that).

Here's the air filter with that trimming mod to remove the lip. It made light contact on the outer edges of each side, so its looking like it'll be more the sides then the top of the airbox getting a trip, which is easier for me anyway.

So far I'm into this about $30 for the tank, another $20 in supplies (not counting redundant tank parts bought to keep both usable), and 3 hours of tinkering. I'll seat the gaskets up in a bit and fill the tank with water and we'll see if it holds!
The slowest going part is done (for me at least). As aluminum wasn't available at Lowes in sheets of any decent size, I went with steel instead for the fuel pump seal off plate. My cutting wheels don't get through that too quickly! On a side note, I tried the old stick-and-hotglue trick to pull the little dent on the tank (worked great on my old Hayabusa tank) and nearly dislocated my freaking arm pulling on the thing. What thickness of metal does Honda use on tanks?! LOL! Amazed the paint stayed attached too!!
Anyhow, here's the tank all cleaned up and ready to go:
The plan is take the big gas proof gasket on the left on first to cover the hole. The cork one follows (hole is recessed a bit from the level of the retention studs), then the smaller steel plate to apply pressure to the center, and the large metal plate to bolt it all in place and press the whole thing in. Once it works, the petcock will be mounted towards the center of the plate (just drilling a few holes for that).
Here's the air filter with that trimming mod to remove the lip. It made light contact on the outer edges of each side, so its looking like it'll be more the sides then the top of the airbox getting a trip, which is easier for me anyway.
So far I'm into this about $30 for the tank, another $20 in supplies (not counting redundant tank parts bought to keep both usable), and 3 hours of tinkering. I'll seat the gaskets up in a bit and fill the tank with water and we'll see if it holds!
Thread Starter
Senior Member
Back Marker
Joined: May 2005
Posts: 216
From: Seattle, WA
Looks good! I'll go back with some goof off later and remove all the old foam residue and duct tape slarg on the underside. I imagine a layer or two of enamel may be in order to make rust a non-issue down here.

Off to the auto store for a few filters for the PCV lines. Qatar motogp starts around 6pm, so this may be it for the day
Off to the auto store for a few filters for the PCV lines. Qatar motogp starts around 6pm, so this may be it for the day

Senior Member
SuperSport
Joined: Jun 2005
Posts: 524
Couple of pointers from having done this mod two years ago.
1. The bike will not run with the airbox lid removed, I tried.
2. The 98-01 tank requires very little modification to fit the lid, mainly in the front corners.
I recently had to fit a CB1 tank on top of an F-3 airbox and made the job a whole lot
easier by removing a 10mm wide band of material between the airbox lid frame and the lid.
I taped the lid with masking tape, marked the lid and the used a hack saw blade to
remove 10mm strip of material. Used superglue to glue the lid back on the frame.
If I had thought of this with the VTR/VFR it would have been a lot easier, especially with
the fuel level sender.
3. I left the rear of the tank mount intact but narrowed it down to work with the seat.
4. Reshaped the seat pan and foam to fit the contour of the tank.
5. Raised the seat to match the back of the tank, raised the tail section to match the seat.
6. mdbuehler, nice job with the block off plate, but be carefull where you put the
fuelvalve, mine barely clears the valve cover. ( Spend the money on the stock gasket,
I've never had a leak)
7. Solder or braze the fuel valve bolts into the block of plate and you'll never have to worry
about a leak from that area.
8. Make sure you leave a gap between the tank and the frame. It'll be easier to clear the
airbox and you won't have to worry about the tank damaging the frame and vice versa.
I've added some detail pis of mine that will hopefully help. ( I hope I don't sound like a know it all, sorry if I come across that way)
Kai Ju
Thread Starter
Senior Member
Back Marker
Joined: May 2005
Posts: 216
From: Seattle, WA
Nice! Thanks for all the info! I didn't realize the fuel valve was going to be so tight, so glad I didn't just aim for the middle and call it good You saved me an attempt at boxless riding too
I was going to weld up something similiar to the stock tank for mounting the rear, but your way looks a lot simpler. With my tab bent down, I bet some angled steel would swing right in there on those two bolts and with two perpendicular holes I can bolt that on solid.
MotoGP is rained out, so back in the garage I may try a variation on that cut a bit out idea, and just lop the corners off as far as needed, then replace the removed material with some sheet plastic or lexan. Hmmm...
I was going to weld up something similiar to the stock tank for mounting the rear, but your way looks a lot simpler. With my tab bent down, I bet some angled steel would swing right in there on those two bolts and with two perpendicular holes I can bolt that on solid.
MotoGP is rained out, so back in the garage
Senior Member
Back Marker
Joined: Jun 2007
Posts: 158
Very interesting project! 4.2 gallons for a stock vtr tank?! I can barely get 3 gallons in my 98 hawk. I must've got screwed ")
________
Iolite Vaporizer Review
________
Iolite Vaporizer Review
Last edited by Malice; May 1, 2011 at 07:27 AM.
Thread Starter
Senior Member
Back Marker
Joined: May 2005
Posts: 216
From: Seattle, WA
Puttering along! The angle bracket worked great for mounting the rear of the tank. I have an even 1.5 - 2mm all around above the frame, which gives it a little wiggle room.
I pulled the seat cover back, and using a knife and coping saw notched it for the shape of the new tank, then took that extra foam and put it a bit high over the inside of the new cut and pulled everything back together / restapled. I was pleasantly suprised with the result:

I'll go back after that wrinkle later, but it notches in rock solid, and just clears the seam on the mounting tab so looks clean too. I had a bunch of stuff ready to raise the seat, but it looks like theres no need at the moment.
With the seat on, I can finally get clean shots of the 'new lines' of the thing. Really, really liking the taller middle, which makes the front seem lower (dunno why, but that works for me).


Reminds me of the old Suzuki Nuda or the Honda NAS for some reason
About out of things to do, so I guess I'll have to get started on the main problem of airbox fitment.
I pulled the seat cover back, and using a knife and coping saw notched it for the shape of the new tank, then took that extra foam and put it a bit high over the inside of the new cut and pulled everything back together / restapled. I was pleasantly suprised with the result:
I'll go back after that wrinkle later, but it notches in rock solid, and just clears the seam on the mounting tab so looks clean too. I had a bunch of stuff ready to raise the seat, but it looks like theres no need at the moment.
With the seat on, I can finally get clean shots of the 'new lines' of the thing. Really, really liking the taller middle, which makes the front seem lower (dunno why, but that works for me).
Reminds me of the old Suzuki Nuda or the Honda NAS for some reason
About out of things to do, so I guess I'll have to get started on the main problem of airbox fitment.
Senior Member
Back Marker
Joined: Jun 2007
Posts: 158
I definately want to do this mod. I'm tired of only getting 98 miles per tank. I love the no gap on the sides and I can pretty easily take care of the gap at the back. I think the larger tank works nice on this bike.
________
Ferrari 575M Maranello Specifications
________
Ferrari 575M Maranello Specifications
Last edited by Malice; May 1, 2011 at 07:28 AM.
Thread Starter
Senior Member
Back Marker
Joined: May 2005
Posts: 216
From: Seattle, WA
For the back gap, something similiar to my old Bandit 400 is the plan. Look under the tank, they have inserts to fill things in. Looks simple enough to whip up a pair (abs or lexan) and mount to fill things in:

I believe SuperBling had a tank bra on his which pretty much covered it all up (so no need for anything at that point).
I believe SuperBling had a tank bra on his which pretty much covered it all up (so no need for anything at that point).
Last edited by mdbuehler; Apr 14, 2009 at 12:24 AM.
Thread Starter
Senior Member
Back Marker
Joined: May 2005
Posts: 216
From: Seattle, WA
Allrighty, not for the faint of heart here! The airbox "trim" turned into airbox snuff film

Must have done several dozen measures and cuts, and believe it or not at the air filter level, the back 2/3 of the airbox follows the contour of the tank within a 1/2" or so. Its tight around the edges, but roomier up top. I'll get some easily deformed insulation strip about 3/4" in depth tomorrow and adhere it all around the exposed perimeter of the airbox, and I'm fairly certain I'll get a pretty good seal.

Got impatient and took apart the old tank for parts, so I'll put the ebay bits on the old tank before selling. Only hold up here is me needing a drill bit for the actual fuel hole.

Least impressive bit of work is this very uninspired rear tank mount With the tab on the tank bent verically, two bolts through the holes lock it in solid.
Hope to have it runnable tomorrow!
Must have done several dozen measures and cuts, and believe it or not at the air filter level, the back 2/3 of the airbox follows the contour of the tank within a 1/2" or so. Its tight around the edges, but roomier up top. I'll get some easily deformed insulation strip about 3/4" in depth tomorrow and adhere it all around the exposed perimeter of the airbox, and I'm fairly certain I'll get a pretty good seal.
Got impatient and took apart the old tank for parts, so I'll put the ebay bits on the old tank before selling. Only hold up here is me needing a drill bit for the actual fuel hole.
Least impressive bit of work is this very uninspired rear tank mount
Hope to have it runnable tomorrow!

Senior Member
Superstock
Joined: May 2008
Posts: 347
From: S.Dak USA
Very cool and interesting mod, nice job.I do agree the new "lines" are better.My only concern would be the gap between tank/frame/seat. Your cover idea might be nice,how about carbon fiber? Or you could make some kind of alloy box to fit in the hole and have a built in sandwich toaster!! Keep us posted........!
Thread Starter
Senior Member
Back Marker
Joined: May 2005
Posts: 216
From: Seattle, WA
Might have it! Or at least I hope Here's what I ended up with:
For the airbox, here's the shape that ends up working. I'll replace the aluminim tape with some thin ABS plastic once I'm sure it all works well.

Now for the tank, the self adhereing insulation strips from Lowes work great. Its very dense stuff, so makes a good seal. The lighter gray foam is much lighter, more compressable, so I used that for weird shaped gaps / a second line for big gaps. When the tank is secured for awhile and removed, there is a clear impression from the airbox lid going the whole way around in the foam (except the top where its flat, that I verified with chalk powder) so I know its got good contact / sealing going on.

I opted for dual inline filters as opposed to the in the tank filter. The low fuel light is functioning, just not sure what level it will come on at yet.
It all goes together very solid, and so far with 3/4 gallon in it overnight no fuel on the floor! I'll try starting / idling before I go to work, then if still no leaks when I get home I'll take it for a spin to the gas station for a full load and to see if it runs any different after all my medling.

For the airbox, here's the shape that ends up working. I'll replace the aluminim tape with some thin ABS plastic once I'm sure it all works well.
Now for the tank, the self adhereing insulation strips from Lowes work great. Its very dense stuff, so makes a good seal. The lighter gray foam is much lighter, more compressable, so I used that for weird shaped gaps / a second line for big gaps. When the tank is secured for awhile and removed, there is a clear impression from the airbox lid going the whole way around in the foam (except the top where its flat, that I verified with chalk powder) so I know its got good contact / sealing going on.
I opted for dual inline filters as opposed to the in the tank filter. The low fuel light is functioning, just not sure what level it will come on at yet.
It all goes together very solid, and so far with 3/4 gallon in it overnight no fuel on the floor! I'll try starting / idling before I go to work, then if still no leaks when I get home I'll take it for a spin to the gas station for a full load and to see if it runs any different after all my medling.

Senior Member
SuperSport
Joined: Jun 2005
Posts: 524
"The low fuel light is functioning, just not sure what level it will come on at yet"
I'm using the stock level sending unit as well and the low fuel light comes on with one gallon left in the tank.
Nice work with the airbox, do you still have what you removed from the lid ?
You might want to just cut the lid frame off and use it to hold/seal the filter to the airbox itself.
Kai Ju
I'm using the stock level sending unit as well and the low fuel light comes on with one gallon left in the tank.
Nice work with the airbox, do you still have what you removed from the lid ?
You might want to just cut the lid frame off and use it to hold/seal the filter to the airbox itself.
Kai Ju
Thread Starter
Senior Member
Back Marker
Joined: May 2005
Posts: 216
From: Seattle, WA
Thanks! Well, it started up right away and idles rock solid. I almost immediately got a leak from my second fuel filter. Looking at it closer its a smaller diameter filter then the first, so isn't sealing well with the fuel lines. I'll pick up the right one on the way home then it'll be time for a test ride!
Thread Starter
Senior Member
Back Marker
Joined: May 2005
Posts: 216
From: Seattle, WA
A gallon is perfect, so I won't bother bending things around.
Good idea! The rear of the filter is only held down by the tank, if I trimmed that back piece down to just the screw level it'd make sure that stays put. Hope nobody took out the trash yet!
Good idea! The rear of the filter is only held down by the tank, if I trimmed that back piece down to just the screw level it'd make sure that stays put. Hope nobody took out the trash yet!
Thread Starter
Senior Member
Back Marker
Joined: May 2005
Posts: 216
From: Seattle, WA
Well, its a success! Just ran around the neighborhood, and she pulls, cruises, idles, etc like I haven't changed a thing. Motored on down to the Chevron and put 4.82 gallons in her on top of the 3/4 gallons I'd allready added in the garage If I can manage 40 mpg (I have 16/43 gearing, so that won't help any) I'll be able to safely commute 3 days in a row without filling up!
Thread Starter
Senior Member
Back Marker
Joined: May 2005
Posts: 216
From: Seattle, WA
Last little update before heading to the next projects. Rode it into work today (about 35 miles) with no problems. Gave it a good shake down of hard running, decel and high speed cruising. Its very blustery out as well, and even while getting blown all over the road she didn't hiccup.
You can her a little more intake noise now when you really get on it, but that is the only thing noticeable besides the tank just being a little closer to me and a little wider / taller.
Recommended for anybody looking for increased range!
You can her a little more intake noise now when you really get on it, but that is the only thing noticeable besides the tank just being a little closer to me and a little wider / taller.
Recommended for anybody looking for increased range!


