
Turning stock cans into shorty cans.


Thread Starter
Senior Member
SuperSport
Joined: Jul 2008
Posts: 621
From: Clarksville TN

Turning stock cans into shorty cans.
I meant slip-on cans to shorty cans, NOT Stock cans. Sorry.
Well I had inquired in the other forum about cutting down cans because I liked the shorty style look. Seemed pretty straight forward so today it is dreary and raining on and off so I said what the heck. First off let me say this is about as easy as washing your bike , so I can would say for anyone who ever thought about doing it GO FOR IT !! Of course I got Erion slip-ons and I can say these were a cake walk, yours may be different. I tried to take some pics to show the steps I took so maybe it would help someone else on doing this mod. I'm no teacher so excuse me if my directions and pics aren't 100% as they should be but I tried.
1st pic is exhaust as it started out as a 500mm Erion slip-on can.
2nd shows can off and rivets drilled out of end caps.
3rd these end caps can be a pain in the butt to get out as they almost seemed to get welded together from the heat of the exhaust(not really but you know what I mean) so I used a claw hammer, claw end in inlet end and just worked my way arouns almost like pulling out a nail and worked it out. because there is really no way to grab onto it. They come out very easily this way.
4th You measure how much you want to take off because inner sleeve and outer shell are 2 different lengths( mine weren't by very much but they were different) I know the other thread on this says use a cut-off wheel with a angle grinder, but I decided to use my chop saw(don't try this unless you know how to cut metal on one of these), I started with just enough cut to go thru the shell and turned the can so it would cut all the way around. Another reason I did it this way is the packing looked like it was gonna be a royal pain to put back in . So this way there is no need to remove it. Then I did the same thing again but this time just enought to cut the packing.
5 shows shell and packing cut to length I need.
cont.
Well I had inquired in the other forum about cutting down cans because I liked the shorty style look. Seemed pretty straight forward so today it is dreary and raining on and off so I said what the heck. First off let me say this is about as easy as washing your bike
1st pic is exhaust as it started out as a 500mm Erion slip-on can.
2nd shows can off and rivets drilled out of end caps.
3rd these end caps can be a pain in the butt to get out as they almost seemed to get welded together from the heat of the exhaust(not really but you know what I mean) so I used a claw hammer, claw end in inlet end and just worked my way arouns almost like pulling out a nail and worked it out. because there is really no way to grab onto it. They come out very easily this way.
4th You measure how much you want to take off because inner sleeve and outer shell are 2 different lengths( mine weren't by very much but they were different) I know the other thread on this says use a cut-off wheel with a angle grinder, but I decided to use my chop saw(don't try this unless you know how to cut metal on one of these), I started with just enough cut to go thru the shell and turned the can so it would cut all the way around. Another reason I did it this way is the packing looked like it was gonna be a royal pain to put back in . So this way there is no need to remove it. Then I did the same thing again but this time just enought to cut the packing.
5 shows shell and packing cut to length I need.
cont.
Last edited by Rollin20z; Dec 25, 2008 at 07:31 PM.
Thread Starter
Senior Member
SuperSport
Joined: Jul 2008
Posts: 621
From: Clarksville TN
Next I slid the packing and shell off the the waste half (inlet end on my cans) to reveal inner baffle tube. As you can see my has a flange end which is larger on the inlet side that slides over the piece on the end cap, so here I needed to slid packing and shell to other end so I could cut this off of outlet side since it was just straight and not tapered.
Then back to the chop saw to cut the inner to size I needed. As you can see in the 3rd pic mine sticks out about a 1/4" which actually slides into end cap of outlet.
Now you have a 300mm cut down Erion slip-on can. Now to replace the end caps. I actually test fit these a couple times and looked inside to make sure everything was lined up correctly since this was my first time doing this. Sometimes these caps might need a little tapping to get started back in but not much. Tap them in to where half of the rivet holes still show(only needed on end you cut off other end will simply slide back in and be reriveted together) mark where your holes need to be drilled. I found it best to put the can back on and get your set-up the way you want it(angle and such the way the can sits when installed)
cont.
Last edited by Rollin20z; Dec 24, 2008 at 03:11 PM.
Thread Starter
Senior Member
SuperSport
Joined: Jul 2008
Posts: 621
From: Clarksville TN
Once you get everything lined up the way you want it then it is time to rivet it back together. I started with the outlet side which still had the original rivet holes in both baffle and shell. And then I did the same with the inlet. Once everything was to my liking I started with one hole, riveted it to keep everything in place and would not move while I drilled the other 3 . I don't have pics of all this but I'm sure you can picture it since it is very straight forward. Next pic you can see the difference in the 500mm original can and the cut down 300mm can. Then what the 300 and the 500 look like side by side on bike. Big difference!!!
Now just repeat for other side and that's it. Slid them on ,hook your springs back up and enjoy the new rumble and more throaty sound of the already impressive Hawk.
Then both new shorties mounted up.
Now just repeat for other side and that's it. Slid them on ,hook your springs back up and enjoy the new rumble and more throaty sound of the already impressive Hawk.
Then both new shorties mounted up.
Last edited by Rollin20z; Dec 24, 2008 at 03:21 PM.
Thread Starter
Senior Member
SuperSport
Joined: Jul 2008
Posts: 621
From: Clarksville TN
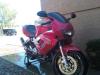
Here's a couple finished pics as of now. Before anyone says anything , I know I still need to add a couple rivets. I just ran out of the size needed. And the spools are just stuck on there as a temp way of using stand(actually a piece of threaded rod with spools mounted, works good and they are on and off in 30 seconds) . All in all this mod took me about a 1 1/2 hours, and this was my first time doing it, in reality in can probably be done in 30-45 minutes if I was to do it again. Hope this may help someone wanting to do this but wasn't sure how difficult it would be.
Last edited by Rollin20z; Dec 24, 2008 at 03:34 PM.

evil man of nothing
MotoGP
Joined: Jan 2006
Posts: 4,516
From: Boynton Beach, FL
Nice job! I've done it to several crashed exhausts before and just cut out the damaged section just like you did. They always ended up looking better, especially the black high mount jardines I did most recently, which the cans are basically identical to the erions. Looks great!


Thread Starter
Senior Member
SuperSport
Joined: Jul 2008
Posts: 621
From: Clarksville TN
Thanks for the nice comments guys, I like them  !!!
!!!
Captain, yeah they had a little scuffing which was one of the reasons I just wanted to try it. I figured if I messed it up i would get some pretty new cans anyhow.
j shizzy & Woodytick, as far as re-jetting, I guess I'll find out whenever I get a chance to take it out and see how she runs. By time I got done with what I needed to it was pouring down, but I did take a quick run down the street as soon as I got it back together (real short ) and besides a little more music performance wise didn't seem any different. But I will know more when I get a chance to take it where I can really try it out.
MLB, you know if they were brand new cans I might not have cut them up, but since they weren't and I like the short look, they got chopped!!
Only thing I don't like is how the strap ended up over the Erion plate. Guess I have to remake an offset strap that will go to back of pipe.
!!!Captain, yeah they had a little scuffing which was one of the reasons I just wanted to try it. I figured if I messed it up i would get some pretty new cans anyhow.
j shizzy & Woodytick, as far as re-jetting, I guess I'll find out whenever I get a chance to take it out and see how she runs. By time I got done with what I needed to it was pouring down, but I did take a quick run down the street as soon as I got it back together (real short ) and besides a little more music
performance wise didn't seem any different. But I will know more when I get a chance to take it where I can really try it out.MLB, you know if they were brand new cans I might not have cut them up, but since they weren't and I like the short look, they got chopped!!
Only thing I don't like is how the strap ended up over the Erion plate. Guess I have to remake an offset strap that will go to back of pipe.
Thread Starter
Senior Member
SuperSport
Joined: Jul 2008
Posts: 621
From: Clarksville TN
MLB,
No offense taken whatsoever , I see what you mean, some thin sheeting,little packing,couple end caps & a tube with some holes drilled in it. Guess it's all how you drill the holes which make them worth so much
j shizzy,
Thanks, it's really no big deal and noone would probably ever notice(except me!!) , just something that will probably nag me until I make some custom hanger's. Something to do if I get bored .
.
No offense taken whatsoever
, I see what you mean, some thin sheeting,little packing,couple end caps & a tube with some holes drilled in it. Guess it's all how you drill the holes which make them worth so muchj shizzy,
Thanks, it's really no big deal and noone would probably ever notice(except me!!) , just something that will probably nag me until I make some custom hanger's. Something to do if I get bored
Thread Starter
Senior Member
SuperSport
Joined: Jul 2008
Posts: 621
From: Clarksville TN
Test ride...
Took the hawk with shortened cans out yesterday to see how they performed. Only difference I noticed was of course little louder rumble and a more crisp throttle response. Really haven't seen if it causes any difference on top end as top speed but on low end it seems more responsive. Gotta pull the plugs and see i fit leaned out any. Will keep you updated as I go.

Squided
Back Marker
Joined: Apr 2009
Posts: 194
I just tried this with my D&D slip on. My "inner baffle tube" is welded to each end cap. It is a pain thus far but I think I can get around it by: 1) Cut ~2 inches of the outer shell on the inlet side (slide this 2 inch waste piece off or make another cut and peel it off). 2) Slide 2 end caps and "inner baffle tube" (all should still be connected) toward the exit. 3) Cut the "inner baffle tube" just below the welds on the exhaust end cap (there should be 8+ spot welds that should be visible). 4) Remove the excess "inner baffle tube" from the end cap and grind/cut off the welds on the end cap.

Senior Member
Back Marker
Joined: Aug 2006
Posts: 227
From: IL
Thanks for the nice comments guys, I like them !!!
Captain, yeah they had a little scuffing which was one of the reasons I just wanted to try it. I figured if I messed it up i would get some pretty new cans anyhow.
j shizzy & Woodytick, as far as re-jetting, I guess I'll find out whenever I get a chance to take it out and see how she runs. By time I got done with what I needed to it was pouring down, but I did take a quick run down the street as soon as I got it back together (real short ) and besides a little more music performance wise didn't seem any different. But I will know more when I get a chance to take it where I can really try it out.
MLB, you know if they were brand new cans I might not have cut them up, but since they weren't and I like the short look, they got chopped!!
Only thing I don't like is how the strap ended up over the Erion plate. Guess I have to remake an offset strap that will go to back of pipe.
!!!Captain, yeah they had a little scuffing which was one of the reasons I just wanted to try it. I figured if I messed it up i would get some pretty new cans anyhow.
j shizzy & Woodytick, as far as re-jetting, I guess I'll find out whenever I get a chance to take it out and see how she runs. By time I got done with what I needed to it was pouring down, but I did take a quick run down the street as soon as I got it back together (real short ) and besides a little more music
performance wise didn't seem any different. But I will know more when I get a chance to take it where I can really try it out.MLB, you know if they were brand new cans I might not have cut them up, but since they weren't and I like the short look, they got chopped!!
Only thing I don't like is how the strap ended up over the Erion plate. Guess I have to remake an offset strap that will go to back of pipe.

Squided
Back Marker
Joined: Apr 2009
Posts: 194
I just go done with my D&Ds. They are pretty much the same except for the welds. The welds take time to overcome. Think twice, cut once. I'll take pics of the finished product when I get them painted and mounted.

Thread
Thread Starter
Forum
Replies
Last Post
ImitationCrab
Modifications - Performance
18
Nov 20, 2009 03:26 AM
LT01SH
Technical Discussion
12
Jul 16, 2007 10:52 AM


