
RC51 Track Bike Project


Thread Starter
Senior Member
SuperBike
Joined: Dec 2005
Posts: 1,689
From: South Lake Tahoe, CA, USA

RC51 Track Bike Project
I've posted some of this before, but decided to consolidate a bit, since this project actually started about 3 years ago.
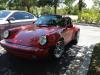
I bought this lovely '02 SP-2 from my good friend Dean. Made payments and got it paid for in January, '09:

I brought it home, took some pictures and started taking it apart:


Down to the basics. Engine and rolling chassis.
Lot's of shared heritage with a VTR-F, but mounted in a GP style chassis.

Torque comes from mass air flow!
these ports looked huge until you view them through GIGANTIC throttle bodies:

The project actually started 3 years ago. I had built an engine for my Super Hawk. Dean had owned one before the RC51. We did a track day at Thunderhill and I proceded to walk away from him (it was more chassis setup and *****, than HP ).
).
Dean just had to have him some of that, so he gave me his bike to work on over the next winter. I put JE pistons in, ported the heads, did a nice valve job, replaced the exhaust valves, rings, etc. The only problem was, I had to give it back to him. I got a new exhaust system out of the deal.


the first baby steps in getting her back together:
New tapered needle bearings in the steering head, for better stiffness and smoother action. I've never liked the painted RC51 triple clamp with the forge flashing line. So I stripped the paint of and filed away the flashing and did as much finishing as I could stand. Waxed it up to make it easier to keep clean.


New steering stops to shorten the excursion from lock to lock. I hope I don't need them!!

An HRC race harness, to get rid of 2.2 pounds of wirings. Race harness above. Street harness below.

I bought this lovely '02 SP-2 from my good friend Dean. Made payments and got it paid for in January, '09:
I brought it home, took some pictures and started taking it apart:
Down to the basics. Engine and rolling chassis.
Lot's of shared heritage with a VTR-F, but mounted in a GP style chassis.
Torque comes from mass air flow!
these ports looked huge until you view them through GIGANTIC throttle bodies:
The project actually started 3 years ago. I had built an engine for my Super Hawk. Dean had owned one before the RC51. We did a track day at Thunderhill and I proceded to walk away from him (it was more chassis setup and *****, than HP
Dean just had to have him some of that, so he gave me his bike to work on over the next winter. I put JE pistons in, ported the heads, did a nice valve job, replaced the exhaust valves, rings, etc. The only problem was, I had to give it back to him. I got a new exhaust system out of the deal.
the first baby steps in getting her back together:
New tapered needle bearings in the steering head, for better stiffness and smoother action. I've never liked the painted RC51 triple clamp with the forge flashing line. So I stripped the paint of and filed away the flashing and did as much finishing as I could stand. Waxed it up to make it easier to keep clean.
New steering stops to shorten the excursion from lock to lock. I hope I don't need them!!
An HRC race harness, to get rid of 2.2 pounds of wirings. Race harness above. Street harness below.
Last edited by RCVTR; Feb 28, 2009 at 09:35 AM.


Thread Starter
Senior Member
SuperBike
Joined: Dec 2005
Posts: 1,689
From: South Lake Tahoe, CA, USA
This is also somewhat related, since many people install RC51 and CBR forks on their Super Hawks.
The '00 and '01 forks have short top-out springs. Top-out springs on the '02-up forks are about 3 times longer and softer. This is the primary difference between the forks.
There are 2 schools of thought on this. The argument for longer top-out springs is that the forks don't extend as far on the gas, so the steering angle remains steep, when accelerating off corners, so the steering rate doesn't change as much. I believe the other reason is to "use" the unsprung weight of the front end to make it less prone to lifting. Simliar to using too-soft springs in the stock VTR forks.
The argument for short top-out springs is that the spring rate remains constant, so that the contact force of the tire with the road surface stays higher, when the front end is light under acceleration. Keeping the fork off the top-out springs maintains a constant, linear spring rate at all suspension positions.
Here is a picture of the SP-1 top-out spring (right), the standard SP-2 top-out spring (center) and shortened SP-2 top-out spring. Another subtle difference is the profile of the slow rebound needles:

Polished sliders, ready for reassembly:

The '00 and '01 forks have short top-out springs. Top-out springs on the '02-up forks are about 3 times longer and softer. This is the primary difference between the forks.
There are 2 schools of thought on this. The argument for longer top-out springs is that the forks don't extend as far on the gas, so the steering angle remains steep, when accelerating off corners, so the steering rate doesn't change as much. I believe the other reason is to "use" the unsprung weight of the front end to make it less prone to lifting. Simliar to using too-soft springs in the stock VTR forks.
The argument for short top-out springs is that the spring rate remains constant, so that the contact force of the tire with the road surface stays higher, when the front end is light under acceleration. Keeping the fork off the top-out springs maintains a constant, linear spring rate at all suspension positions.
Here is a picture of the SP-1 top-out spring (right), the standard SP-2 top-out spring (center) and shortened SP-2 top-out spring. Another subtle difference is the profile of the slow rebound needles:
Polished sliders, ready for reassembly:
Thread Starter
Senior Member
SuperBike
Joined: Dec 2005
Posts: 1,689
From: South Lake Tahoe, CA, USA
Progress report:
I modified the compression valve bodies by increasing orifice diameters slightly to keep the high-speed damping stack controlled to higher velocities. I stayed with Bob Hayashida's shim stack that was already in there. By comparing with the stock stacks it made sense that the stack opens at near the same speed, but increases the damping at higher speeds. It is starting to come more clear. I'm not sure I will be able to determine the need for more stack control with the larger body orifices. It should be more than enough at this point. Bob has a special blend of fork oil, to get the right viscosity, based on his research and testing on the fork dyno.
I did a good lap on the valve faces and put it back together.
I also dirlled out the retainers for the low-speed rebound needles and replaced them with the SP-1 needles. They are supposed to provide more linear adjustment.
I sent the rear shock out for a rebuild/service and spoke with Stig Pettersen at Petterson Pro suspension in So Cal. He's a great guy and very helpful. It turns out the spring rate was too high for my rider weight, which explains why the thing felt so harsh in the rear. he also explained to me that they run a lot of preload on that shock in an RC51, because you need a high spring force, but not a high spring rate. Because of the high spring force, you need a lot of rebound damping, and the low-speed adjustment was not quite enough, so he's going with smaller low-speed orifice. The last thing is to replace the hose on the preload adjuster, so I can remount it and get rid of the big excess hose loop. That was all a bit more expensive than I had hoped, but I may as well get it dialled in now.
Lot's of other stuff getting done. I'll get some more pictures, once the forks are installed.


Senior Member
SuperBike
Joined: Jul 2005
Posts: 1,548
From: MN

wow rand you are going to have a blast on that thing. it will really be set.
I was on the speedzilla forum last weekend looking for RC wheels and saw someone selling moriwaki stage II engine stuff new in box if you need any temptations (I think cams and springs)
I was on the speedzilla forum last weekend looking for RC wheels and saw someone selling moriwaki stage II engine stuff new in box if you need any temptations (I think cams and springs)
Fastest Color
SuperBike
Joined: Jul 2007
Posts: 2,091
From: Lithia, FL
RC

Out of my mind, back in 5
MotoGP
Joined: Nov 2006
Posts: 6,109
From: Skurup, Sweden
Don't give the man ideas...
Wait till he has it buttoned up and ready to go...
 Then we give him ideas...
Thread Starter
Senior Member
SuperBike
Joined: Dec 2005
Posts: 1,689
From: South Lake Tahoe, CA, USA
Oh, I have ideas...
I think it will be a while before I can justify more HP. And I need to stop the bleeding.
Fortunately, the forks were almost free (if you don't count $80 for seals and oil).
the shock is $450, just to make it a better Ohlins than the stock one.
Battery $250, but you should see the little bugger. Cheapest lb/$ I know of.

Radiator air scoops $250.
And I thought I already had most of the stuff I needed.
Still have to buy bodywork...
You should see the box of heavy stuff I'm not putting back on.
I think it will be a while before I can justify more HP. And I need to stop the bleeding.
Fortunately, the forks were almost free (if you don't count $80 for seals and oil).
the shock is $450, just to make it a better Ohlins than the stock one.
Battery $250, but you should see the little bugger. Cheapest lb/$ I know of.
Radiator air scoops $250.
And I thought I already had most of the stuff I needed.
Still have to buy bodywork...
You should see the box of heavy stuff I'm not putting back on.

Senior Member
Superstock
Joined: Aug 2007
Posts: 293
damn rcvtr, i love seeing RC rebuilds as im in the throes of an RC rebuild or two of my own. love seeing how much crap gets lopped off for the track bikes though, its always entertaining haha.
one of the guys on the rogue forum built his harness from scratch essentially, trimming away at the unnecessaries of the oem street harness and wiring in where needed. he ended up with a GIANT ball of wires. i mean, easily filling a 20x20x20" box.
lovin' the marchesinis, what clipons and rearesets are you running? oh, and no front rad conversion?
Thread Starter
Senior Member
SuperBike
Joined: Dec 2005
Posts: 1,689
From: South Lake Tahoe, CA, USA
I got an HRC Basic Racer harness for $200 and didn't have to worry about removing the wrong wires, or spending time I don't have poring over a wiring diagram. It's hard enough to find the time as it is.
The front air scoops are reported to provide enough air pressure to the inside of the radiators to keep a mildly tuned engine running cool. Front mounts are not necessary and extremely expensive. I'm not running cooling fans, because I won't be sitting in traffic.
The rear sets and clip-ons are Moriwaki.
I weighed my new battery. It came in at 1 lb. 6 oz. I had to pull up on my stock battery a lot to keep from going off the scale on my 5 lb scale. A 4 -5 lb weight savings for $250. Not bad!

Senior Member
MotoGP
Joined: Apr 2005
Posts: 5,631
From: Montreal
I was just reading up about that battery on the Speedzilla site. If I keep my VTR long enough to have to replace my battery again (did so last summer with a lighter "10" series I beleive, saved me two lbs) that`ll likely be my choice.
Thread Starter
Senior Member
SuperBike
Joined: Dec 2005
Posts: 1,689
From: South Lake Tahoe, CA, USA
I decided to consloidate the project from other postings (photos and description above), to put it all together.
No progress, this week. Out paying the bills.
I have all the stuff to make Earl's brake and clutch lines. His stuff uses really good hose and the fittings crimp on with a wrench, so you can make custom lengths. I didn't want to use kevlar lines (front brakes, anyway) on a track bike. Pictures to come.
I put stainless screens on the radiators and go the rad scoops on and cooling system installed. Wiring and packaging of the electronics is almost done.
I found a map for a Turn One airbox, with a full exhaust system. It should be a reasonable place to start.
Thread Starter
Senior Member
SuperBike
Joined: Dec 2005
Posts: 1,689
From: South Lake Tahoe, CA, USA
A couple things, since I have some time to kill:
Here's a picture of the Moriwaki shock link, compared to the stock linkage. It changes the linkage ratio significantly, softening up the top of travel. Not for two-up riding!
They made one for the VTR-F, but I've never seen one for sale. Milling machine anyone?

Here's a picture of the Moriwaki shock link, compared to the stock linkage. It changes the linkage ratio significantly, softening up the top of travel. Not for two-up riding!
They made one for the VTR-F, but I've never seen one for sale. Milling machine anyone?
Thread Starter
Senior Member
SuperBike
Joined: Dec 2005
Posts: 1,689
From: South Lake Tahoe, CA, USA
I bought a TurnOne intake snorkel a few months ago. A nice, light carbon fiber piece:

I didn't like the abrupt transition from the floor to the throat, so I made a rigid foam core that transitions in tangent to the floor of the throat. Then laminated it in with some dry carbon cloth. I just finished sanding it in my hotel room. A little fine sanding and some clear coat and it will be done:


I didn't like the abrupt transition from the floor to the throat, so I made a rigid foam core that transitions in tangent to the floor of the throat. Then laminated it in with some dry carbon cloth. I just finished sanding it in my hotel room. A little fine sanding and some clear coat and it will be done:

") I am going through my track hawk wiring harness now. Not a lot of fun, but will be worth it in the long run. Nice job on the RC.
I am going through my track hawk wiring harness now. Not a lot of fun, but will be worth it in the long run. Nice job on the RC.
Thread Starter
Senior Member
SuperBike
Joined: Dec 2005
Posts: 1,689
From: South Lake Tahoe, CA, USA
You don't need a 400 lb, 140 HP RC51 to do that!
It was probably more satisfying to do it on a Super Hawk street bike!
Riding it in the A goup is another story.
This bike is going to be beyond my capabilities. Building it is half the fun. Eventually, I should be able to ride it like I built it. The chassis will be very confidence-inspiring. I was a fairly fast B group rider before. Hoping to get back there and have enough consistency to move up, by the end of this season. It's been quite a while, but I'm sure it will come back.
I ended up with 16.5 wheels. Not because I need the capabilities of Superbike slicks, but because I found the right price on the set of forged magnesiums I was looking for. I'm glad I grabbed them. I haven't seen another set at that price. They were the first thing I bought, and the price went through the roof, right after that.
Last edited by RCVTR; Feb 28, 2009 at 04:45 PM.


Thread Starter
Senior Member
SuperBike
Joined: Dec 2005
Posts: 1,689
From: South Lake Tahoe, CA, USA
This is what happens when your wife won't let you buy it, for a year. You sit around collecting parts. At least I didn't lose all this money in the stock market. A losing investment, but rewarding.
I've got a chance to get some things done on it today.
Senior Member
MotoGP
Joined: Apr 2005
Posts: 5,631
From: Montreal
Lightweight wheels make a big difference in the way the bike responds to steering input, throttle input and in terms of suspension response. Installing the magnesium PVM`s on mine was a nice touch. Sounds like you`ll have a nice toy to play with


