
Tire changes are easy. Now with video!


Thread Starter
Senior Member
Back Marker
Joined: Jul 2009
Posts: 117
From: Santa Cruz, CA

Tire changes are easy. Now with video!
Simple, stupid and anyone can do it without busting their knuckles and getting a hernia. The video is nothing you haven't seen on youtube before quite honestly. And changing a moto tire is not as difficult as people make seem. Naturally, it gets easier the more you do it. I would say it's worth it to buy a cheap rim from the wrecker and an old sport touring tire to practice and develop your own technique.
The video is more of a synopsis and not so much an instructional, really. The whole thing, camera roll to camera stop was about 22 min. Irons-in to tire-off-the-rim was less than 2 minutes.
http://www.youtube.com/watch?v=L6FD_...layer_embedded
Good luck.
Detailed instructions and insight can be found here for here, and here for install. The original scudman tire change video. I originally came across this vid. when i was looking for suspension setup instructions.
p.s. Dig the ginormous 2x4 for a lever and forgive the german torque specs I used on the axle bolt
and no rotors were harmed in the making of this video lol.
Last edited by Karbon; Dec 1, 2010 at 09:43 AM.

Senior Member
SuperBike
Joined: Aug 2009
Posts: 1,978
From: thorold ontario
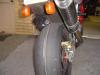
cool idea, but it looks like that rim has taken a beating. you can buy the proper spoons to do it yourself for like 60 bucks and they wont damage rims or buy a tire changer for 200 or so and do it in your garage. my buddy has one and does tires, also balances them. but a nice trick is to take the bare rim and put it on a balancer like in the video, find the heaviest spot and mark it and the lightest as almost all new tires come with a dot to indicate i believe the lightest spot, so you can usually get it pretty close without any weights 

Senior Member
SuperBike
Joined: Apr 2010
Posts: 1,090
From: Big Lick
he didn't line up the dot on the tire with the stem either. Too much trouble compared to spending 80 bucks on a harbor freight model. He does get an A for effort though. Anyone who does it themselves instead of just going to the shop and paying gets kudos.
Thread Starter
Senior Member
Back Marker
Joined: Jul 2009
Posts: 117
From: Santa Cruz, CA
cool idea, but it looks like that rim has taken a beating. you can buy the proper spoons to do it yourself for like 60 bucks and they wont damage rims or buy a tire changer for 200 or so and do it in your garage. my buddy has one and does tires, also balances them. but a nice trick is to take the bare rim and put it on a balancer like in the video, find the heaviest spot and mark it and the lightest as almost all new tires come with a dot to indicate i believe the lightest spot, so you can usually get it pretty close without any weights
The rim doesn't have a scratch on it. The lighting kind of makes it look that way. Most tools can scratch the rim when used improperly or carelessly.
As with the case with most tires there will be an indicated heavy spot. Sometimes it's a dot, a paint mark ect., Usually described in the manufacturer's website. With all the Michelins I've shoed on, it's usually the bar code badge on the bead. Not shown in the video, I generally line the bar code opposite the metal valve stem. A lot of the times I get very close to balance and require minimal weights to achieve final balance. I can't remeber when I've used more than 3 weights with Michelins.
also, first post edited for link insert.
Last edited by Karbon; Dec 1, 2010 at 09:45 AM.

Senior Member
Superstock
Joined: Jul 2008
Posts: 320
Well, I was going to play with balancing it mounted to the bike. Is there a reason why nobody seems do it this way? Just make sure it's spinning freely, and then spin it over and over marking the low point each time. Then put weights opposite the low point and continue spinning and checking until it stops in a random location.
I'm going to try Dynabeads also for balancing. I've heard mixed reviews, but I'm not going racing with these tires anyway, so I thought I'd try it out.
I'm going to try Dynabeads also for balancing. I've heard mixed reviews, but I'm not going racing with these tires anyway, so I thought I'd try it out.

Banned
MotoGP
Joined: Aug 2007
Posts: 5,942
From: Lake View Terrace, CA
Actually it's the "light" spot of the tire. That is why you line it up with the "heavy" spot (or the valve stem if you haven't located the true "heavy" spot) on the rim to get the balance as close as possible before adding weights.

Senior Member
MotoGP
Joined: Jul 2010
Posts: 3,871
From: Phoenix, AZ
I can't seem to find the video right now, but I saw a guy break the bead by driving his car over it. He put the motorcycle wheel/tire on one of those soft foot mats (the ones with the puzzle piece edges) and lined up the car wheel with the motorcycle tire. He drove over it with the weight of the car on the tire and not the wheel and it came off. Seemed to work really well...
Edit: found the video:
http://www.youtube.com/watch?v=_0s2NzImDhA
Edit: found the video:
http://www.youtube.com/watch?v=_0s2NzImDhA
Last edited by 7moore7; Dec 1, 2010 at 10:34 AM.
Senior Member
Superstock
Joined: Jul 2008
Posts: 320
He drove over it with the weight of the car on the tire . . .
Thread Starter
Senior Member
Back Marker
Joined: Jul 2009
Posts: 117
From: Santa Cruz, CA
For Dunlops, yes. The website says the dot is the light spot. The PDF from the Michelin website only details the the procedure needed to find the light spot on the rim, without the tire. In any case, weights should take care of balance issues.
As far as bead braking goes, AFAIK certain type of tires are more difficult that others. I find sport touring tires, with its stiffer sidewalls harder to break than sport tires.
Last edited by Karbon; Dec 1, 2010 at 12:21 PM.

Senior Member
Superstock
Joined: Jun 2010
Posts: 313
From: South Kakalaki
Or....I can buy a tire from a local shop I use here at a low price (I always haggle with them when I find the same tire online cheaper) and then so long as I buy their tire they mount it for free
Honducati
SuperSport
Joined: Oct 2006
Posts: 809
From: Anaheim, CA
Well, I was going to play with balancing it mounted to the bike. Is there a reason why nobody seems do it this way? Just make sure it's spinning freely, and then spin it over and over marking the low point each time. Then put weights opposite the low point and continue spinning and checking until it stops in a random location.
Banned
MotoGP
Joined: Aug 2007
Posts: 5,942
From: Lake View Terrace, CA
Let me correct myself. It varies by manufacturer.
For Dunlops, yes. The website says the dot is the light spot. The PDF from the Michelin website only details the the procedure needed to find the light spot on the rim, without the tire. In any case, weights should take care of balance issues.
For Dunlops, yes. The website says the dot is the light spot. The PDF from the Michelin website only details the the procedure needed to find the light spot on the rim, without the tire. In any case, weights should take care of balance issues.
That is why it is common practice to mount the tire with the float mark aligned with the valve stem. As it is the "default" heavy spot on the wheel.
What would be the point of marking the heavy spot on the tire? For the average person, who doesn't know the light spot on their wheel, it would serve no purpose.
Then again, I have been wrong before but I would like a reference to a manufacturers site saying they mark the heavy point, as I have never heard of such a thing.
medium fast guy
Back Marker
Joined: May 2008
Posts: 212
From: western MI, rust & pot hole capital of the world
There are some reasonably priced balancing stands out there (Harbor Freight),
or you can make your own with a couple pieces of aluminum or steel plate, 4 roller blade bearings, and a couple pieces of string. Accurate to a couple grams or so.
or you can make your own with a couple pieces of aluminum or steel plate, 4 roller blade bearings, and a couple pieces of string. Accurate to a couple grams or so.
Thread Starter
Senior Member
Back Marker
Joined: Jul 2009
Posts: 117
From: Santa Cruz, CA
That really doesn't make a whole lot of sense. The float mark is always at the light spot on the tire.
That is why it is common practice to mount the tire with the float mark aligned with the valve stem. As it is the "default" heavy spot on the wheel.
What would be the point of marking the heavy spot on the tire? For the average person, who doesn't know the light spot on their wheel, it would serve no purpose.
Then again, I have been wrong before but I would like a reference to a manufacturers site saying they mark the heavy point, as I have never heard of such a thing.
Did some research, you are right.
I made an assumption based on the Michelin's. Oddly enough I've mounted the bar code (on michelins) opposite and along the valve stem and the tires have always fallen on a different area on the balancer, but the rate of fall has always been fairly slow like in the video.
Last edited by Karbon; Dec 1, 2010 at 09:30 PM.
Member
Squid
Joined: Apr 2010
Posts: 85
From: NorCal
I've got one of those Marc Parnes balancers which work great.
Before that I used to use two axle stands that I vice gripped some angle iron to (to create a knife edge). I then used the axle to spin the wheel on.
I tested this method against the $100 balancer and the results were the same!! Should have saved my money!
Doing it bolted into the wheel would work but you are also having to deal with wheel bearing drag.

Senior Member
MotoGP
Joined: May 2008
Posts: 3,454
From: San Clemente, CA
That's called "static balance". Snap-on made a balancer 35+ years ago, that pretty much worked that way. It worked fine on car tires, until they got wider and "dynamic balance" came to be a factor. But static balance is still used for motorcycle tires.

Senior Member
MotoGP
Joined: Jul 2007
Posts: 5,066
From: NYC
I have done hand changes on all my bikes & tires & can at least warn that the bead NEVER breaks that easy. I have broken 2x4s doing it. It does vary but street bikes are the hardest. Race bike tires are never on long enuff to be stuck. It is worth doing. I havent tried the run it over method (yet) always did the minimalist change method. Also built a bead breaker out of angle iron from a bed frame. The real trick is spooning it on & off without dings.
Senior Member
SuperSport
Joined: Sep 2008
Posts: 805
From: Delmar NY
3 years ago I decided to start mounting my own tires. I've got the Harbor freight balancer and their mounter modified with teflon rim blocks and a No-mar tire iron. I'm by no means an expert but I find it pretty easy to do.
Basically learned everything off of utube
Basically learned everything off of utube
Senior Member
MotoGP
Joined: Aug 2006
Posts: 2,934
From: altoona, pa
you got to be at the end of your rope to drive a car over the bead to get it to let loose. And believe me, I've been there too, after trying C-clamps, a sledge on a 4x4, sweat and cussin, etc.
A few years ago, I did the harbor freight thing, and now it's a simple, effortless process. I use plastic clothes line to tie a slip knot around the tire to squeeze the bead together and then tie it down to the tire changer frame and this helps to keep the bead in the deep part of the rim.
At the suggestion of a friend, I removed the "L" section (upper section) of the harbor freight changer to make it easier to move the tire iron around without having to reset it when you hit that frame sticking up. Works a lot better!
Also have the tire changer mounted to a hefty piece of plywood to stable things up a bit.
Use jack stands with axle or pipe leveled between them for balancing rim and then mounted tire.
I would have liked to bought the No-Mar changer (invented by Hawkrider's brother i believe), but couldn't afford it. I saw it in action at Indianapolis Moto GP vendor area and it's definitely slick.
Senior Member
SuperSport
Joined: Sep 2008
Posts: 805
From: Delmar NY
I would have bought their iron too, but the No-mar seemed more rugged and Greg's (Hawkrider) brother owns the company
http://www.nomartirechanger.com/products/6
You will need to bolt the tire changer to the floor or come up with a way to secure it.
It looks like today altogether the price would be a little over $220, depending on how much discount you get at HB.
The mojo teflon blocks are a bit pricy for what they are, but you definitely need something as the standard HB kit will mark up your wheels pretty badly.
I've changed 6 tires on it so far so I figure after the next set it will have paid for itself. As mentioned above I'd rather change tires on my schedule than deal with a shop
Senior Member
MotoGP
Joined: Aug 2006
Posts: 2,934
From: altoona, pa
no pics right now, but google search "harbor freight motorcycle tire changer" and you'll see all kinds of helpful pics, videos, etc. Look at the "you tube" vid below and you'll see the red square tube sticking up is the one I unbolted and removed.
http://www.youtube.com/watch?v=iyg2WgSxGlI
Senior Member
MotoGP
Joined: Aug 2006
Posts: 2,934
From: altoona, pa
they are just bare steel on the Harbor Freight, but it looks like the U-tube example was coated in liquid rubber or the like. The rubber may work i don't know. I have electrical tape on mine for lack of a better solution. If you buy one and find a better solution or if the rubber coating works, give me a shout.


