
DIY Wheel Balancer


Thread Starter
Senior Member
SuperSport
Joined: Aug 2007
Posts: 599
From: Eagle, ID.

DIY Wheel Balancer
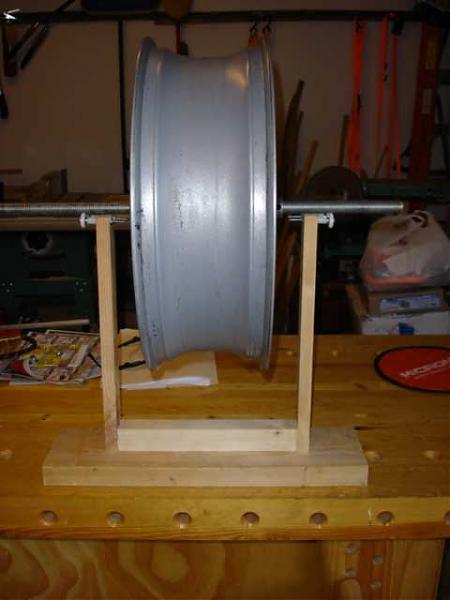
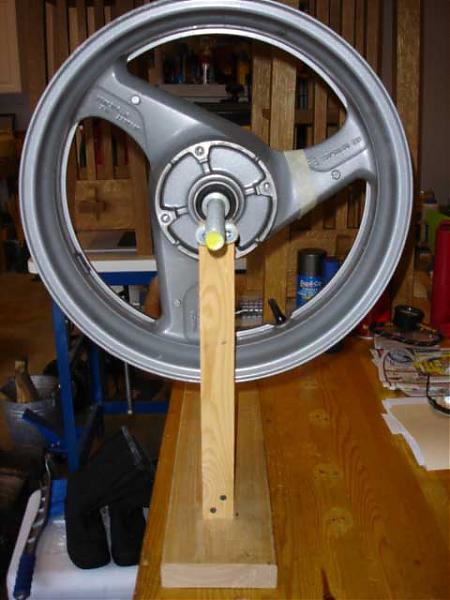
For all you DIY'ers, which is just about every member, here is a wheel balancer that I put together for less than $20 and all parts can be purchased at a large box hardware store.

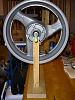
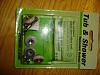
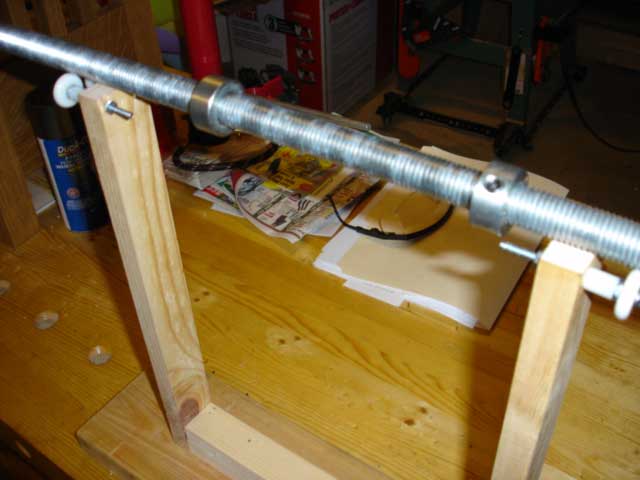
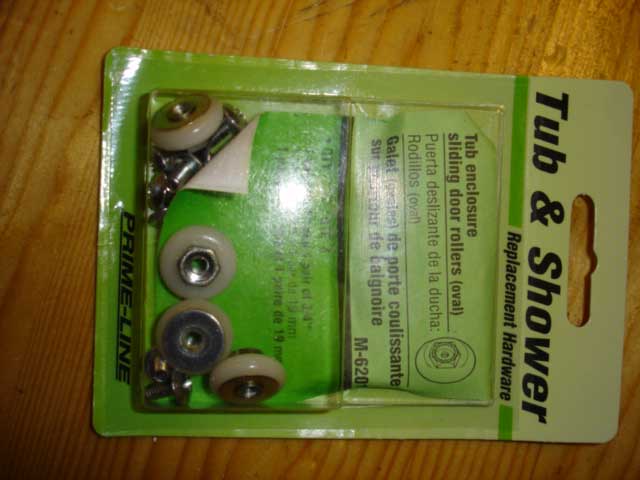
The large rod is a 24" x 3/4" and the lock collars and 1/2" nylon spacers I got out of the specialty trays in the hardware aisle. The bolt and nuts used with the rollers are 10-24 x 2 1/2". I have included a picture of the shower rollers so everyone has an idea what to look for. I used the 3/4" diameter rollers.
Rethinking the design, I could have done away with the rollers altogether and used something that keeps the threaded rod on top of the wooden posts from falling off. The metal collars have a headless hex bolt to lock the collar to the rod. By pushing the collars against the wheel spacers, it lock the wheel in to allow it to spin freely.
The wood I used was scrap dimensional lumber, 2"x6" and 1"x2". I used wood screws to put the base together. The dimension of the base is 6"x20" and the posts are 15" tall and 11" apart, inside distance.
The big box hardware stores usually have a lot of scrap that can be picked up for next to nothing.
The 3/4" threaded rod is almost the same size as either wheel axle in diameter, so that in combination with the lock collars allows the wheel to spin very free.
To date I have balanced two sets of wheels/tires on this setup and it works flawless.
Last edited by reaper; Jan 25, 2008 at 06:26 PM.

Senior Member
Back Marker
Joined: Aug 2006
Posts: 134
thanks for taking the time to post up. i have something similar in the works. just out of curiosity, what are you using to spoon off the rubber with? is keeping the stand level in all directions tough? or is that a non issue?

Senior Member
Superstock
Joined: Feb 2006
Posts: 474
From: Merritt,MI.

as far as changing tires I just installed a harbor freight manual tire changer 49.00$ and added the motorcycle attachment 49.00$ but I have yet to try it out. tires are on the way I'll let anyone interested know how it goes,but my tires are dirt bike tires these day's!!
Senior Member
Back Marker
Joined: Aug 2006
Posts: 134
as far as changing tires I just installed a harbor freight manual tire changer 49.00$ and added the motorcycle attachment 49.00$ but I have yet to try it out. tires are on the way I'll let anyone interested know how it goes,but my tires are dirt bike tires these day's!!
Senior Member
Superstock
Joined: Feb 2006
Posts: 474
From: Merritt,MI.
yeah I read a review about the changer and they used old inner tubes on the rim clamps. But I'm more concerned with the tire removal tool!! it may not scratch it but it will leave red paint on everything it touches.
Thread Starter
Senior Member
SuperSport
Joined: Aug 2007
Posts: 599
From: Eagle, ID.
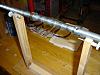
The two sets of wheels/tires where changed on the HF tire changer with motorcycle attachment. It took approximately 30 minutes each to remove the old tire and put the new tire on, this was using 1/2"x1"x14" strips of scrap oak as the spoons. The appropriate metal spoons would make the process a little faster.
Two things to keep in mind when you are doing this is 1. Make sure the bead is broken on the tire you are removing or it will be impossible to remove, and 2. Once you get the first side of the new tire on the rim, Use 2 or 3 clamps wood clamps, C-clamps or like items to clamp the tire together so that the two beads, where clamped, are centered in the lowest part of the rim. By doing this, you will have enough play to push the last part of the bead over the rim.
Also, make sure you generously use a soapy water solution throughout the entire process. And to prevent rim damage, dip the three rim clamps and the ends of the tire rod in the liquid rubber - the LR is available at HF as well.
Good luck.
Senior Member
Back Marker
Joined: Aug 2006
Posts: 134
"liquid rubber" "scrap oak" sweet! just thought i would mention that i saw a youtube video of a guy who had tie wrapped cut up shampoo bottles for protection if i can find the link i will post it
cheers
oh yeah, did you level the balance stand in some way???
cheers
oh yeah, did you level the balance stand in some way???
Senior Member
Back Marker
Joined: Aug 2006
Posts: 134
ok here is a little you tube action
http://www.youtube.com/watch?v=t_34kAlZALg&NR=1
http://www.youtube.com/watch?v=t_34kAlZALg&NR=1

Senior Member
SuperBike
Joined: Jul 2004
Posts: 1,015
as far as changing tires I just installed a harbor freight manual tire changer 49.00$ and added the motorcycle attachment 49.00$ but I have yet to try it out. tires are on the way I'll let anyone interested know how it goes,but my tires are dirt bike tires these day's!!
Now as far as the Dismount/Mount tool goes, throw that peice of crap away and do what i did. for around $120 you get the tire solution and tire mount paste as well as the No-Mar Dismount/Mount tool with Nylon tips and even spare tips and a great video.
Guys it is the **** when it comes to making the hF tire changer a scratch free unit.
http://www.nomartirechanger.com/06DemountBar.html


Senior Member
Superstock
Joined: Feb 2006
Posts: 474
From: Merritt,MI.
Well I put the tires on my kids dirt bike today with the above mentioned tool, WOW I've put tires on his bike before with pry bars on the tool bench.and I'm happy to say NEVER AGAIN!!!!!!!! So easy I actually left the top arm off like that you-tube video and the pledge trick was way better than soap and water for a dirt bike = water rust's out valve stems and spoke nipples. I don't have to worry about balancing but man was this easy!!! on to my bike next

Hawk Newbie
Back Marker
Joined: Apr 2008
Posts: 203
From: Illinois
ok here is a little you tube action
http://www.youtube.com/watch?v=t_34kAlZALg&NR=1
http://www.youtube.com/watch?v=t_34kAlZALg&NR=1

Senior Member
SuperSport
Joined: Aug 2007
Posts: 714
From: Fredericksburg, VA
To answer a question about using this tire balancer:
Reaper acquired some wheel weights from a friend who works at a tire place first, and I'm sure there are other places you can get them.
What I have been doing lately is balancing the wheel without a tire on it to find the true heavy spot because it is not always at the valve stem. This lets me know where to put the "dot" on the tire (supposed to be the light spot of the tire to even out weight) and minimize the weights used if any at all.
To use the balancer:
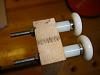
1. Put the rod through the wheel up against one collar
2. Slide the opposite collar on (which really isn't needed)
3. Pretend you're on Price is Right and spin the wheel when Bob tells you. The wheel should make about one revolution.
4. Pick a point on the wheel and remember it
5. Spin the wheel again in the opposite direction at a different speed
6. Watch where it stops
7. If its the same place turn wheel 1/4 turn- watch the heavy spot fall to the bottom
8. Turn the wheel 1/4 turn in the other direction- watch the same heavy spot fall
9. Put a weight on the opposite end which should be the light end
10. Repeat steps 3-9.
11. Try to avoid having weights everywhere. All it should need is weight in one spot, but you might have to add a little more, just stick one at a time.
12. When the wheel stops at a different point everytime you give it a light spin it is balanced.
13. Put the wheel back on and REMEMBER- Fresh rubber means slick tires!
Reaper acquired some wheel weights from a friend who works at a tire place first, and I'm sure there are other places you can get them.
What I have been doing lately is balancing the wheel without a tire on it to find the true heavy spot because it is not always at the valve stem. This lets me know where to put the "dot" on the tire (supposed to be the light spot of the tire to even out weight) and minimize the weights used if any at all.
To use the balancer:
1. Put the rod through the wheel up against one collar
2. Slide the opposite collar on (which really isn't needed)
3. Pretend you're on Price is Right and spin the wheel when Bob tells you. The wheel should make about one revolution.
4. Pick a point on the wheel and remember it
5. Spin the wheel again in the opposite direction at a different speed
6. Watch where it stops
7. If its the same place turn wheel 1/4 turn- watch the heavy spot fall to the bottom
8. Turn the wheel 1/4 turn in the other direction- watch the same heavy spot fall
9. Put a weight on the opposite end which should be the light end
10. Repeat steps 3-9.
11. Try to avoid having weights everywhere. All it should need is weight in one spot, but you might have to add a little more, just stick one at a time.
12. When the wheel stops at a different point everytime you give it a light spin it is balanced.
13. Put the wheel back on and REMEMBER- Fresh rubber means slick tires!

Senior Member
Back Marker
Joined: Oct 2007
Posts: 226
From: East TX
Or you can take 5 minutes and pour in some DynaBeads. Been using them on front and back since beginning of the summer with NO wheel weights and not a single vibration up to 110. Smooth as butta. I just replaced my rear tire last weekend, cut a hole in the middle of the old tire, drained out the DynaBeads, sifted out the rubber tire remmants and reinstalled them into the new tire. Smooth as the first tire. And no unsightly wheel weights.
https://www.superhawkforum.com/forum...ght=Dyna+Beads
https://www.superhawkforum.com/forum...ght=Dyna+Beads

Thread
Thread Starter
Forum
Replies
Last Post
speedkelly@aol.com
Technical Discussion
48
Aug 11, 2013 06:39 PM


