Li-ion Battery
 12-24-2016, 06:03 AM
#1
Senior Member
SuperBike
Thread Starter

Join Date: Sep 2010
Location: Bisbee, AZ
Posts: 1,873

Li-ion Battery
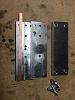
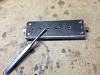
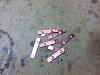
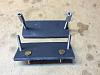
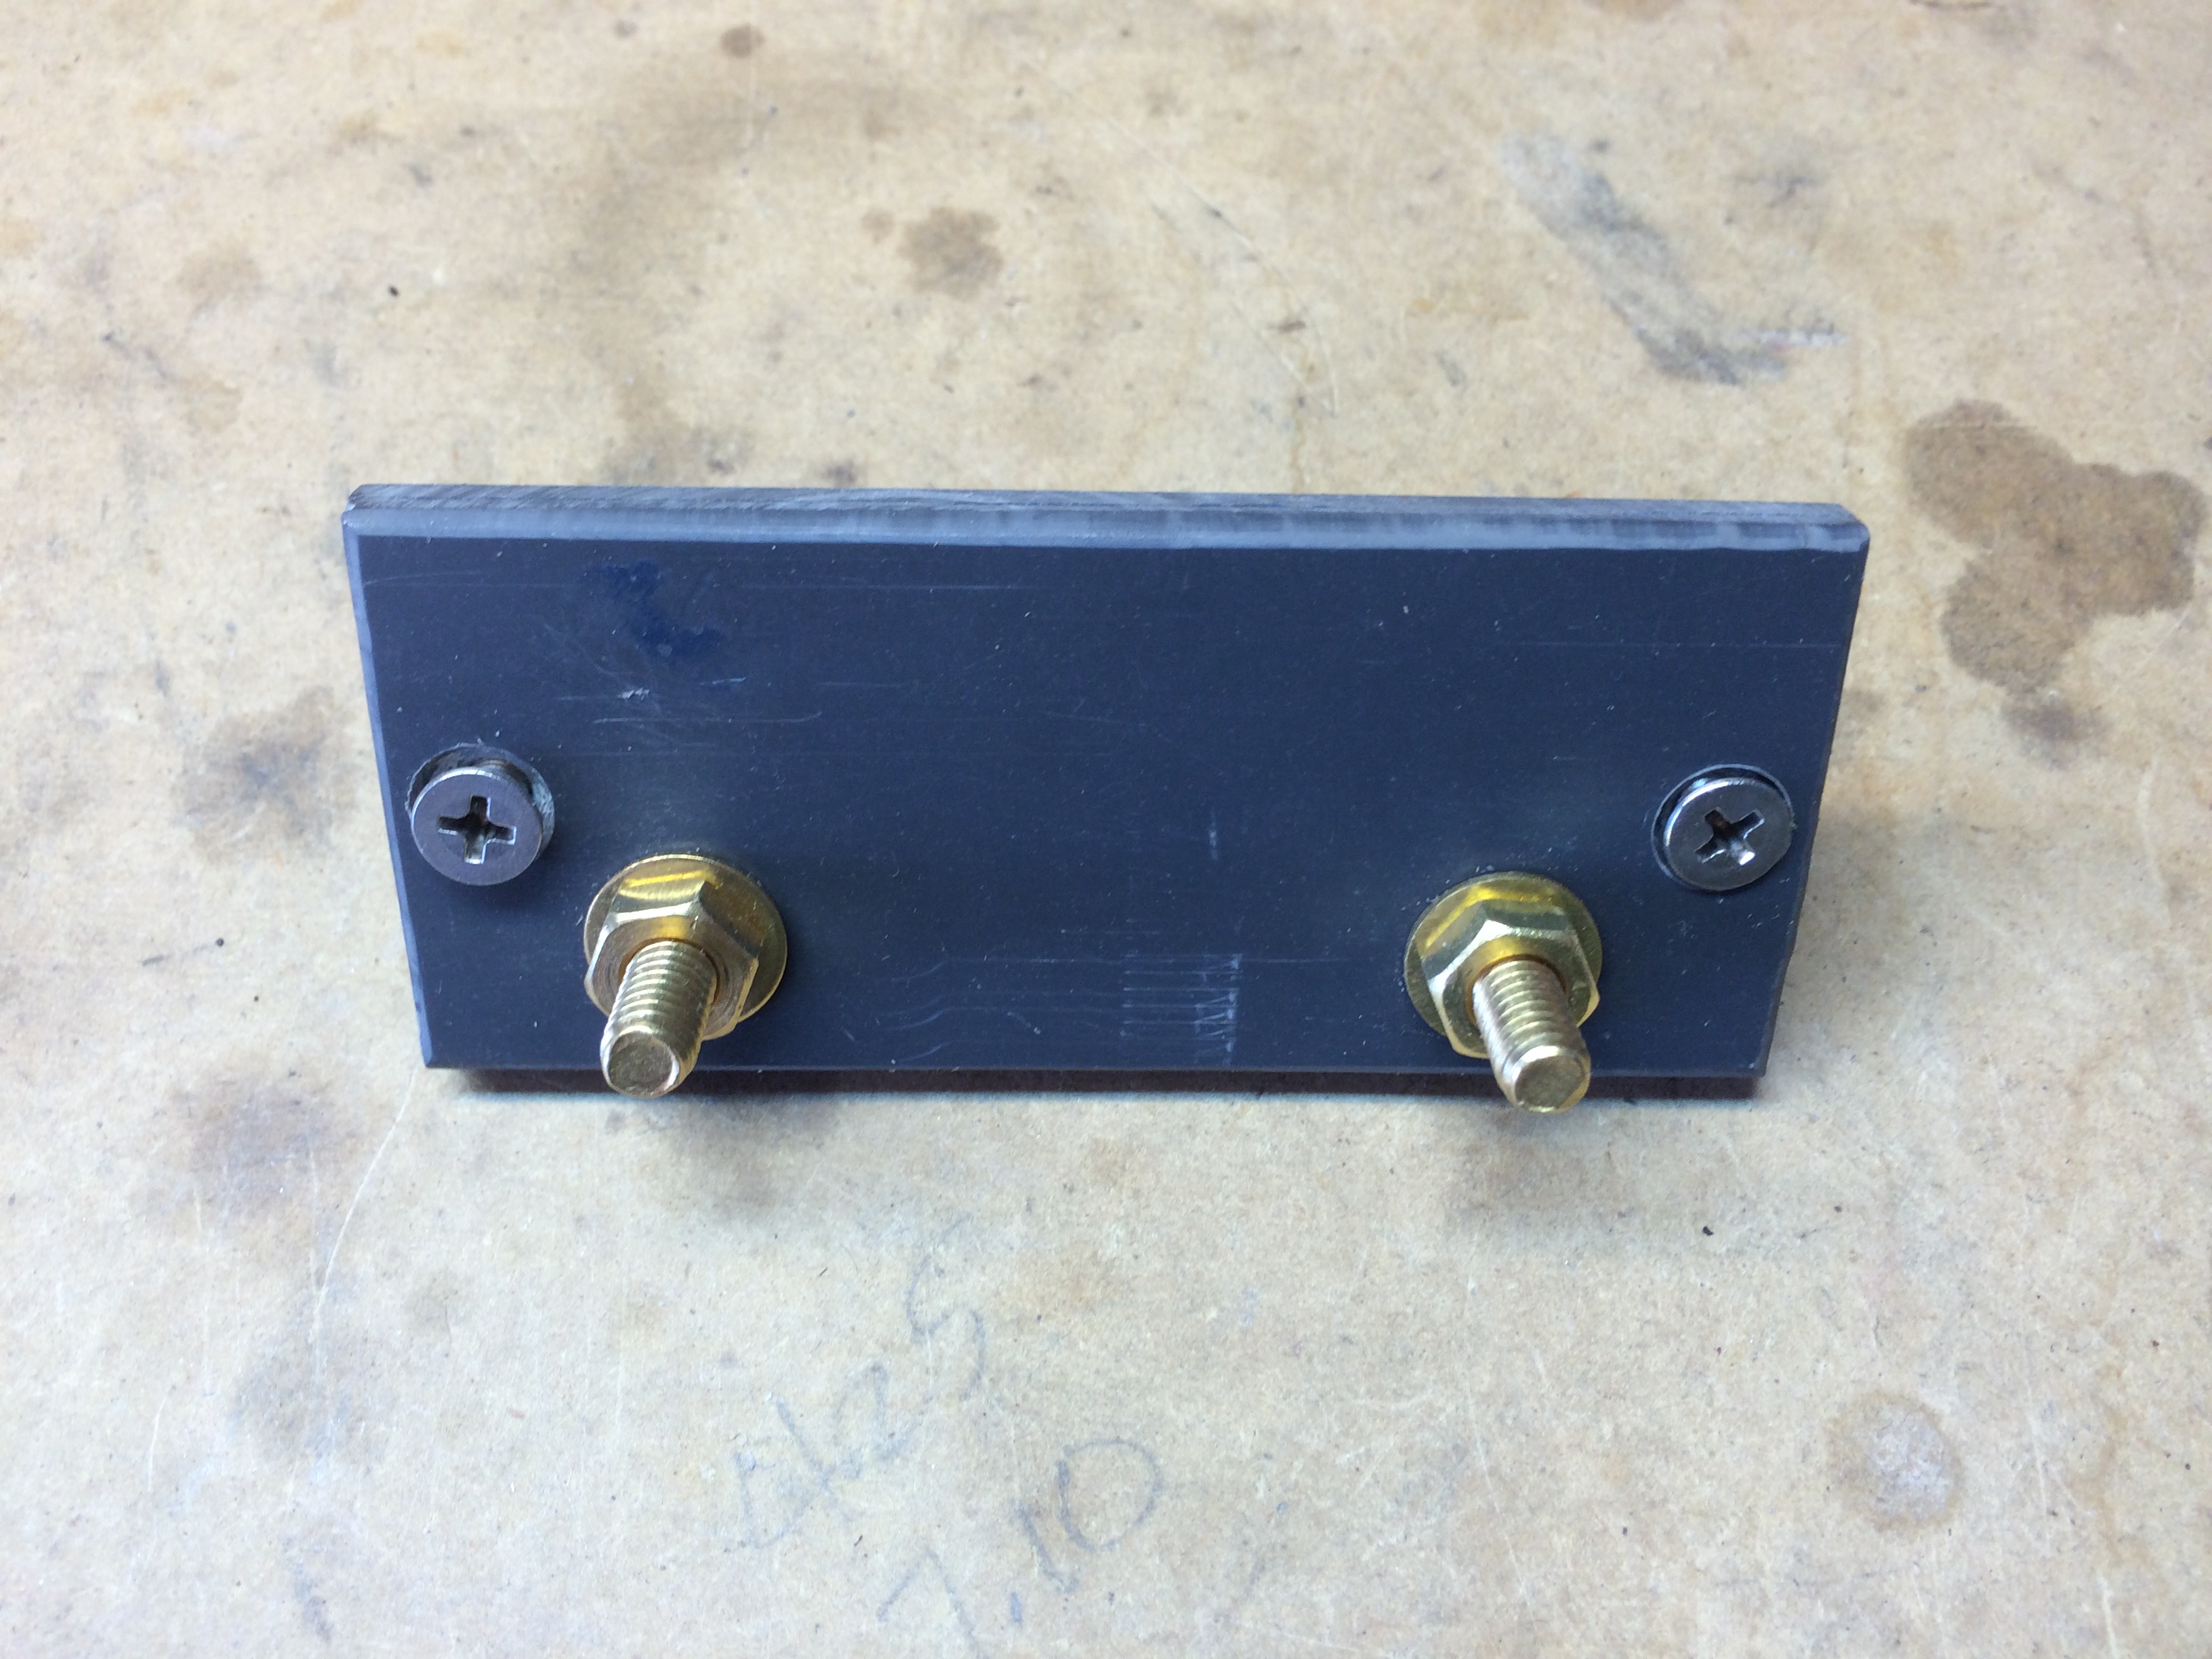
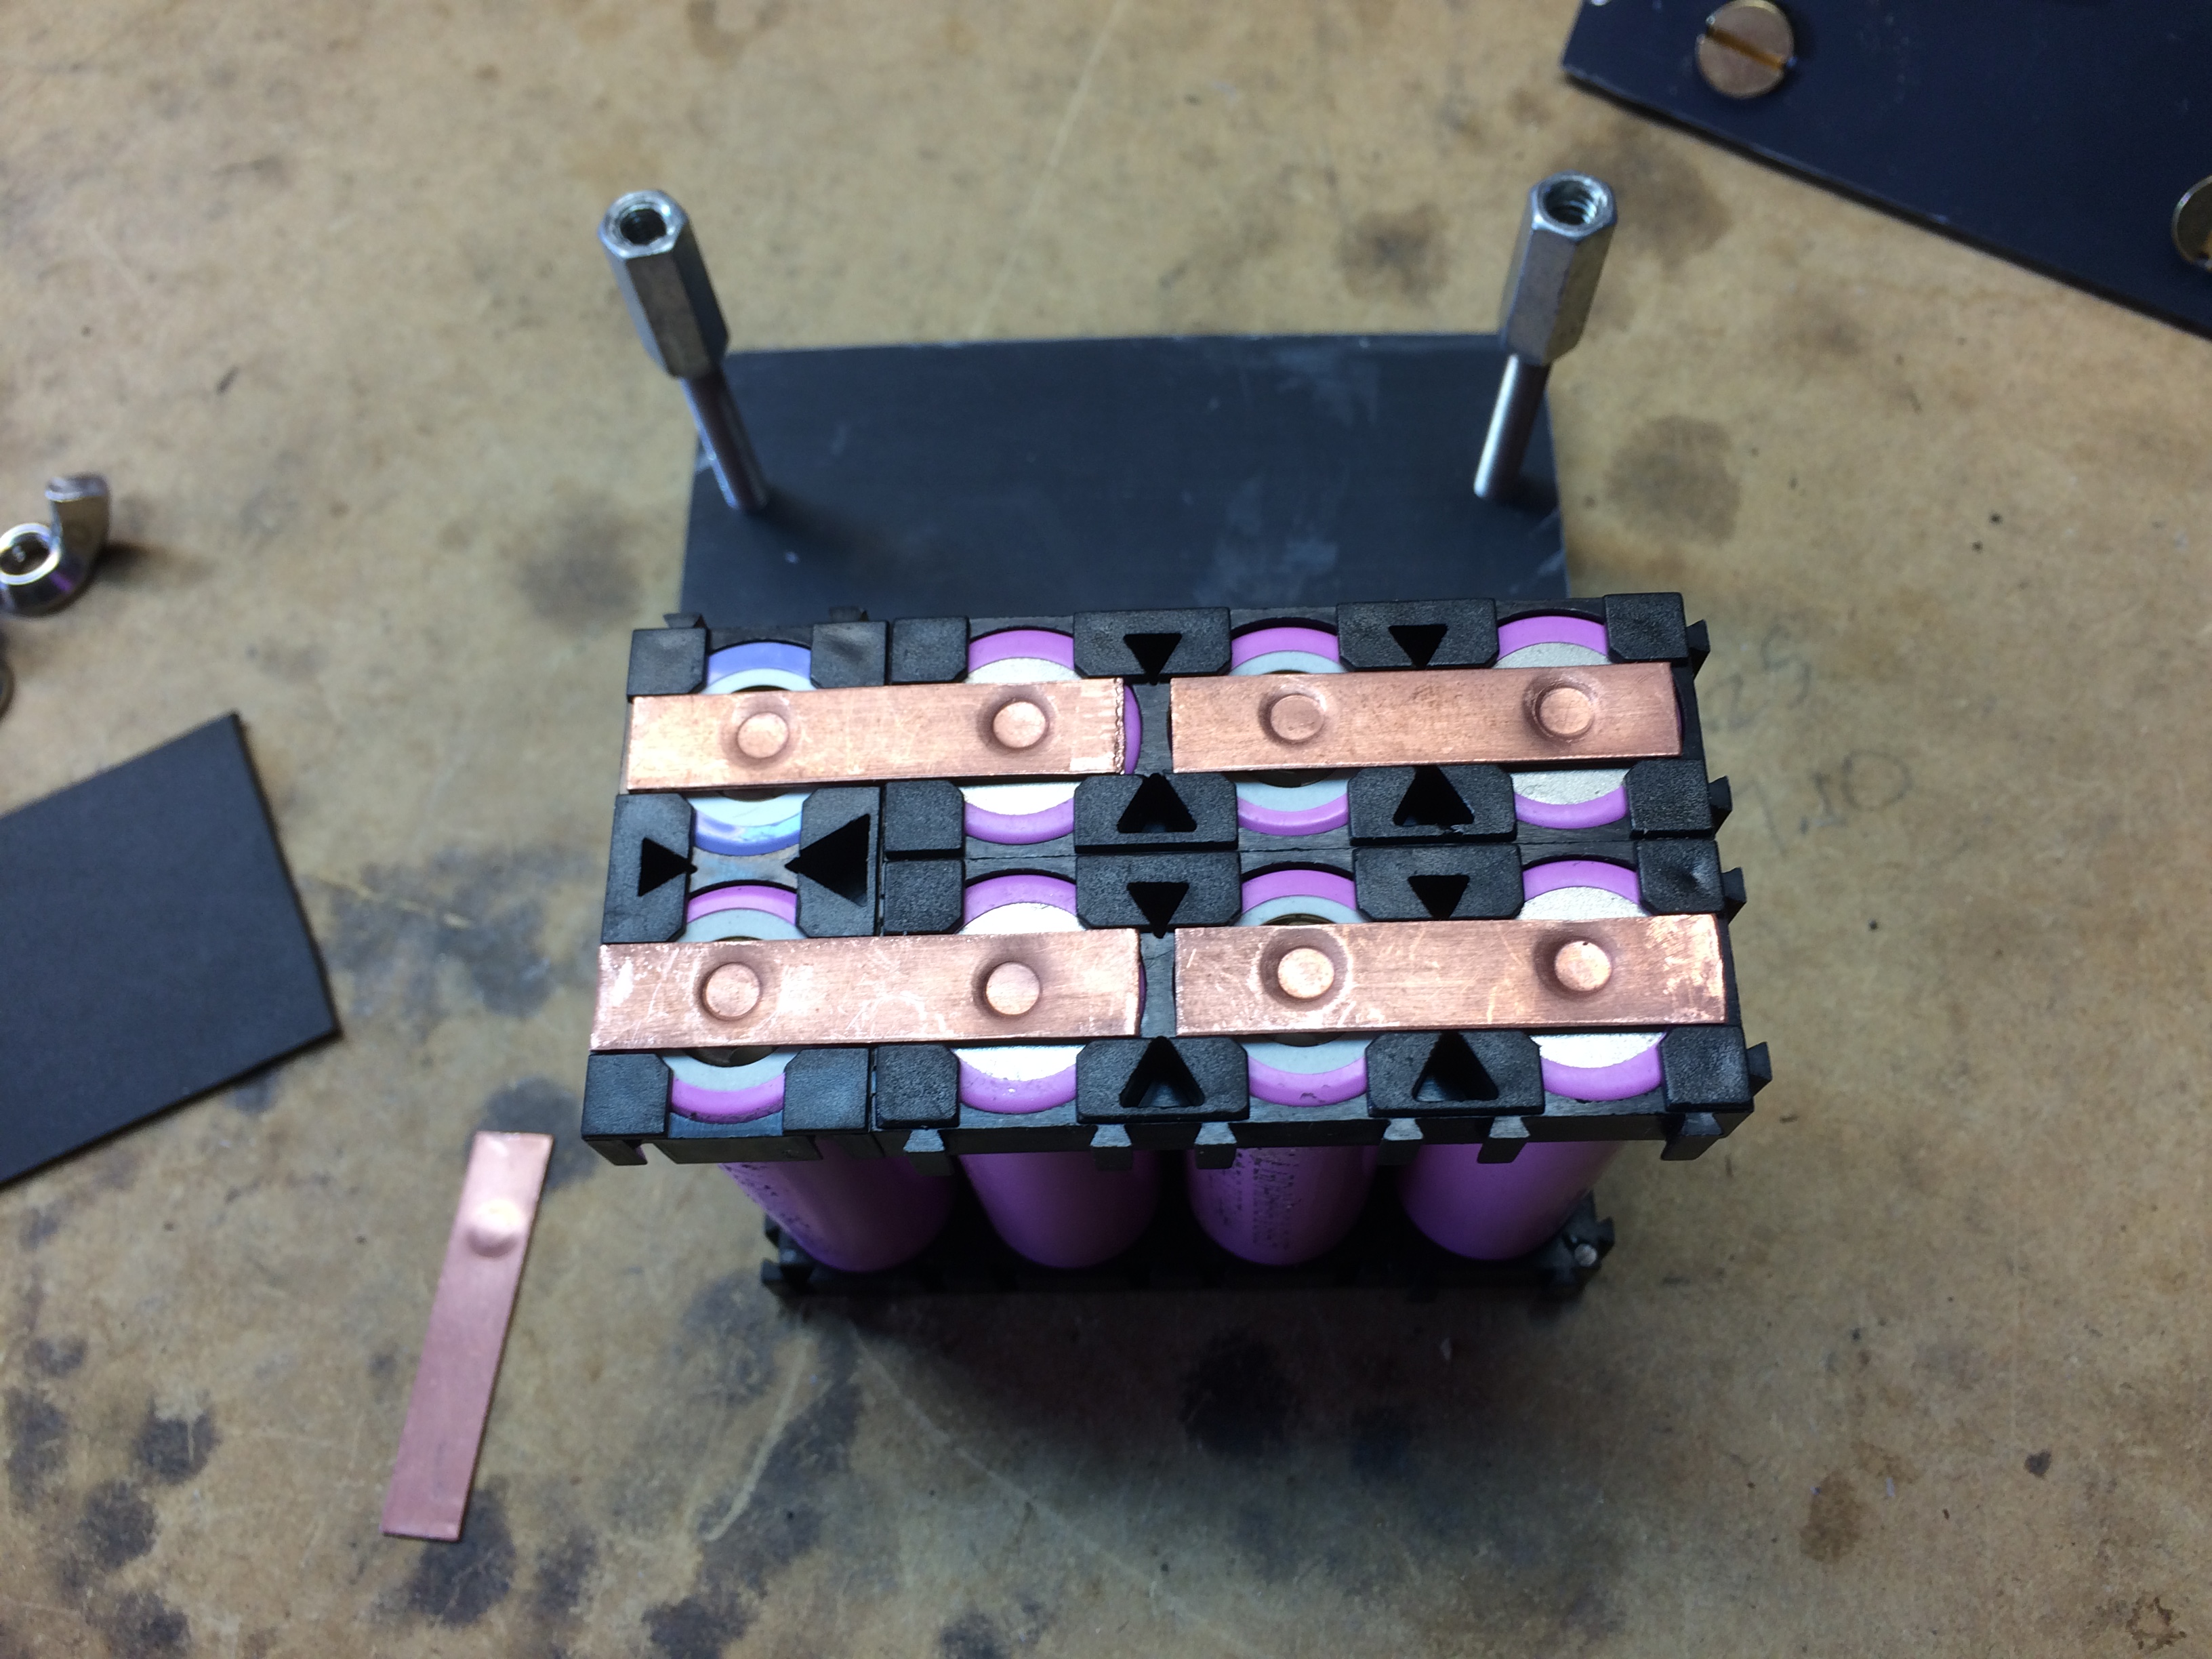
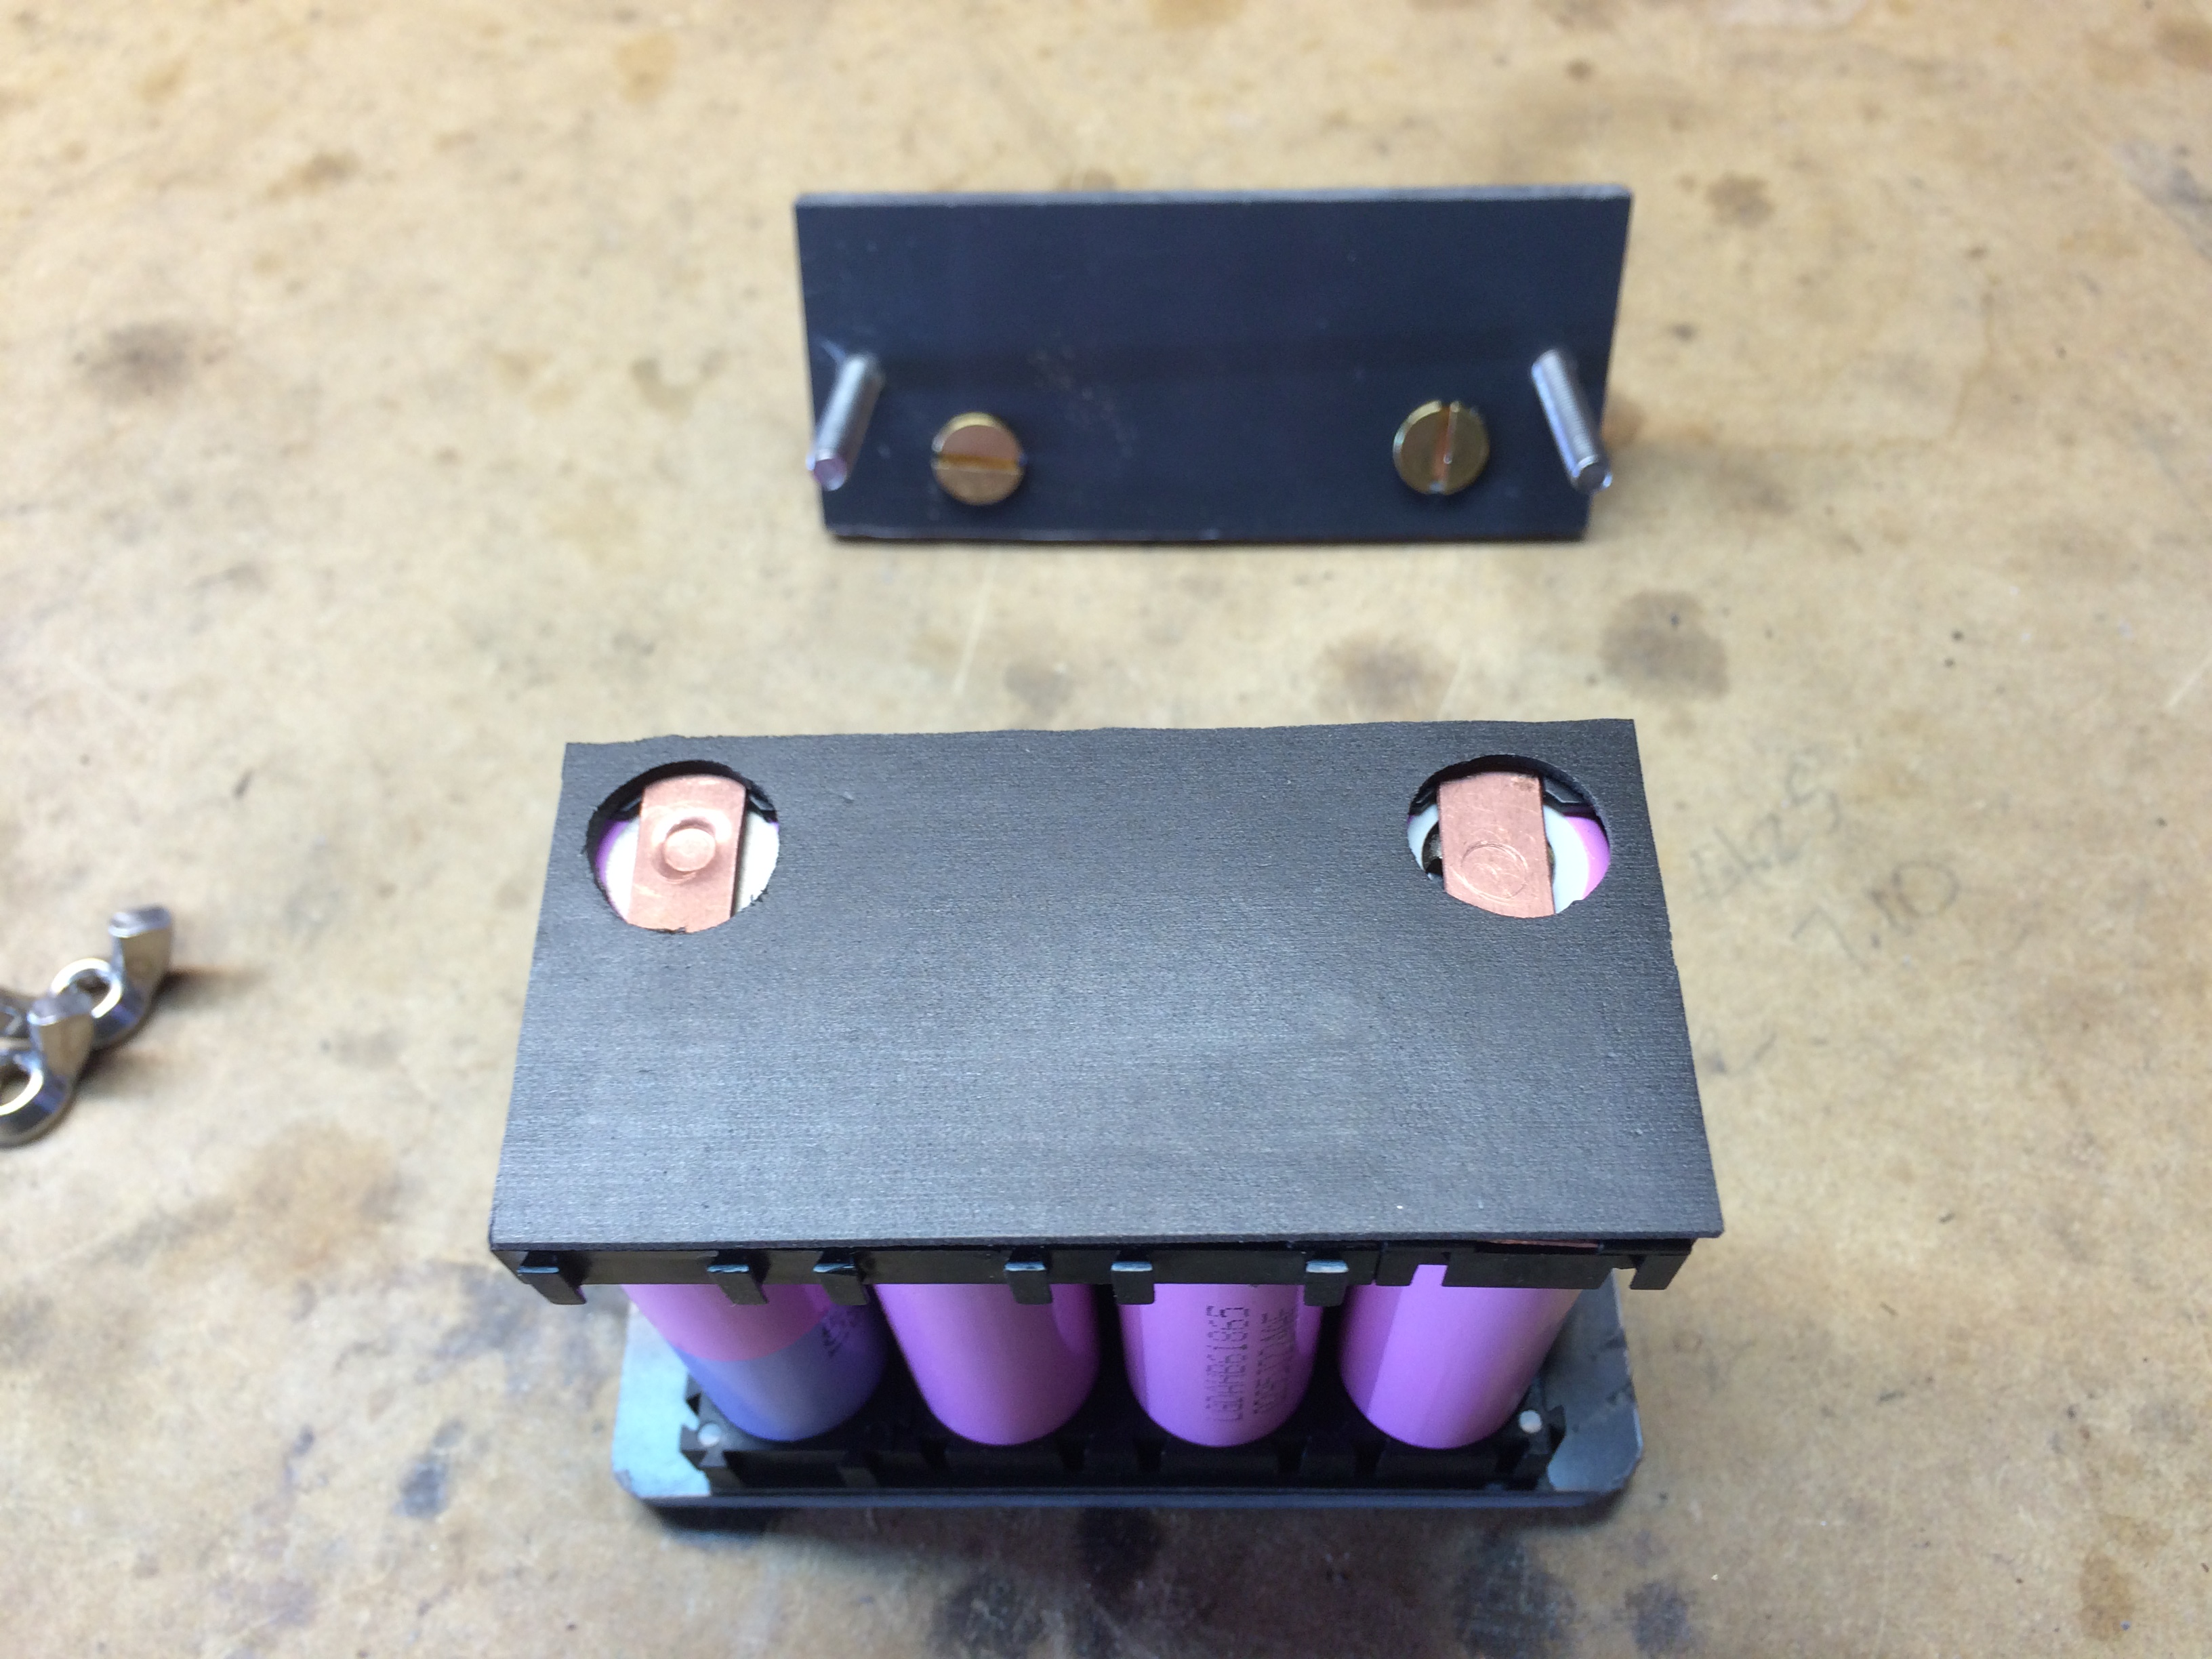
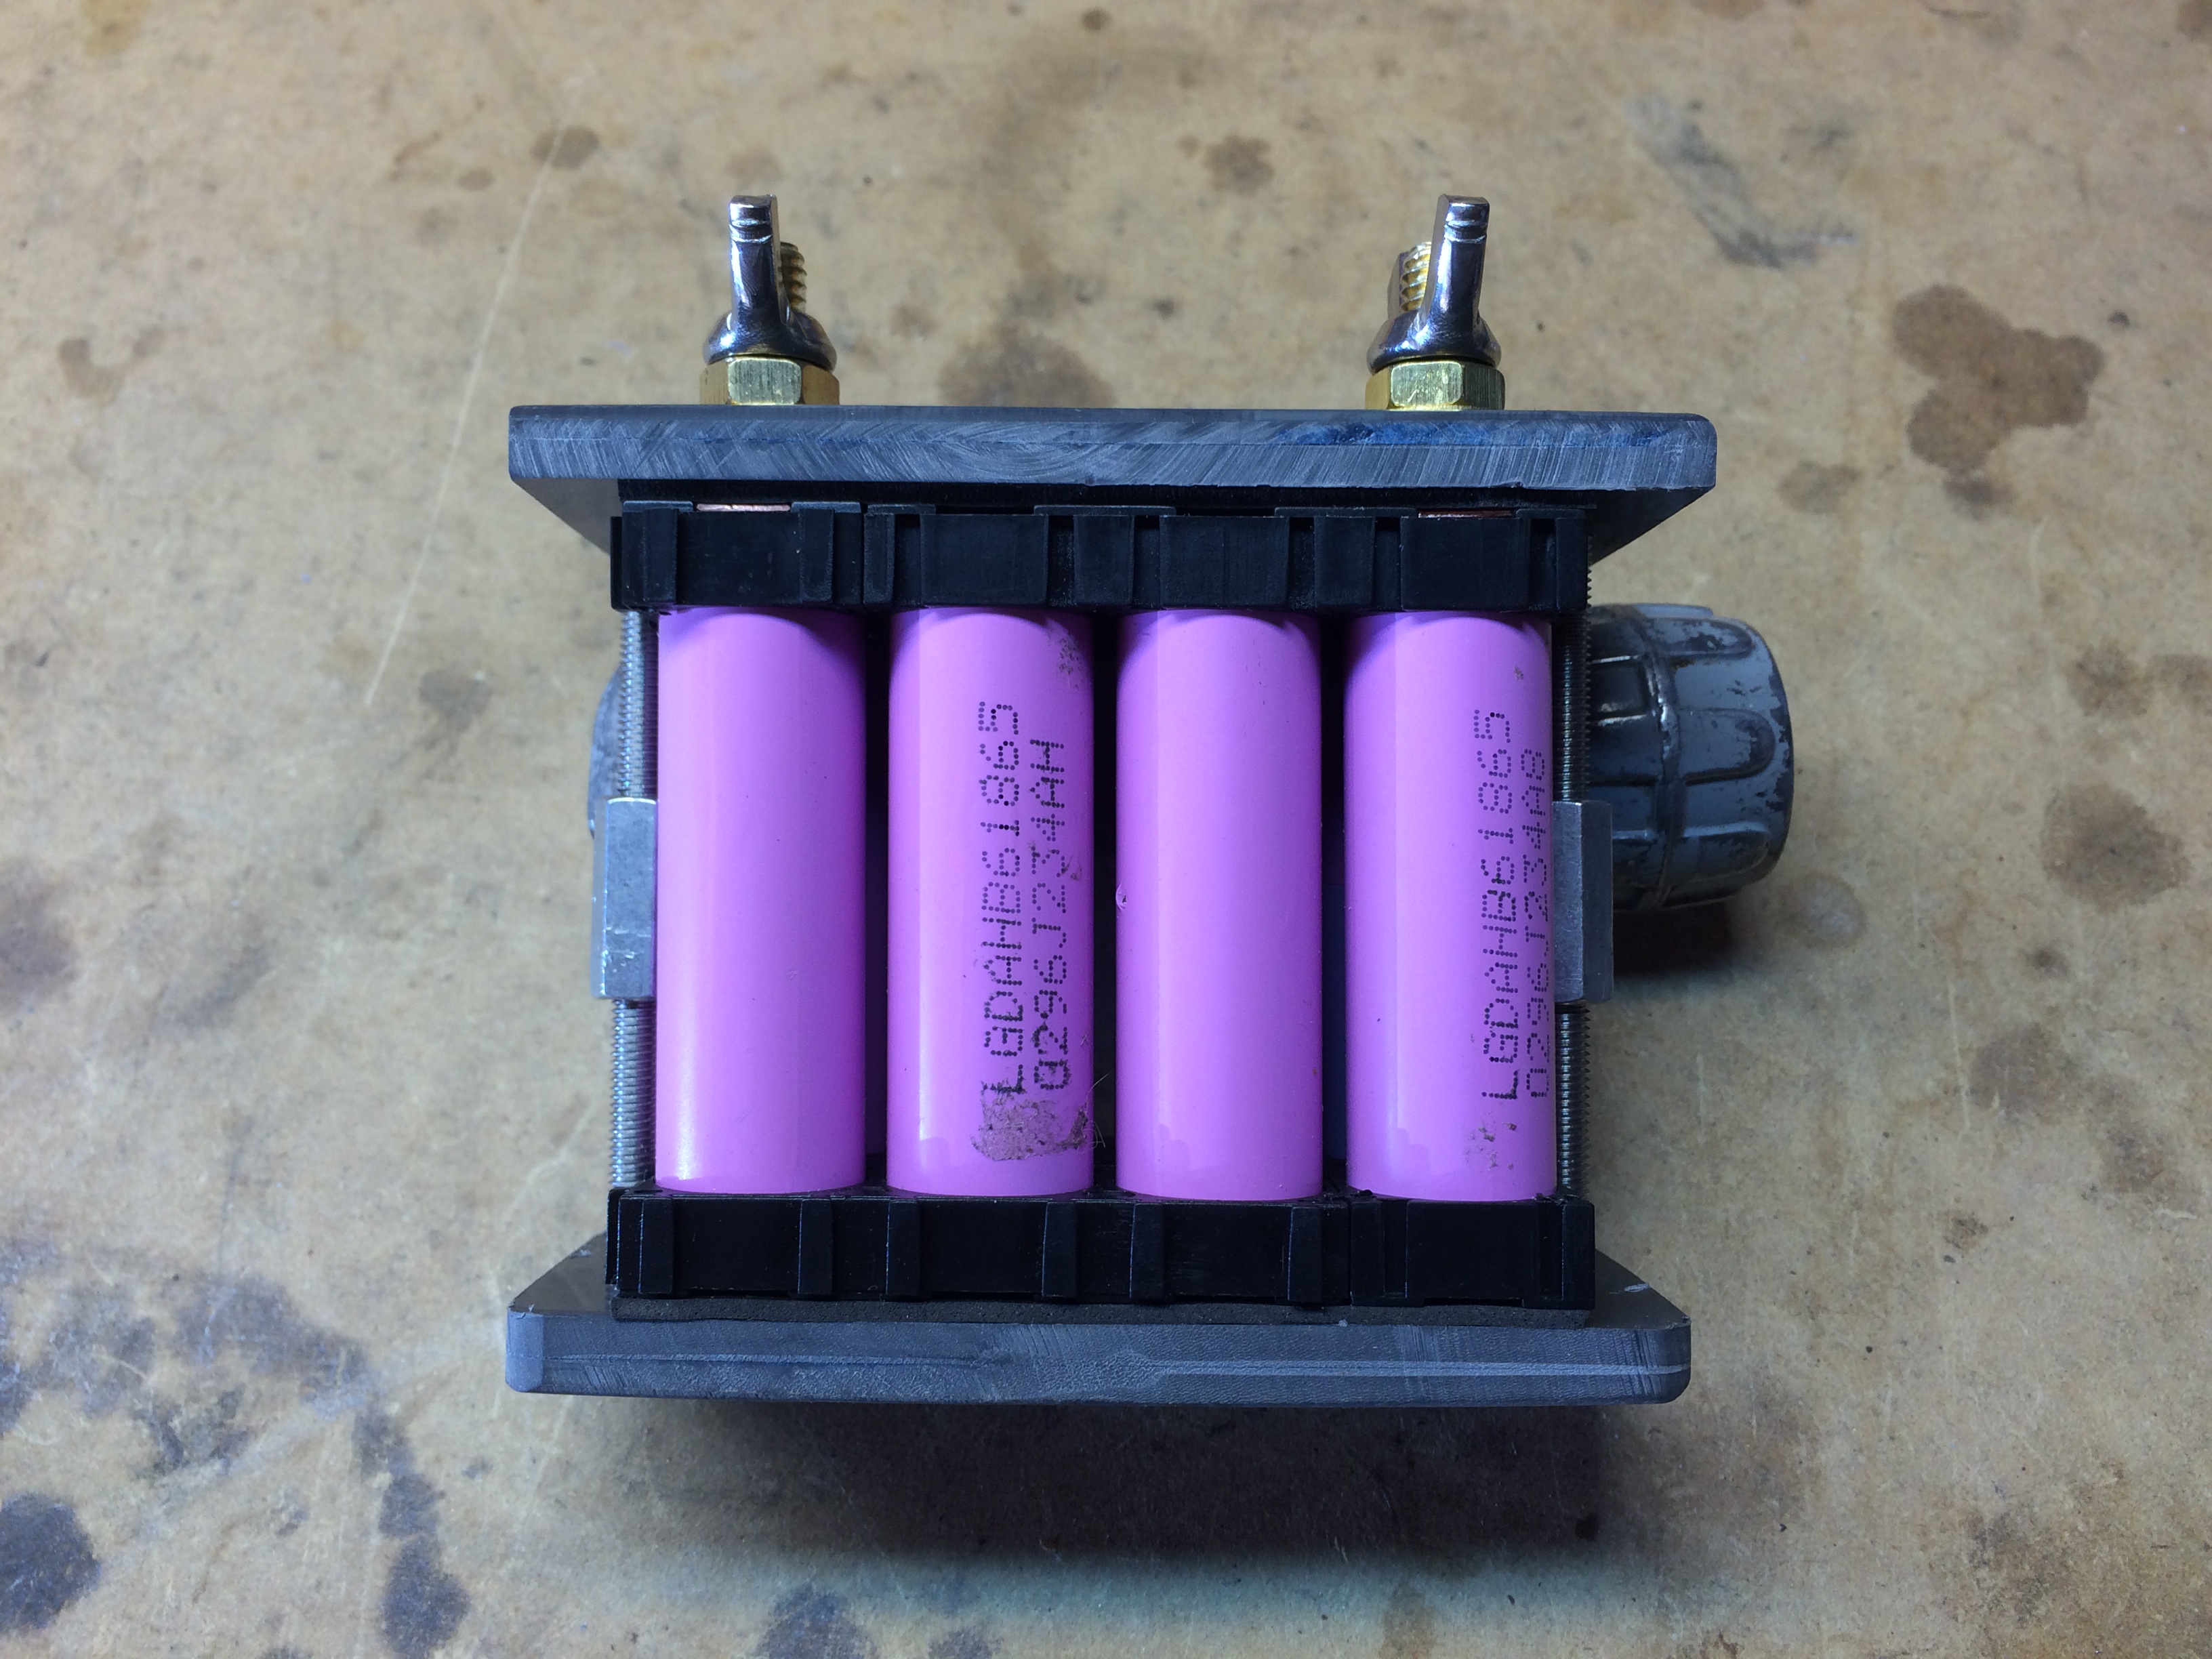
Have been fooling around with assembly of a Li-ion battery. Uses the ubiquitous 18650 cell Previously I had tried to solder the bus bars to the cells with results that I didn't like. The big difference in pack design (for me) was the discovery of the spacers Battery Spacers, Separators : Lithium Rechargeable Batteries, Battery BMS, Pack Assembling that allowed a non solder build. Found this site and thread https://endless-sphere.com/forums/viewtopic.php?f=14&t=57810
Picked up the poron blanket material here McMaster-Carr - Poron Urethane Foam
Thought it looked like a smart way to build a pack. Pack can easily be disassembled and any issue with a cell can be addressed. Cells could also be upgraded to what ever new, better cell that comes into the market. Found the cells here http://liionwholesale.com/
Also purchased some 26650 cells and spacers, but have not finished a pack using them yet.
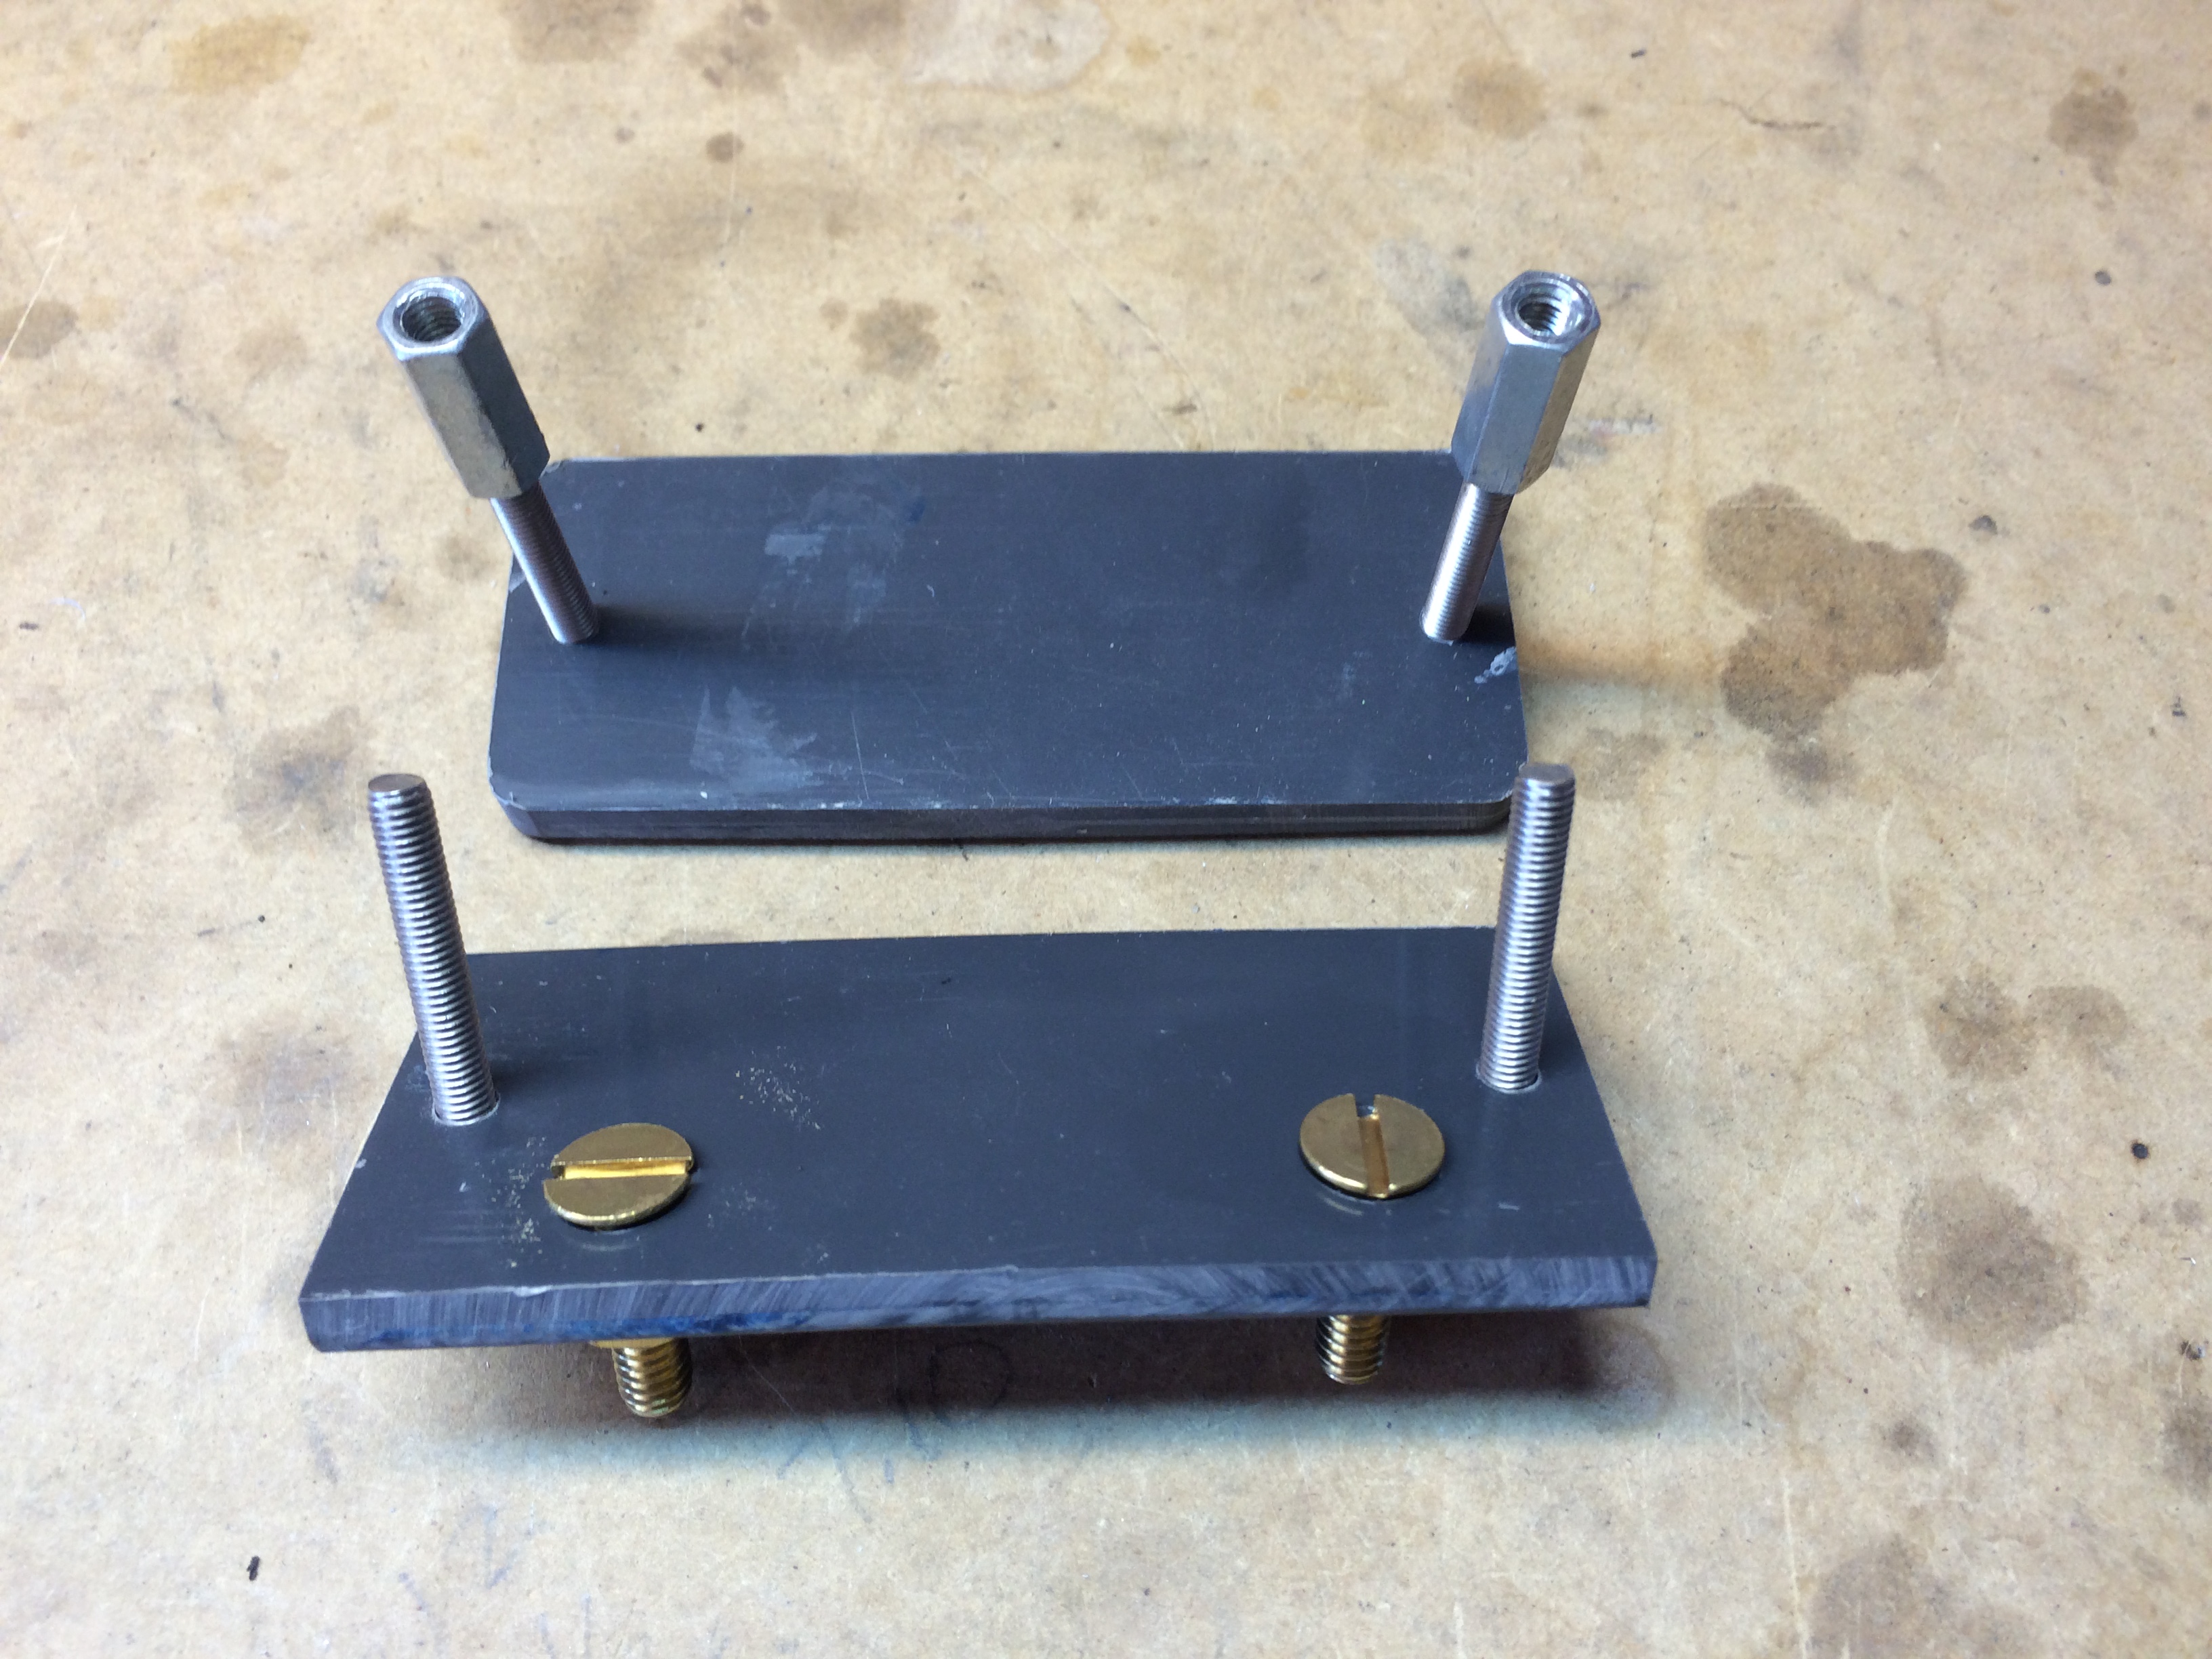
Used two pieces of 1/8" PVC laminated together (1/4") to form top and bottom plates. During the glue up of the plates I built a bit of camber into the pieces. Discovered the need for the camber on my first experiment in building the pack using ~1/4" plexi for top and bottom plates. Probably could use a center screw to eliminate the bowing up in the middle of the plates, or other reinforcement on the plates. Might do that in a future build, but right now this is how it came out.
I thinking about draining the pack to ~14.2-4V. Not sure if the higher voltage the pack has now will cause a problem with the electrical components in the bike (converter unit, ICM?) Since that voltage is where the charging system is currently running at I know that is OK. The fully charged cells, 4.2V which yielded 16.8V for the pack. Have been testing the pack by cranking over the motor on a C70 Passport I have in the garage. Using that to reduce the voltage and check for any issues with the pack.
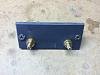
Some photos.
Picked up the poron blanket material here McMaster-Carr - Poron Urethane Foam
Thought it looked like a smart way to build a pack. Pack can easily be disassembled and any issue with a cell can be addressed. Cells could also be upgraded to what ever new, better cell that comes into the market. Found the cells here http://liionwholesale.com/
Also purchased some 26650 cells and spacers, but have not finished a pack using them yet.
Used two pieces of 1/8" PVC laminated together (1/4") to form top and bottom plates. During the glue up of the plates I built a bit of camber into the pieces. Discovered the need for the camber on my first experiment in building the pack using ~1/4" plexi for top and bottom plates. Probably could use a center screw to eliminate the bowing up in the middle of the plates, or other reinforcement on the plates. Might do that in a future build, but right now this is how it came out.
I thinking about draining the pack to ~14.2-4V. Not sure if the higher voltage the pack has now will cause a problem with the electrical components in the bike (converter unit, ICM?) Since that voltage is where the charging system is currently running at I know that is OK. The fully charged cells, 4.2V which yielded 16.8V for the pack. Have been testing the pack by cranking over the motor on a C70 Passport I have in the garage. Using that to reduce the voltage and check for any issues with the pack.
Some photos.


 12-24-2016, 08:09 AM
#4
Senior Member
SuperBike
Thread Starter
Join Date: Sep 2010
Location: Bisbee, AZ
Posts: 1,873
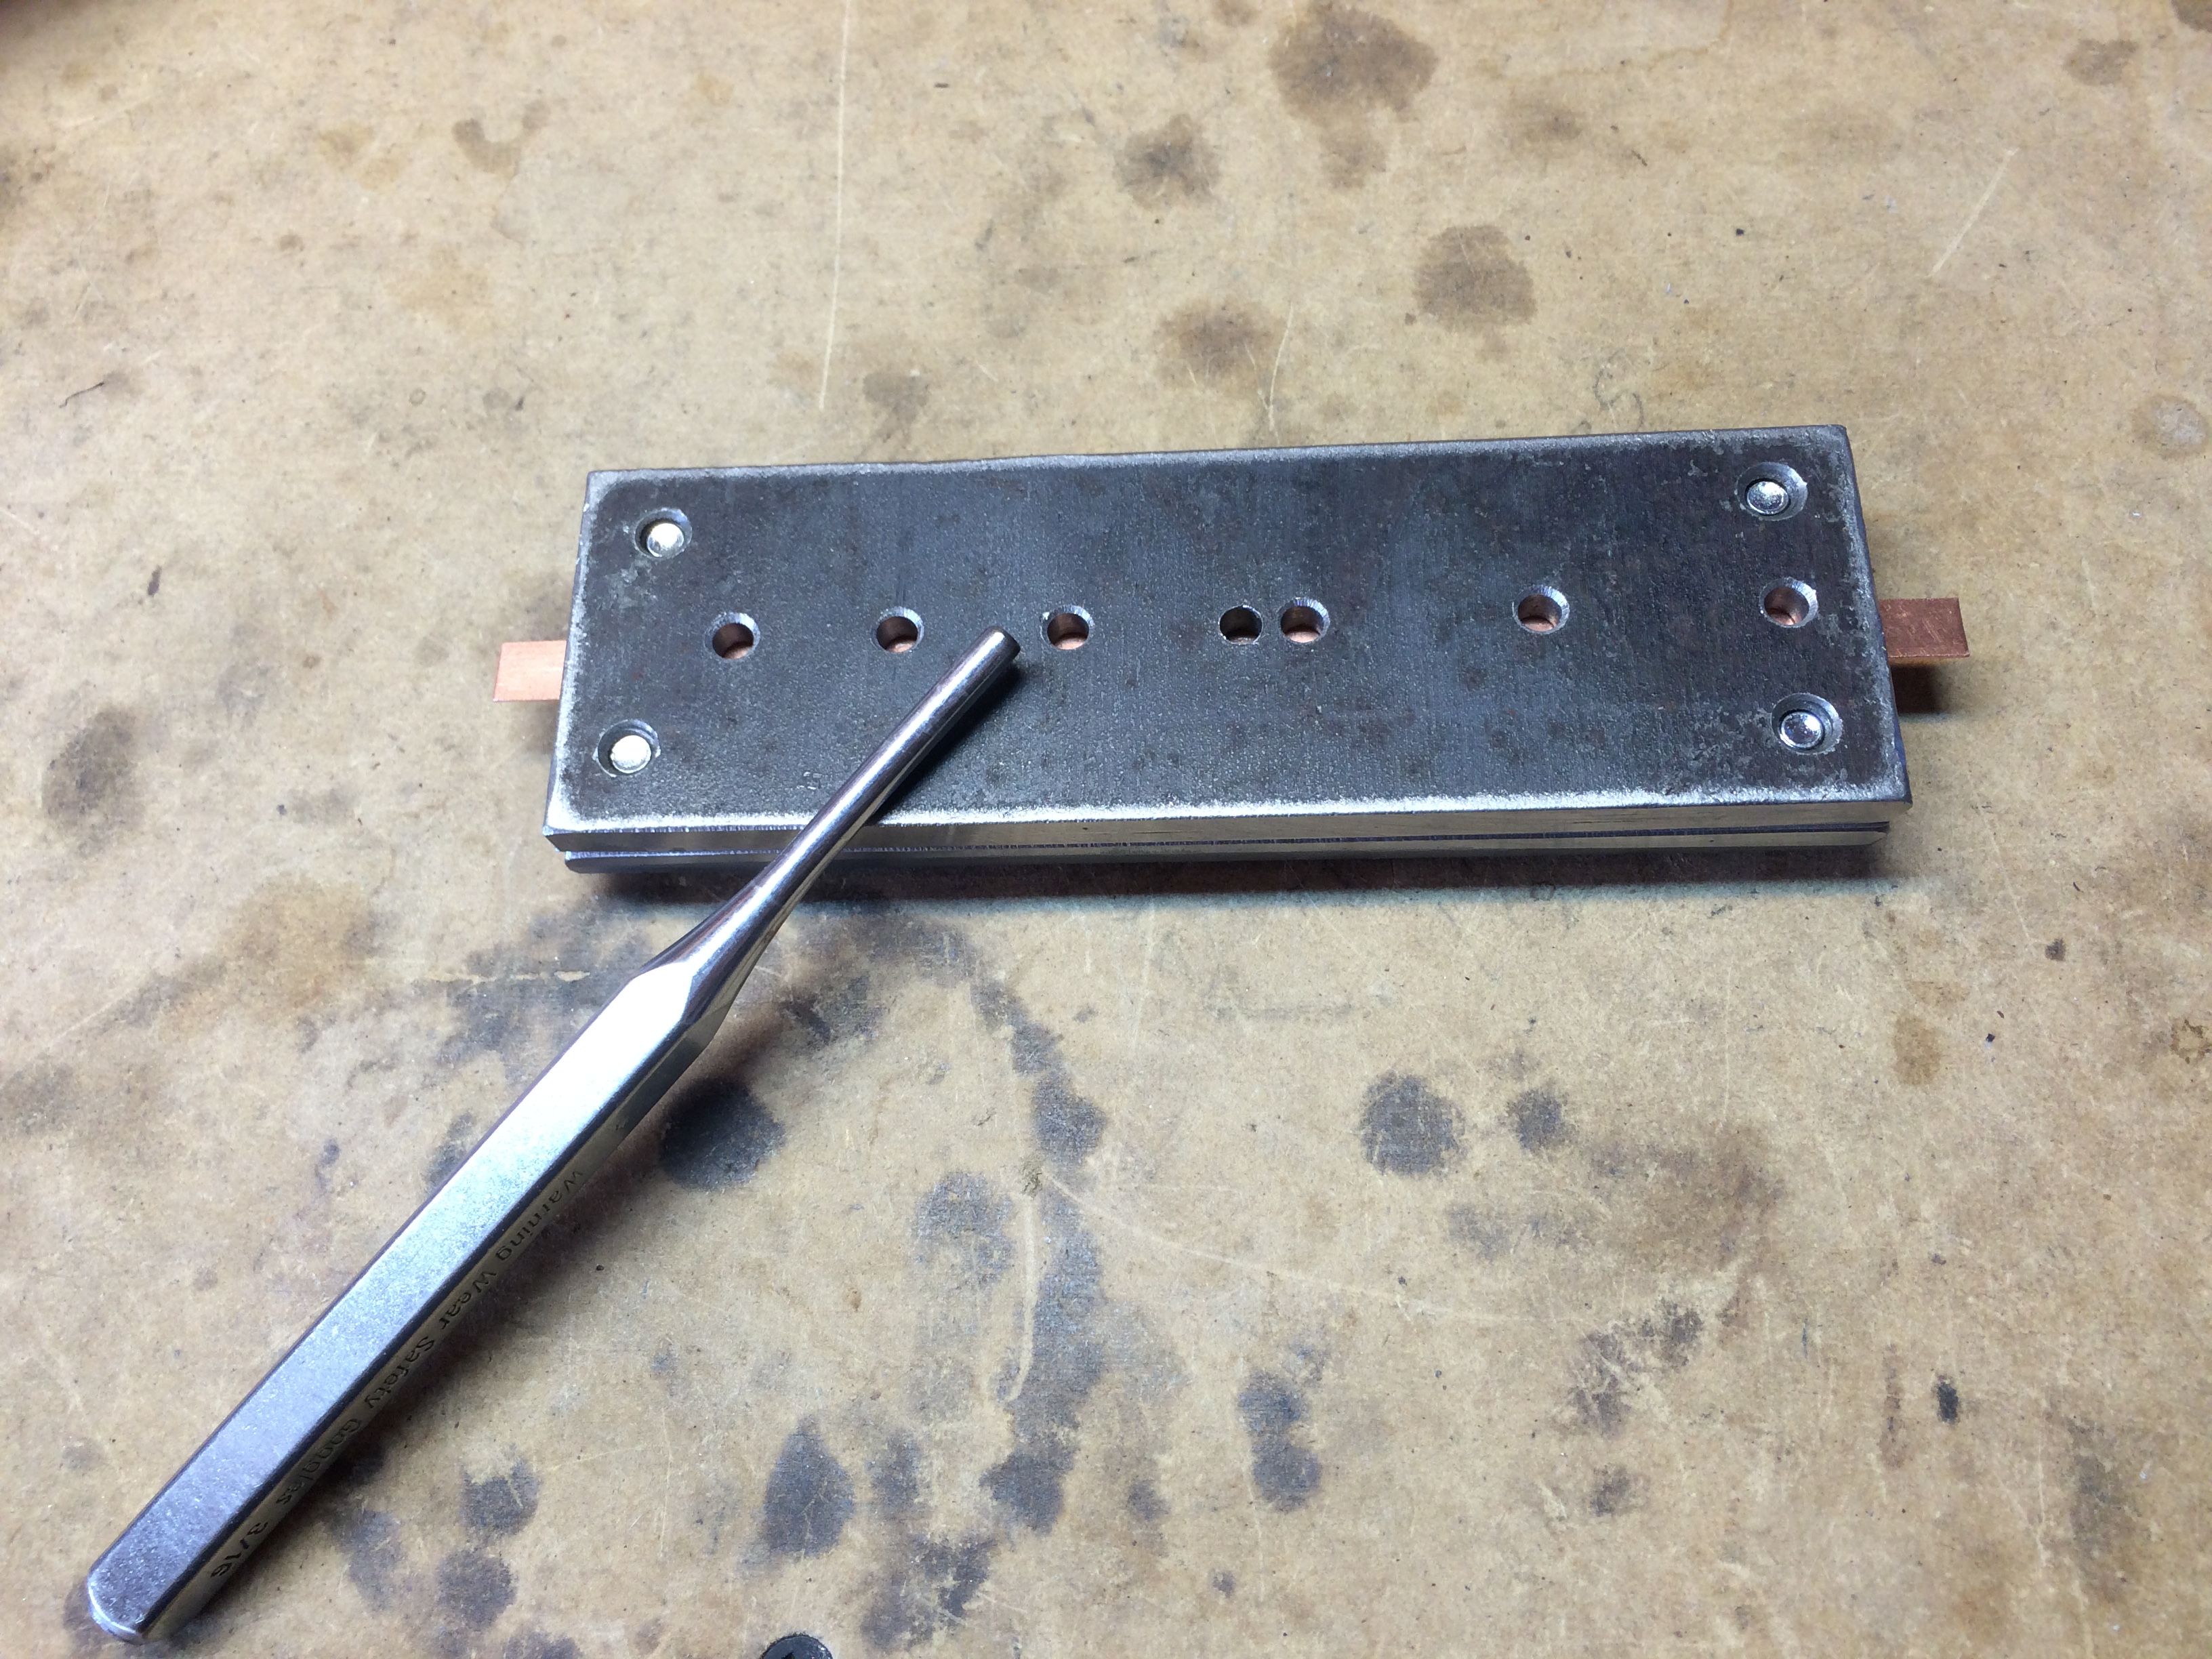
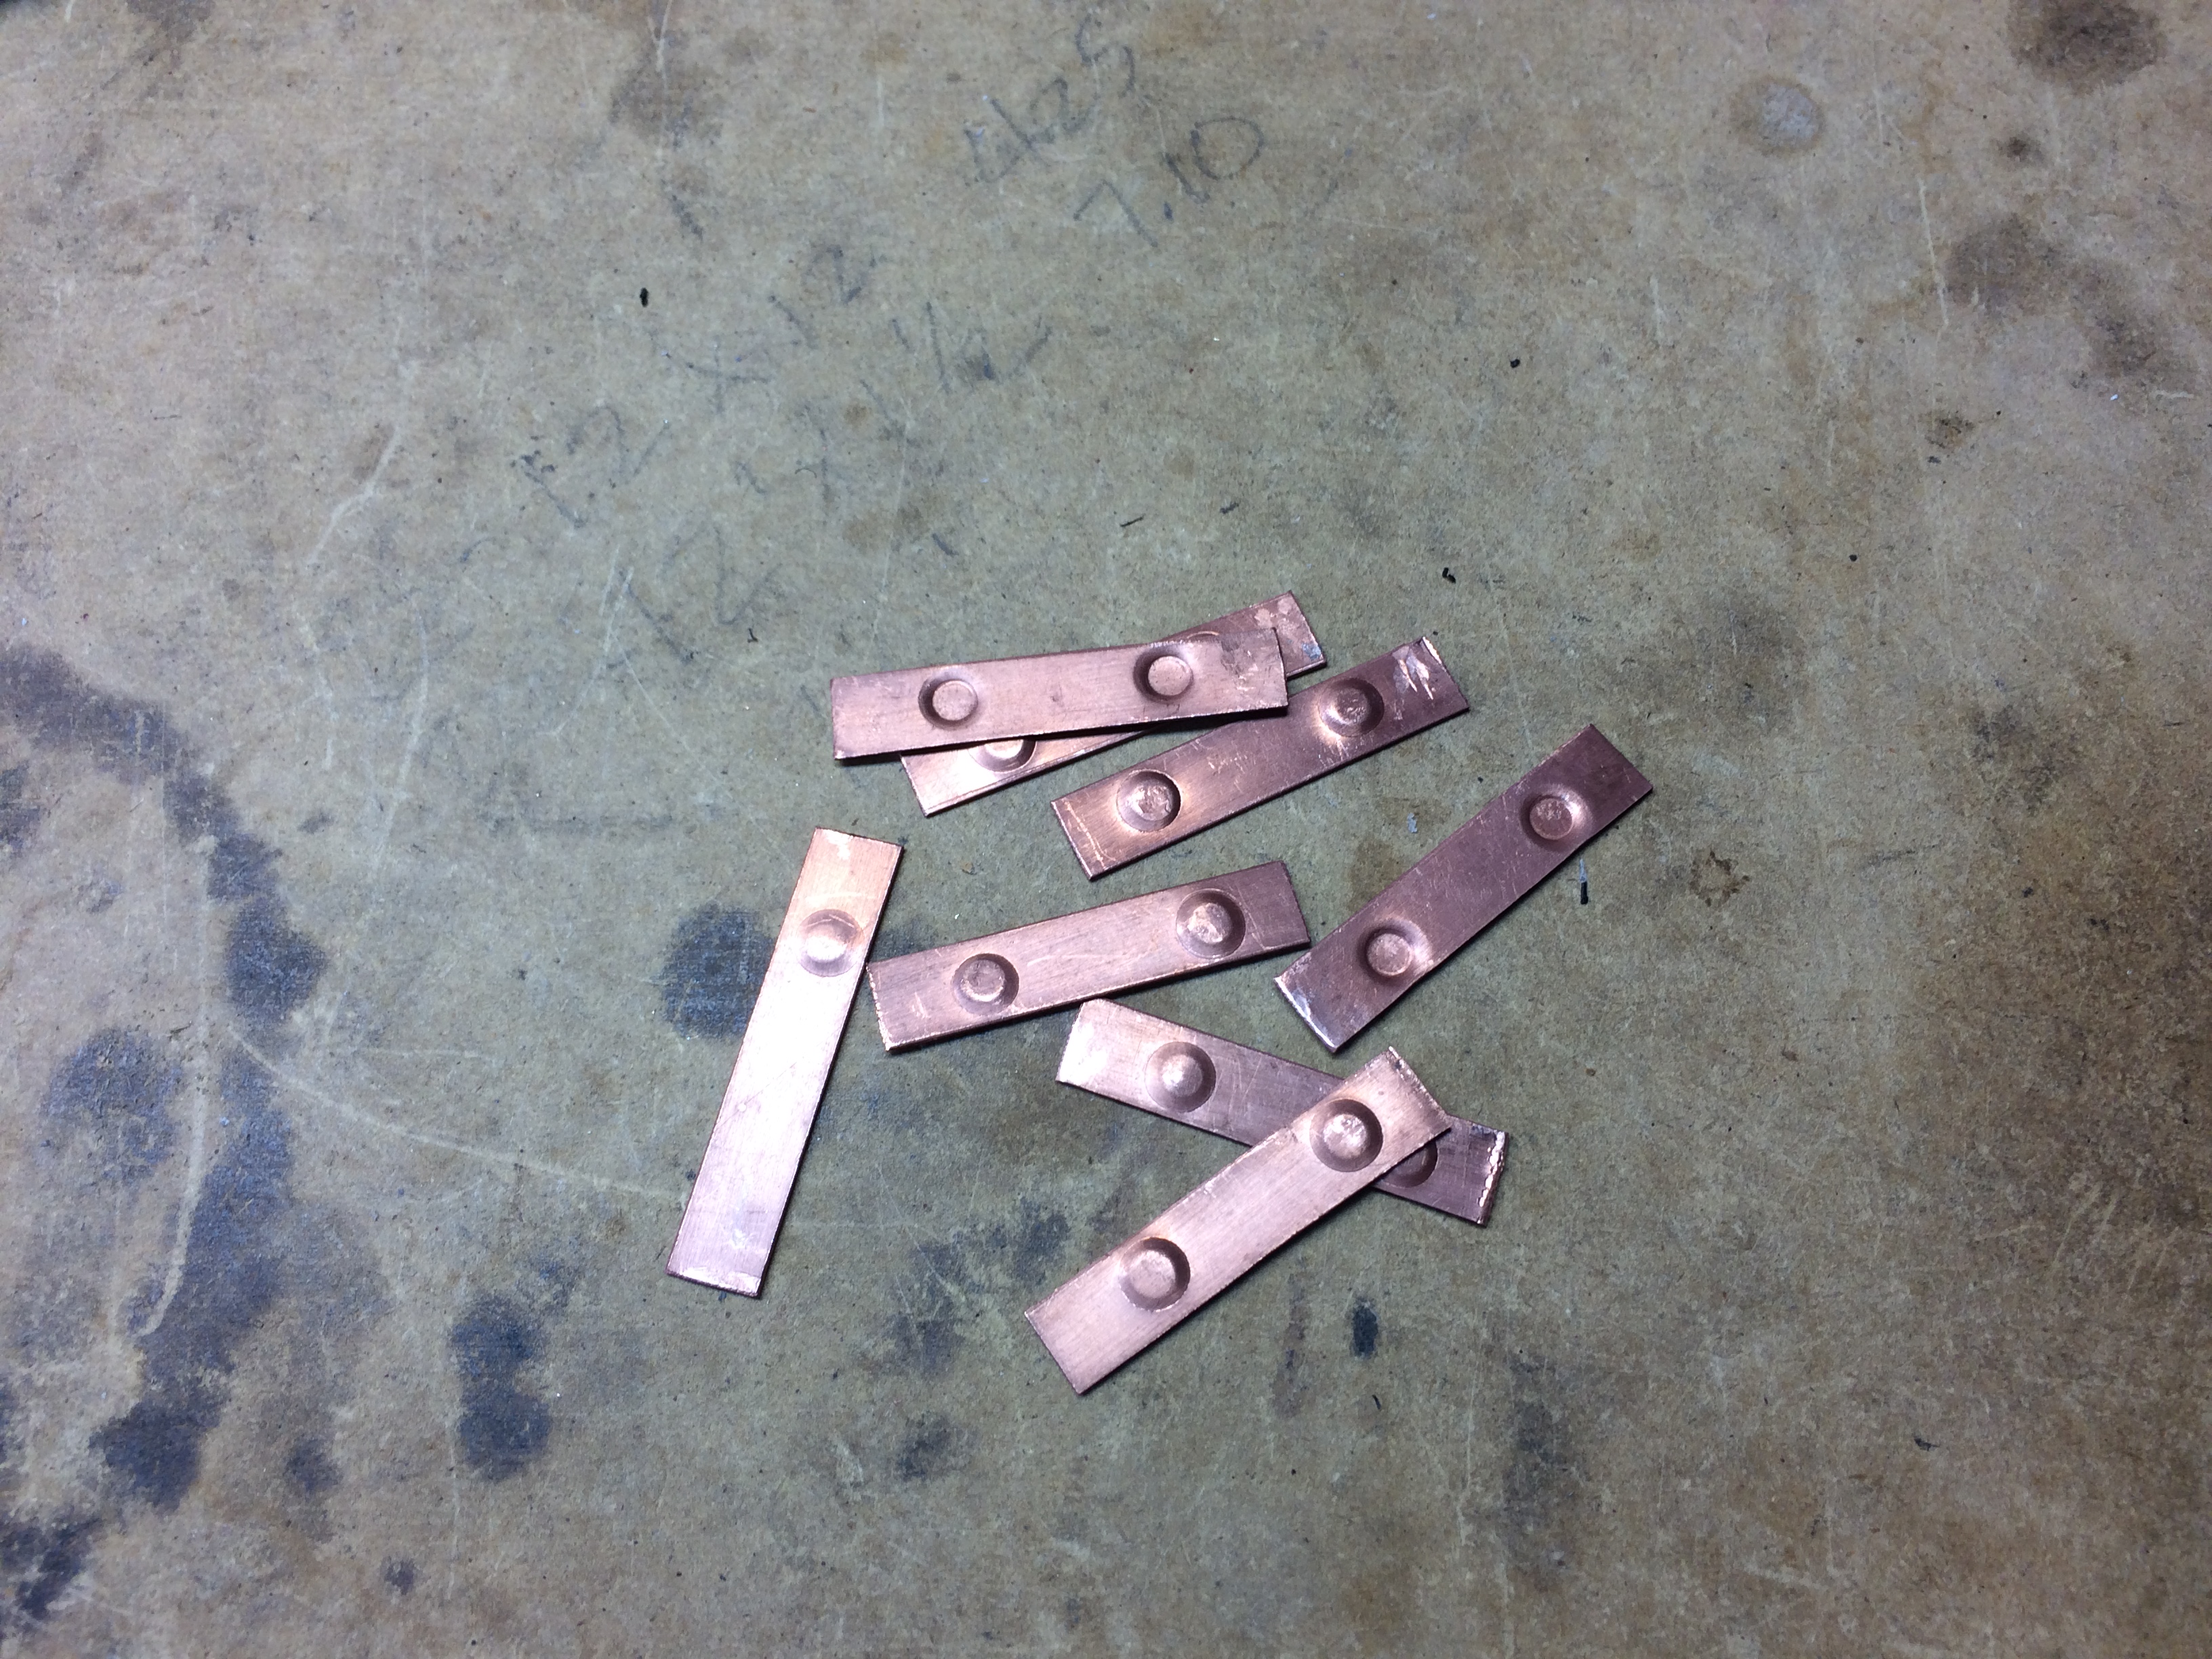
The 18650 cells were $4.xx ea. ~$38.00ish. for eight. The spacers were pennies ea. Copper for bus bars, free. Steel for tool to dimple bus bars, free. Local machine shop $20 for milling the dado in the steel bus bar tool. Which can be used over and over and over and over again. Screws and misc. fasteners ~$3-4 beyond what I had in my 30 odd year old stash of same. The PVC and poron sheets were <$20. and are enough to make multiple packs.
The big advantage over buying a $100+ ready made Li-ion battery they can be repaired if a cell goes bad. I know what quality of cell the pack is comprised of, which is the biggest advantage as not all Li-ion cells are equal in quality.
Most important, to me, the same reason we wrench on our bikes, to make it mine.
12-24-2016, 10:32 AM
#5
Senior Member
SuperBike

Join Date: Jul 2011
Location: South of Live Free or Die & North of Family Guy
Posts: 1,456
Respect!!! way to go, especially the fact you came up with a real solution to be able to maintain each battery individually with such ease. True engineering mind!
I been using the 8 pack shrink wrapped trough Daugherty for 4 years now successfully on the VTR, ton's of torque on every start, but wondered what am I going to do when it will start failing..
Also had a smaller 6 pack that I got at the same time that failed last year on my XR650 and was very disappointing. Partly my fault, I didn't upgrade the oem charging system which kinda suck, these batteries do like better charge than the old Honda diode crappy R&R can give.
12-24-2016, 12:43 PM
#7
Administrator
MotoGP

Join Date: Apr 2006
Location: Kempner, TX
Posts: 4,402
Nice take on a DIY battery pack...
Ive been making my own for a few years now. each battery gets a soldiered on tab.. the tabs connect by copper buss bar, the whole thing is shrink wrapped.
So i can still pull a battery pack apart to individual cell, and charge them / test them individually. I can balance individual cells or pairs. And if the day comes, replace an individual cell by removing the cell, soldiering the tab, and soldiering it onto new, charged and balanced cell.
I like the idea you came up with....
Are you concerned at all, you will have less than perfect contact between cells and the copper "buss bar" Vibration and shock is a huge factor in pack failure..
Is there a "springy" pad between battery and the end caps? that might help keep great contact between batter and the copper bar...
Overall size... does your pack end up same, larger? smaller then an OEM battery?
Because of the extra space between rows of cells in my packs to connect tabs the buss bar...my packs end up the same size as an OEM battery in width and length, just less in height. ..and a whole lot lighter of course.
12-24-2016, 04:58 PM
#8
Senior Member
SuperBike
Thread Starter
Join Date: Sep 2010
Location: Bisbee, AZ
Posts: 1,873
Nice take on a DIY battery pack...
Ive been making my own for a few years now. each battery gets a soldiered on tab.. the tabs connect by copper buss bar, the whole thing is shrink wrapped.
So i can still pull a battery pack apart to individual cell, and charge them / test them individually. I can balance individual cells or pairs. And if the day comes, replace an individual cell by removing the cell, soldiering the tab, and soldiering it onto new, charged and balanced cell.
With the thickness of the copper and depth of the dimple on the bus bar, the depth of the channel the bar fits into across the spacers I feel like there will be more than enough pressure on the cells.
12-25-2016, 03:40 AM
#9
Administrator
MotoGP
Join Date: Apr 2006
Location: Kempner, TX
Posts: 4,402
http://www.mgchemicals.com/products/...mbly-paste-847
The other concern I was having with the need for a "spring" layer is cell contraction / expansion while heating and cooling.
12-26-2016, 07:13 AM
#10
Senior Member
SuperBike
Thread Starter
Join Date: Sep 2010
Location: Bisbee, AZ
Posts: 1,873
How about contact paste? It would both prevent oxidation that would increase resistance and help ensure constant contact.
http://www.mgchemicals.com/products/...mbly-paste-847
http://www.mgchemicals.com/products/...mbly-paste-847
The post I remember contained some mention of the price. At $13 for 25mg, building a big pack, e-bike or similar would get into your pocket a bit. For what I'm doing, not so much.
Here is a place to purchase from MG Chemcials 847 Carbon Conductive Assembly Paste
I'm hoping that the Poron sheet as called for in the e-bike pack build will keep any thing bad from happening.
Going to do a 4S pack build with 26650 cells also. Those cells that I have are rated at 45amp continuous and 60amp pulse. Might have to get four more of those cells to do a 4S2P build as well.
12-26-2016, 09:30 AM
#12
Senior Member
SuperBike

Join Date: Aug 2004
Location: Atlanta, GA
Posts: 1,802
Which cells did you use? The linked site has about a million.
I have an old shrink wrapped JD battery that finally died after 5 years. I wonder if I could use parts of it to make a new battery.
I have an old shrink wrapped JD battery that finally died after 5 years. I wonder if I could use parts of it to make a new battery.
12-26-2016, 09:31 AM
#13
Senior Member
SuperBike
Join Date: Aug 2004
Location: Atlanta, GA
Posts: 1,802
This is the link xeris posted in one of the first posts in this thread.
https://liionwholesale.com/
https://liionwholesale.com/
12-26-2016, 10:39 AM
#14
Senior Member
SuperBike
Thread Starter
Join Date: Sep 2010
Location: Bisbee, AZ
Posts: 1,873
The Bassen 26650 cells are the ones that I have. The 18650 cells that I used are LGHP6. If I were to order more to make a battery I would consider a Samsung INR 18650�25R
12-26-2016, 10:45 AM
#15
Senior Member
SuperBike
Thread Starter
Join Date: Sep 2010
Location: Bisbee, AZ
Posts: 1,873
https://liionwholesale.com/
Based on the reviews at the site it seems like their claim of testing the cells that they get in is real.
Based on the reviews at the site it seems like their claim of testing the cells that they get in is real.
12-26-2016, 06:50 PM
#16
Administrator
MotoGP
Join Date: Apr 2006
Location: Kempner, TX
Posts: 4,402
https://liionwholesale.com/
Based on the reviews at the site it seems like their claim of testing the cells that they get in is real.
Based on the reviews at the site it seems like their claim of testing the cells that they get in is real.

Thread
Thread Starter
Forum
Replies
Last Post


