
Carb Jet kit install


Thread Starter
Senior Member
Back Marker
Joined: Aug 2007
Posts: 155

Carb Jet kit install
I have been reading about all the nightmares with a K&N and tuning....I installed a used K&N and new jet Dynojet kit yesterday.
Stage 1.....I called Dynojet the other day just to make sure this kit was what I needed.......I spoke with a fella in the tech department and he gave me the settings based the aftermarket upgrades I have. 190 front 195 rear air fuel mixture 3 turns out.
E clip on 5th position on needle. I installed per his instructions and so far no problems and major performance gain. I have no holes or problems bike runs perfect. I guess I got lucky...
Last edited by Partsman; Mar 28, 2010 at 10:36 PM.


Thread Starter
Senior Member
Back Marker
Joined: Aug 2007
Posts: 155
Fuel Milage
I dropped about 10 miles per tank......or should I say now after a good hard ride.....110 miles or so....The low fuel is blinking.....so I would say I have lost about 3 or 4 miles to the gallon.....Safely rich is fair to say.....
Senior Member
SuperSport
Joined: Aug 2009
Posts: 684
From: Richmond, VA

still running good? wondering because i also have a mig exhaust and k&n filter (bot no ignition advance) and am considering rejetting soon. dont care too much about economy, as long as i get at least 100 miles per tank.


Senior Member
SuperBike
Joined: Sep 2008
Posts: 1,707
From: Essex, UK
Did you run it on a dyno before & after installation?
I have been reading about all the nightmares with a K&N and tuning....I installed a used K&N and new jet Dynojet kit yesterday.
Stage 1.....I called Dynojet the other day just to make sure this kit was what I needed.......I spoke with a fella in the tech department and he gave me the settings based the aftermarket upgrades I have. 190 front 195 rear air fuel mixture 3 turns out.
E clip on 5th position on needle. I installed per his instructions and so far no problems and major performance gain. I have no holes or problems bike runs perfect. I guess I got lucky...
Stage 1.....I called Dynojet the other day just to make sure this kit was what I needed.......I spoke with a fella in the tech department and he gave me the settings based the aftermarket upgrades I have. 190 front 195 rear air fuel mixture 3 turns out.
E clip on 5th position on needle. I installed per his instructions and so far no problems and major performance gain. I have no holes or problems bike runs perfect. I guess I got lucky...
Senior Member
Back Marker
Joined: Feb 2010
Posts: 182
From: Western PA
It was a nightmare getting my dj kit right. I'm running stock except for slip ons. Was too lean with stock jetting. After the shop installed the jet kit, I was lean still. Possibly more so, since it would backfire thru the carbs between 3 and 4k. Shop set me up 185 in the rear and 180 in the front. Needles were on 4th groove. To get it running right I had to go to 6th groove and turn pilot screws to 2.5 out. No real noteworthy performance gain. But at least no backfires. May be too rich. Dyno will determine that.
Senior Member
Back Marker
Joined: Aug 2009
Posts: 112
From: North
I remember the challenges I had installing the dyno-jet kit. A full system Yoshimura exhaust and stage 1 cams were installed before dyno-jetting.
I followed the recommendations with needle position and main jet sizes, put it back together and it bogged! Too rich!
I took it apart, raised the needles one position, dropped down jet sizes to 180 front/185 rear, put it back together and it seemed to run fine. Maybe a bit too rich because on cool days it seemed to run faster.
I just finished adjusting the valve clearances and while it was apart I dropped main jet sizes down further to 175 front/180 rear. Runs noticeably better overall - seems to be a bit more over-rev past redline and the front tire skips lightly over the road under maximum acceleration in 2nd gear.
Next challenge: carb synchronization. I have a Motion Pro synchronizer, just need to build and install fittings to connect it. So next time I won't need to take the tank off.
Senior Member
Back Marker
Joined: Feb 2010
Posts: 182
From: Western PA
Talk to nath981. He's got the info on that quick sync setup. He did it to my bike. You gotta get this part from Honda called joint, boost. It's $4. It screws into the front cylinder. Then get some ts from petco or auto zone and some caps. I'd tell you how to set it up, but I don't recall exactly how he did it and I'm not near the bike at the moment or I'd go have s look at it
Senior Member
Back Marker
Joined: Aug 2009
Posts: 112
From: North
The rear cylinder connection should be easy - just install a tee connection in the rubber hose that runs from the fuel valve to the rear cylinder vacuum port. That rubber hose is accessible without removing the tank. And put a cap on the tee to be removed to connect the synchronizer. Looks like about a 1/8" rubber hose.
Also need a pinch clamp to be placed upstream of the tee (the Honda service manual states to start the engine then pinch the fuel valve vacuum hose before removing it from the cylinder vacuum port, and stop the engine).
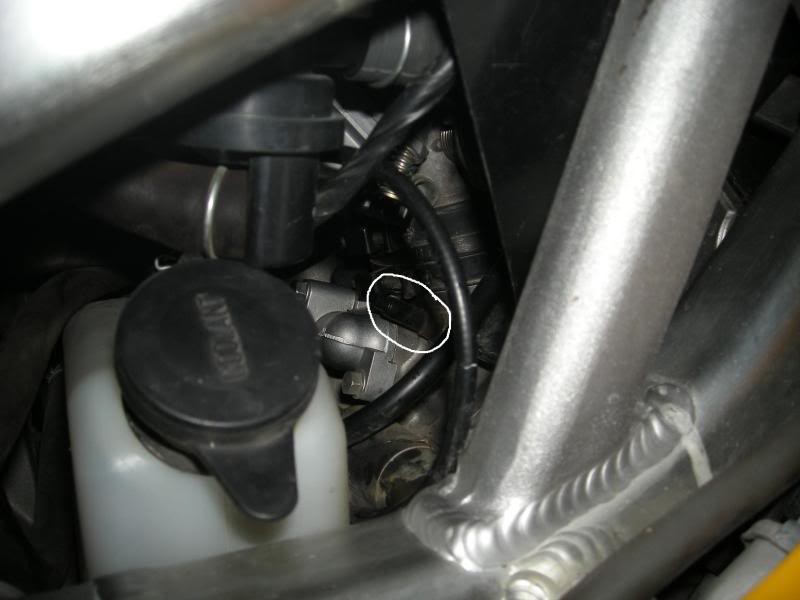
It's the front cylinder vacuum port connection that's more difficult, shown here. Not accessible with the tank and air filter housing in place. The vacuum port connection looks like it takes a 5mm male thread. Just need to extend it to the right a few inches and put on a cap to be removed to connect the synchronizer.
Also need a pinch clamp to be placed upstream of the tee (the Honda service manual states to start the engine then pinch the fuel valve vacuum hose before removing it from the cylinder vacuum port, and stop the engine).
It's the front cylinder vacuum port connection that's more difficult, shown here. Not accessible with the tank and air filter housing in place. The vacuum port connection looks like it takes a 5mm male thread. Just need to extend it to the right a few inches and put on a cap to be removed to connect the synchronizer.
Senior Member
Back Marker
Joined: Feb 2010
Posts: 182
From: Western PA
The area circled on that pic is where that part I mentioned goes. Remove the hex bolt that's in there now and screw in the joint boost (Honda part number OMB 6214 000 I believe). It's threaded on one end and has a post on the other to attach a vacuum hose. Cut the vacuum hose going to the petcock. Push the cut length of hose onto the joint boost, install t and cap when not in use. Install another t to reassemble the vacuum hose that runs to the petcock, cap the bottom. Done. Sound right Nate? Or anyone else who reads this? Let me know if I'm wrong, as I didn't actually do the install, nath981 did it for me.
Last edited by steve29; Apr 25, 2010 at 08:33 PM.
Senior Member
Back Marker
Joined: Feb 2010
Posts: 182
From: Western PA
This setup will allow you to sync easily. Just unbolt the front tank bolts, loosen the rear one. Pull the tank up as far as it will go. Take a ratchet strap and attach one end to the front of the tank and hook the other anywhere that looks suitable back near the tool storage tray and tighten it. Use some rags or whatever else you have to avoid scratches. Now you are able to access everything you need to while syncing the carbs without removing the tank.


Junior Member
Squid
Joined: Apr 2009
Posts: 2
From the "whatever-it's-worth" department:
I just installed my DynoJet kit with a new stock air filter.
Other important information:
1000 ft. above sea level (Minnesota)
Leo Vince SBK high mounts with baffles removed
I started with 180 and 185 and 2.5 turns out on the fuel/air screw and #4 on the needles. (Like what Dynojet instructions say) However, I was too lean. I ended up on #5 on the needles with 185 front and 190 back, and 2.5 turns out on the fuel/air screw. It's alot better now than before. (Might go to 3 turns out on the A/F screw.)
Some helpful info that might benefit others that are new to Superhawks:
If you plan on pulling the float bowls off the carbs while leaving the cooling/fuel/vacuum/throttle lines on, be prepared for the possibility of the float/valve assembly falling out when you pull them off. Don't just plug the intake holes, but also put something like a towel in the valley to catch them in case they fall out. (Or be prepared to go treasure hunting with your magnet)
Last edited by herman_g60; May 5, 2010 at 02:37 PM.
Member
Squid
Squid
Joined: May 2009
Posts: 78
From: Bremerton WA
My 2 cents
Finally got rid of my lean spot. Have Dynojet Stage 1 190/185 on 6th grove, 2.5 turns out.
I finally ditched the K&N, for a brand new stock air filter. Best $59 I ever spent. Finally runs right without the 3.5K - 4K rpm hiccup in traffic. Lost just a little upper midrange pull but pulls hard from 3.5K now, and smooth from 3K. I did put a fin on the K&N and it helped some, but I am done with it. Bike didn't come with a stock filter when I bought it, now I won't go back to K&N.
K&N for sale w/fin, with K&N filter recharge oil. Make me an offer.

Thread
Thread Starter
Forum
Replies
Last Post
Speed_Demon
Classifieds
4
Apr 2, 2008 04:35 PM


