
Shock mounting?

Thread Starter
Senior Member
Superstock
Joined: Jul 2004
Posts: 442
From: Little Rock, AR

Anybody got any guidance about how to mount a new rear shock....
I have a Penske inbound and I don't want to take the whole subframe assembly off & kill my riding time.
A basic procedure would be helpful.
Thanks in advance....
I have a Penske inbound and I don't want to take the whole subframe assembly off & kill my riding time.
A basic procedure would be helpful.
Thanks in advance....

Senior Member
Back Marker
Joined: Sep 2006
Posts: 151
From: canada

Shock
I just did mine, took an hour. You will have to remove the exhaust as the rear header is in the way of the bottom mount. I removed the cans, removed the front header then the rear header. Spray all the bolts with release spray the night before you start. Top mount bolt will require a 14mm socket on a universal, there is a welded nut on my O3. Bottom mount and the linkage mount are 17mm nuts on 14mm bolts. Break loose all three then lift the back tire off the ground. I used my stand to raise the bike then bungy to a rafter and removed the stand. Remove the bottom bolts, remove the top bolt and slide the shock out the bottom. Install the new shock and reverse the process. 33lb/ft on the shock bolts. Cheers

Senior Member
Back Marker
Joined: Aug 2007
Posts: 105
From: Hudson Valley, New York
I can't believe this just posted today!
I performed this operation yesterday with my Ohlins, pretty much just as bowhawk described. Complete removal of the exhaust was needed, to allow the shock reservoir up through the swingarm as you install the shock. I think the biggest pain in the butt of the entire operation was threading the lower/interior nut of the rear exhaust flange when putting everything back together - but then I have big, clumsy hands. Don't forget to Loctite the shock mounting bolts, too
It did take me...ummm...slightly more than an hour... Keep in mind that I was figuring it out as I went along, though.

Senior Member
SuperBike
Joined: Jul 2005
Posts: 1,548
From: MN
would agree and also say leave much more than an hour. you can at times remove less than the full exhaust if you like cussing and pushing and pulling. but all said and done easier to remove it and get the shock on. Measure the free length eye to eye of the stock shock and set the penske same or if you are going for 5mm increase ride height etc. I find putting long bolts through the shock eye the easiest way to accurately measure the length.
Moderator
MotoGP
Joined: Dec 2004
Posts: 2,553
From: South Texas
I think I've installed 6 or 7 shocks on superbling while exploring alternative models. I never removed the pipes. I use a rear wheel stand and a set of heavy duty ratchet tie downs hung from garage rafters that attached to the subframes' cross brace.
Clean and lube all suspension bearings.
Clean and lube all suspension bearings.

Senior Member
SuperBike
Joined: Feb 2007
Posts: 1,051
From: Portland, Oregon
I think I've installed 6 or 7 shocks on superbling while exploring alternative models. I never removed the pipes. I use a rear wheel stand and a set of heavy duty ratchet tie downs hung from garage rafters that attached to the subframes' cross brace.
Clean and lube all suspension bearings.
Clean and lube all suspension bearings.
tim

Banned
MotoGP
Joined: Aug 2007
Posts: 5,942
From: Lake View Terrace, CA
There is no need to remove the exhaust. Mine is out right now and like Super said, it can be dropped with everything still in place. I'll see if I can get a pic snapped fro you. As for holding the bike up, You can use the "hang from the rafters" method or right now mine is sitting on two jack stands with a bar running right in front of the passenger pegs (the jack stands are on a pair of milk crates for extra height) or there is always the "redneck" method (not the best way but it does work even though I expect the normal comments of how dangerous it is and all that but I've done it with no problem, just exercise a little care) of taking a 2x4 and cutting a "U" shaped notch in one end that will allow the subframe to fit into and then placing it between the subframe (towards the front before it starts to angle up) and the swingarm.
Also it is easier to remove the shock with the exhaust in place if you also remove all the linkage with it. While you have it out it is always good to relube all the bearings in the linkage so you might as well pull it anyways. As always YMMV.
Also it is easier to remove the shock with the exhaust in place if you also remove all the linkage with it. While you have it out it is always good to relube all the bearings in the linkage so you might as well pull it anyways. As always YMMV.
Moderator
MotoGP
Joined: Dec 2004
Posts: 2,553
From: South Texas
A cbr954 penske was damn good but the used VTR ohlins was easily the best. For the record I also tried: cbr900rr fox (very used), next an R6, R1, and ducati 900 all with a heavier spring and spacers, and a very, very low mileage stocker.
Last edited by superbling; Mar 23, 2008 at 08:27 PM.
Moderator
MotoGP
Joined: Dec 2004
Posts: 2,553
From: South Texas
Oh yeah, I forgot about removing the linkage as that makes getting to the allen head bolt possible.

Senior Member
SuperSport
Joined: Nov 2007
Posts: 807
From: Hamilton, Ontario, Canada
+1 on removing the linkage for access rather than the exhaust.
+1 on lubing the linkage needle bearings. Honda was not too generous with grease when they put the bike together. I used moly grease and replaced the seals. I probably couldn't have gotten by without replacing the seals.
The
+1 on lubing the linkage needle bearings. Honda was not too generous with grease when they put the bike together. I used moly grease and replaced the seals. I probably couldn't have gotten by without replacing the seals.
The
Senior Member
SuperSport
Joined: Nov 2007
Posts: 807
From: Hamilton, Ontario, Canada
The stock shock is 345 mm. eye to eye if you want to use that as a starting point for adjusting ride height.
I wrapped my Penske in rags before installing it. It helped keep it pretty. Put the reservoir in the space where the linkage was and rotate the shock as you lpush it up. Sort of a pirouette.
Another way of supporting the bike is to use saw horses and a metal fence post for a chain link fence. The post I use is about 2" in diameter. Maybe it's bigger but I haven't measured it recently. I slid an old piece of ABS pipe over the fence post to protect the subframe. I put the post in front of the passenger peg brackets, rested one end on the saw horse, levered the bike up and rested the end I was lifting the bike with on the other saw horse. There are a lot of ways to raise the bike. It doesn't matter which one you use as long as it's stable. Be ready to improvise.
Breaking nuts and bolts loose before you raise the bike is a good idea. I usually think of it after I've raised the bike.

Senior Member
Superstock
Joined: Nov 2007
Posts: 320
From: Arlington Heights, IL
Does anyone know how many mm you can shim a shock? I might have a line on a pretty new 2007 CBR1000RR rear shock, but I haven't been able to find out the length of the shock. It might be too short and not worth it.
Thread Starter
Senior Member
Superstock
Joined: Jul 2004
Posts: 442
From: Little Rock, AR
8541Hawk,
What I'd really like is a pic of "the stand" (others appreciated though)....I don't have rafters in my garage to do the "hang" method. I have jackstands, and concrete blocks, to use under the frame rails.
PM sent with my home email address (I can accept BIG photos).
Thanks
What I'd really like is a pic of "the stand" (others appreciated though)....I don't have rafters in my garage to do the "hang" method. I have jackstands, and concrete blocks, to use under the frame rails.
PM sent with my home email address (I can accept BIG photos).
Thanks

Senior Member
MotoGP
Joined: Aug 2007
Posts: 2,547
From: Way Out West
8541Hawk's milk crate/jackstand method works fine for holding the bike up. Getting it up in the first place can be a pita if you are alone.
I use a milk crate (cinder block would be fine) with plywood or 2'X4' on top on each side of the bike, and run a round steel bar (from an old barbell set) under the seat rail, just in front of the passenger peg brackets same as he described. But I put a bottle jack with a "U" shaped head on top of each milk crate and crank them up alternately until the bar lifts the bike enough off the ground. Real easy and plenty stable.
I use a milk crate (cinder block would be fine) with plywood or 2'X4' on top on each side of the bike, and run a round steel bar (from an old barbell set) under the seat rail, just in front of the passenger peg brackets same as he described. But I put a bottle jack with a "U" shaped head on top of each milk crate and crank them up alternately until the bar lifts the bike enough off the ground. Real easy and plenty stable.
Banned
MotoGP
Joined: Aug 2007
Posts: 5,942
From: Lake View Terrace, CA
8541Hawk,
What I'd really like is a pic of "the stand" (others appreciated though)....I don't have rafters in my garage to do the "hang" method. I have jackstands, and concrete blocks, to use under the frame rails.
PM sent with my home email address (I can accept BIG photos).
Thanks
What I'd really like is a pic of "the stand" (others appreciated though)....I don't have rafters in my garage to do the "hang" method. I have jackstands, and concrete blocks, to use under the frame rails.
PM sent with my home email address (I can accept BIG photos).
Thanks
Senior Member
Back Marker
Joined: Aug 2007
Posts: 105
From: Hudson Valley, New York
If it comes down to it, you could always wedge a small length of 4x4 between the rear tire and the undertray/subframe (assuming you have the stock undertray and not a pretty aftermarket one!). I saw an article where they used a small bottle jack this way, too.
Moderator
MotoGP
Joined: Dec 2004
Posts: 2,553
From: South Texas
Here's yet another method: with cheap 1 inch (or so) iron water pipe and assorted threaded fittings from the plumbing section, make a large "T" (say 6ft or so) and invert it so the flat top will become a base on the floor. Make another one, invert it too, and place it on the other side of the bike. Finally with two 90 degree elbows and one more section of pipe, bridge the two above the bike and screw together.
Now you have a heavy duty cradle to hoist from. Plus, you can break it apart for storage. I've wanted to build on these but always had rafters available. Now with a new home and a finished garage, I may have no excuse not to do it.
A limited search found this how-to. This example is WAY overkill from what I described. Not only did he use larger pipe and made it very tall but he also welded everything instead of using screw together fittings. But you'll get the idea:
http://www.backyardmetalcasting.com/bighoist01.html
Fastest Color
SuperBike
Joined: Jul 2007
Posts: 2,091
From: Lithia, FL
Superbling, will a RC51 stocker fit the Superhawk and would it be an improvement over ther SH stocker?
Here's one on Ebay:
http://cgi.ebay.com/ebaymotors/2002-...spagenameZWDVW
Here's one on Ebay:
http://cgi.ebay.com/ebaymotors/2002-...spagenameZWDVW
Moderator
MotoGP
Joined: Dec 2004
Posts: 2,553
From: South Texas
Nope, the bottom mount is wrong.
The closest stock honda in both size and spring rate are from the later VFR's but those OEM's aren't any better. I only mention this in case you run into a used penske/ohlins VFR unit but they are rare.
The closest stock honda in both size and spring rate are from the later VFR's but those OEM's aren't any better. I only mention this in case you run into a used penske/ohlins VFR unit but they are rare.
Moderator
MotoGP
Joined: Dec 2004
Posts: 2,553
From: South Texas
For what? I didn't answer your question (missed it actually). 
I've seen/heard as large as 60mm but that is with greatly modified bracket mounts. Look at how many threads are above the locknut for the top mount. It's there just below the bottom rear of the tank. That's the amount most will save you safely have to play with which is not a lot.
Now, you can remove said bracket and remove the bolt by cutting the lock welds, install a longer bolt*, and then add the necessary amount of spacers between the bracket and the subframe to make up the difference for the shorter shock.
I don't know if a 1000rr will work or how well.
*bolt head may need slight grinding to clear top of shock. BTDT

RUNLEVELZERO #99
SuperBike
Joined: Jan 2007
Posts: 2,222
From: Skokie
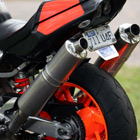
+1 on not removing pipes and cleaning/greasing everything. Turn triple rocker bolt 180 for easier removal/install near pipe and loosen & rotate pipe clamp for room (put back afterwards).
2X4s, crates, fence posts, jacks & rafters are all feasible.
I do it my way which of course is the right way...
Note the fuel filters & resevoir location
2X4s, crates, fence posts, jacks & rafters are all feasible.
I do it my way which of course is the right way...
Note the fuel filters & resevoir location
Last edited by skokievtr; Mar 25, 2008 at 04:46 PM.
Senior Member
Superstock
Joined: Nov 2007
Posts: 320
From: Arlington Heights, IL
Superbling, I think you inadvertantly answered my question........Then again in more depth. (I now see you were answering flo2supahawk996) but in doing so you answered my question also.....Anyway, thanks again.......I think I'll pass for right now on the 1000RR shock.....too much of a hassle, for probably too little improvement.

Senior Member
Superstock
Joined: Oct 2006
Posts: 277
Shock Vtr modify
Hi, sorry for jack thread, look at this item 200208905045 on Ebay http://cgi.ebay.com/ebaymotors/ws/eB...WA:PIC&ih=010i think it may work for VTR rear shock replace mod and it is Ohlins center to center bolts 330mm just 15mm off but shimming adjust should be fine.
Last edited by trinity012; Mar 26, 2008 at 09:44 PM.
Moderator
MotoGP
Joined: Dec 2004
Posts: 2,553
From: South Texas
That one is so old it's not listed on the ohlins site where I went to check out its spring rate. The spring on the duc916 shock I tried was way too lite and had to be changed.
Although it looks good in the pics, something that old might need a rebuild too.
Although it looks good in the pics, something that old might need a rebuild too.

Thread Starter
Senior Member
Superstock
Joined: Jul 2004
Posts: 442
From: Little Rock, AR
Anybody using the "hang method"...I've 'bogarted' Skokie's pic.
Where do y'all place the tie-downs (for hanging), or bar (if using jack/saw horse method). I'm thinking of the areas within the green or yellow circles in the pic?
BTW, Why can't Honda figure out to add centerstands to their bikes? This is something they used to do on all bikes. They could add attachment points onto the frame (like the VFR) and sell the stand separately. That would make this (and chain lubes, tire changes, etc) so much easier.


