
DanMoto rear-set "loose brake" mod/fix


Thread Starter
Senior Member
SuperSport
Joined: Apr 2013
Posts: 834
From: Thousand Oaks, CA

DanMoto rear-set "loose brake" mod/fix
My experience, and also that of a lot of other guys, with danmoto has been pretty good. I have their 3-way adjustable Clip-ons as well as their adjustable rearsets. Danmoto's products are VERY reasonably priced when compared with similar products from other brands.
The one thing that comes with the good price's is a little ingenuity on the customers part to get things to 100%
one of my dissapointments with the rearsets was the way the brake master cylinder was mounted. it flexed so much and made it so you had to press the petal 3 times further than you should have to because of the crappy mounting. i tried a couple different things until i finally came up with this... and it works GREAT!
the downfall of the way the MC is mounted is the bracket on which is mounted to uses 2 bolts to connect it to the rest of the rear set. on is one of the bolts that you use to adjust the forward, backward, upward, downward, position of the rear sets. this bolt is big and strong and does its job well.
the other bolt that is use is a tiny, miniature little bolt that is all but useless. so small and crappy and is what allows for the movement of the MC mounting bracket when the pedal is pressed.
my solution was to drill out the inner threads inside the rearsets which this tiny little bolt screws into. i drilled it out alll the way through to the other side. you also have to drill out the whole in the MC mounting bracket. then i used a much larger bolt with a lock washer and nut on the other side. here is what it looks like now.
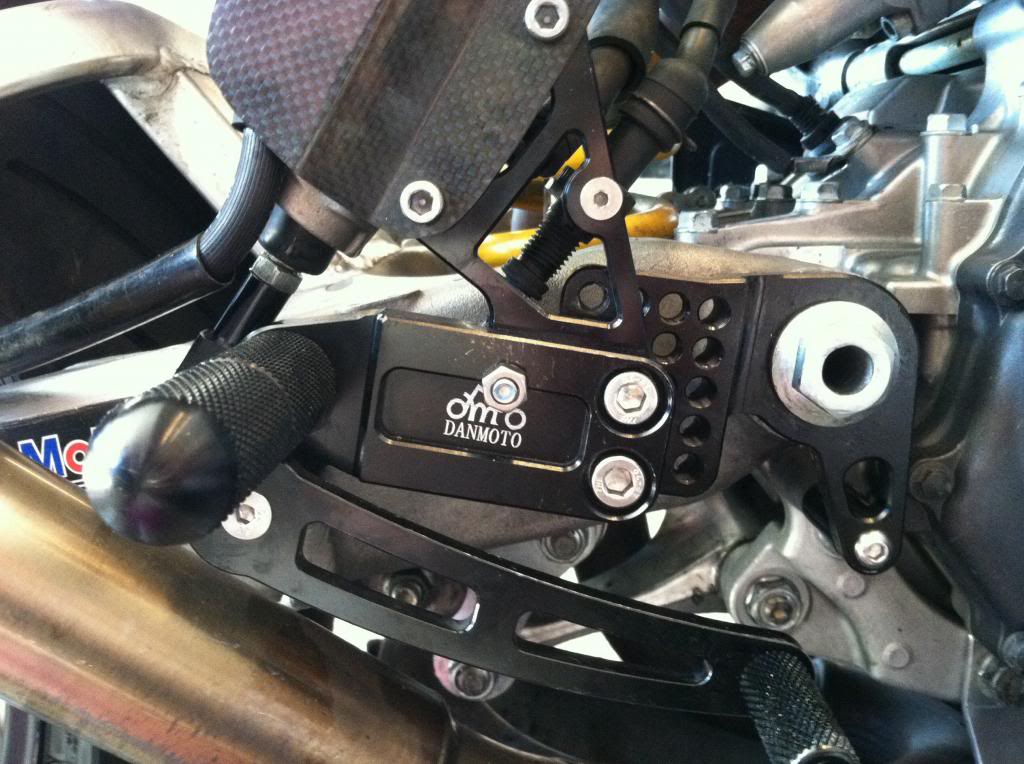
it now feels 100% solid and has no more flex or movement when you press the pedal. a very much need mod to the otherwise really good rearsets. eventually ill get a black nut and bolt and also put the bolt through the other direction to clean things up a bit. i might also sink the face of the whole so that the head of the bolt is flush and doesnt stick out just for again a cleaner look.
hope this helps anyone who was getting tired of all that flex in the braking system.
The one thing that comes with the good price's is a little ingenuity on the customers part to get things to 100%
one of my dissapointments with the rearsets was the way the brake master cylinder was mounted. it flexed so much and made it so you had to press the petal 3 times further than you should have to because of the crappy mounting. i tried a couple different things until i finally came up with this... and it works GREAT!
the downfall of the way the MC is mounted is the bracket on which is mounted to uses 2 bolts to connect it to the rest of the rear set. on is one of the bolts that you use to adjust the forward, backward, upward, downward, position of the rear sets. this bolt is big and strong and does its job well.
the other bolt that is use is a tiny, miniature little bolt that is all but useless. so small and crappy and is what allows for the movement of the MC mounting bracket when the pedal is pressed.
my solution was to drill out the inner threads inside the rearsets which this tiny little bolt screws into. i drilled it out alll the way through to the other side. you also have to drill out the whole in the MC mounting bracket. then i used a much larger bolt with a lock washer and nut on the other side. here is what it looks like now.
it now feels 100% solid and has no more flex or movement when you press the pedal. a very much need mod to the otherwise really good rearsets. eventually ill get a black nut and bolt and also put the bolt through the other direction to clean things up a bit. i might also sink the face of the whole so that the head of the bolt is flush and doesnt stick out just for again a cleaner look.
hope this helps anyone who was getting tired of all that flex in the braking system.
Thread Starter
Senior Member
SuperSport
Joined: Apr 2013
Posts: 834
From: Thousand Oaks, CA
interested to see what you come up with! i tried 3 or 4 different aproaches before i got febd up and put a bolt through it.
everything else that i tried worked good at first but eventually worked its way loose again
everything else that i tried worked good at first but eventually worked its way loose again
Thread Starter
Senior Member
SuperSport
Joined: Apr 2013
Posts: 834
From: Thousand Oaks, CA
Like I said I tried about 3 other fixes before I drilled it and put a bolt through it. I didn't wanna put holes in something I'm trying to make more sturdy but it worked so well.
Now I'm gonna counter sink the hole and clean it up to make it look like it was meant to be that way. It works so we'll and I got tired of the flex.
What was your plan? Interested to know if it was similar to one of my previous attempts.
Now I'm gonna counter sink the hole and clean it up to make it look like it was meant to be that way. It works so we'll and I got tired of the flex.
What was your plan? Interested to know if it was similar to one of my previous attempts.

Senior Member
SuperBike
Joined: Mar 2012
Posts: 1,544
From: New South Wales Australia
Tried the following and it didn't work.
Drilled the back of the M/C mounting plate to correspond with a threaded hole in the rear set mounting adjustment plate and used a bolt that went into the hole from the rear.

Like so!

Like so

Put it all together

Put it back on the bike and she it it still moved .
Will go down your road now!
I wanted something that was hidden but it don't work!
Back to the drawing board.
Stay tuned , I'm not going to give up!
Thread Starter
Senior Member
SuperSport
Joined: Apr 2013
Posts: 834
From: Thousand Oaks, CA
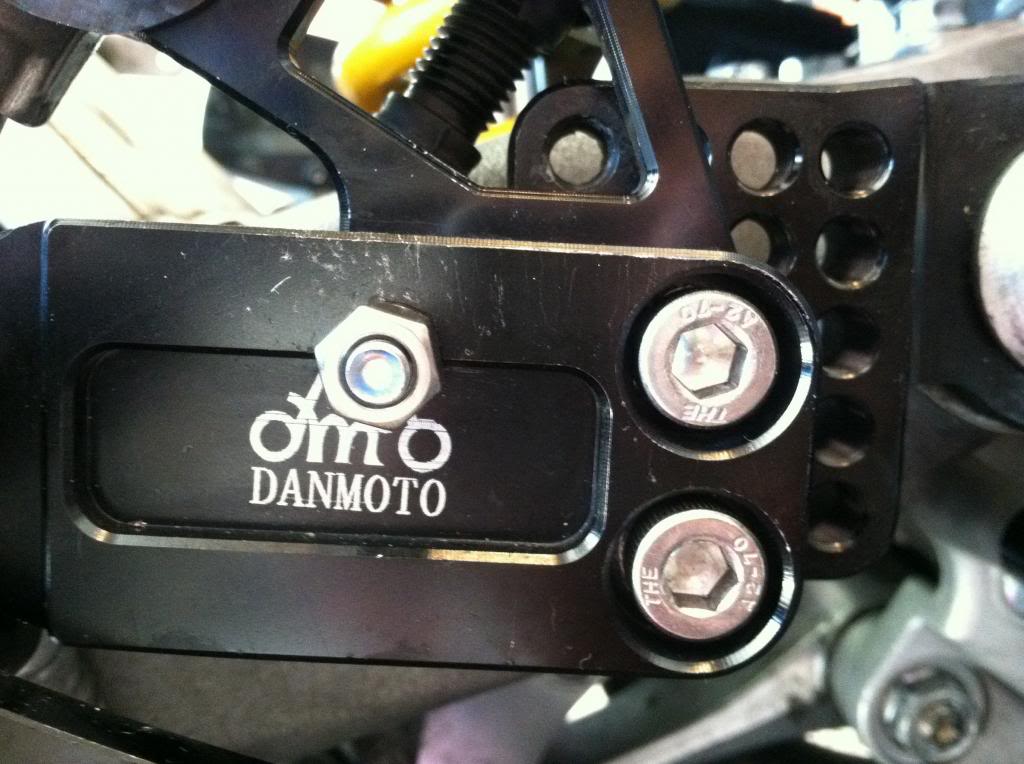
ohhhh see when i did it, i drilled the hole in the picture that is in the top left corner. then i went straight through the threads for the old tiny screw that use to go where i now have a much bigger bolt all the way through the rear set.
but i see, you made your own whole using a much larger bolt and threaded it into the "adjustable" part of the set. i like it!
but i see, you made your own whole using a much larger bolt and threaded it into the "adjustable" part of the set. i like it!
Senior Member
SuperBike
Joined: Mar 2012
Posts: 1,544
From: New South Wales Australia
Yep, I lined it all up and used a much longer bolt.
Still some fiddling to do, but it now seems sturdy.
Next thing I will do is mount the master Cylinder better to get a better angle on the actuator rod, it's still not operating to my liking.
Still some fiddling to do, but it now seems sturdy.
Next thing I will do is mount the master Cylinder better to get a better angle on the actuator rod, it's still not operating to my liking.
Thread Starter
Senior Member
SuperSport
Joined: Apr 2013
Posts: 834
From: Thousand Oaks, CA
Yea that's my next task. Let us know if u come up with a viable fix. Still not sure how to go about re positioning it while maintaining rigidity while depressing the pedal. Hmmmmmmmm.......... The wheels are turning...
Senior Member
SuperBike
Joined: Mar 2012
Posts: 1,544
From: New South Wales Australia
Yeah this whole Dan thing is perplexing.
My cogs are working overtime on it.
Having said that these rear sets are a bargain for the $$$, and I would recommend them to anyone.
My cogs are working overtime on it.
Having said that these rear sets are a bargain for the $$$, and I would recommend them to anyone.

Administrator
MotoGP
Joined: Apr 2006
Posts: 4,402
From: Kempner, TX
Gentlemen
As I assume the intent it to keep the looks appealing while providing for a fix..
A suggesting for others following along.
Drill and tap a hole from the back side , but not all the way through to the front.
Install a M8 stud.
Drill a corresponding hole in the back (second) bracket for the stud, and use a nut on the "inside" to clamp it together.
You get the same clamp function that way, with a hidden fastener and a cleaner look.
Not flaming you guys for your fix... ... until you did what you did, there was no way to know that was what was going to work.. Congrats.
.
Senior Member
SuperSport
Joined: Oct 2012
Posts: 501
From: Orlando, FL
Gentlemen
As I assume the intent it to keep the looks appealing while providing for a fix..
A suggesting for others following along.
Drill and tap a hole from the back side , but not all the way through to the front.
Install a M8 stud.
Drill a corresponding hole in the back (second) bracket for the stud, and use a nut on the "inside" to clamp it together.
You get the same clamp function that way, with a hidden fastener and a cleaner look.
Not flaming you guys for your fix... ... until you did what you did, there was no way to know that was what was going to work.. Congrats.
.
As I assume the intent it to keep the looks appealing while providing for a fix..
A suggesting for others following along.
Drill and tap a hole from the back side , but not all the way through to the front.
Install a M8 stud.
Drill a corresponding hole in the back (second) bracket for the stud, and use a nut on the "inside" to clamp it together.
You get the same clamp function that way, with a hidden fastener and a cleaner look.
Not flaming you guys for your fix... ... until you did what you did, there was no way to know that was what was going to work.. Congrats.
.
Or you could do what I did and put in my write up which was to drill the hole to fit an M6 drill it till its about to come through the other side, and pick up some M6 allen bolts with tapered heads, tap it and install it. doesn't show from the front, but still holds the MC bracket in place better.
Thread Starter
Senior Member
SuperSport
Joined: Apr 2013
Posts: 834
From: Thousand Oaks, CA
i care more about usability than i do about how things look.
that being said, obviously i want my bike to look good/clean. i think when i sink the front side and put the bolt in the other way so the head is recessed it will look as tho it was always supposed to be there. not sure if im gonna use a black bolt or stainless since stock all the bolts are stainless.
i like Erik's stud idea as it keeps everything hidden. although it serves the same purpose just looks a little cleaner.
mostly im just happy that i finally got things pretty solid.
my next concern is getting the proper angle for the MC as i still dont think its in an optimum position. any thoughts on how to achieve this Erik?
Thread Starter
Senior Member
SuperSport
Joined: Apr 2013
Posts: 834
From: Thousand Oaks, CA
Shims won't do anything as it's not that the Mc is too close to the bracket. It's that it's at to steep of an angle. I'm thinking some sort of bracket that bolts up where the MC currently is and has holes at a better angle to mount the MC to. If it's not thick enough it won't be sturdy. If it's too thick it puts the MC to war in towards the bike and puts it at a bad angle just in a different direction.
Not sure what direction to go from here. Maybe having someone custom fab a whole new bracket and just toss the current one. Idk how much that would cost though
Not sure what direction to go from here. Maybe having someone custom fab a whole new bracket and just toss the current one. Idk how much that would cost though
Administrator
MotoGP
Joined: Apr 2006
Posts: 4,402
From: Kempner, TX
Senior Member
SuperBike
Joined: Mar 2012
Posts: 1,544
From: New South Wales Australia
After much debate I have come to the conclusion that there are a couple of ways to remedy this problem.
One is to have a new Master Cylinder bracket made up
The top hole on the original is about 1/2 a thread width out which means that if I get a new bracket made up I won't have any holes drilled in them so that I can drill them to get the angle just right for the actuator rod.
Another way may be to machine the clevis to enable it to tilt further forward. This may also fix the problem.
I think I will try the latter as it seems the easier way to go.
Will let you know what happens!
Senior Member
SuperBike
Joined: Mar 2012
Posts: 1,544
From: New South Wales Australia
Well I tried relieving the clevis on the actuator rod, and it was close. To achieve the desired actuator rod angle it is now apparent that the tang at the back of the brake lever needs to be longer.
Have a look at these photos and you will see what I mean.
This is before.

This is where the brake lever tang needs to be. Get it welded up and then drill and tap a hole to mount the clevis and hey presto, you now have a functioning and adjustable back brake!
Effen hallelujah!
I hope this is the answer to the Dan Dilema once and for all.
Will keep you' all posted.
Senior Member
SuperBike
Joined: Mar 2012
Posts: 1,544
From: New South Wales Australia
Damn Photobucket, playing up.
Here goes with where the tang needs to be built up to and then drilled and tapped to fit the clevis.
See how the rod is straight not at an angle, and when you press the brake pedal it actyally returns by itself!

Watch this space.
Here goes with where the tang needs to be built up to and then drilled and tapped to fit the clevis.
See how the rod is straight not at an angle, and when you press the brake pedal it actyally returns by itself!

Watch this space.
Administrator
MotoGP
Joined: Apr 2006
Posts: 4,402
From: Kempner, TX
Perhaps Im not understanding.. but in the pic you posted.... YOU HAVE CLEARANCE
If it has clearance as the picture indicates,,, when? how? does it not have the needed clearance? why do you want more?
Looks like that clevis could be turned down to the same diameter as the threaded section, a few mm further toward the clevis end. That would give you the clearance needed and no welding required yes?
Or the clevis could be made from Stainless Steel and that would allow it to be smaller, more compact in outside dimensions giving more clearance to the foot rest it fouls with.
Thread Starter
Senior Member
SuperSport
Joined: Apr 2013
Posts: 834
From: Thousand Oaks, CA
Perhaps Im not understanding.. but in the pic you posted.... YOU HAVE CLEARANCE
If it has clearance as the picture indicates,,, when? how? does it not have the needed clearance? why do you want more?
Looks like that clevis could be turned down to the same diameter as the threaded section, a few mm further toward the clevis end. That would give you the clearance needed and no welding required yes?
Or the clevis could be made from Stainless Steel and that would allow it to be smaller, more compact in outside dimensions giving more clearance to the foot rest it fouls with.
If it has clearance as the picture indicates,,, when? how? does it not have the needed clearance? why do you want more?
Looks like that clevis could be turned down to the same diameter as the threaded section, a few mm further toward the clevis end. That would give you the clearance needed and no welding required yes?
Or the clevis could be made from Stainless Steel and that would allow it to be smaller, more compact in outside dimensions giving more clearance to the foot rest it fouls with.
its not about clearence. its about the angle at which the rod entering the master cylinder is at. the way it sits currently it doesnt go straight into the MC
Administrator
MotoGP
Joined: Apr 2006
Posts: 4,402
From: Kempner, TX
What is the concern with a slight angle of the rounded end of the rod, in the cup of the master cylinder piston ?
Is that what you are attributing the rear brake "binding" issue you had upon initial install?
Thread Starter
Senior Member
SuperSport
Joined: Apr 2013
Posts: 834
From: Thousand Oaks, CA
Ahh, ok.. you mentioned you "clearanced" the clevis ... so i thought that was the issue you were addressing.
What is the concern with a slight angle of the rounded end of the rod, in the cup of the master cylinder piston ?
Is that what you are attributing the rear brake "binding" issue you had upon initial install?
What is the concern with a slight angle of the rounded end of the rod, in the cup of the master cylinder piston ?
Is that what you are attributing the rear brake "binding" issue you had upon initial install?
but the Dan Moto site clearly states that these pedals are angled steeper so i was adjusting it to a point it wasnt meant to be in, which caused the pedal to not fully release because of the poor rod angle causing the pads to drag and then bind.
i now have the pedal at a much steeper angle and actually like it better. the angle still isnt perfectly straight into the MC but i havnt had any bad effects from this yet. although i feel as though you dont get as strong a braking affect with the not straight rod angle.
Administrator
MotoGP
Joined: Apr 2006
Posts: 4,402
From: Kempner, TX
yes that was the issue. although i had the pedal adjusted in a similar position as the stock rear brake pedal because i was use to that.
but the Dan Moto site clearly states that these pedals are angled steeper so i was adjusting it to a point it wasnt meant to be in, which caused the pedal to not fully release because of the poor rod angle causing the pads to drag and then bind.
i now have the pedal at a much steeper angle and actually like it better. the angle still isnt perfectly straight into the MC but i havnt had any bad effects from this yet. although i feel as though you dont get as strong a braking affect with the not straight rod angle.
Is there a "simpler" solution to this in changing the angle of the MC? Vs messing with the stressed end of a small aluminum arm?
Thread Starter
Senior Member
SuperSport
Joined: Apr 2013
Posts: 834
From: Thousand Oaks, CA
thats where my thoughts were heading. actually changing how the MC mounts to get a better angle. i just cant figure out how to use brackets or something to change the MC angle without compromising my new found rigidity of the pedal.
i prefer to have a not so optimum angle then have the flex i had before
i prefer to have a not so optimum angle then have the flex i had before
Senior Member
SuperBike
Joined: Mar 2012
Posts: 1,544
From: New South Wales Australia
It' a Dilema as to how to go about getting the optimum angle on the rod.
I still think welding, drilling and repositioning the bolt hole on the brake lever is the way to go.
Won't know until next week now as work is the priority at the moment.
I still think welding, drilling and repositioning the bolt hole on the brake lever is the way to go.
Won't know until next week now as work is the priority at the moment.
Administrator
MotoGP
Joined: Apr 2006
Posts: 4,402
From: Kempner, TX
Seems like there is enough material there to do that.
And the clamp load from those two fasteners is more than enough to hold the MC in place.. But you could make an offset bushing if you wanted to "fix" the MC mounting position on that bracket.
Senior Member
SuperBike
Joined: Mar 2012
Posts: 1,544
From: New South Wales Australia
Hey Eric, I would like to think that drilling the mounting bracket is the way to go, but it is flimsy.
I might give it a go and use longer bolts with locking nuts behind it, however the one thing I am worried about is flex.
Took enough to get rid of it but at the moment the rear brake is all but useless and that worries me when charging hard, not to mention the possibility of rear brake lock up because of the rod causing the brake to bind.
Stops one from enjoying the ride, and that is why I am persevering with this seemingly insignificant problem with the Dans.
Love everything else about them though!
That's what I love about this forum, thanks for your input and interest in this, it's much appreciated.
Wish you lived just around the block because I would get you to make up an offset clevis and the problem would be solved.
Such is life!!!!!!
Senior Member
SuperBike
Joined: Mar 2012
Posts: 1,544
From: New South Wales Australia
Well Surprise Surprise, I drilled the mounting bracket and refitted it to the bike.
Then I proceeded to reassemble the rear set, mounted the master cylinder to ensure that the actuator rod was at the right angle , tightened all the bolts and the brake pedal that had returned by itself without a bolt in the back of it and the clevis and actually had some feel, was binding again with the clevis bolt in and tightened.
Removed the bolt and all was well with the pedal returning by itself, and having feel again.
Now I have come to the conclusion that I can fix this pesky problem once and for all by exchanging the bolt through the clevis and actuator rod with a clevis pin and a split pin holding it in place that I will actually have a workable back brake again.
On the positive side without a back brake I have learnt the importance of the front brakes and the effect that they have over the bike under a wide range of conditions.
My background is Dirt Bikes and the back brake is used more often in the dirt than on the road, however not having that safety blanket on the Storm(HAWK) for some time now I am Looking forward to getting it back. I have always used the rear brake to adjust my line if I have hit a corner too hot. Lately there have been a few times when riding my favourite mountain road that I wished that I had a rear brake, but Didn't.
Butt clenching moments indeed!!!
Jscobey remove the bolt in your clevis and see,what happens.
I hope this is the answer to our problem and that it helps fellow owners


