
How to install Vinyl Graphics -DIY

Thread Starter
Senior Member
SuperBike
Joined: Jul 2004
Posts: 1,015

How to install Vinyl Graphics -DIY
OK first let me say i am not an expert, just a tinkerer like most of us and enjoy working on my bike and want it to look different than the rest. If i could paint i would.
Several forum members have asked me about the graphics and or paint on my SuperChicken. I have been asked if it is a TapeWorks kit and the answer is no.
I created all from scratch. For those interested and possibly wanting to try installation yourself i will do my best to describe how i installed the vinyl, some may do it differently and get same results.
First off, I only use the "Avery Graphics" brand and i really like the A7 series as it is very durable and will work around convex and compound curves if you are patient.
http://www.averygraphics.com/pls/ave...series_id=1020
It removes without leaving glue on surface, but will hold tight even with direct Pressure spray hit. So needless to say the stuff is tough and fantastic looking.
Step 1.
You need to design or make some kind of template of what you want before you even begin to cut the vinyl material. 3M brand 1/8" pin stripe and create/design the outline of what i am looking for on the bike surface. Pin stripe is fairly flexible and keep in mind if you try to make a 90 degree turn or sharp turns the pin stripe may not bend and stay down well. Try to round your turns as much as you can. Once you have the outline on the bike with the pin stripe, use strips of notebook paper and tape to the body work over the outlined pin stripe with masking tape. Due to body work surface curves you may or may not be able to use a single piece of paper, you may have to cut strips and overlap as need to get all of the paper to lay flat on the body work surface and tape the paper over laps together. Once you have the entire pin stripe area covered with paper use a pencil to highlight the pin stripe area that is under the paper so as to make an image onto the paper.
Step 2.
Remove the paper from the body work keeping all peices of paper together. Cut the outline out so as to create a template.
Step 3
Use the paper template and lay it flat on the vinyl material orienting it the correct way according to how the material will stick to the surface. Trace around the template and cut out your vinyl piece. Set it aside for now as you must first prep the surface.
Step 4
Since the outline pin stripe should still be on the body work where you created your paper template, it will need to be removed prior to step 5. I usually take a few pieces of masking tape and mark the outer edges of the pin stripe so i can have a reference for lining up the material when i go to put it on the body work. Now remove the 1/8" 3M pin stripe and toss in the trash.
Step 5
I use Rubbing alcohol with a soft cloth to carefully remove wax and grease from the body work area where i plan to apply the graphics, making sure not to remove the masking tape reference points.
Step 6
Prepare a empty spray bottle (Windex bottle) with warm water and 2 or 3 drop of soft soap (hand soap) and shake. This is used to apply to the back of the vinyl material and surface during installation. It allows you to slide the material around on the surface and line it up where you want is before working the excess water out from under the vinyl. Don�t worriy the water will not harm the material or cause an adhesion problem. Also get a rubber squeegee or use a credit card wrapped with a 2 or 3 layer of soft cloth like say and old t-shirt cut to fit. This will act as a squeegee to work out the water and keep from scratching the material. A bare Credit card or plastic squeegee WILL SCRATCH the material, use caution.
You will also need a hair dryer for those stubborn bubbles.
Step 7
Now it�s time to apply some vinyl. Be prepared to screw up a piece or two till you get the hang of it. Buy extra material, so you can have extra if needed.
With a cleaned surface and tools at hand, hairdryer, soft soap/water spray bottle, squeegee and single sided Razor blade if need it time to start.
Peel off the backing being careful to not get any hand finger print oil on the surface if possible. Spray the back of the material and the body work area with the soft soap/water mixture. Spray it good!
Step 8
Place the vinyl onto the surface and line it up with your reference masking tape marks.
Start working the water out from under the vinyl from center out toward all of the edges. Use both hands, one to hold vinyl in place and one to squeegee. If you used enough water/soap spray the material will most likely try to move on you easily. Expect this, once you work the excess water out from the center areas it will start to stay in place and become easier to work with.
Step 9
Always work form center outward, if you do not you run the chance of getting air and or water/soap mixture trapped under vinyl and you will have a blemish you cannot get out.
Step 10
The outer edges may have streaking bubbles that appears to keep coming back even as you work them down and out with your squeegee. This is due to the excess water still under the material and possibly the convex or compound curve of the material. Believe me you can work out the most difficult bubbles with patience and hair dryer/squeegee. Just keep working them till the vinyl sticks down. If you force it you will crinkle the vinyl and once you do that you will have a blemish you cannot get out, thus a less than perfect install.
Step 11
Let the vinyl dry over night or in the sun. Once dry i install an outline using 3M Pin Stripe tape. Overlap the Pin stripe 50/50 over vinyl and paint. Use caution, if you try to put this on too soon before the vinyl is dry it may cause the vinyl to buckle or come up. When you install the vinyl try to put it down in the right spot and on target the first time, if you have to pull it up, it may also pull the vinyl up. Not Good!
Use the single edge razor blade to cut the pin stripe after making a full outline and over lapping it back onto the pin stripe start area about a 1/4"
Step 12
Excellent, first piece done. Keep the material backing as a future template or if installing same pattern on the other side of the bike, just flip it over and use to make the other side so it will be identical.
In closing, PM me if you have any question. This is really not too hard, just plan to take extra time and try an easy piece first. EXPECT to screw some up first time.
****INSTALLATION IS YOUR RESONSIBILTY, NOT MINE **** I accept no responsibility in the technique described above and or material or solutions. If in doubt do not do it on your bike or at least perform on a less conspicuous location on your body work to make sure no damage occurs to your rides surface.
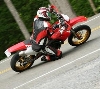
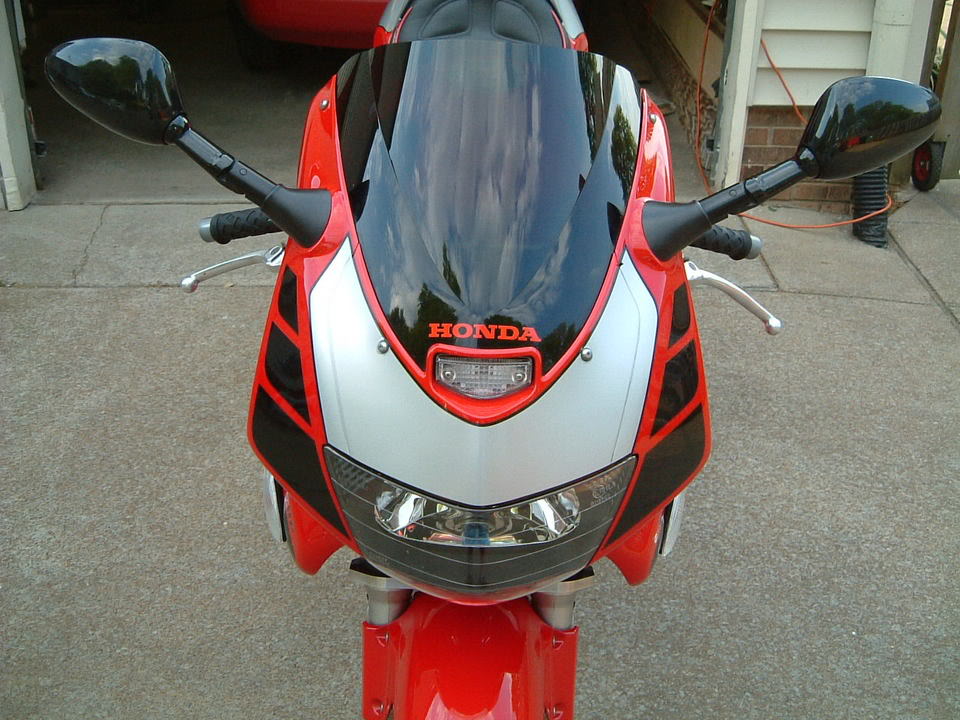
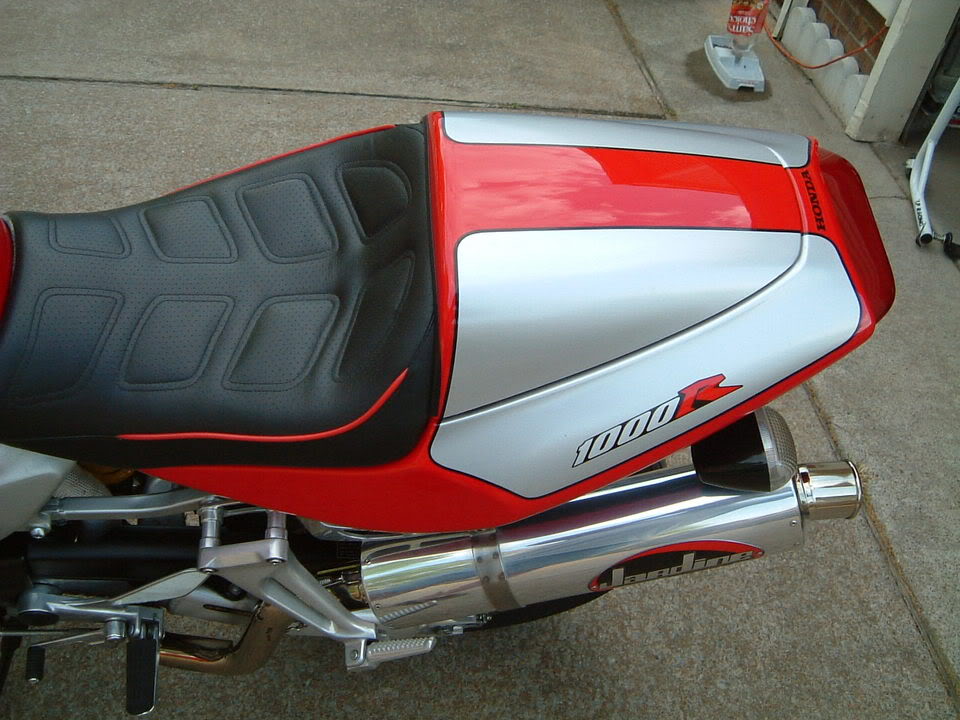
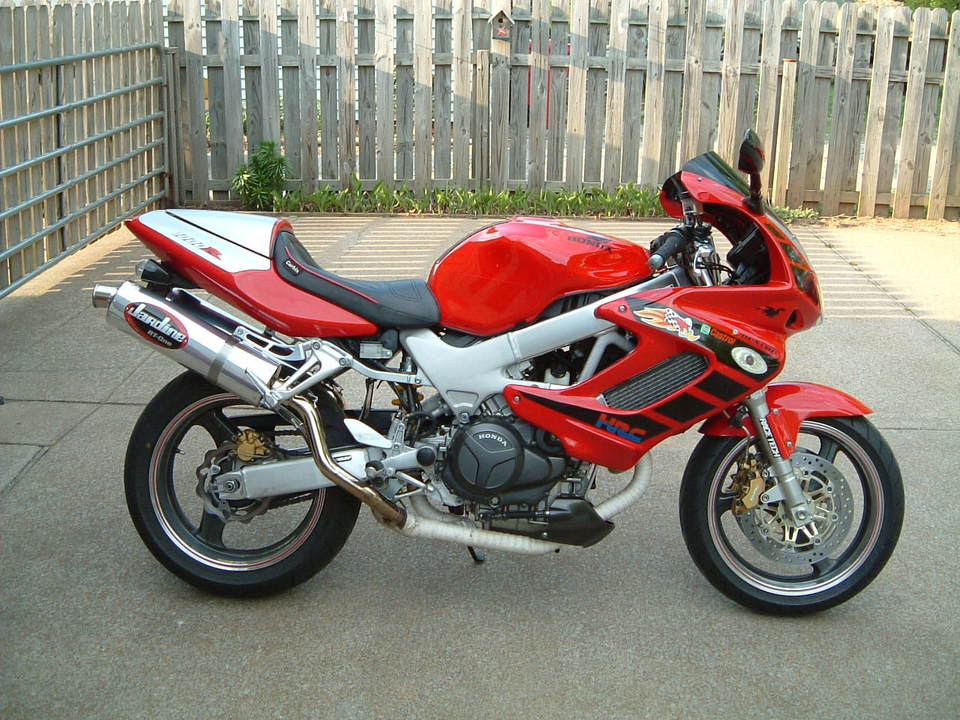
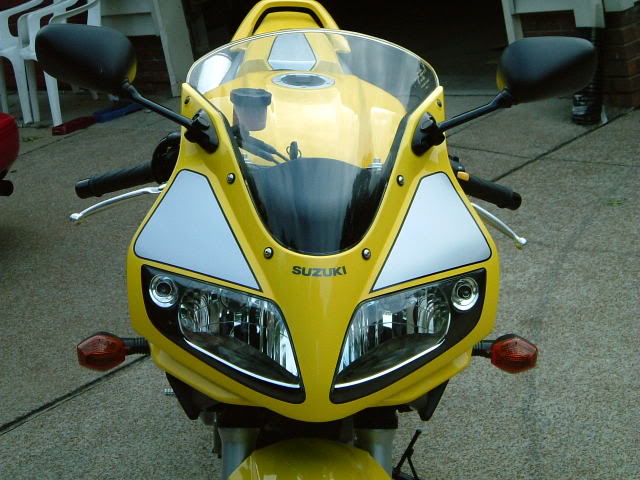
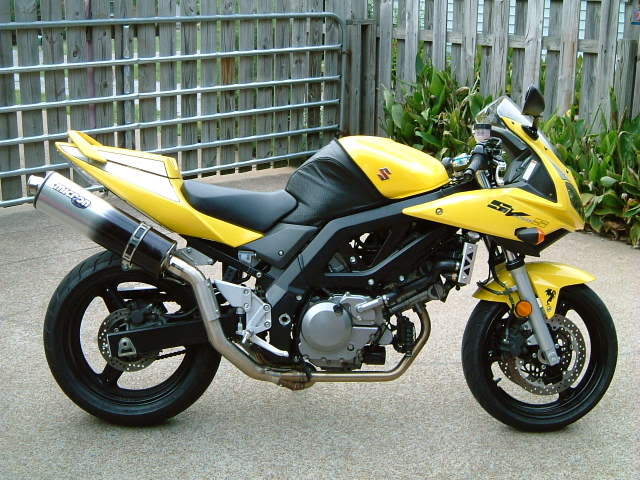
Good Luck and here are a few pictures of some work I have done using the above procedure.

Several forum members have asked me about the graphics and or paint on my SuperChicken. I have been asked if it is a TapeWorks kit and the answer is no.
I created all from scratch. For those interested and possibly wanting to try installation yourself i will do my best to describe how i installed the vinyl, some may do it differently and get same results.
First off, I only use the "Avery Graphics" brand and i really like the A7 series as it is very durable and will work around convex and compound curves if you are patient.
http://www.averygraphics.com/pls/ave...series_id=1020
It removes without leaving glue on surface, but will hold tight even with direct Pressure spray hit. So needless to say the stuff is tough and fantastic looking.
Step 1.
You need to design or make some kind of template of what you want before you even begin to cut the vinyl material. 3M brand 1/8" pin stripe and create/design the outline of what i am looking for on the bike surface. Pin stripe is fairly flexible and keep in mind if you try to make a 90 degree turn or sharp turns the pin stripe may not bend and stay down well. Try to round your turns as much as you can. Once you have the outline on the bike with the pin stripe, use strips of notebook paper and tape to the body work over the outlined pin stripe with masking tape. Due to body work surface curves you may or may not be able to use a single piece of paper, you may have to cut strips and overlap as need to get all of the paper to lay flat on the body work surface and tape the paper over laps together. Once you have the entire pin stripe area covered with paper use a pencil to highlight the pin stripe area that is under the paper so as to make an image onto the paper.
Step 2.
Remove the paper from the body work keeping all peices of paper together. Cut the outline out so as to create a template.
Step 3
Use the paper template and lay it flat on the vinyl material orienting it the correct way according to how the material will stick to the surface. Trace around the template and cut out your vinyl piece. Set it aside for now as you must first prep the surface.
Step 4
Since the outline pin stripe should still be on the body work where you created your paper template, it will need to be removed prior to step 5. I usually take a few pieces of masking tape and mark the outer edges of the pin stripe so i can have a reference for lining up the material when i go to put it on the body work. Now remove the 1/8" 3M pin stripe and toss in the trash.
Step 5
I use Rubbing alcohol with a soft cloth to carefully remove wax and grease from the body work area where i plan to apply the graphics, making sure not to remove the masking tape reference points.
Step 6
Prepare a empty spray bottle (Windex bottle) with warm water and 2 or 3 drop of soft soap (hand soap) and shake. This is used to apply to the back of the vinyl material and surface during installation. It allows you to slide the material around on the surface and line it up where you want is before working the excess water out from under the vinyl. Don�t worriy the water will not harm the material or cause an adhesion problem. Also get a rubber squeegee or use a credit card wrapped with a 2 or 3 layer of soft cloth like say and old t-shirt cut to fit. This will act as a squeegee to work out the water and keep from scratching the material. A bare Credit card or plastic squeegee WILL SCRATCH the material, use caution.
You will also need a hair dryer for those stubborn bubbles.
Step 7
Now it�s time to apply some vinyl. Be prepared to screw up a piece or two till you get the hang of it. Buy extra material, so you can have extra if needed.
With a cleaned surface and tools at hand, hairdryer, soft soap/water spray bottle, squeegee and single sided Razor blade if need it time to start.
Peel off the backing being careful to not get any hand finger print oil on the surface if possible. Spray the back of the material and the body work area with the soft soap/water mixture. Spray it good!
Step 8
Place the vinyl onto the surface and line it up with your reference masking tape marks.
Start working the water out from under the vinyl from center out toward all of the edges. Use both hands, one to hold vinyl in place and one to squeegee. If you used enough water/soap spray the material will most likely try to move on you easily. Expect this, once you work the excess water out from the center areas it will start to stay in place and become easier to work with.
Step 9
Always work form center outward, if you do not you run the chance of getting air and or water/soap mixture trapped under vinyl and you will have a blemish you cannot get out.
Step 10
The outer edges may have streaking bubbles that appears to keep coming back even as you work them down and out with your squeegee. This is due to the excess water still under the material and possibly the convex or compound curve of the material. Believe me you can work out the most difficult bubbles with patience and hair dryer/squeegee. Just keep working them till the vinyl sticks down. If you force it you will crinkle the vinyl and once you do that you will have a blemish you cannot get out, thus a less than perfect install.
Step 11
Let the vinyl dry over night or in the sun. Once dry i install an outline using 3M Pin Stripe tape. Overlap the Pin stripe 50/50 over vinyl and paint. Use caution, if you try to put this on too soon before the vinyl is dry it may cause the vinyl to buckle or come up. When you install the vinyl try to put it down in the right spot and on target the first time, if you have to pull it up, it may also pull the vinyl up. Not Good!
Use the single edge razor blade to cut the pin stripe after making a full outline and over lapping it back onto the pin stripe start area about a 1/4"
Step 12
Excellent, first piece done. Keep the material backing as a future template or if installing same pattern on the other side of the bike, just flip it over and use to make the other side so it will be identical.
In closing, PM me if you have any question. This is really not too hard, just plan to take extra time and try an easy piece first. EXPECT to screw some up first time.
****INSTALLATION IS YOUR RESONSIBILTY, NOT MINE **** I accept no responsibility in the technique described above and or material or solutions. If in doubt do not do it on your bike or at least perform on a less conspicuous location on your body work to make sure no damage occurs to your rides surface.
Good Luck and here are a few pictures of some work I have done using the above procedure.

Senior Member
Back Marker
Joined: Oct 2006
Posts: 224
From: Fresno, Ca

Having recently performed this procedure, I would like to add/ask a couple of things to further assist others.
-Definately get enough vinyl to ruin a few pieces while trying to get the technique down. I tested the wet method and the dry method a number of times. The wet method is a "must do"
-Cut the pieces before assembly. While it is tempting to think that you can go back and trim once it is stuck down, I would advise against it. Certain exceptions may apply, but generally I think it is best to have the exact shape before applying the vinyl.
-The vinyl remains workable as long as there is still water under it. There is no hurry to, so don't rush it. Keep pushing the water outwards until those outer edge bubbles start sticking down. The hair dryer works wonderfully.
Potential Questions-
-Is it better to do it with the plastics on or off of the bike? In most cases I think you want the plastic on the bike. I did the seat cowl off of the bike, but I am not sure how I would do the front if I were to have a graphic that I wanted the desing to carry across a seam.
-How do you carry the graphic to the "under side" of the plastics? Do you wrap it around and stick it to the back side, or do you keep the vinyl all on the visible plane?
Thread Starter
Senior Member
SuperBike
Joined: Jul 2004
Posts: 1,015
Potential Questions-
-Is it better to do it with the plastics on or off of the bike? In most cases I think you want the plastic on the bike. I did the seat cowl off of the bike, but I am not sure how I would do the front if I were to have a graphic that I wanted the desing to carry across a seam.
-How do you carry the graphic to the "under side" of the plastics? Do you wrap it around and stick it to the back side, or do you keep the vinyl all on the visible plane?
BTW - yours looks great. And Wet is the only way to go.

Junior Member
Squid
Joined: Apr 2008
Posts: 26
From: Southern NH
Quick question- where did you buy your vinyl? Did you purchase direct from Avery or were you able to get it somewhere like Staples or a sign store? I did this same thing on my Ducati 748 to add on number plates, and I want to do the same to the '02 Superhawk I'm picking up this week.
-TM
-TM
Thread Starter
Senior Member
SuperBike
Joined: Jul 2004
Posts: 1,015
I usually just look for a local shop that carries Avery graphics. They typically have the A7 or later series for their production work and will sell it over the counter.
If you have no luck locally just do google search for some Avery supliers and buy from one you like.
I know you knew all that already, just replied because i did,'t buy from an internet supplier.
Good luck!
I am about to rip all of mine off and go with a different color, don't know which color yet, but since i kept all of my templates it will be easy to create new ones.

Thread Starter
Senior Member
SuperBike
Joined: Jul 2004
Posts: 1,015

Senior Member
Superstock
Joined: Apr 2007
Posts: 284
From: Warren, NH
Those graphic are great! My hats off to you especaily since those are hand cut vinyl graphics. I do a small amount of vinyl letting on the side and realy know what it takes to do that. The only difference is i feed the template into a scanner so that then I can cut the template on a machine. I know, that is cheating but it works for me. Again, great job!

Thread
Thread Starter
Forum
Replies
Last Post
F1 Fan in Nascar Land
Modifications - Cosmetic
11
Dec 2, 2006 10:26 AM


