
Petcock fix with pics


Senior Member
MotoGP
Joined: May 2008
Posts: 3,454
From: San Clemente, CA

I still don't see the upside of using WD40 on rubber parts. Again, I use carb spray to help remove and install fuel lines. For just about anything else, a little shot of silicone spray works. I do keep a couple of cans of WD40 for light lubrication, freeing up parts and cleaning tools.
As for composition of different types of "rubber"...I've seen a number of carbureted cars/trucks where the PCV hose was replaced with a length of heater hose. The heater hose softens from the exposure to hydrocarbons and then collapses, causing the engine to leak oil from the seals.
And one time my students were driving a Chevy pick-up into the shop to do a brake job, when they smelled gas. Someone had replaced the fuel line going to the carb with vacuum hose, which had softened and split.
And I've seen a number of v-belts ruined by WD40...use silicone for squeaky v-belts, after checking for glazing and adjustment.
Senior Member
MotoGP
Joined: May 2008
Posts: 3,454
From: San Clemente, CA
I have been at work for a few hours, but before I left the petcock had still not released. I left it overnight.
The thing is, unless my vacuum port is buggered and only flowing one direction this makes perfect sense to me. There is no way for air to get back in and allow the spring to push the diaphragm back.
The thing is, unless my vacuum port is buggered and only flowing one direction this makes perfect sense to me. There is no way for air to get back in and allow the spring to push the diaphragm back.
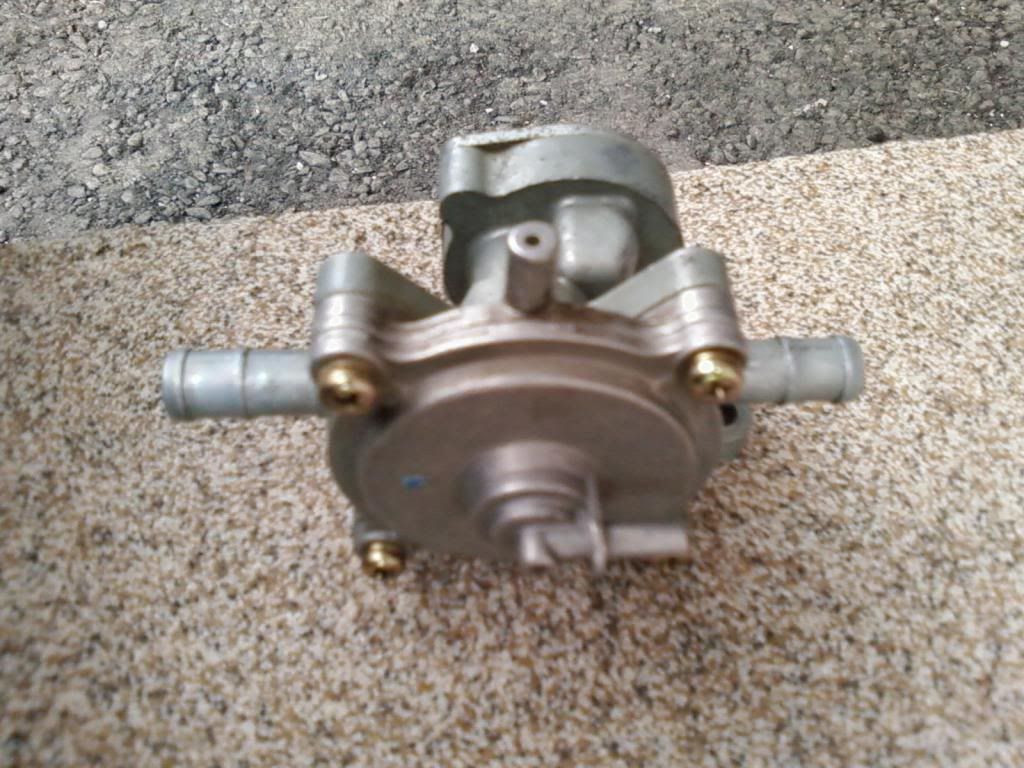
1. Disassemble petcock to make sure spring is on vacuum side of diaphragm. Make sure diaphragm is intact.
2. Make sure vent is open and clear, no obstructions.
3. Make sure the vacuum hose is pulling good vacuum and has no obstructions or kinks. There could be a chunk of hose that broke loose inside that is acting as an internal check valve.
4. Double check to make sure vacuum is hooked up to the correct port, the one facing sideways towards the left side of the bike. Vent port faces down.
Another possibility is that the actual mechanical valve, not the diaphragm, is sticking. I haven't had one of these apart, so I don't know exactly what part moves to open and close fuel flow.
Last edited by VTRsurfer; Jul 7, 2010 at 02:26 PM.

Member
Squid
Joined: Feb 2009
Posts: 37
This problem should be possible to solve.
1. Disassemble petcock to make sure spring is on vacuum side of diaphragm. Make sure diaphragm is intact.
2. Make sure vent is open and clear, no obstructions.
3. Make sure the vacuum hose is pulling good vacuum and has no obstructions or kinks. There could be a chunk of hose that broke loose inside that is acting as an internal check valve.
4. Double check to make sure vacuum is hooked up to the correct port, the one facing sideways towards the left side of the bike. Vent port faces down.
Another possibility is that the actual mechanical valve, not the diaphragm, is sticking. I haven't had one of these apart, so I don't know exactly what part moves to open and close fuel flow.
When I first saw the problem I ordered a rebuild kit for the petcock and completely rebuilt it. It functions perfectly in that a vacuum definitely opens it, and it will definitely flow fuel...the problem is the closing.
It has now been about 24hrs since the vacuum was first applied and the diaphragm has yet to "pop" back out.
Here is the current test (in progress):


Sadly, I did not take a photo with the diaphragm "out". You will have to take my word for it that it is currently sucked in and the vacuum was momentarily applied about 24hrs ago. You can also see that both the vacuum and vent ports are clear. To be clear, before I reassembled the petcock I could blow air in both directions through the vent but only the one direction through the vacuum port.
Unless someone can tell me that the vacuum port should flow both directions I see nothing wrong with the above...quite simply there is no way for air to get back into the vacuum side. Honda apparently went to a lot of effort to give the illusion of a vacuum petcock when in reality it is a gravity drain
Member
Squid
Joined: Feb 2009
Posts: 37
Based on a PM from a helpful member, stating that the vacuum port was 180deg rotated I decided to disassemble the petcock and rotate it.
Not surprisingly it does not appear to have improved the operation of the petcock.
It did give me an opportunity to snap a pic of the diaphram in the "out" position though:

Not surprisingly it does not appear to have improved the operation of the petcock.
It did give me an opportunity to snap a pic of the diaphram in the "out" position though:

Senior Member
Back Marker
Joined: Aug 2009
Posts: 112
From: North
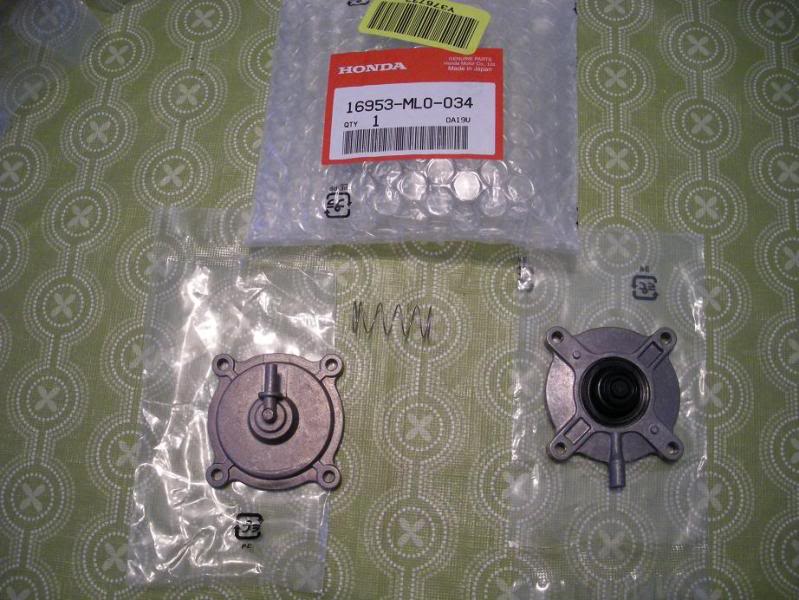
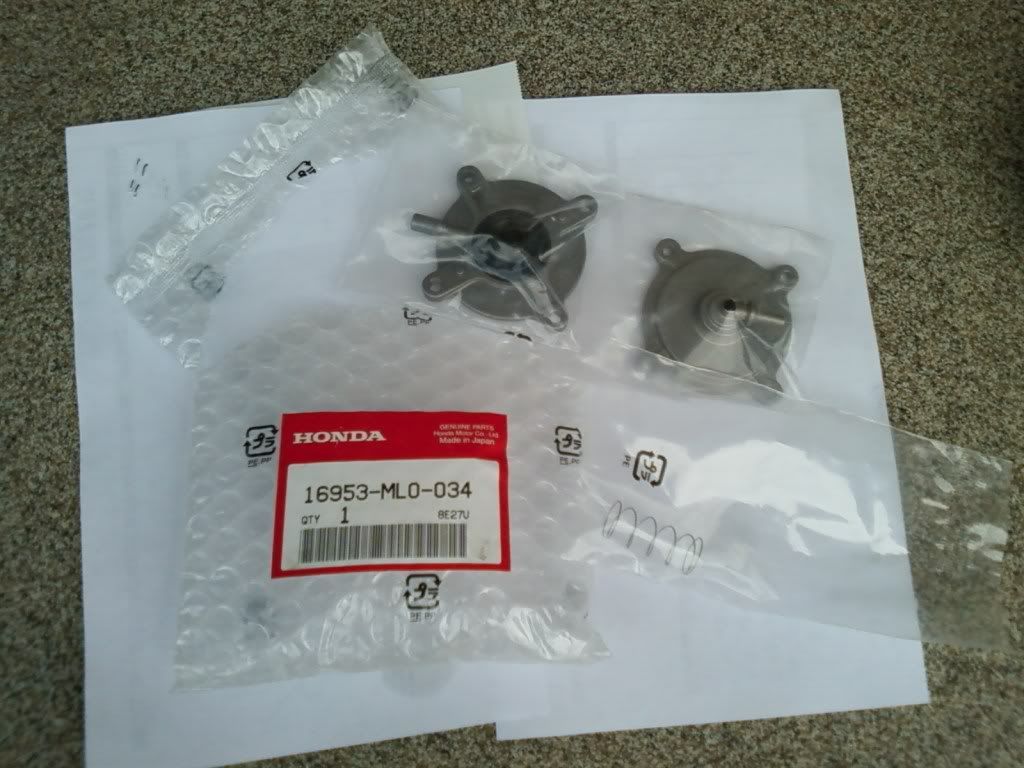
I received my rebuild kit today. Shouldn't be any problem if it's re-assembled exactly as found. Are you sure you have all the right components as shown here?

Last edited by storm_rider; Jul 13, 2010 at 09:19 AM.
Senior Member
Back Marker
Joined: Mar 2008
Posts: 139
From: Brisbane, Australia
Kraher, I have read and reread your response to vtrsurfer and can't understand it. He is asking you to check the position of the spring and that the ports are not blocked.
This is a simple assembly, the valve is held open by vacuum only. If it stays open, something is not right.
Is it possible that the valve was assembled incorrectly before you disassembled it - i.e. is it possible the previous owner/service person stuffed it up?
This is a simple assembly, the valve is held open by vacuum only. If it stays open, something is not right.
Is it possible that the valve was assembled incorrectly before you disassembled it - i.e. is it possible the previous owner/service person stuffed it up?
Senior Member
MotoGP
Joined: May 2008
Posts: 3,454
From: San Clemente, CA
Kraher, I have read and reread your response to vtrsurfer and can't understand it. He is asking you to check the position of the spring and that the ports are not blocked.
This is a simple assembly, the valve is held open by vacuum only. If it stays open, something is not right.
Is it possible that the valve was assembled incorrectly before you disassembled it - i.e. is it possible the previous owner/service person stuffed it up?
This is a simple assembly, the valve is held open by vacuum only. If it stays open, something is not right.
Is it possible that the valve was assembled incorrectly before you disassembled it - i.e. is it possible the previous owner/service person stuffed it up?
All I know is that during the several (almost 10) times I've pulled my tank, I've never manually turned off the petcock. I just put it on my rear stand and pull the tank. I've never had any gas spill out of the tank, only the gas in the lines to the carbs spills out.
Member
Squid
Joined: Feb 2009
Posts: 37


I instead ordered an after-market rebuild kit that included all of the rubber bits as well as the spring.
Can you pass air through both directions on that vacuum port?
Kraher, I have read and reread your response to vtrsurfer and can't understand it. He is asking you to check the position of the spring and that the ports are not blocked.
This is a simple assembly, the valve is held open by vacuum only. If it stays open, something is not right.
Is it possible that the valve was assembled incorrectly before you disassembled it - i.e. is it possible the previous owner/service person stuffed it up?
This is a simple assembly, the valve is held open by vacuum only. If it stays open, something is not right.
Is it possible that the valve was assembled incorrectly before you disassembled it - i.e. is it possible the previous owner/service person stuffed it up?
As for you only getting air to pass through the vacuum port in one direction, there may be a check valve in the vacuum port, since at full throttle vacuum is zero. Therefore at extended full throttle, you would run out of gas in the float bowls if constant vacuum was required to keep the petcock open.
All I know is that during the several (almost 10) times I've pulled my tank, I've never manually turned off the petcock. I just put it on my rear stand and pull the tank. I've never had any gas spill out of the tank, only the gas in the lines to the carbs spills out.
All I know is that during the several (almost 10) times I've pulled my tank, I've never manually turned off the petcock. I just put it on my rear stand and pull the tank. I've never had any gas spill out of the tank, only the gas in the lines to the carbs spills out.
There is some form of mechanism on the vacuum port (it is not just an open hole) of the back plate, I was wondering if it was just something that forced the pressure to equalize slowly in order to avoid momentary blips in fuel flow between intake strokes? But in leaving the thing on my desk for two days and the pressure failing to equalize that is not the case.
I do not think this mechanism is a check valve as there is no other way for air to get back into the petcock and equalize the pressure and stopping flow.
The back plate has failed, I have been using the bike with it as a gravity drain. Not the best practice but I am tired of thinking about it. If someone could confirm for me that air should flow both ways through that port then I would just buy a new or used petcock and be done with it.

Senior Member
Back Marker
Joined: Jun 2012
Posts: 211
From: Hagerstown, MD
I removed my PAIR system and no longer have a hose for the Tank Vent seen below Unknown #2 port next to drain inlet. Does this port remain open or should it be capped. Im not so sure I understand its purpose.
Any explanation would be awesome
Thanks
Any explanation would be awesome
Thanks
I was having some idle and running issues and did a search. A few other posts explained the same issues that I had and the most recommended fix was a tear/leak in the petcock diaphragm.
The issues I had were
The new parts, $45 Canadian from Honda, took 1 day to get them
After you remove the seat and lower bolt from the tank put a towel over the metal bracket and seat area so you don't scratch your tank while flipping it upside down like I did.
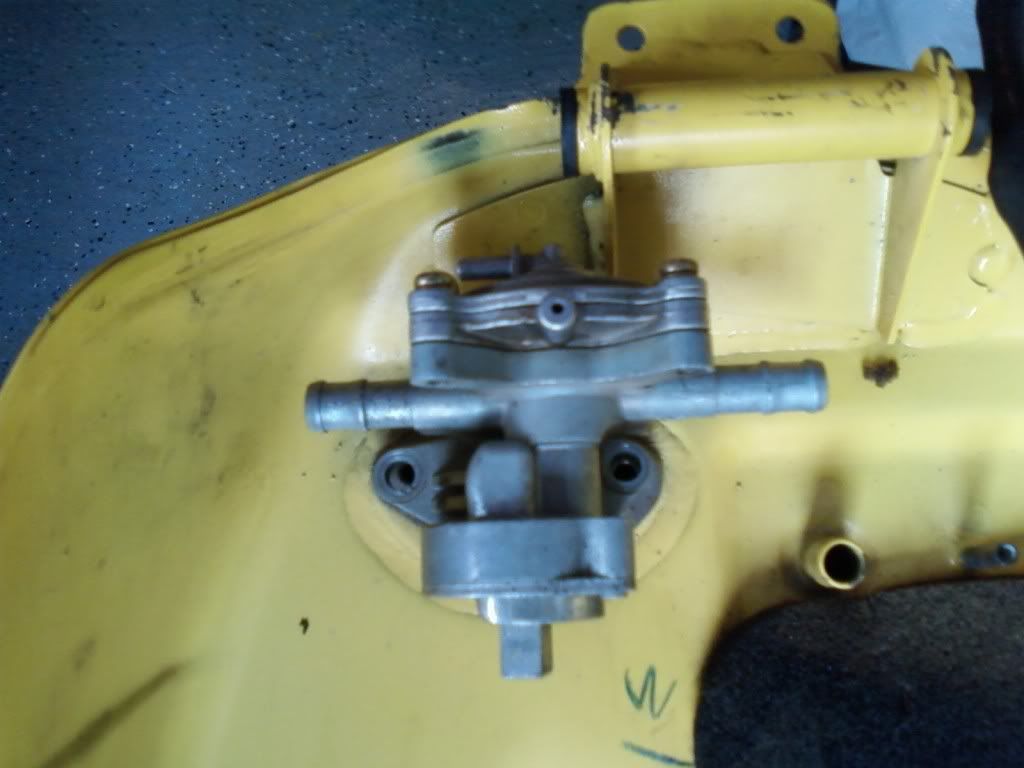
Petcock on the tank, at the front is a square part that you turn to cut off the fuel prior to taking off the hoses. When you remove it with the two Allen bots be careful not to pull or rip the fuel filter and O ring that attaches to the bottom
This is the part that gets replaced. Simply remove the four screws. Pay attention to the orientation of the openings. The kit comes with a new spring to go between the two plates.
Back in with all the hoses reconnected.
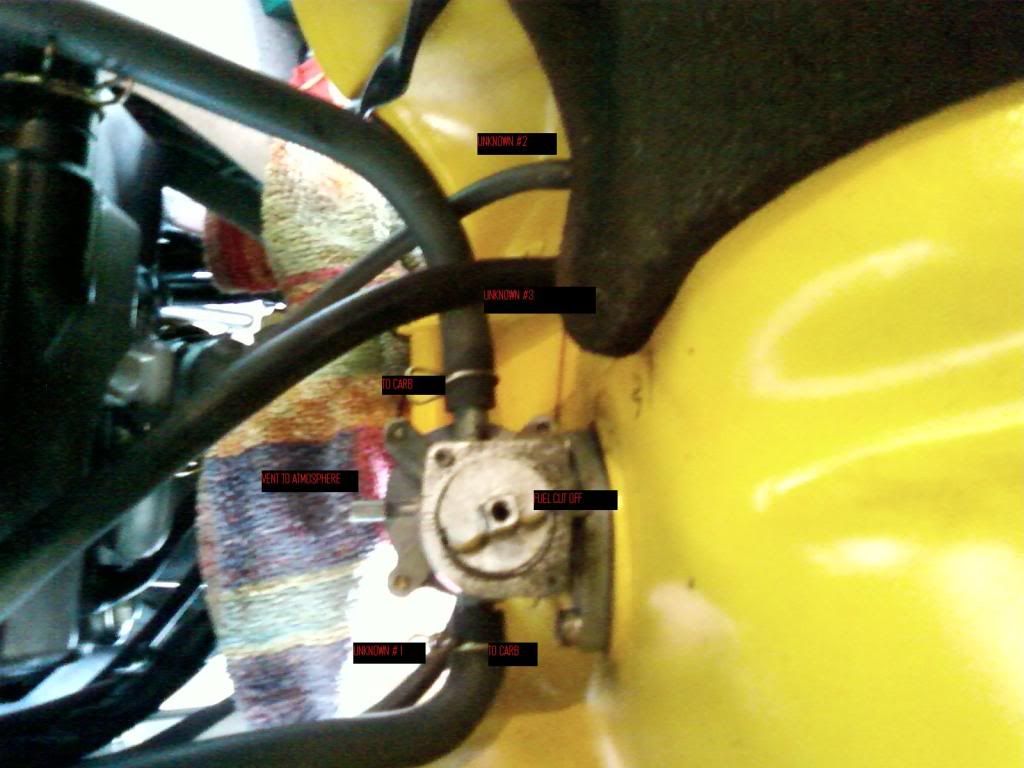
2 hoses go to the carb, they both have the clips on them and due to the bends can't be mixed up.
From what I read about the hook up it appears as my petcock was hooked up wrong so I would like someone to verify that this hook up is right. Also if anyone knows what the three unknown hoses are leading to please add that info.
Unknown # 1 has a small clip on it and goes to the side vent of the petcock. The bottom vent on the petcock vents to atmosphere. Here's a better pic of that hose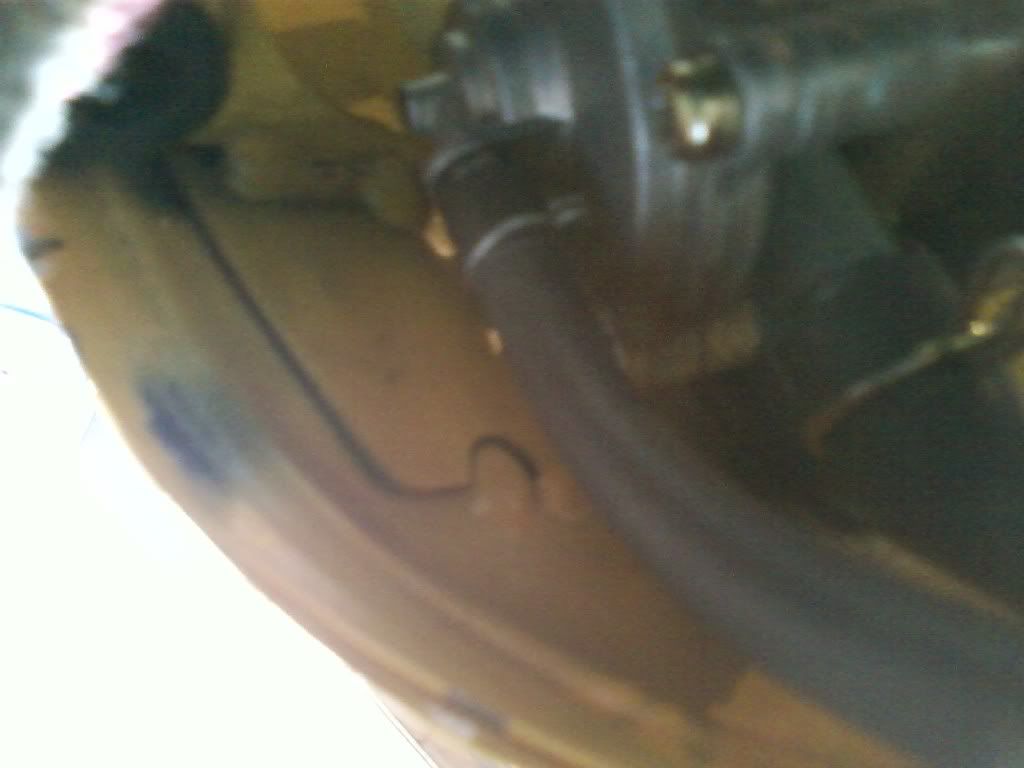
Unknown #2 goes to the far right side. *note* this should be the last hose removed and the first put back since it will leak fuel through the opening. This hose is long enough to leave it on while you flip the tank.
Unknown #3 goes to the larger opening beside #2, it's the only hose that will fit that opening.
Since #2 and #1 appear as they will fit either vent tie them off to their respective sides after removal so you don't mix them up.
The issues I had were
- stalling out at idle
- while cruising at 4-5k rpm I might lose power, be able to cruise but not accelerate more than a smart car with two fat men in it.
- rev it up high in neutral and it would go no problem but not sound that great.
- running rich
The new parts, $45 Canadian from Honda, took 1 day to get them
After you remove the seat and lower bolt from the tank put a towel over the metal bracket and seat area so you don't scratch your tank while flipping it upside down like I did.
Petcock on the tank, at the front is a square part that you turn to cut off the fuel prior to taking off the hoses. When you remove it with the two Allen bots be careful not to pull or rip the fuel filter and O ring that attaches to the bottom
This is the part that gets replaced. Simply remove the four screws. Pay attention to the orientation of the openings. The kit comes with a new spring to go between the two plates.
Back in with all the hoses reconnected.
2 hoses go to the carb, they both have the clips on them and due to the bends can't be mixed up.
From what I read about the hook up it appears as my petcock was hooked up wrong so I would like someone to verify that this hook up is right. Also if anyone knows what the three unknown hoses are leading to please add that info.
Unknown # 1 has a small clip on it and goes to the side vent of the petcock. The bottom vent on the petcock vents to atmosphere. Here's a better pic of that hose
Unknown #2 goes to the far right side. *note* this should be the last hose removed and the first put back since it will leak fuel through the opening. This hose is long enough to leave it on while you flip the tank.
Unknown #3 goes to the larger opening beside #2, it's the only hose that will fit that opening.
Since #2 and #1 appear as they will fit either vent tie them off to their respective sides after removal so you don't mix them up.

the boss
SuperBike
SuperBike
Joined: Mar 2010
Posts: 1,182
From: largo,fl
the very bottom nipple on the petcock doesnt get blocked off.
the nipple on the back of the petcock that is sideways has a hose that goes to the rear head,this is the vacuum line to operate the petcock.
on the left side of bike,right underneath to the left of the carb boot,should be a nipple,it should have a hose.if it doesnt,then you need to put a hose to it to connect to the back of the petcock.
Senior Member
Back Marker
Joined: Jun 2012
Posts: 211
From: Hagerstown, MD
yeah after i wrote this i did some research and opened my eyes lol. It was dark out so... but no excuse the line was there it just fell flat with my rear spring so i was not able to see it. I re assembled went for a 10 mile test ride and im good to go.
No more squid like posts from me haha and I also realized this thread was way old lol. my apologies with this as well!
No more squid like posts from me haha and I also realized this thread was way old lol. my apologies with this as well!
the very bottom nipple on the petcock doesnt get blocked off.
the nipple on the back of the petcock that is sideways has a hose that goes to the rear head,this is the vacuum line to operate the petcock.
on the left side of bike,right underneath to the left of the carb boot,should be a nipple,it should have a hose.if it doesnt,then you need to put a hose to it to connect to the back of the petcock.
the nipple on the back of the petcock that is sideways has a hose that goes to the rear head,this is the vacuum line to operate the petcock.
on the left side of bike,right underneath to the left of the carb boot,should be a nipple,it should have a hose.if it doesnt,then you need to put a hose to it to connect to the back of the petcock.


VTR virgin
Superstock
Joined: Mar 2015
Posts: 447
From: Auckland, New Zealand
I had a problem with a fuel leak through the carbs with the bike parked. Having read the posts above (especially poor Kraher) I think I can add a little detail. There certainly is a one-way valve built into the vacuum fitting, and my one showed the same symptoms as Kraher, the diaphragm was in good order and was able to open the fuel flow, but it then stayed that way for a long time and would be the source of my carb leak (a non-sealing float valve must also be in the loop but I haven't gone there yet). I attempted to diassemble the one-way valve by trying to lift out the small silver fitting inside the body, but couldn't hook it out, but I did succeed in making it work properly i.e. releasing the vacuum slowly and allowing the fuel valve to close.

VTR virgin
Superstock
Joined: Mar 2015
Posts: 447
From: Auckland, New Zealand
Answering this post earlier today prompted me to head for the garage and actually install the new diaphragm parts. So I can definitely confirm that the 16953-MLO-034 part was an exact replacement for the parts in my 1997 model.

Senior Member
Superstock
Joined: Mar 2015
Posts: 409
From: Central CA
http://www.ebay.com/itm/Honda-16953-...24b9c8&vxp=mtr
Pretty good price on these from PARTzilla
But this seller may be a better bet:
http://www.ebay.com/itm/Honda-Fuel-P...f9eb49&vxp=mtr
Mine is working ok now with (half the parts from) an aftermarket kit . But keeping an eye on it.
Pretty good price on these from PARTzilla
But this seller may be a better bet:
http://www.ebay.com/itm/Honda-Fuel-P...f9eb49&vxp=mtr
Mine is working ok now with (half the parts from) an aftermarket kit . But keeping an eye on it.
Last edited by Hangfly; May 15, 2015 at 09:58 AM.


Rex Kramer-Thrill Seeker
SuperBike
Joined: Jan 2011
Posts: 2,312
From: Brookfield, WI
Chris, those two hoses aren't actually needed. I and several others have run our carbs without those two hoses. With the hose gone, point the black plastic nipple downwards. However, if you feel that you need the hose, you can pick some up from your local hardware store or hobby store. If you feel that you need to have hoses from Honda, check Partzilla.com
Last edited by CruxGNZ; Mar 26, 2016 at 07:46 PM.
Rex Kramer-Thrill Seeker
SuperBike
Joined: Jan 2011
Posts: 2,312
From: Brookfield, WI
Your picture doesn't show up. You must go to dropbox to view it. The picture shows two lines that are highlited with yellow, correct? Those are two seperate lines. They do not connect the two carbs together. Each of those black nipples vents to atmosphere.
Last edited by CruxGNZ; Mar 26, 2016 at 08:20 PM.

Junior Member
Squid
Joined: Jan 2014
Posts: 13
From: Columbia, SC
Ok, I know this is a very old thread but I really need some help here. My 98' Superhawk has had every fuel issue known to man and I am desperate to get this bike fixed. My gas turned to tree sap (still not sure how this happen), causing one of my float values to be stuck open, flooding my engine with gas AND leaking all over the floor in my garage (causing the wife to be irate). I have since cleaned the carbs (also had a torn diaphragm so had to replace that). I have cleaned the carbs on this bike many times, but this time I picked up a gallon of Berryman's and soaked all the metal only parts. The carb that really failed I let soak for about 4 hours which is the maximum recommend time to let anything soak. everything looks very new and shiny now but, then I discovered my petcock diaphragm is shot. I have replaced this before without any issue but this time something is wrong. After putting the petcock back together, I attached a piece of scrap vacuum hose and sucked on the port for vacuum. The diaphragm opens and closes but does NOT make full contact with the open the fuel comes out of. I can hold it up to the light, look through one of the fuel ports and barely see a gap to the to the other fuel port. Has anyone had this issue? This bike is costing me so much money, I just want to get it running again and sold. In the past year I have spent money on a pulse generator, carb. parts, new battery, my brake lever snapped, and now this petcock issue. I have never abused this bike in the 15 years I have owned it, but this is ridiculous of all the stuff breaking at the same time. PLEASE HELP!

Member
Squid
Joined: Sep 2011
Posts: 32
I have that issue with a ebay rebuild kit. Opens fully but doesn't seem to close all the way maybe 1/16" gap left from fully sealing and takes a while to do that. The spring doesn't seem to have the oomph to close it fully.

Administrator
MotoGP
Joined: Apr 2006
Posts: 4,402
From: Kempner, TX
Ok, I know this is a very old thread but I really need some help here. My 98' Superhawk has had every fuel issue known to man and I am desperate to get this bike fixed. My gas turned to tree sap (still not sure how this happen), causing one of my float values to be stuck open, flooding my engine with gas AND leaking all over the floor in my garage (causing the wife to be irate). I have since cleaned the carbs (also had a torn diaphragm so had to replace that). I have cleaned the carbs on this bike many times, but this time I picked up a gallon of Berryman's and soaked all the metal only parts. The carb that really failed I let soak for about 4 hours which is the maximum recommend time to let anything soak. everything looks very new and shiny now but, then I discovered my petcock diaphragm is shot. I have replaced this before without any issue but this time something is wrong. After putting the petcock back together, I attached a piece of scrap vacuum hose and sucked on the port for vacuum. The diaphragm opens and closes but does NOT make full contact with the open the fuel comes out of. I can hold it up to the light, look through one of the fuel ports and barely see a gap to the to the other fuel port. Has anyone had this issue? This bike is costing me so much money, I just want to get it running again and sold. In the past year I have spent money on a pulse generator, carb. parts, new battery, my brake lever snapped, and now this petcock issue. I have never abused this bike in the 15 years I have owned it, but this is ridiculous of all the stuff breaking at the same time. PLEASE HELP!
Get a OEM repair set COVER SET, PETCOCK 16953-ML0-034
$29~33 retail online parts places, likely double that at your local dealer...
Amazon and Ebay in the $45 range
Last edited by E.Marquez; Sep 11, 2018 at 05:03 AM.
Junior Member
Squid
Joined: Jan 2014
Posts: 13
From: Columbia, SC
Much appreciated! I am guilty of buying the aftermarket kit. I bought one before but, did not have any issue.
Administrator
MotoGP
Joined: Apr 2006
Posts: 4,402
From: Kempner, TX
If the choice is dont fix / Ride because someone cant get or afford the OEM parts, then heck ya, buy the K&L or other repair kits.....I buy um every month ....for me its a huge financial savings over OEM parts for our trainer bikes, even factoring in labor to install another kit a few years later.... The OEM ones don't last either due to crappy high %ethanol gas we get stuck with here and that the bikes sit day after day each week, and for longer stretches in the winter season.
But My personal bikes and the ones that roll though my shop other than trailers..... nothing but OEM parts if available.


