
How-to: LED tail retrofit


Senior Member
Back Marker
Joined: Apr 2005
Posts: 187
From: Massachusetts

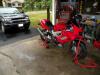
Not to hijack this or anything, but you mentioned moving the plate, if your plate holes line up this works well. Sorry about the quality, it's a 5 year old pic, I don't even think it was a 1 megapixel camera.

Also with the LED in the tail, you could probably just drill a single white LED in the bottom of the lens to light the plate, that is how my undertail is and it's plenty bright.
Also with the LED in the tail, you could probably just drill a single white LED in the bottom of the lens to light the plate, that is how my undertail is and it's plenty bright.

Thread Starter
Senior Member
SuperSport
Joined: May 2008
Posts: 702
From: Bham, AL

I've thought about that but I'm not sure.
I think i might buy both of these and see which one I prefer....
http://www.maxxima.com/m42205wcl-specs.html

-or-
http://www.maxxima.com/LED-300CL-specs.html

I'm leaning towards the first one though but the second one looks cleaner.
I think i might buy both of these and see which one I prefer....
http://www.maxxima.com/m42205wcl-specs.html
-or-
http://www.maxxima.com/LED-300CL-specs.html
I'm leaning towards the first one though but the second one looks cleaner.
Thread Starter
Senior Member
SuperSport
Joined: May 2008
Posts: 702
From: Bham, AL
Yeah I've seen those as well. Only thing is my tag is mounted from the bottom on a hinge. I suppose I could use those and just bolt them in place of my top holes on the tag if I were to go with those on mine. Let me know how yours goes. I'd like to see pics when you get them installed and lit up.
Senior Member
SuperBike
SuperBike
Joined: Jun 2007
Posts: 1,031
From: Los Angeles ish
Will do, but it's probably weeks away. Low on my priorities. Waiting on some nuts to replace the rounded off ones on the shock linkage. They were torqued way more than 33lbs. Oh, and if you're tempted to unscrew the rearview mirror from the stalk, don't. No captive nut, a spring, washer, then nut. No way to put it back on without cutting into the plastic. Sheez!

Thread Starter
Senior Member
SuperSport
Joined: May 2008
Posts: 702
From: Bham, AL
I simply slide the red lens back over the housing and pushed it together as tight as I could. Then I reheated the housing edge until I got it soft enough that I could slide the lens onto the housing to lock in the "ribs" in the slots. Then I went around the housing edge and pushed hard to make the sealant 'squash' in the channel to make for a even tighter seal. I kept pressure on the housing edge until it was cool to the touch. After that I laid down some rubber butyl just as an extra measure for a good weathertight seal. Although I don't think its necessary if you reheat and seal the housing good as there is enough of the stock sealant to reuse and get a good reseal. It's just a preference to apply more sealant just "in case" you know  .
.
I'm not a big fan of RTV silicone as its messy and stinks. It works and all but you need to amke sure to clean the area you're applying the silicone as it will/can come off later on a few months out. I much prefer rubber butyl as its cleaner and looks stock for the most part. Just a preference
I'm not a big fan of RTV silicone as its messy and stinks. It works and all but you need to amke sure to clean the area you're applying the silicone as it will/can come off later on a few months out. I much prefer rubber butyl as its cleaner and looks stock for the most part. Just a preference
Thread Starter
Senior Member
SuperSport
Joined: May 2008
Posts: 702
From: Bham, AL
LOL, I guess this how-to is doing its job. A member on sportbikes.net did my mod on his CBR F3 after seeing my post.....
The F3 has a much more fluted lens so it's not as noticeable as the SH but it still came out good IMO....
Lights on....

Brake on...

The F3 has a much more fluted lens so it's not as noticeable as the SH but it still came out good IMO....
Lights on....
Brake on...

Senior Member
Superstock
Joined: Mar 2007
Posts: 268
From: San Diego
Has anyone tried experimenting with Cree, Seoul and Luxeon emitters with a driver board? They are super bright depending on the current levels you run it at.
The Cree Q5 puts out 260 lumens (white) when driven at 1000mA. The colored ones, red and amber, put out a bit less when driven at spec but it's still bright as hell.
They'd have to be mounted on a considerable heatsink, seeing as how running lights / brake lights are always on.
The Cree Q5 puts out 260 lumens (white) when driven at 1000mA. The colored ones, red and amber, put out a bit less when driven at spec but it's still bright as hell.
They'd have to be mounted on a considerable heatsink, seeing as how running lights / brake lights are always on.
Senior Member
SuperBike
SuperBike
Joined: Jun 2007
Posts: 1,031
From: Los Angeles ish
Hi Anto,
I'm running 2 Luxeon 3s. I made the bracket from aluminum and put thermal paste between that and the LEDs for heat transfer. There shouldn't be that much heat in the LEDs in the running light mode if you're running them at 1/4 current. However the resistor for the running light will get hotter than the one for the brake. I used 10w resistors. Here's a shot of them taken with camera flash.
This video doesn't have Hak's production value (no music), but it shows the LEDs in daylight.http://www.youtube.com/watch?v=_ci1ngUx60k
Last edited by Gregw; Jul 2, 2008 at 04:24 AM.


Senior Member
Superstock
Joined: Mar 2007
Posts: 268
From: San Diego
Hak's the man!
I went out last night on my bike and bought pretty much the exact same LED assembly, the only difference was there being no mounting points, but I epoxyed it and it was fine.
I actually figured a way to integrate a license plate LED bar into it. I like the white LED plate lights, but most LEDs are a cool white, which looks a bit ricer to me. The new Lexus & some BMW cars have warm white LEDs, and I want that.
So I found this:

Datasheet here: http://superbrightleds.com/specs/LB3_accents.htm
Which is rated at 4500k and outputs lots of light. The website states it's not weatherproof, but I'm planning to pot the assembly with epoxy anyway. My plan was to mount it right on the bottom of the taillight assembly and route the wires through the inside. It would be perfect for the way my plate is setup as well.
I went out last night on my bike and bought pretty much the exact same LED assembly, the only difference was there being no mounting points, but I epoxyed it and it was fine.
I actually figured a way to integrate a license plate LED bar into it. I like the white LED plate lights, but most LEDs are a cool white, which looks a bit ricer to me. The new Lexus & some BMW cars have warm white LEDs, and I want that.
So I found this:
Datasheet here: http://superbrightleds.com/specs/LB3_accents.htm
Which is rated at 4500k and outputs lots of light. The website states it's not weatherproof, but I'm planning to pot the assembly with epoxy anyway. My plan was to mount it right on the bottom of the taillight assembly and route the wires through the inside. It would be perfect for the way my plate is setup as well.
Thread Starter
Senior Member
SuperSport
Joined: May 2008
Posts: 702
From: Bham, AL
Awesome find Anto! That is the same kind of lighting I am looking for on the plate. Nothing blueish but pure white like like the newer Lexus'. I've bought form them before on other LED stuff for my old car. At $4.95 you can't go wrong, even with making it waterproof later on.

Certified Bad Ass
Squid
Joined: Oct 2007
Posts: 32
From: Boone, NC
ok guys, the problem is that i am a copycat. i took one look at this article and instantly said, thats what i want to do. so i did, except i have a small twist. i went to NAPA and bought a 6 inch tractor-trailer tail brake light and it has like 12 or 14 LEDs in it, all with fresnels. the thing is this unit is not a surface mount it is one of the metal hole mounts. so for $40 i got one light with a million LEDs and the rubber grommet (Crucial) and the pigtail. i went home and took my bike all apart and then i did the unthinkable, i used a coping saw and a drill to cut out almost all of the reflector. that way i could use the rubber grommet to mount the light just like in the metal side of a dump truck. as much as i liked the idea of retaining stock revertability and putting the LED on the inside of the light, i am WAY more pleased with the super clean professional look that mounting it with the rubber grommet gives it. it was a tight fit to put the light back together but if you get the glue good and warm it isn't so bad. while it is really scary to be cutting apart the $77 factory lens assembly the difficulty of the mod isnt bad. i have included a picture of me holding the lens. what you can see it the backside, of the LED with the white part being the back of the LED. these are DOT approved stop and tail lights so you cant get into any trouble. happy modding


Senior Member
Superstock
Joined: Mar 2007
Posts: 268
From: San Diego
Installed the plate lights yesterday. They look nice, not blue tinted. To the eye it actually looks a little warmer than the lexus lights, it may just be me. I still like it better though.
I realized that even though the kelvin ratings are the same through different LED assemblies, colors can be different. That light bar was rated at 4500k. It appears to be closer toward 3000k. The high power WHP light was rated at 4500k, but looks much cooler than this.


I realized that even though the kelvin ratings are the same through different LED assemblies, colors can be different. That light bar was rated at 4500k. It appears to be closer toward 3000k. The high power WHP light was rated at 4500k, but looks much cooler than this.
Last edited by Anto; Jul 15, 2008 at 02:37 AM.


Senior Member
SuperBike
Joined: Nov 2007
Posts: 1,216
From: Westerly, RI
Steve, he mentioned this on the previous page. There is plenty of sealant left. Re-heat and stick the lens back in. If you want to use extra he uses the Nissan sealant.
I just did this today. Very easy. About an honest hour and you're done.
Can't believe how simple it was.
Thanks Hak, informative and simple write-up.
I just did this today. Very easy. About an honest hour and you're done.
Can't believe how simple it was.
Thanks Hak, informative and simple write-up.

Thread Starter
Senior Member
SuperSport
Joined: May 2008
Posts: 702
From: Bham, AL
Steve, he mentioned this on the previous page. There is plenty of sealant left. Re-heat and stick the lens back in. If you want to use extra he uses the Nissan sealant.
I just did this today. Very easy. About an honest hour and you're done.
Can't believe how simple it was.
Thanks Hak, informative and simple write-up.
I just did this today. Very easy. About an honest hour and you're done.
Can't believe how simple it was.
Thanks Hak, informative and simple write-up.
Glad you modded yours and like it. Much safer and better looking than stock for sure!
You're very much welcome! Glad to share.

Senior Member
Back Marker
Joined: Aug 2006
Posts: 227
From: IL
I did this mod today, it worked just like the instructions said so. It was super easy, except I ran out of connectors for the wires, so I had to rig something up; because I did not want to solder them because then I would have to cut the wire in order to get the cowl off..
Next thing is to find some LED's for the license plate light.
Next thing is to find some LED's for the license plate light.
Thread Starter
Senior Member
SuperSport
Joined: May 2008
Posts: 702
From: Bham, AL
I did this mod today, it worked just like the instructions said so. It was super easy, except I ran out of connectors for the wires, so I had to rig something up; because I did not want to solder them because then I would have to cut the wire in order to get the cowl off..
Next thing is to find some LED's for the license plate light.
Next thing is to find some LED's for the license plate light.


