
Installing a FH020AA Regulator / Rectifier


Thread Starter
Administrator
MotoGP
Joined: Apr 2006
Posts: 4,402
From: Kempner, TX

Installing a FH020AA Regulator / Rectifier
I won't jack this thread any more after this, but, yes, I can do all of those things.... later though. You're just replacing your wires with new wires? Everywhere, or just for the charging system?
I know somewhere Tweety said that he added extra fuses and grounds. Upgrading the wiring has very little "bling" factor so you don't hear much about it around the interwebs...
I know somewhere Tweety said that he added extra fuses and grounds. Upgrading the wiring has very little "bling" factor so you don't hear much about it around the interwebs...
I thought I did a write up.. but do not see it now.
The basics are.. replace the OEM R/R with another, OEM style. The HOW is the variable as well as the what R/R to use.
My requirements were a commonly available R/R, of MOSFET design, one known for long life, priced reasonable, used modern style sealed plugs which could be bought as repair/replacement parts and of course fit in the space available.
For me this turned out to be a FH020AA from a 09 Yamaha YZF R1.
The VTR stator is only capable of about 23 amps, so a FH012 which is a 35 amp rated unit is more then capable of handling the VTR charging needs.
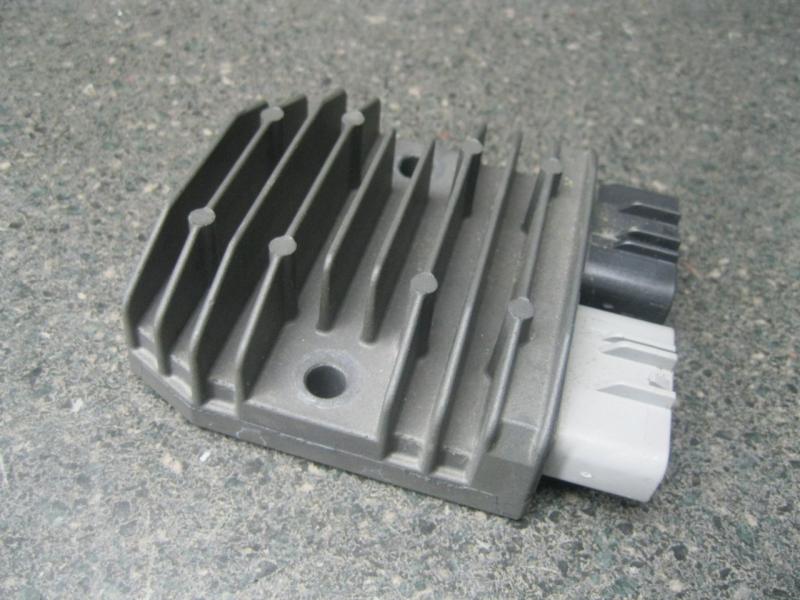
I like this model R/R because it has a smaller lower profile fin design then others, it has separate battery charge plug and stator wire plug as well as it meets all the other requirements above.
At this point you have a few choices on the HOW.
Some have used crimp on spade connectors and just plugged right in to the R/R. I'm sure this works, but it is not the most stable, nor weathertight way to make the connection. It also does not address the smallish charge wire used in the OEM system, nor the multiple connections the ground wire has in the system, or even the fact the wires on a 1997 (yes my MY1998 VTR was built July 1997) has over the years had some amount of tarnish, corrosion built up, and a higher resistance has been noted.
You can buy an almost complete wiring package at Eastern Beaver for relatively cheap.. Have to make only a few basic connections and you're done. If you're pressed for time, not comfortable with crimping small terminals, using heat shrink tube, have the tools required to get the job done right.. buy a kit..message me, I know a guy...lol
I do not recommend buying the adapter plug that allows you to mate a new style FH010 type R/R directly to your OEM R/R plug. For a few reasons, one the OEM plug is not a sealed design, front or back. Two, that OEM plug has some amount of corrosion on the terminals from being exposed since new.. as do the wires where they are crimped,, it is very difficult to get that clean.. as corrosion tends to wick it's way under the insulation any place it's open, like at the crimp. Three, the charge wire used in the OEM system, is not sufficient in size for a larger R/R or any time any connection in the system is degraded (like happens over time)
So, New OEM style sealed Furukawa connectors can be had from Cycle Terminals or Corsa Technic

Add to that, some new marine grade wiring from the R/R direct to the battery (more on that later) and one additional ground from the R/R and you have a very robust system that charges at peak voltage, does not over heat the R/R, fits in the stock location, uses common parts available cheaply and can be assembled at most any home garage with just a few simple tools. The crimper's being the only tool most will not have on hand.
So about that wiring... Marine grade wire.. typically is designed to resist corrosion by having each wire strand tinned and the insulation is abrasion and chemical resistant. This wire can be had by the foot at better automotive supply stores IF THEY KNOW WHAT TO ORDER for you... Took me three attempts at a local shop to get the right wire.. Last time I just went online and ordered two spools... Ancor brand is a known commodity, not saying its the "best" just that I know for sure what it is, the insulation, wire type ect..where as if you by from some random Ebay seller its a toss up, and buyer beware.
Make sure you install the connectors and silicone wire seals correctly on the wires.


Quality wire, all joints covered in dielectric silicone and heat shrink tube, all wires routed in split loom or other outer covering, and fixed in place with zip ties or cable clamps should keep the issue of a damaged wire grounding, But... makes your choices, take your chances.
For sale Superhawk Mosfet Kit FH020AA
Last edited by E.Marquez; Oct 18, 2018 at 06:48 AM.


Thread
Thread Starter
Forum
Replies
Last Post
superbling
Knowledge Base
46
Mar 10, 2008 03:02 PM
inderocker
Technical Discussion
6
Dec 26, 2005 01:00 PM


