
It has begun! G35 HID projector retrofit....


Thread Starter
Senior Member
SuperSport
Joined: May 2008
Posts: 702
From: Bham, AL

Received my used in good condition headlight from clarkswebb the other day (thanks again!).
I will post pictures of the process just like I did on my LED tail retrofit. Please stay tuned as it should get exciting over the next few days as I tackle this project. I will take some preliminary beam pattern shots tonight in a little while.
Components used:
G35 is a bi-xenon projector meaing I'll have both low and high beam functionality with only one source of light (bulb). A must IMO for the SuperHawk since it originally comes with one H4 low/high beam halogen bulb.
On with a few teaser pics of the process so far....
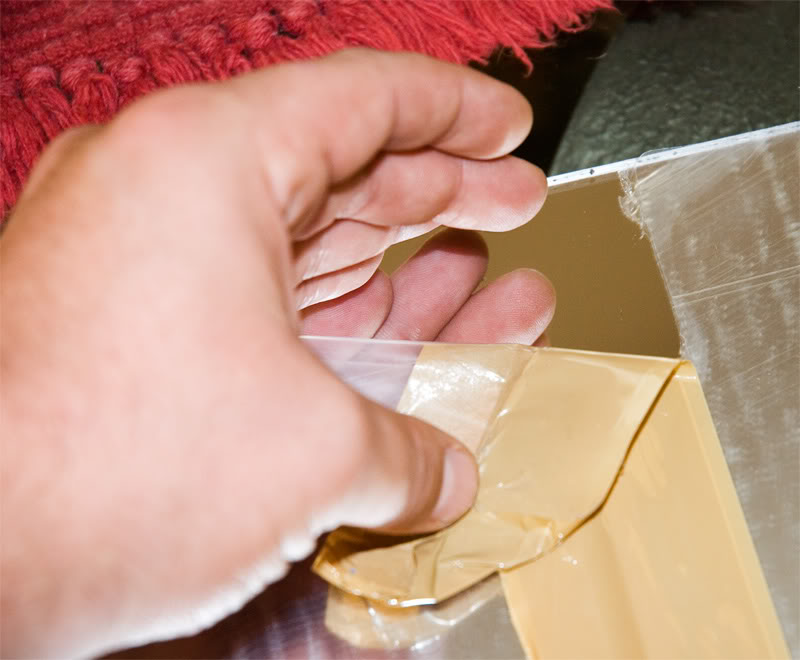
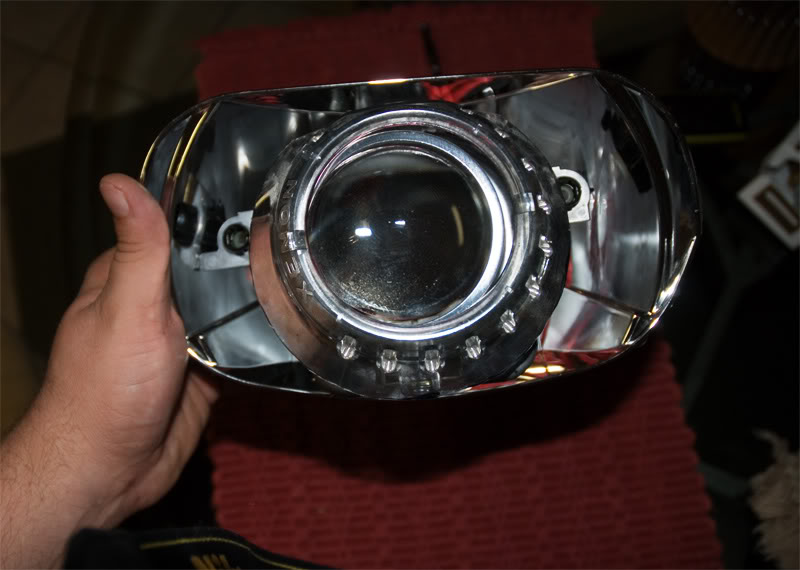
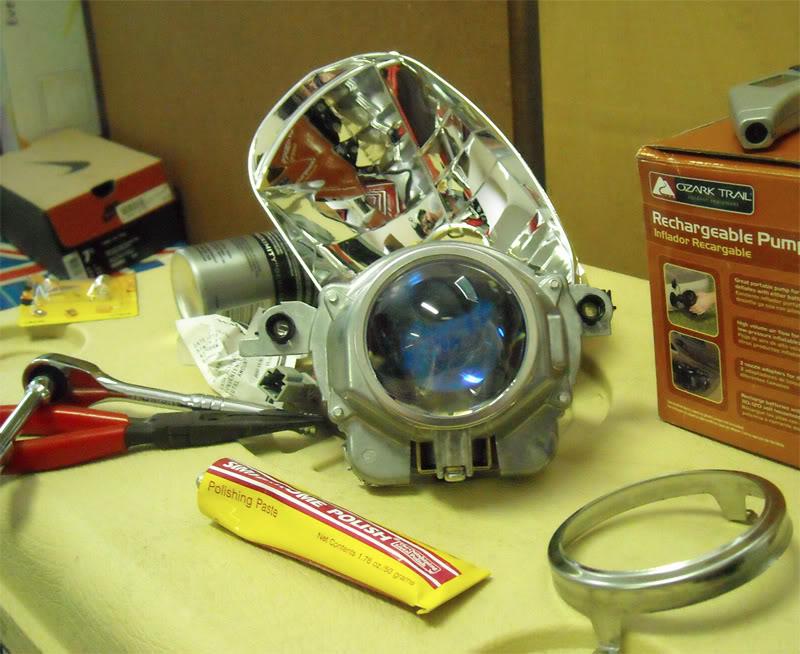
Here is the headlght, projector, shroud, and a sheet of mirrored acrylic...

Here is a close-up of the mirrored acrylic after I pulled the protective backing off....
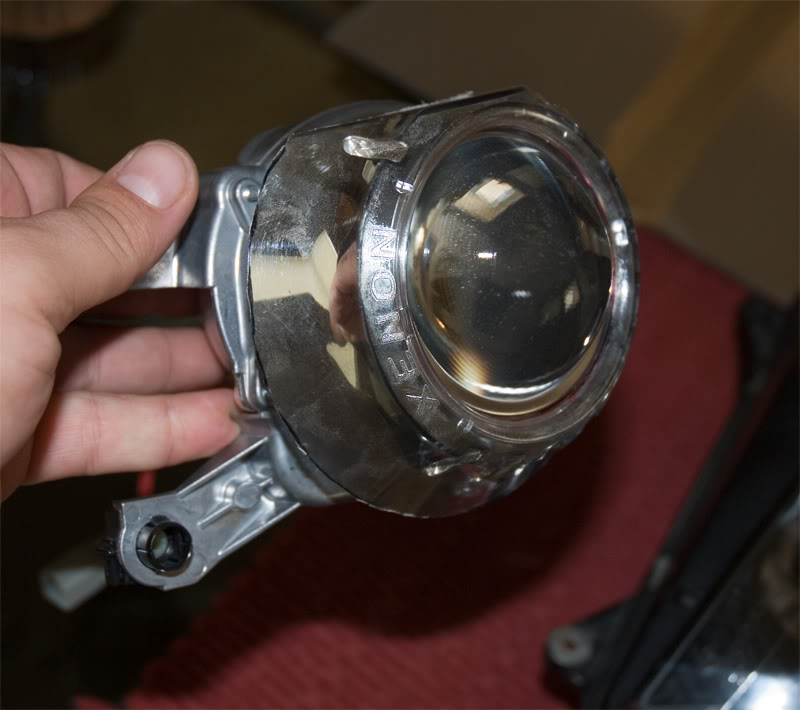
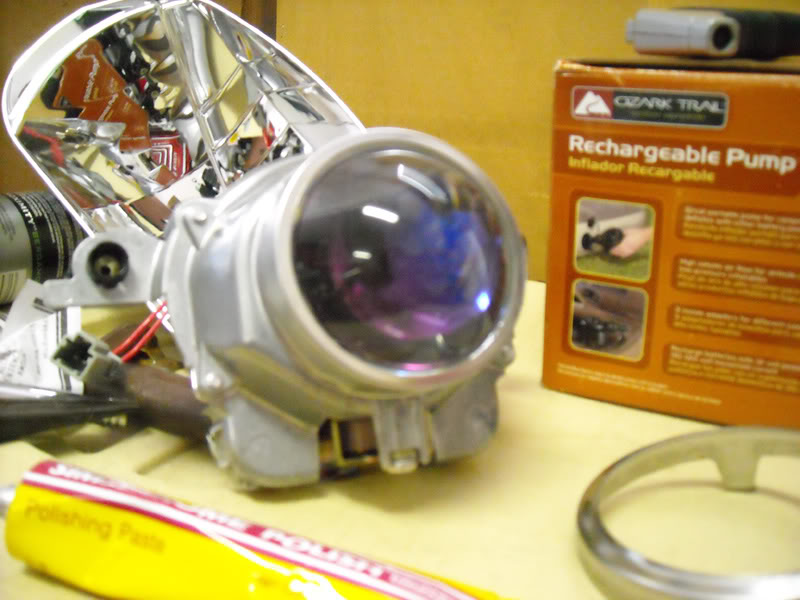
Here is my VERY used and abused shroud sitting on the projector. The shroud will have to have its inner opening diamter enlarged to accomidate the G35 lens holder diameter. Dremel FTW....
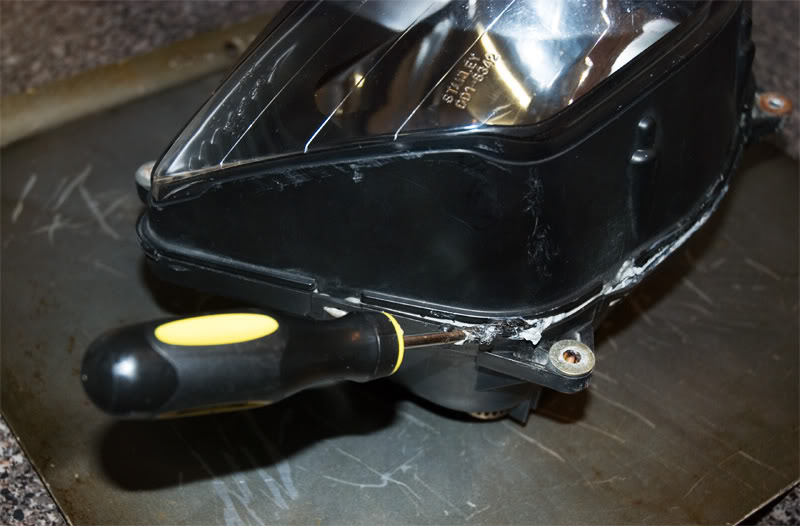
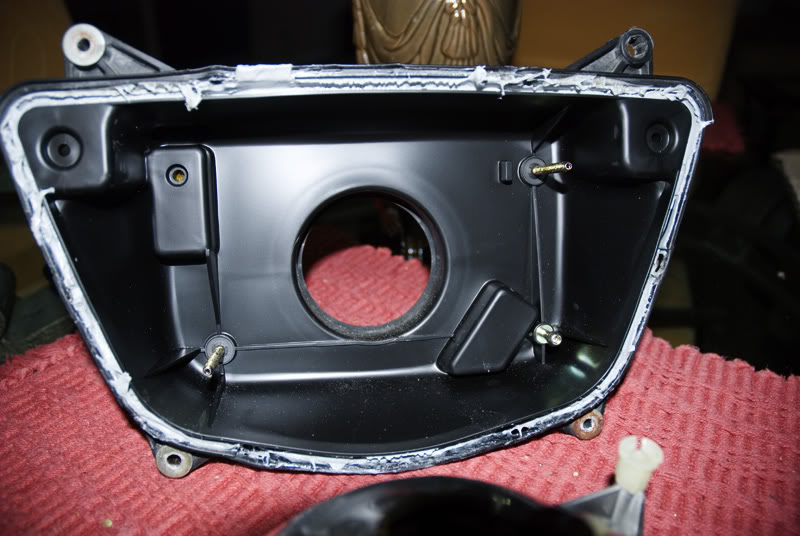
Here is the initial stages of opening the stock headlight. You basically open it with heat just like I explain in the LED retrofit thread. Go along the "seam" of the lens cover half and the rear housing half with a heat gun, hair dryer, oven method, etc. Use a screwdriver to carefully and slowly work your way around the headlights seam...
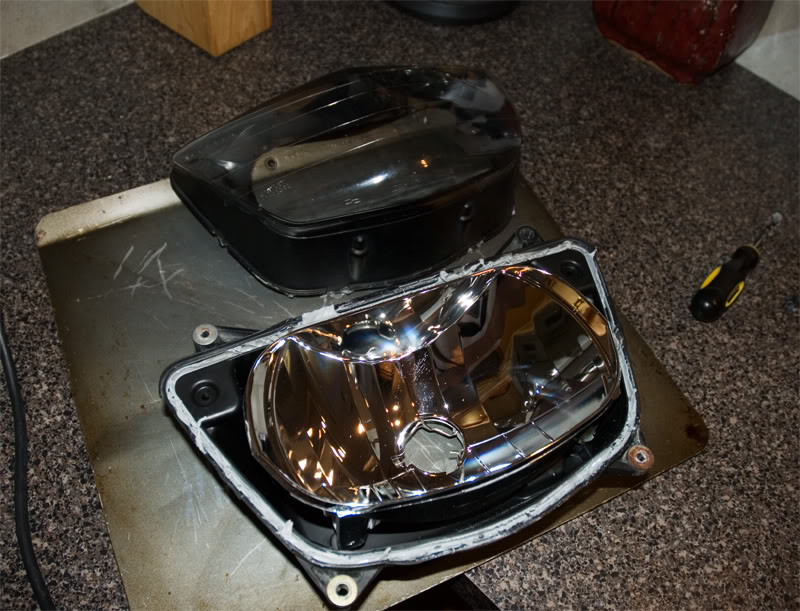
After some coaxing she's got her guts exposed....
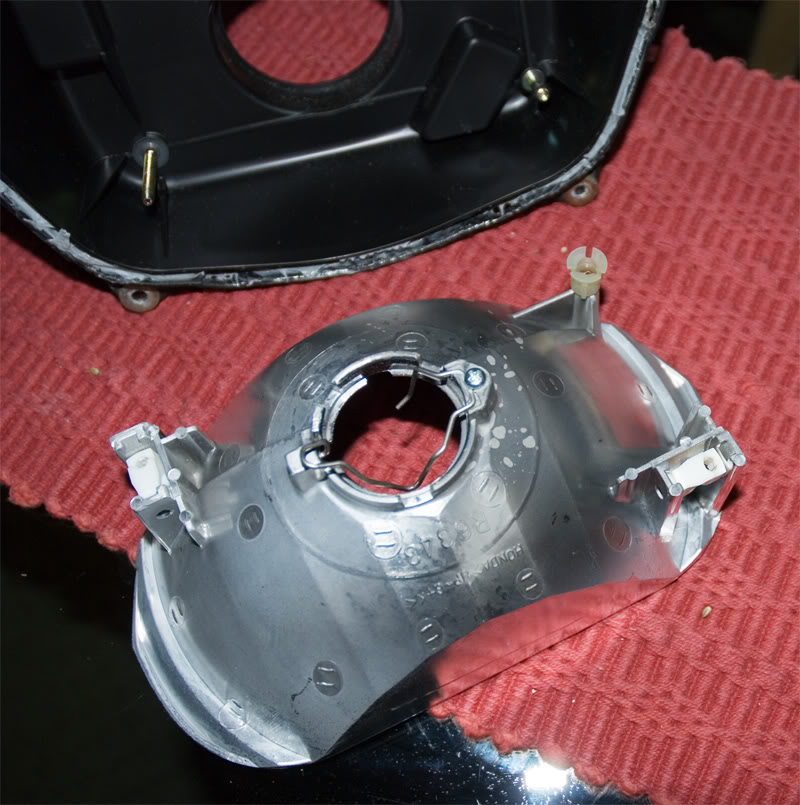
More carnage. To remove the stock halogen reflector from the rear housing you loosen the two diagonal aiming bolts from the rear. Loosen one for a little bit then move to the other. Then repeat until you slowly and equally have loosened the bolts all the way backed out from the halogen reflector. Then there is one plastic piece that pops onto a shaft with a round end. This just pops loose. Should look like this now....
Rear housing
rear of the halogen reflector
This is a rough attempt to give you a slight idea of what this will kind of look like when I'm done. You might need beer goggles to help this process...
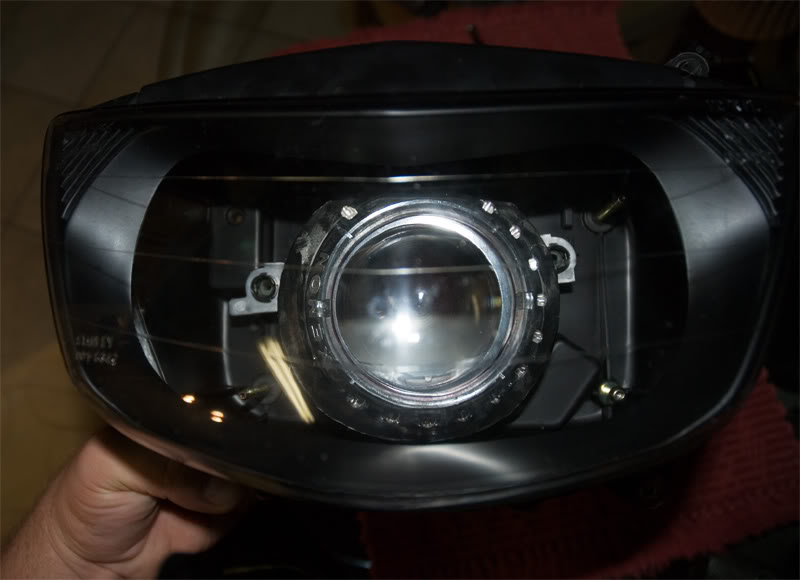
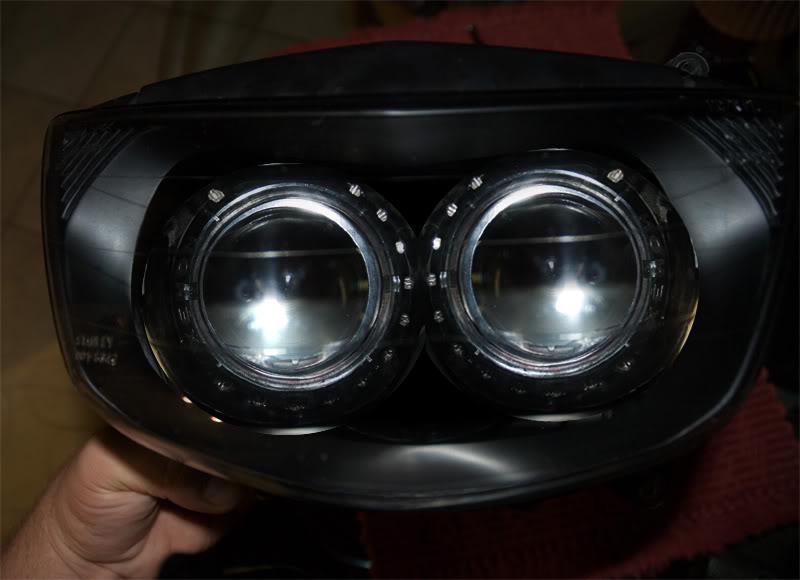
Here I'm again attempting to give you an idea. Here I'm loosely placing the projector and shroud in the halogen reflector. Keep in mind the halogen reflector will be trimmed considerably to allow the projector to sit far enough back and be bolted securely. As you can see by the reflection in the halogen reflector, the projector shroud does not fully cover the projector and its mounting areas. This is where the mirrored acrylic backplate will come in.
Beam shots to come tonight so stay tuned fellas!
I will post pictures of the process just like I did on my LED tail retrofit. Please stay tuned as it should get exciting over the next few days as I tackle this project. I will take some preliminary beam pattern shots tonight in a little while.
Components used:
- OEM Infiniti G35 bi-xenon projector
- OEM used headlight
- OEM BMW E46 shroud
- mirrored acrylic
- OEM Philips D2S 4300k bulb
- OEM Hella Gen 3 ballast
G35 is a bi-xenon projector meaing I'll have both low and high beam functionality with only one source of light (bulb). A must IMO for the SuperHawk since it originally comes with one H4 low/high beam halogen bulb.
On with a few teaser pics of the process so far....
Here is the headlght, projector, shroud, and a sheet of mirrored acrylic...
Here is a close-up of the mirrored acrylic after I pulled the protective backing off....
Here is my VERY used and abused shroud sitting on the projector. The shroud will have to have its inner opening diamter enlarged to accomidate the G35 lens holder diameter. Dremel FTW....
Here is the initial stages of opening the stock headlight. You basically open it with heat just like I explain in the LED retrofit thread. Go along the "seam" of the lens cover half and the rear housing half with a heat gun, hair dryer, oven method, etc. Use a screwdriver to carefully and slowly work your way around the headlights seam...
After some coaxing she's got her guts exposed....
More carnage. To remove the stock halogen reflector from the rear housing you loosen the two diagonal aiming bolts from the rear. Loosen one for a little bit then move to the other. Then repeat until you slowly and equally have loosened the bolts all the way backed out from the halogen reflector. Then there is one plastic piece that pops onto a shaft with a round end. This just pops loose. Should look like this now....
Rear housing
rear of the halogen reflector
This is a rough attempt to give you a slight idea of what this will kind of look like when I'm done. You might need beer goggles to help this process...
Here I'm again attempting to give you an idea. Here I'm loosely placing the projector and shroud in the halogen reflector. Keep in mind the halogen reflector will be trimmed considerably to allow the projector to sit far enough back and be bolted securely. As you can see by the reflection in the halogen reflector, the projector shroud does not fully cover the projector and its mounting areas. This is where the mirrored acrylic backplate will come in.
Beam shots to come tonight so stay tuned fellas!
Last edited by haknslash; Jul 30, 2008 at 06:31 PM.

Dances with Guardrails
Squid
Joined: Apr 2007
Posts: 88
From: Knoxville, TN
Sweet. I never knew that there was a "bi-xenon".
I am running the 65w H4, it is pretty impressive. I've yet to try the 85w, the vendor says he doubts the wiring and stator will handle it.
Please show us more when it is available! I love "garage experiments"!!!
I am running the 65w H4, it is pretty impressive. I've yet to try the 85w, the vendor says he doubts the wiring and stator will handle it.
Please show us more when it is available! I love "garage experiments"!!!

Thread Starter
Senior Member
SuperSport
Joined: May 2008
Posts: 702
From: Bham, AL
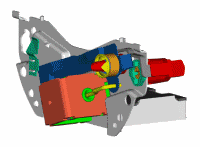
Yup bixenon works by basically having a moving shield inside the projector via a electro-magnetic solenoid. The moveable shield is the low beam pattern shield and when its activated via the high beam switch, it will move out of the way (down) and expose the high beam pattern shield.
Similar to this animated gif....
You wil defintiely need to run a relay if you plan to keep your bikes wiring in check and not fry something like the switch, or worse.
Similar to this animated gif....
You wil defintiely need to run a relay if you plan to keep your bikes wiring in check and not fry something like the switch, or worse.
Thread Starter
Senior Member
SuperSport
Joined: May 2008
Posts: 702
From: Bham, AL
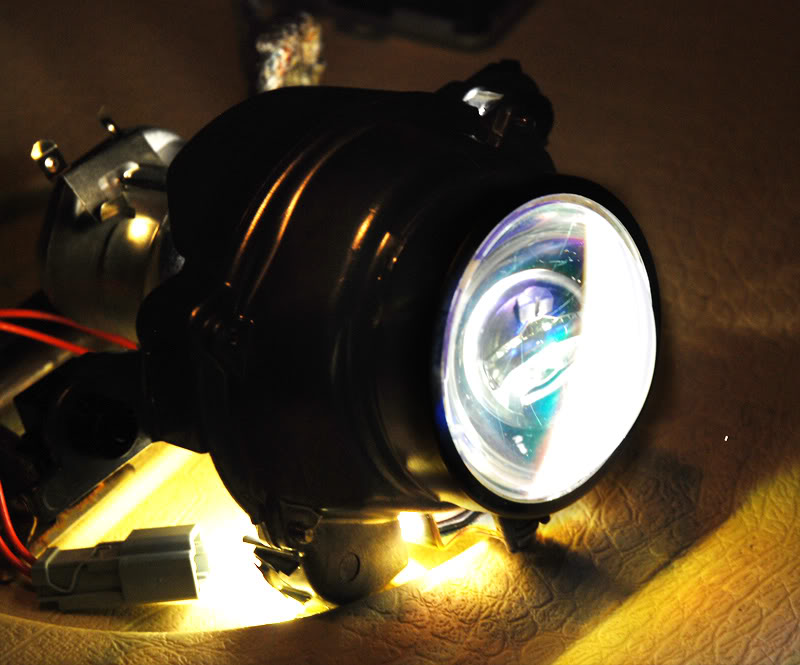
Few initial test fires...
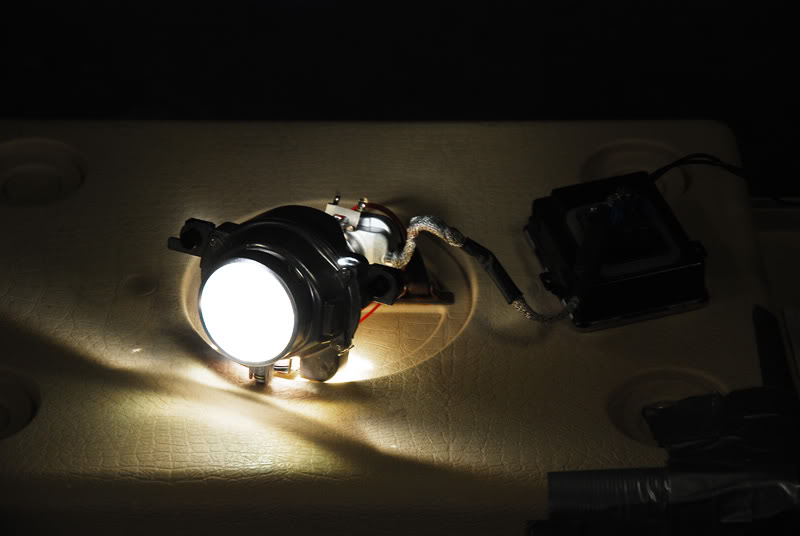
This one was with the bike turned on running Silverstar 55w/65w bulbs. Big difference in output, intensity, and width. Should make night riding much safer and fun! The stock superhawk lighting sucks!
This one was with the bike turned on running Silverstar 55w/65w bulbs. Big difference in output, intensity, and width. Should make night riding much safer and fun! The stock superhawk lighting sucks!

Senior Member
Superstock
Joined: Mar 2007
Posts: 268
From: San Diego
NICE.
i wanna see how you use that mirrored acrylic. havent been on the forums in a bit so its new to me.
ballast placement should be interesting, theres not much space for one, hellas are square so it should be easy.. where are you planning on mounting it? inner fairing?
i wanna see how you use that mirrored acrylic. havent been on the forums in a bit so its new to me.
ballast placement should be interesting, theres not much space for one, hellas are square so it should be easy.. where are you planning on mounting it? inner fairing?
Thread Starter
Senior Member
SuperSport
Joined: May 2008
Posts: 702
From: Bham, AL
I knew you'd chime in 
Actually won't be using a Hella G3 afterall. Seems it has died. Typical luck for me and electronics. That is what happens when you let electronics sit for too long haha. The ballast used in these pics was a Mitsubishi ballast I believe. Not completely sure.
As for ballast placement, I'm not sure. The Mitsu ballast is not shielded!! I found that out by the ballast resting on my bike frame test firing LOL!!! Yeah not much room and whatever I do I will have to get an enclosure from radio shack or usplastics so that I can protect and mount the ballast(s). Ignitor wiring is only about 6-9 inches on this ballast . Gonna be tight LOL.
I played around with some mirrored acrylic on a Neon retro. Ended up not using it as I was able to mount from the rear of the reflector but it would of came out pretty cool IMO had I finished it. Who knows how this one will turn out. Over on the forums they are trying to talk me inot using both G35's LOL. We'll see. I'm not going to rush this but I should have my mind made up by tomorrow night wether I'll be using one or both projectors. I was also thinking of buying some 55w ballasts but that will be later on, if I decide on it.
Actually won't be using a Hella G3 afterall. Seems it has died. Typical luck for me and electronics. That is what happens when you let electronics sit for too long haha. The ballast used in these pics was a Mitsubishi ballast I believe. Not completely sure.
As for ballast placement, I'm not sure. The Mitsu ballast is not shielded!! I found that out by the ballast resting on my bike frame test firing LOL!!! Yeah not much room and whatever I do I will have to get an enclosure from radio shack or usplastics so that I can protect and mount the ballast(s). Ignitor wiring is only about 6-9 inches on this ballast
I played around with some mirrored acrylic on a Neon retro. Ended up not using it as I was able to mount from the rear of the reflector but it would of came out pretty cool IMO had I finished it. Who knows how this one will turn out. Over on the forums they are trying to talk me inot using both G35's LOL. We'll see. I'm not going to rush this but I should have my mind made up by tomorrow night wether I'll be using one or both projectors. I was also thinking of buying some 55w ballasts but that will be later on, if I decide on it.
Last edited by haknslash; Jul 30, 2008 at 08:01 PM.
Thread Starter
Senior Member
SuperSport
Joined: May 2008
Posts: 702
From: Bham, AL
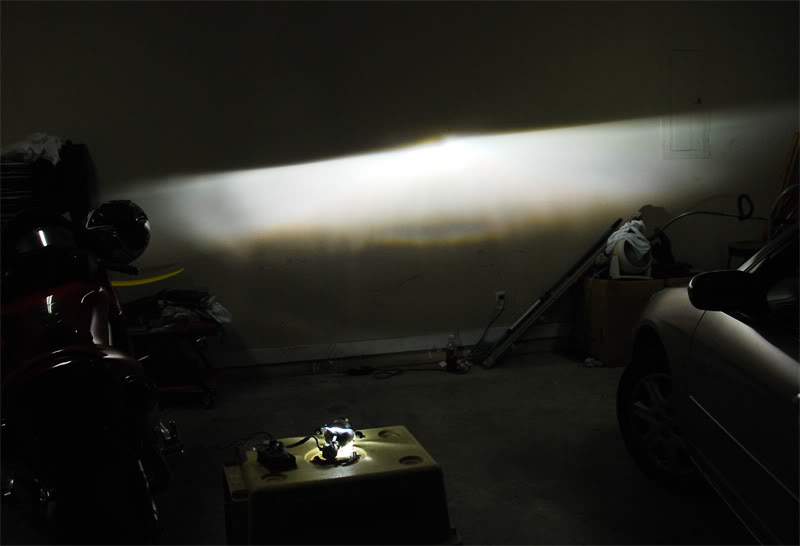
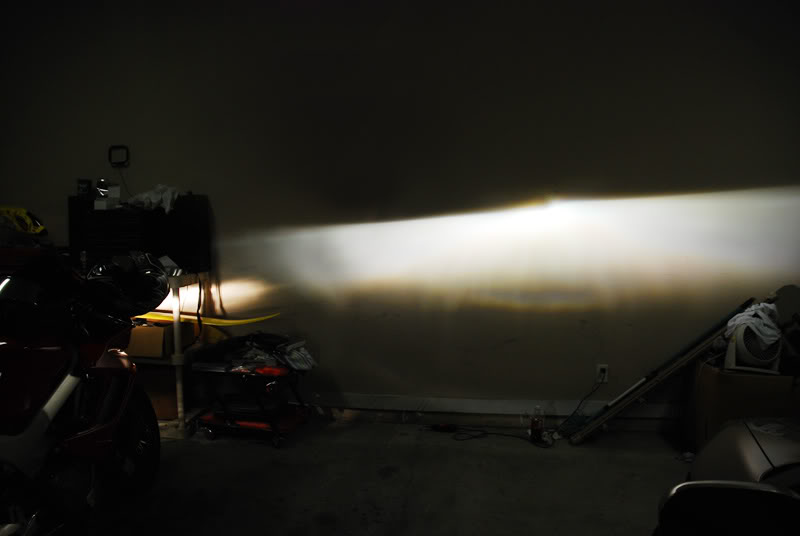
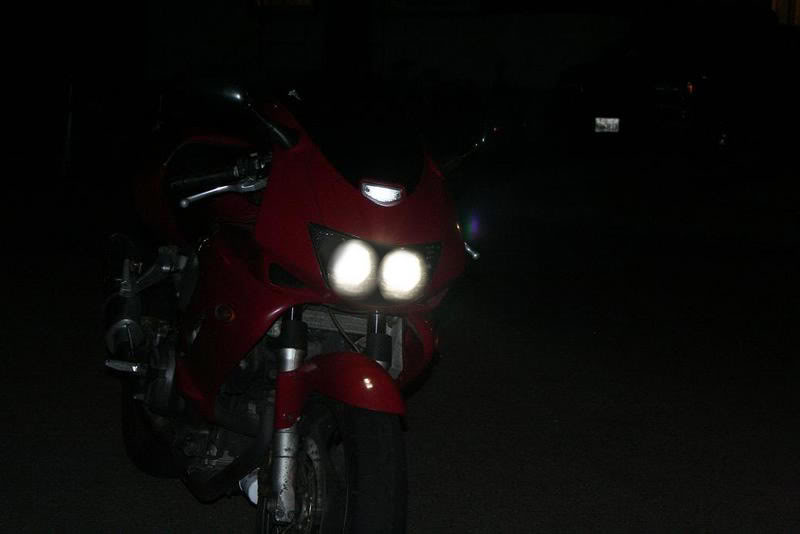
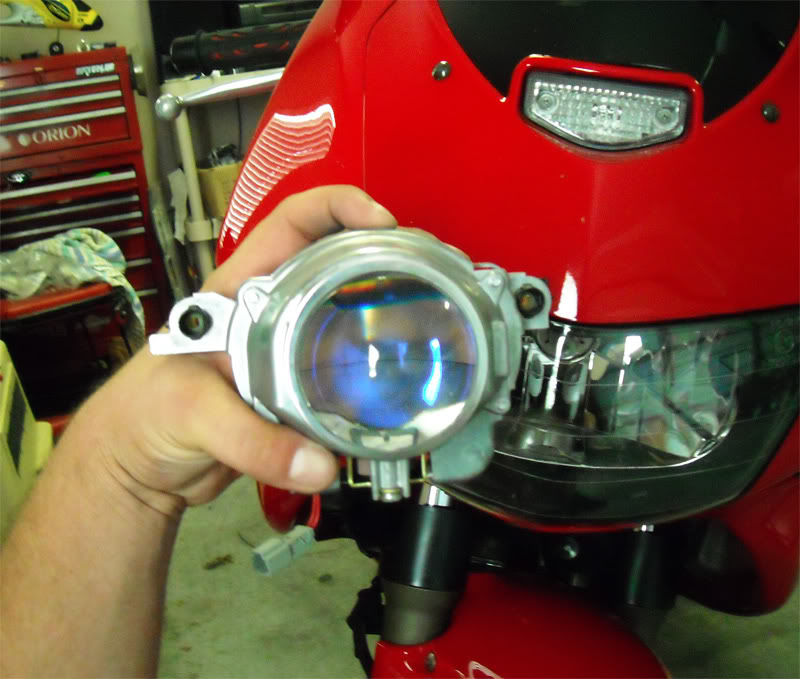
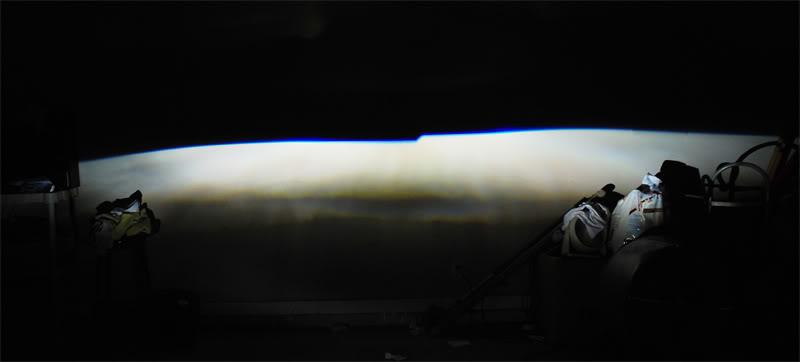
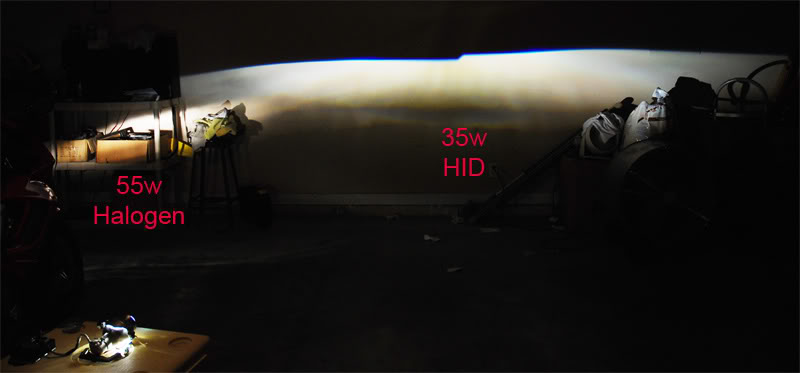
The last pic above didn't really give you an idea so here are some better comparison shots, granted they are underexposed but I'm tired and don't feel like dragging out the tripod and crap LOL. The projector was placed just further back from the halogen headlight on the bike for reference.
Halogen low beam vs HID low beam...
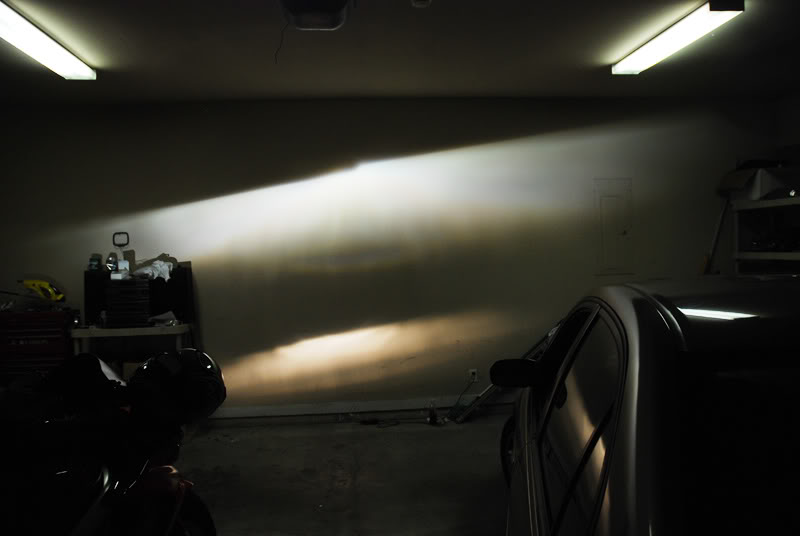
Different angle...
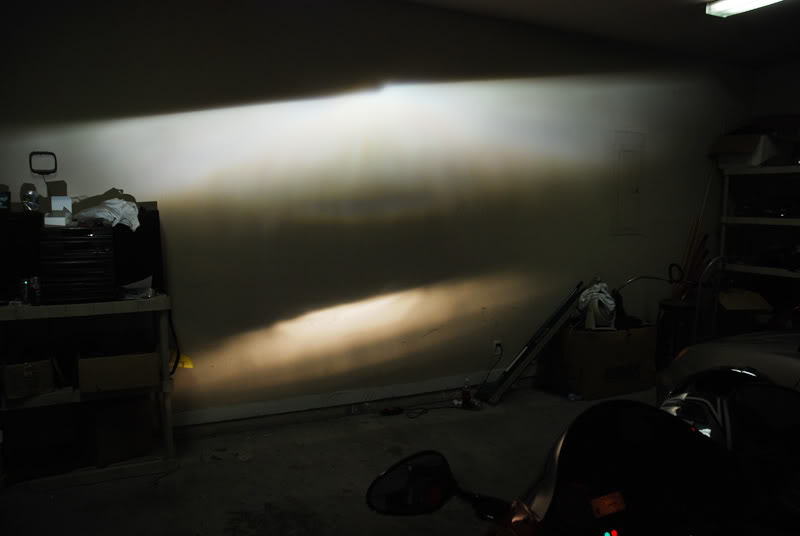
Halogen high beam vs HID low beam...

Halogen low beam vs HID low beam...
Different angle...
Halogen high beam vs HID low beam...
Thread Starter
Senior Member
SuperSport
Joined: May 2008
Posts: 702
From: Bham, AL
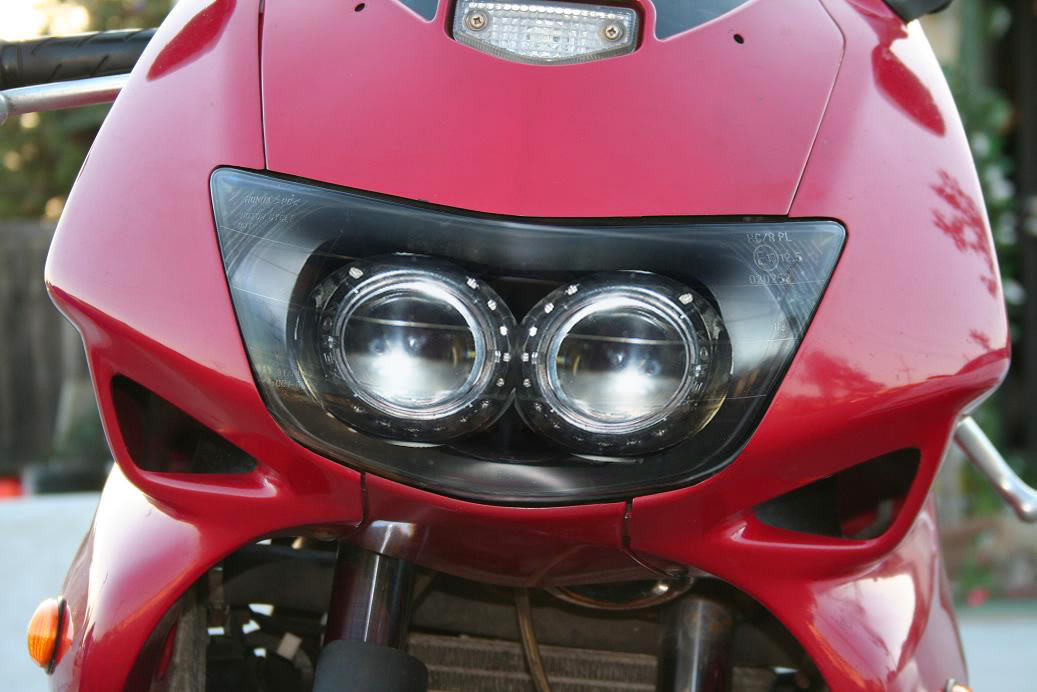
Ok here is a rough photoshop of what two in there would look like and painted gloss black. Reminds me of wall-e or Johnny-5. Tough choice between that and cyclops LOL. I'm not too keen on having the many holes drilled in the rear housing though. Decisions....decisions.
What do you guys think?
What do you guys think?


 .
.
Thread Starter
Senior Member
SuperSport
Joined: May 2008
Posts: 702
From: Bham, AL
Dances with Guardrails
Squid
Joined: Apr 2007
Posts: 88
From: Knoxville, TN
The brief moments of ignition is the only time that an HID creates more draw than halogen. I don't know how much higher the draw is during ignition, but it is significant. After ignition, the amperage that an HID pulls ramps down fairly rapidly, to well below the 55w draw of the stocker. On my XX, which I retro'd with an HID bulb in the low-beam position, I did not have to put it on a relay or even increase the fuse amperage on the headlight circuit. Perhaps the load is brief enough and the stock system overengineered sufficiently to allow for it. It would be different running two HIDs at once, though - and I suspect that a dedicated unit made by an automaker is of better quality and probably pulls more than the Chinese bulb/igniter setup I have. Maybe a delayed start for the second HID?
Many other folks doing HID retros on bikes are installing euro headlight switches so that the light doesn't come on with the key, then off during the engine start, then back on after the engine starts. HIDs are sensitive to multiple starts, and have a fixed number of ignitions before failure. Euro light switches have an "off" position that prevents this - if you remember to shut the lights off before starting the bike (and remember to turn them on before you ride).
If you don't have an ammeter that will handle the load (many on multis only run to 10a), you could insert an inline fuse holder and grab a fuse assortment - start with a 30a and work your way down until you get one that blows.
Last edited by icepick; Jul 31, 2008 at 01:39 PM.
Senior Member
Superstock
Joined: Mar 2007
Posts: 268
From: San Diego
ooooh
+1 on the headlight switch, I still need to add one on my bike to shut off the HID's for startup.
I don't even know if there's enough room for duals on the hawk, the rear ignitors might hit on full lock of the handlebars, plus space issues. I'm thinking about mounting my matsushita on the inside of the fairing.. right now it's tied to the left side right below the upper triple tree on the wiring harness
Oh, I forgot to add, check your high beam switch as well. When I hit high beam, my bike takes a little bit to turn off the low beam filament and activate the high beam one. Normally you would use a diode inline with the low to high beam, but in my case, power delivery is interrupted long enough to shut the ballast off and induce a hot restrike. bad bad.
Try yours out hak - yours might not do it since it's newer.
Last edited by Anto; Jul 31, 2008 at 01:51 PM.
Thread Starter
Senior Member
SuperSport
Joined: May 2008
Posts: 702
From: Bham, AL
The brief moments of ignition is the only time that an HID creates more draw than halogen. I don't know how much higher the draw is during ignition, but it is significant. After ignition, the amperage that an HID pulls ramps down fairly rapidly, to well below the 55w draw of the stocker. On my XX, which I retro'd with an HID bulb in the low-beam position, I did not have to put it on a relay or even increase the fuse amperage on the headlight circuit. Perhaps the load is brief enough and the stock system overengineered sufficiently to allow for it. It would be different running two HIDs at once, though - and I suspect that a dedicated unit made by an automaker is of better quality and probably pulls more than the Chinese bulb/igniter setup I have. Maybe a delayed start for the second HID?
Many other folks doing HID retros on bikes are installing euro headlight switches so that the light doesn't come on with the key, then off during the engine start, then back on after the engine starts. HIDs are sensitive to multiple starts, and have a fixed number of ignitions before failure. Euro light switches have an "off" position that prevents this - if you remember to shut the lights off before starting the bike (and remember to turn them on before you ride).
If you don't have an ammeter that will handle the load (many on multis only run to 10a), you could insert an inline fuse holder and grab a fuse assortment - start with a 30a and work your way down until you get one that blows.
Nominal Input Voltage 14.0 VDC (12V battery)
Input Voltage Range 9.0 to 16.0 VDC
Input Power (steady state) <46W
Input Current (steady state) 6A @ 9V; <4A @ 14V
Input Current (starting) <20 Amps for up to 6 seconds and up to 4 Amps after ignition
Output power 35� 2W
Lamp Frequency 250 Hz Square Wave
Ignition Pulse Voltage Nominal 22KV
I have read on hid forum from riders with the lights coming on with the key. I'm not sure how much of an issue this really is. Some swear its voodoo and others brush it off. I run my SUVs lights on "auto" so its the same functionality of the bike. However if it were an issue, I'll probably just run a simple heavy duty inline switch.
After looking at the duals chop for a bit today, I'm just not sure if I like the look of it as opposed to a single bixenon. Almost seems to visually add age if I run two IMHO. Maybe its just me. As for it they would fit, they could fit I believe so long as you don't retain or reuse the stock reflector. Then most definitely it would not fit LOL.
Last edited by haknslash; Jul 31, 2008 at 02:58 PM.

Out of my mind, back in 5
MotoGP
Joined: Nov 2006
Posts: 6,109
From: Skurup, Sweden
Well I can tell you that the stock harness and switch most decidedly will NOT handle that kind of output in the long run... I melted mine with a 85W bulb... and 2*46W at steady state will most probably kill yours too... run a relay and heavy gauge wires is my advice...
Thread Starter
Senior Member
SuperSport
Joined: May 2008
Posts: 702
From: Bham, AL
Yes I always run a relay and preach on it religiously LOL
I have seen first hand what it does to a wiring and MFS system LOL.
This was not even HID related wither but a typical issues with DCX vehicles and MFS systems...


I have seen first hand what it does to a wiring and MFS system LOL.
This was not even HID related wither but a typical issues with DCX vehicles and MFS systems...
Last edited by haknslash; Jul 31, 2008 at 04:07 PM.
Thread Starter
Senior Member
SuperSport
Joined: May 2008
Posts: 702
From: Bham, AL
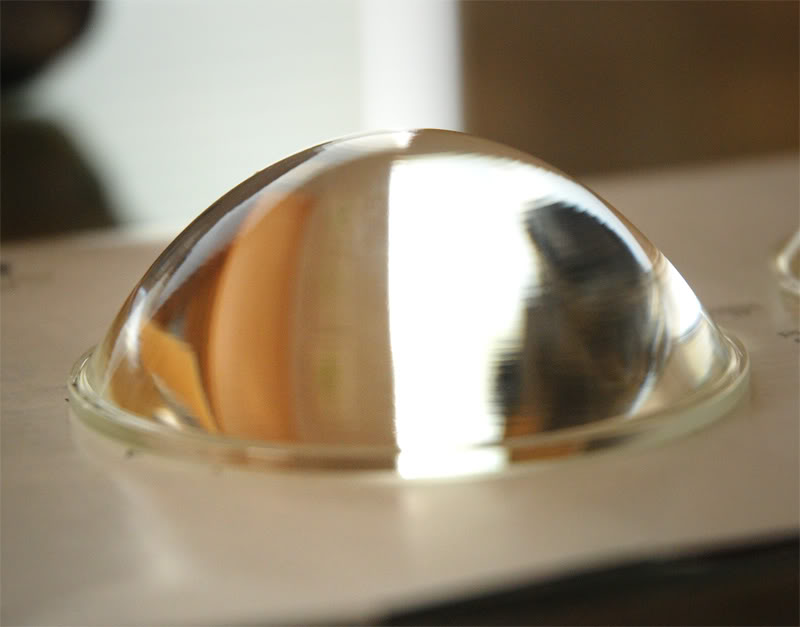
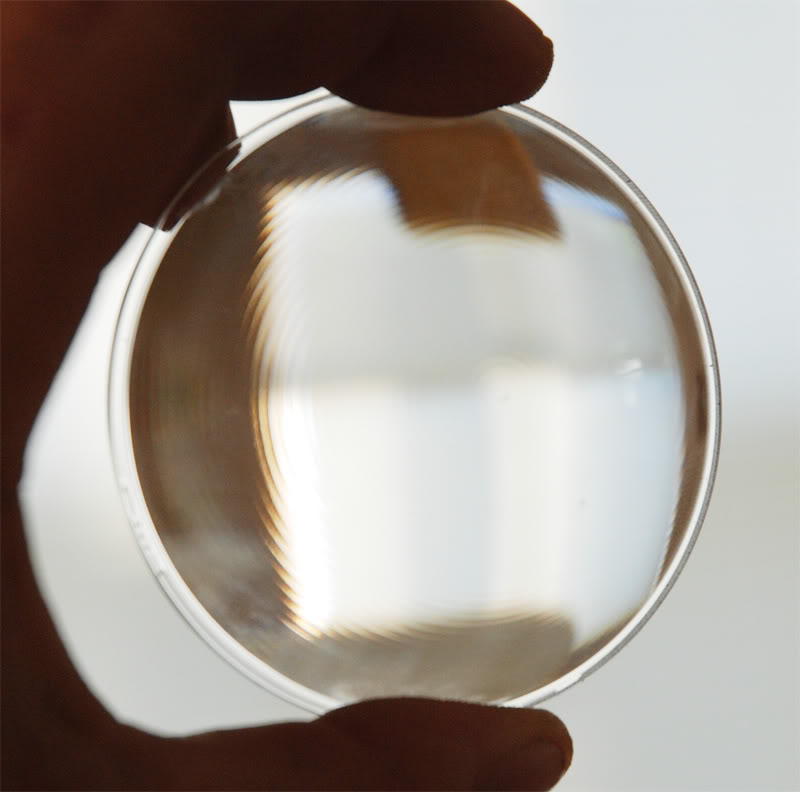
Got the clear purple lens Valeo in today. This lens will replaced the fresnel lens and increase sharpness, create vivid colorband, and increase intensity output.
Here are some initial shots comparing the two...
Stock fresnel lens
Clear lens

Stock lens
Clear lens
Stock lens
Clear lens

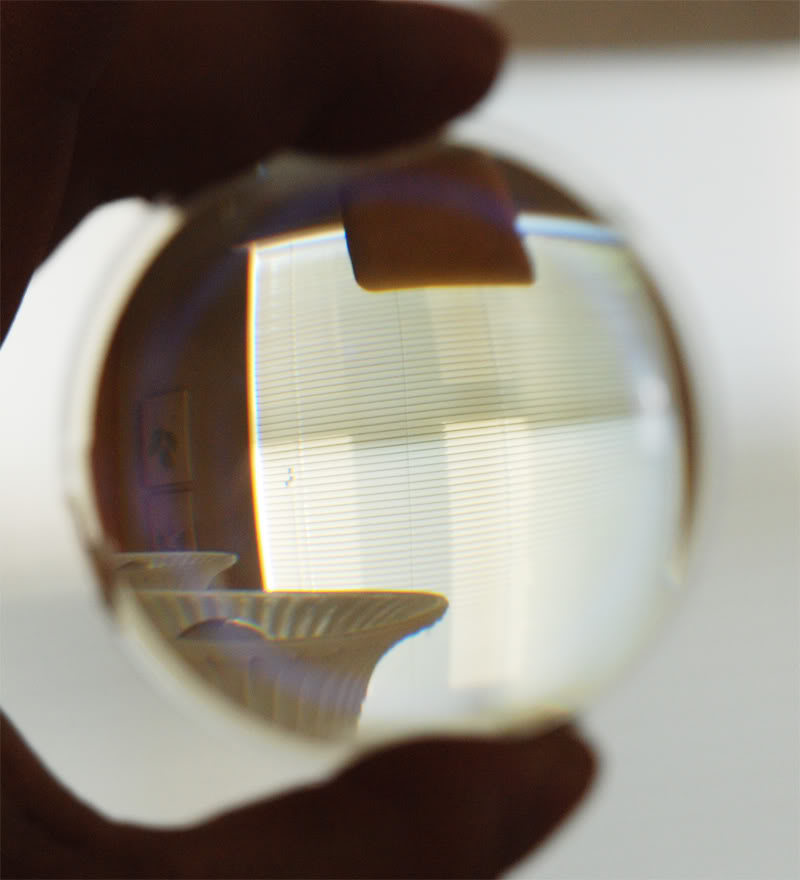
And one crazy shot thru the clear lens seeing the edge of the shield
Here are some initial shots comparing the two...
Stock fresnel lens
Clear lens
Stock lens
Clear lens
Stock lens
Clear lens
And one crazy shot thru the clear lens seeing the edge of the shield
Thread Starter
Senior Member
SuperSport
Joined: May 2008
Posts: 702
From: Bham, AL
Yeah the mountain is there ... but with tinkering with focal length / lens spacing I have seen people almost get rid of it. I'll take shots once I can work on it again. I sliced my finger pretty bad removing the lens holder.
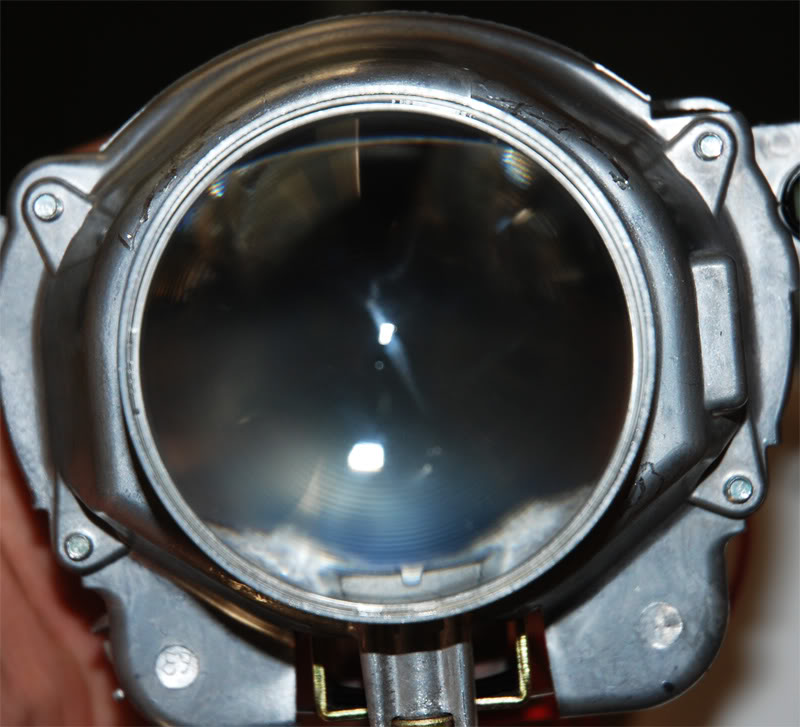
Camera flash killed the purple tint of the lens. It looks good contrasting against the red heh.
Camera flash killed the purple tint of the lens. It looks good contrasting against the red heh.
Thread Starter
Senior Member
SuperSport
Joined: May 2008
Posts: 702
From: Bham, AL
Ran into a snag. Having to wait and see if someone on hidplanet can hook me up with an aftermarket 2.5" lens holder as the stocker won't work with the new lens + gasket for colormod. Shouldn't be too much longer. Finger is healed up enough now
I've decided to run only one projector ratehr than two. Looks cleaner with one IMO. I'll run a boosted 50w ballast if I feel one @ 35w isn't enough.
Here are a few pics I snagged while out polishing on the bike. Shows the purple color without flash. Contrast looks good against the red IMO....
I've decided to run only one projector ratehr than two. Looks cleaner with one IMO. I'll run a boosted 50w ballast if I feel one @ 35w isn't enough.
Here are a few pics I snagged while out polishing on the bike. Shows the purple color without flash. Contrast looks good against the red IMO....
Thread Starter
Senior Member
SuperSport
Joined: May 2008
Posts: 702
From: Bham, AL
I tried cereal spacers and just can't get the lens holder real snug. It's snug enough to hold the lens and all but it allows me to rotate the lens at will. Not good, so off to option 2....
I bought some aftermarket 2.5" lens holders and plan to try and use the gasket E46Civic supplied me with the purple Valeo lens. These have two moutning tabs which I plan to drill and tap my front projector housing to accomidate a threaded bolt connection. This way I can us ethe spacer and "tune" the output and colorband as I tighten the bolts thus manipulating focal point and lens spacing.
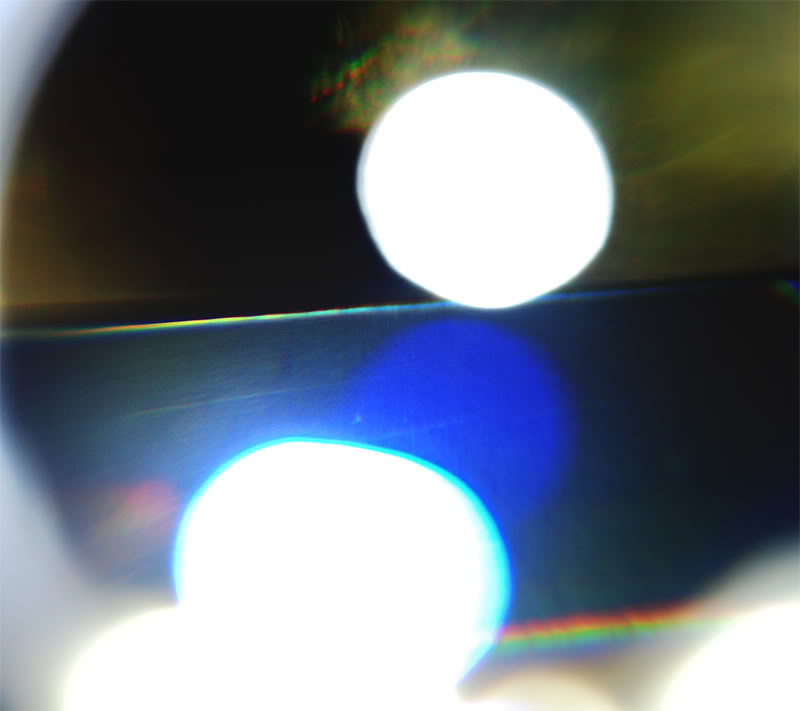
Just toying around I did some test fires with cereal spacers plus the stock lens holder. I forgot to place the seperate metal piece inside the projector and I think that is what is causing the shield to not sit in its stock location, thus the "bowing" effect.
I think though with this spacing, the output gets deminished a good bit. I'm going to have to do a good bit of trial and error on this I can tell. Need to have color, sharpness and intensity. Intensity being the most important for me though.
Here are some funny shots of the bow effect. Camera of course didn't pick up the colorband worth a crap. It has the vivid purple hues on top of the blue but its not visible.
Still working on it guys but it will soon come around once I get the output how I want it.
I bought some aftermarket 2.5" lens holders and plan to try and use the gasket E46Civic supplied me with the purple Valeo lens. These have two moutning tabs which I plan to drill and tap my front projector housing to accomidate a threaded bolt connection. This way I can us ethe spacer and "tune" the output and colorband as I tighten the bolts thus manipulating focal point and lens spacing.
Just toying around I did some test fires with cereal spacers plus the stock lens holder. I forgot to place the seperate metal piece inside the projector and I think that is what is causing the shield to not sit in its stock location, thus the "bowing" effect.
I think though with this spacing, the output gets deminished a good bit. I'm going to have to do a good bit of trial and error on this I can tell. Need to have color, sharpness and intensity. Intensity being the most important for me though.
Here are some funny shots of the bow effect. Camera of course didn't pick up the colorband worth a crap. It has the vivid purple hues on top of the blue but its not visible.
Still working on it guys but it will soon come around once I get the output how I want it.
Thread Starter
Senior Member
SuperSport
Joined: May 2008
Posts: 702
From: Bham, AL
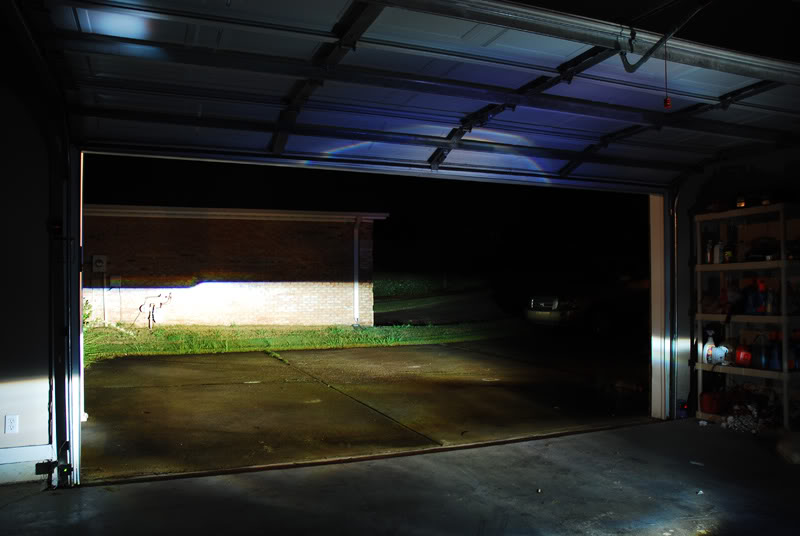
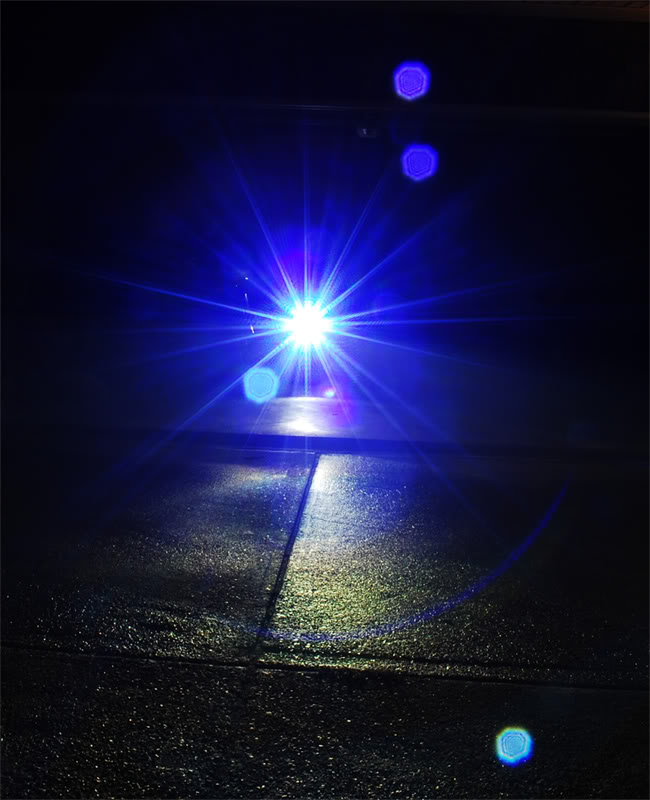
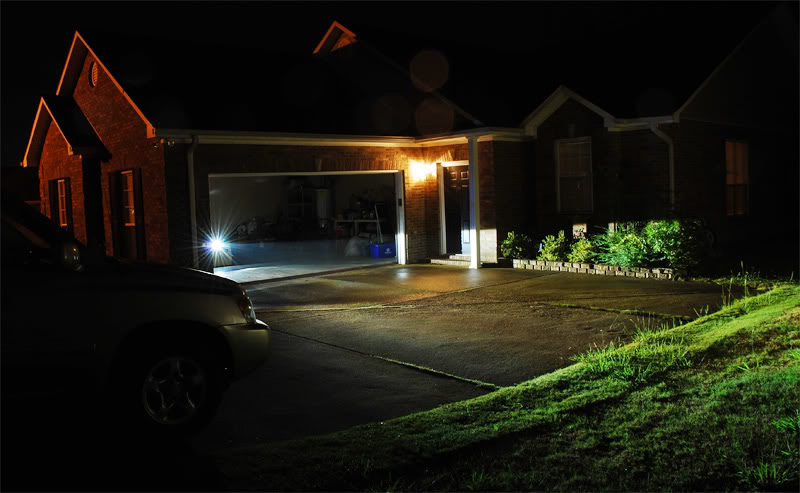
Now we're getting somewhere!!!
Here's how the projector performs now. I'm pretty please with these results. Up close within 20 ft or so the cutoff doesn't have much of a colorband. After that the beam stretches out a little and reveals a very nice, clean, and vibrant colorband. Sure to get tons of flicker and attention to the cagers! I've noticed in the process of tuning the lens spacing that I've dropped the "mountain" and picked up a cool TSX-esqe rainbow halo above the cutoff. It's faint but there. I'm sure that will play fun tricks on the eye as the bike suspension bounces lol.
This shot was about 5 ft from the wall.
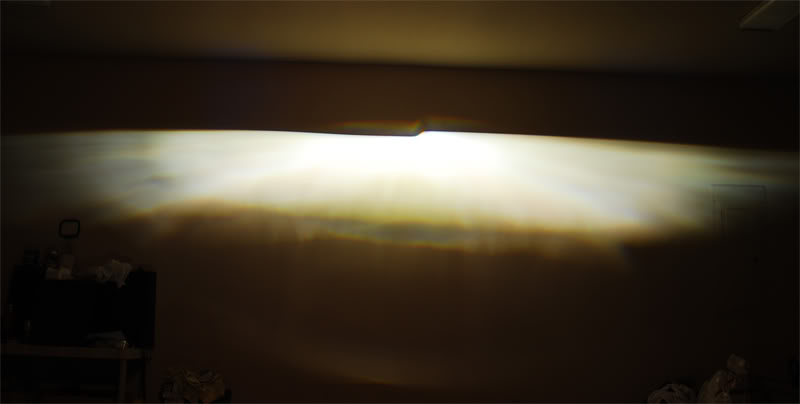
It's been raining for days due to tropical storm Fay so it's wet. Not the greatest conditions for output pics but oh well.
Look up on the garage door. Those purple hues you see are also to the upper sides of the cutoff. Comes from the purple tinted lens I suspect. I like it lol.
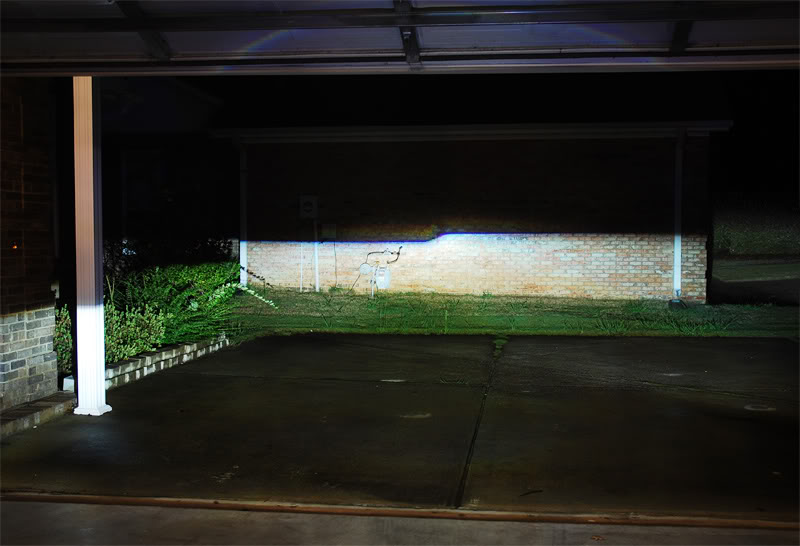
Close-up of the colorband. You can see the rainbow a little.
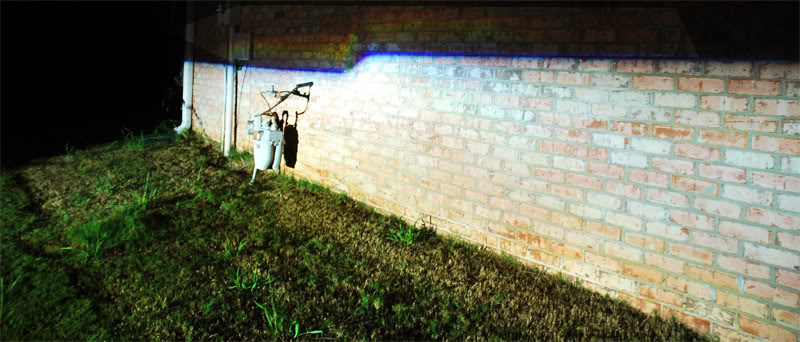
Raining on my camera lens but vibrant intensity of the colorband
Here's how the projector performs now. I'm pretty please with these results. Up close within 20 ft or so the cutoff doesn't have much of a colorband. After that the beam stretches out a little and reveals a very nice, clean, and vibrant colorband. Sure to get tons of flicker and attention to the cagers! I've noticed in the process of tuning the lens spacing that I've dropped the "mountain" and picked up a cool TSX-esqe rainbow halo above the cutoff. It's faint but there. I'm sure that will play fun tricks on the eye as the bike suspension bounces lol.
This shot was about 5 ft from the wall.
It's been raining for days due to tropical storm Fay so it's wet. Not the greatest conditions for output pics but oh well.
Look up on the garage door. Those purple hues you see are also to the upper sides of the cutoff. Comes from the purple tinted lens I suspect. I like it lol.
Close-up of the colorband. You can see the rainbow a little.
Raining on my camera lens but vibrant intensity of the colorband
Last edited by haknslash; Aug 26, 2008 at 09:30 PM.


