
HID Retrofit in progress - E46 Bixenon Projectors


Thread Starter
Senior Member
SuperSport
Joined: Dec 2008
Posts: 507
From: Arizona

HID Retrofit in progress - E46 Bixenon Projectors
So I decided to go with a Bixenon HID setup as I love the amount of light they put out and I tend to ride at night. Also it�s just some sexy looking light coming out of a bike. I am just posting to help others as well as get some feedback from you guys on how to get this done as I have never done such a thing.
So far I have the following
Shroud and bezel parts
What else needs to be done:
Get a delayed relay for the fire up process as I hear starting and stopping HID�s are not the best for the life of the setup. Stock the HID fire up when you turn the key then when you start the bike the lights will cycle off to allow all the power to the starter then fire the lights up again. The delay relay will wait for a set time after the key is turned on to fire up the lights. Plus I think it looks pretty cool to have the lights fire up after the bike is started.
As I have the Bixenon setup off a BMW with non stock ballast it will require a separate controller to control the solenoid which actuates plate in the projector to have high beams. I should be getting this setup in the next week or so from here:
http://integramod.tripod.com/product...n/bixenon.html
Complete the shroud for the projector and somehow get the thing mounted in the stock fixture. Currently I do not have another headlight to work with to prevent down time, I am currently waiting for the final purchase of another stock one. I am not sure if I jumped the gun and started making the shroud without seeing if it would even fit inside the unit. I would like to keep the functionality of the headlight adjustments on the back of the housing to fine tune alignment after it�s mounted. I would have preferred the Infinity G35 projector as it is sealed, ready to go, a lot smaller and has been used by others on the forum.
I�ll try and provide pics as I go with the project, so far this evening I had a chance to get the basic concept I had with the plumbing parts.
So far I have the following
- BMW E46 Bixenon projector
- Igniter and ballast which I am not sure are stock
Shroud and bezel parts
- Home Depot - 3 In. ABS Female Street Adapter Spigot x FIPT - Model C580323 - $3.65
- Home Depot � 3X2 ABS Reducer � $4ish
- Walmart � Travel coffee cup in the auto section for the bezel, placed in an oven for a few minutes to pull the stainless ring off of it. Found the Idea on HIDplanet.com http://www.hidplanet.com/forums/viewtopic.php?t=2822 ring is the perfect size for the E46 projector and looks great. � About $3.5ish
What else needs to be done:
Get a delayed relay for the fire up process as I hear starting and stopping HID�s are not the best for the life of the setup. Stock the HID fire up when you turn the key then when you start the bike the lights will cycle off to allow all the power to the starter then fire the lights up again. The delay relay will wait for a set time after the key is turned on to fire up the lights. Plus I think it looks pretty cool to have the lights fire up after the bike is started.
As I have the Bixenon setup off a BMW with non stock ballast it will require a separate controller to control the solenoid which actuates plate in the projector to have high beams. I should be getting this setup in the next week or so from here:
http://integramod.tripod.com/product...n/bixenon.html
Complete the shroud for the projector and somehow get the thing mounted in the stock fixture. Currently I do not have another headlight to work with to prevent down time, I am currently waiting for the final purchase of another stock one. I am not sure if I jumped the gun and started making the shroud without seeing if it would even fit inside the unit. I would like to keep the functionality of the headlight adjustments on the back of the housing to fine tune alignment after it�s mounted. I would have preferred the Infinity G35 projector as it is sealed, ready to go, a lot smaller and has been used by others on the forum.
I�ll try and provide pics as I go with the project, so far this evening I had a chance to get the basic concept I had with the plumbing parts.
Thread Starter
Senior Member
SuperSport
Joined: Dec 2008
Posts: 507
From: Arizona
I am also thinking of adding an angel eye or halo to the shroud. Of course it would be a street legal color, I dont think red is. I am thinking of doing everything in the housing a flat black except for the bezel. Im wondering if heat is going to be an issue for the ABS which will be pretty close to the bulb. I have not looked at the temp rating on the bulb yet to see how it compares to a stock hawks h4.
Thread Starter
Senior Member
SuperSport
Joined: Dec 2008
Posts: 507
From: Arizona
Looking into the delay relay right now, this video show pretty much what I am wanting. http://s76.photobucket.com/albums/j7...rent=bi004.flv
Thread Starter
Senior Member
SuperSport
Joined: Dec 2008
Posts: 507
From: Arizona


Member
Squid
Joined: Jul 2007
Posts: 56
From: Manchester UK
Ebay is your best bet i did mine about a month ago using a CLK Mercedes light that i got from ebay. The mounting lugs on the merc headlights break really easy making them useless to merc owners so they sell them really cheap got my VTR one for �40 and then got a pair of e class merc ones for �60 which i retro fitted into my car.

mildly retarded
SuperBike
Joined: Mar 2008
Posts: 1,278
From: Denver, CO
How do you go about aiming the lights properly? I look forward to seeing the completion of this thread too! I would love to do this to my hawk!
Last edited by j shizzy wizzy; Feb 25, 2009 at 07:29 AM.

Senior Member
SuperSport
Joined: May 2008
Posts: 702
From: Bham, AL
www.hidplanet.com/forums
You will find everything you need there and often cheaper, and much safer than ebay.
Not to mention a TON of info.
Senior Member
SuperSport
Joined: May 2008
Posts: 702
From: Bham, AL
The horizontal and vertical isn't that difficult. The more time consuming portion of getting the mounting right is making sure its centered on all axis, or as close as possible. Sometimes it helps to have a friend sit on the bike while you mock up your points. Soemtimes its easier for folks to do the math and mark up the projector/reflector points so it will sit even. Thankfully the VTR reflector has some lines which can aid in getting in the ballpark of things being lined up. From there you tweek tweek and tweek some more while the headlight is on and bike parked away from a flat wall. If you have a pit bull stand it will make things much easier.
The clear lens on the outside of the headlight also has a sweet spot in the center of its bend. This will help you line up the beam horizontally as well.
Thread Starter
Senior Member
SuperSport
Joined: Dec 2008
Posts: 507
From: Arizona
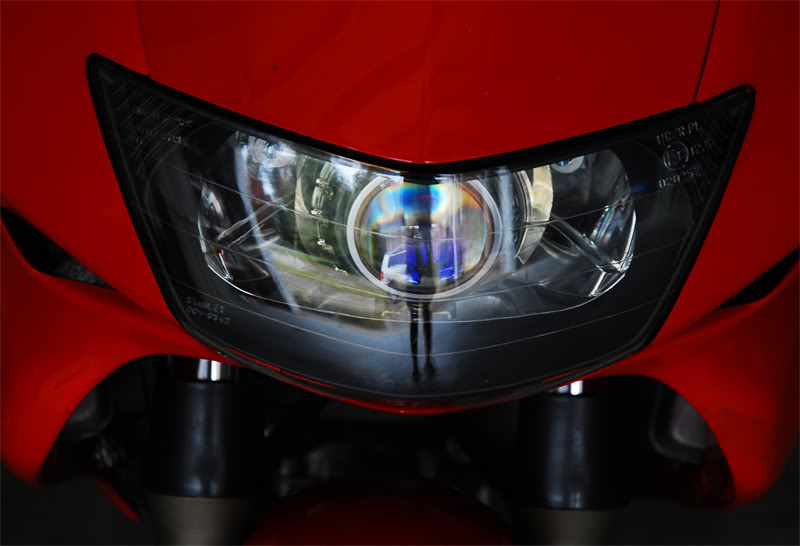
I found the solenoid is fried on the the projector but found a replacement off of ebay. A nickel here a dime here, fun. So I was wondering what the heck is with the strange angle of the cutoff.
http://www.hidplanet.com/forums/viewtopic.php?t=46359&highlight=file+flat+e46
I am debating if I should file down the high beam plate so it is either flat or perhaps a slight arch either up or down. Does this strange cutoff do anything?
http://www.hidplanet.com/forums/viewtopic.php?t=46359&highlight=file+flat+e46
I am debating if I should file down the high beam plate so it is either flat or perhaps a slight arch either up or down. Does this strange cutoff do anything?
Thread Starter
Senior Member
SuperSport
Joined: Dec 2008
Posts: 507
From: Arizona
Ok never mind after doing a little searching I discovered that cutoff is pretty well designed and is there for a reason, plus it looks like more of a pain not that I am making this more difficult. http://www.hidplanet.com/forums/viewtopic.php?t=46694&highlight=e46
Thread Starter
Senior Member
SuperSport
Joined: Dec 2008
Posts: 507
From: Arizona
My second stock headlight will be in tomorrow so I will get to start the fun part of starting to put it in the housing. I also ended up purchasing a circuit for the delay relay as opposed to making one.
http://www.tripageled.com/PAGES/hond...#HIDdelayrelay
http://www.tripageled.com/PAGES/hond...#HIDdelayrelay

Thread Starter
Senior Member
SuperSport
Joined: Dec 2008
Posts: 507
From: Arizona
Got the stock headlight in. I took a few pictures for others so they can see the dimensions in case they are thinking of doing the same and wont have to take their lights off to start planning.
Thread Starter
Senior Member
SuperSport
Joined: Dec 2008
Posts: 507
From: Arizona
After looking at a few threads on hidplanet I decided the oven method was going to be the easiest to pull the light apart.
http://www.hidplanet.com/forums/view...rature&start=0
Some people use a heat gun or hair dyer but it�s a pain I guess as the glue sets back up quickly. Wow that glue is some crazy stuff. I set the electric oven to 200 and let it preheat until the oven light shut off. I placed a wet towel on a cookie sheet and placed the light on it and put the whole thing in on a lower rack. I forgot to shut off the oven at this point as it is recommended so the burner does not come one, I was lucky and it didn�t. I placed it in the oven for 10 minutes, after that the glue was still pretty damn tough to be working with. I cranked it up to 250 and placed it in for another 10 minutes.
I have read on hid planet that some have cranked it up to 400 with success with different types of light fixtures. I, as well as others say lower temperatures for longer periods are better. If I am to do it again I will stick with 10 minutes at 250.
last pic shows the entire headlight apart in all its glory.
I had gloves on to hold the entire fixture while Lazn used the flat head to push up the few tabs. The glue was nicely malleable at this point. Some people have recommended placing tooth picks in the parts you have separated to keep them from coming back together however I found by me keeping an even pull on it while he worked the screw driver around worked best. That glue does tack up within a few minutes but we had the entire thing separated within a minute or two. I will deal with removing the extra glue later, probably by putting back in the oven and getting it while its warm but I have also thought of using a dremel on it.
Thread Starter
Senior Member
SuperSport
Joined: Dec 2008
Posts: 507
From: Arizona
Here are a few moch-ups. I am glad there is plenty of room in the fixture. I think the projector I got is one of the larger ones and I don�t think I have much room for more. It looks like the fun part is just starting as I will need to figure out a few details. I want to keep the ability to adjust the light externally using the stock adjusting screws however I don�t think I will be able to use the stock reflector as the shroud I am using is pretty big as the projector is as well. I also want to be able to use the stock dust boot on the back and keep access to the bulb so I don�t have to take everything apart to change a light bulb.
The stock fixture also has that black piece that fits under the lens kind of like a border which may be in the way to put angel eyes in. If I were to put the eyes in then the tops and bottom of the eyes would be cut off, not sure If I like that look. Plus that plastic piece really covers up a bunch or crap you would see without it.
I will be starting more of the fabrication (jimmy rigging) tomorrow. I will keep you guys updated.
Thread Starter
Senior Member
SuperSport
Joined: Dec 2008
Posts: 507
From: Arizona
1.Where do you recommend putting the ballast and igniter, this is an older model ballast so it’s about twice the thickness of the newer slim ones. I was debating putting them in the air box as they will be out of the elements, pretty close to the headlight assembly and there is plenty of room in there. Will it do anything with performance? Where have you mounted yours and do you have pics.
2.Since I have the timing circuit to delay the fire up of the HID igniter I was debating if I want to have the timer triggered off the stock headlight wiring or if I want to trigger it off the started button. I can set the delay from 0-15 seconds.
I made a huge amount of progress on the entire setup and will post pics tonight. I was able to get the new shroud I made inside the stock reflector so I will be able to maintain the stock adjusting screws. I had it fired up and heat does not seem to be a problem and looks like I am pretty close to mounting it up.
Senior Member
SuperSport
Joined: May 2008
Posts: 702
From: Bham, AL
1.Where do you recommend putting the ballast and igniter, this is an older model ballast so it�s about twice the thickness of the newer slim ones. I was debating putting them in the air box as they will be out of the elements, pretty close to the headlight assembly and there is plenty of room in there. Will it do anything with performance? Where have you mounted yours and do you have pics.
I put mine just below my right side fairing below my hand. I had to remove the right plastic "snorkel duct" though. I wished I would of had a more slim ballast lying around the garage but all I had were Mitsu and Hella Gen3, both of which are bulky and take up a lot of the limited space on the VTR. Tweety has his mounted behind a panel he made to hide his ballast and mount his CBR gauge cluster in. Since space is so limited on the VTR I would encourage folks to find either real slim ballasts or one of the older Hella Gen3's with the 12" length connector. Or you could always use a gen 4 type ballast and mount the actual ballast under the seat. Then you just have the bulky ingintor to deal with.
2.Since I have the timing circuit to delay the fire up of the HID igniter I was debating if I want to have the timer triggered off the stock headlight wiring or if I want to trigger it off the started button. I can set the delay from 0-15 seconds.
Totally depends on you and your starting routine I suppose. I never did a timer on my set-up as I didn't feel the need for it. Some people claim its bad for a ballast or your bikes wiring but I've never ran into an issue personally and I've been in with HID for quite a while. Not saying it can't or won't cause an issue for anyone else though. That's what's so nice bout electronics isn't it?
I made a huge amount of progress on the entire setup and will post pics tonight. I was able to get the new shroud I made inside the stock reflector so I will be able to maintain the stock adjusting screws. I had it fired up and heat does not seem to be a problem and looks like I am pretty close to mounting it up.
Thread Starter
Senior Member
SuperSport
Joined: Dec 2008
Posts: 507
From: Arizona
I put mine just below my right side fairing below my hand. I had to remove the right plastic "snorkel duct" though. I wished I would of had a more slim ballast lying around the garage but all I had were Mitsu and Hella Gen3, both of which are bulky and take up a lot of the limited space on the VTR. Tweety has his mounted behind a panel he made to hide his ballast and mount his CBR gauge cluster in. Since space is so limited on the VTR I would encourage folks to find either real slim ballasts or one of the older Hella Gen3's with the 12" length connector. Or you could always use a gen 4 type ballast and mount the actual ballast under the seat. Then you just have the bulky ingintor to deal with.
Totally depends on you and your starting routine I suppose. I never did a timer on my set-up as I didn't feel the need for it. Some people claim its bad for a ballast or your bikes wiring but I've never ran into an issue personally and I've been in with HID for quite a while. Not saying it can't or won't cause an issue for anyone else though. That's what's so nice bout electronics isn't it?
[COLOR=black][FONT=Verdana]
Heat will be less than your stock halogen setup. Glad the progress is making good ground with no snags. Pretty easy to do this mod on the VTR and everyone should do it over a regular HID kit IMHO. MUCH better lighting!!!!
Thread Starter
Senior Member
SuperSport
Joined: Dec 2008
Posts: 507
From: Arizona
So my dad let me use some of his shop tools which helped out a bunch. So I decided to place my shroud and projector into the stock reflector so I would not lose the ability to adjust the headlight externally. As you can see from the picture we just shaved two flat sides onto the shroud in order to fit it into the stock reflector.
I am glad I did some testing at this point because I was just about to put the projector in the housing upside down. I recall seeing a thread on HID planet that the lens reverses everything. Sure enough they are right. If I would have made that mistake I would have had the high beam cutoff on the top of the projector which would have cutoff the lower part of the beam.
I wish I would have taken a picture of the setup I used to lock the projector into place but forgot to. The projector fits into the abs with a few notches that I drilled out so it will not rotate with vibration. The projector is then held into place by screwing the threads of a male abs cap down until it holds the housing firmly in place. I will be putting a few dots of epoxy on things to ensure they stay as well.
Thread Starter
Senior Member
SuperSport
Joined: Dec 2008
Posts: 507
From: Arizona
After setting the abs shroud into the stock reflector I determined what I needed to cut out with the dremel in order for the back of the new light come out of the rear. I used the sanding wheel to basically make the back of the stock reflector completely flat. This gave me room to see through and determine what I needed to clean up with the dremel. Wow does that reflector kick out some funky dust, the shop took a while to clear out. The dremel cut through that stuff like it was butter. This process took a bit as I did not want to take more away than I had to but I think it came out pretty good.
Thread Starter
Senior Member
SuperSport
Joined: Dec 2008
Posts: 507
From: Arizona
At this point I decided to sand down the shroud and make it a little better on the eyes. As you can see from the pic I cleaned up all the sharp edges and got it about the way I wanted it to look. Now I needed the shroud to be able to sit in the reflector without any light leaking behind it. I used plumbers epoxy. Its basically JB weld but you get twice as much for half the price. I made long worm with it and placed in on the bottom of the shroud. I placed the shroud into the reflector and let it sit for twenty minutes. This created a perfect seat for it to mount to. The pic shows clear tape covering the putty as I was preparing to paint it up. As you can see I roughed up the reflector with some fine sand paper to give the paint something to stick to.

Thread Starter
Senior Member
SuperSport
Joined: Dec 2008
Posts: 507
From: Arizona
Thread Starter
Senior Member
SuperSport
Joined: Dec 2008
Posts: 507
From: Arizona
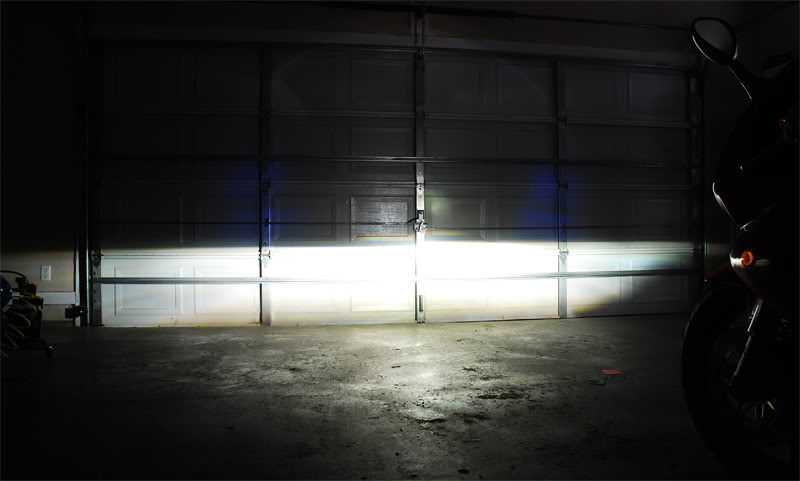
Well I have the shroud almost done, as I used the plumbers epoxy to fill in the light leaks between the different abs parts. I have the coffee cup ring mounted with the epoxy as well. Fired up the light for the 3rd time now and am just amazed at how much light it puts out. Not sure if I will be able to get every spec of dust off the lens, its driving me crazy as you see it when on.
Well I guess I got buy happy and bought crap I didnt end up needing. It turns out the solenoid controller was not needed as I have the model that only requires wires, which means now I have an extra solenoid controller for a 3 wire setup and an extra solenoid. Not to mention the timing circuit I got appears to not be working correctly. I was testing everything before mounting and I can only hear a buzzing from the timing circuit and the a click from the relay once in a while. I am debating just forgetting about the angel eye and the timing circuit like others have suggested and just hook it up to stock wiring. And I just looked up and its past 1 AM...this is Ripley, last survivor of the Nostromo, signing off
Well I guess I got buy happy and bought crap I didnt end up needing. It turns out the solenoid controller was not needed as I have the model that only requires wires, which means now I have an extra solenoid controller for a 3 wire setup and an extra solenoid. Not to mention the timing circuit I got appears to not be working correctly. I was testing everything before mounting and I can only hear a buzzing from the timing circuit and the a click from the relay once in a while. I am debating just forgetting about the angel eye and the timing circuit like others have suggested and just hook it up to stock wiring. And I just looked up and its past 1 AM...this is Ripley, last survivor of the Nostromo, signing off


