
Fr33ks exclusive what NOT to do, & build thread


Thread Starter
Member
Squid
Joined: Jun 2015
Posts: 42
From: Mid West

Fr33ks exclusive what NOT to do, & build thread
Okay, Here we go Wolverine... And thank you.
I picked up forks today, from a TL1000. and I'll post pics tonight some time.
I have an appointment with the Doc tomorrow, Hand surgery is coming up soon. but I'm riding to the appointment on the bike.. LOL...
She's going to slap me in the back of the head... Seriously.. Hahaha..!
Any way, In haste, I made a few measurements and they seem to be very close in tube length, width across the top of the tubes, and axle to the lower, and upper trees, and the neck bolt length.
Over at All *****, they have a chart and part numbers for the swap bearings that I'll need.
Now all I have to worry about are the fork stop locations and any modification I might have to do there won't be terrible, FINGERS CROSSED.
I would have rebuilt any forks I would've found regardless of the condition or claims made about them anyway, so the seeping these have from the seals doesn't worry me.
I was going to buy all new pieces for brakes, bearings, etc also any way, so I may as well get serious about this and build a dream bike.
I do need to locate, or have made, a new upper, which in effect, opens a window to have custom trees made, which could be stronger than the original. Or possibly after more research, I'll find a set from a Hayabusa that may work also..?
Okay, I'm out to take pics and actually look at my R/R to finally get that nailed down...

Thread Starter
Member
Squid
Joined: Jun 2015
Posts: 42
From: Mid West
Hahaha, NO problem in any way Wolverine, I'm retired from the military... I'll post a few stories here and there... LOL.
I know, I'm totally amped about him doing it too..! I just can't wait, he's been doing it for years, he did my Dad's conversion van back in 1976... and he remembered me, LOL.. as "that little hooligan **** that ran around on the purple bicycle with a shifter on it"
It's just too cool man, I can't even think about it...HAHAHA


Thread Starter
Member
Squid
Joined: Jun 2015
Posts: 42
From: Mid West
Okay y'all, This is going to be VERY pic Heavy..!
First, In honor of Dirty Beavers Off Road Club, Here's My H3. It's still pretty much stock but I've done a couple cosmetic things.
Cranked the front bars, Bed lined the fenders, and tinted 70% of the taillights.
Put in a handheld midland, obviously for the trail as the reach is about 200 yards, LOL.
And that's about it so far.
It's the inline 5 cylinder because I knew I was going to do a swap later.
The first one is the day I picked her out of the line up, the second was last month when I was picking up some louvers out at Hoppersteads Hot Rod Shop.
Last edited by VtwinFr33k; Jun 11, 2015 at 08:45 PM.
Thread Starter
Member
Squid
Joined: Jun 2015
Posts: 42
From: Mid West
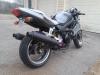
Okay, now the Super Hawk... The day I picked it up it was a total disaster, but I got it cheap enough and I could handle what was up with the electrical, and other minor stuff that had been neglected... The FIRST thing I did was get rid of the useless blue glow lights... and start tearing it down... Then Put it all back together with everything working except the rear brake light switch, it's on it's way... still...
Cool... I love the way it pulls..!
The forks seem to be twitchy, a little, not bad...
and it runs super rich sometimes...
Then, I pulled it all apart to start painting it and fix what other stuff I found not working, like the stupid taillight again, and the plug on the side of the radiator not even plugged in, and the CCT leaking... LOL
Senior Member
SuperBike
Joined: Feb 2007
Posts: 1,252
From: boston
I had an issue with my brake light switch at one point but it is somewhat adjustable the way the plastic screw on the housing meets the bracket. Also the plugs for the brake light are notorious for not being able to put enough pressure on the pins of the bulbs.
Thread Starter
Member
Squid
Joined: Jun 2015
Posts: 42
From: Mid West
So, I started to get the paint done, and it just seemed like it was still going to be missing something...
Oh, damn it... The freakin' girl... Nope just kidding I'm not a Kennedy.
The cool factor...! I had spent hours trying to figure out what to do, then I was going through some old family photos and found a picture of our 1976 Conversion Van, remember those..? Hahahaha, Ours was the RED Baron, complete with the waterbed and a mural, hand painted by the Man, Myth, and Legend...
Tom Wojahn.
He's drawn stuff for Cycle World, Easy Rider, Hot Rod, Popular Hot Rodding, Open Wheel, and my favorite car rag ever... Car-Toons.
I gave him a call, and he's going to fix me up with some great pin-stripping and a couple of flying eyeballs..! YEAH..!
I just have to finish up a few details that will fit the bike a bit better than the way it looks currently.
Mirrors, Grips, Bar ends, new turn signals, an actual LED flasher, chop down the new windshield, and finish painting the frame until I pull it all apart this winter and have it powder coated.
and my favorite new idea to put some real 60's flare in it... COOL TAILLIGHTS...
Thread Starter
Member
Squid
Joined: Jun 2015
Posts: 42
From: Mid West
The wires were actually pulled out of the plastic plug on the switch itself, and then covered with a rubber boot to hide it before I bought it... Shady little salesman... LOL
Thread Starter
Member
Squid
Joined: Jun 2015
Posts: 42
From: Mid West
I'll be disassembling them this week to get them cleaned up and powder coated to match the frame, Black with some sort of 50s metal flake.
Then I'll be putting them on this winter when I strip it apart again and go through the engine...
That way I know I'll have all the parts. I'm going to re-assemble them and have them completed and ready to put on in one fell swoop.
I'll be sure to do a swap list on the parts as well.

Member
Squid
Joined: Apr 2015
Posts: 79
From: St. Louis MO!
I apologize scottiemann, I forgot to answer the question about the forks...
I'll be disassembling them this week to get them cleaned up and powder coated to match the frame, Black with some sort of 50s metal flake.
Then I'll be putting them on this winter when I strip it apart again and go through the engine...
That way I know I'll have all the parts. I'm going to re-assemble them and have them completed and ready to put on in one fell swoop.
I'll be sure to do a swap list on the parts as well.
Learned this with cars hahaha of course the hard way.
Thread Starter
Member
Squid
Joined: Jun 2015
Posts: 42
From: Mid West
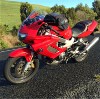
Okay, Here's what's been happening... I went over the whole bike.
I replaced the front signals with triangulated LEDs which fit the shape of the bike a little better.
I did a practice cut on the old windshield to see the effect of trimming it with a 4.5 side grinder, and it worked, very well, as there was little or no vibration at all like using a scroll saw.
I trimmed and re-shaped the front fairing near the top where the windshield ends, then crafted, painted, and installed metal plates over the old mirror mount holes and installed billet mirrors that were actually kinda' cheap, but made really well.
I ordered spikes for the windshield, and they'll be here July 27th (WTF Amazon).
I added Spike Bar Ends (they arrived missing the rubber piece that goes in the bar, ordered a new pair, delivery July 17) and had to make a retainer, and they are temporarily mounted until the new ones arrive.
I added Spider Grips.
I then bought an LED flasher, but it's only a two pin connection, so I'll order a three pin to install.
I then had to adjust, clean, and lube the chain.
designed a seat hold down till the factory ordered piece arrives.
Then, the best part.
I designed, and built a bracket, painted it, and installed, DUAL, LED BULB, Maltese Cross Taillights, along with part of the junk taillight that was originally on it when I got it. I dis-assembled the lights and had to paint the chrome housing black to tie it all together though.
These are full bulbs, not little yellow chips, there are 45 bulbs in each light, plus another 8 in each light, that shine on the plate. 90 of them per light. I then wired them as the Running lights, Stop lights, and the turn signals. They are 4 inches wide and 4 inches tall, and they are total "Bad Assery."
I then peeled of the tank stickers, rubbed it all down, and got it ready, checked everything over and went on a ride last night to check everything out.
Today, I dropped it off, and set it up on the stand in a 2 car attached garage. And then started having a conversation with a man who has been working on American muscle cars since he started pin-stripping in 1955. We talked for a couple of hours. And he is an amazing man, the real deal from the grass roots of the automotive counter culture, he hung around with Ed Roth, and Von-Dutch, and has the pictures and stories to prove it. He drew cartoons for so many Automotive and motorcycle magazines I don't think I'll ever know them all.
A legendary cartoonist, and famous pinstripe artist, has my bike for a week or so. In his words,
"I'm going to get a pizza, and just sit and stare at it tonight for a couple of hours, and compare it to your personality, and the sketches I've come up with. I may change it around a little, ya' don't mind do ya..?"
My response was, "You do what ever you want, I've wanted to have something this cool done my entire life, you do what you think is cool."
I saw his sketches, and they are so RIGHTEOUS..!
I'm not going to post them, you'll have to wait.
I'll post pictures when he says it's finished.
Thread Starter
Member
Squid
Joined: Jun 2015
Posts: 42
From: Mid West
Okay, Here's a couple of pics of the bike, just before I finished it up, and before I put her to bed last night.
Then, parked in his garage, after I drove her over to have her art work done today.
And one of the wheel decals that finally did arrive, of course, my garage help photo-bombed me.. Hahaha, she's pretty cool, so she can get away with that.
Then, parked in his garage, after I drove her over to have her art work done today.
And one of the wheel decals that finally did arrive, of course, my garage help photo-bombed me.. Hahaha, she's pretty cool, so she can get away with that.
Thread Starter
Member
Squid
Joined: Jun 2015
Posts: 42
From: Mid West
I remembered that I had posted so much about the sad condition of the bike when I got it...
Here's a shot of the rear sprocket that now has it's own spot on the garage wall.
EPIC fail previous owner, epic fail.
Here's a shot of the rear sprocket that now has it's own spot on the garage wall.
EPIC fail previous owner, epic fail.
Last edited by VtwinFr33k; Jun 17, 2015 at 11:00 PM.
Senior Member
SuperBike
Joined: Feb 2007
Posts: 1,252
From: boston
Finally some build pics!!!!
At first when I saw your half painted fairing I got a little nervous (where is he going with this one) lol, but now seeing the bike in one piece the two tone gunmetal and yellow work very nice together... cant wait to see what he comes up with for pinstriping.
Hey your helpers fingernails almost match the bike lol, nice work on the tail light, not so sure about the "hood" you got going on but let it grow on me
And I thought you were exagerating about the PO and the chain and sprockets but damn, thats probably one of the most unsafe sprockets I have ever seen... what did you replace it with and what are you running for gearing?

VTR virgin
Superstock
Joined: Mar 2015
Posts: 448
From: Auckland, New Zealand
Seriously, how is wear like that even possible???

Rex Kramer-Thrill Seeker
SuperBike
Joined: Jan 2011
Posts: 2,312
From: Brookfield, WI


