
Getting my Superhawk on the Road


Thread Starter
Junior Member
Squid
Joined: Dec 2010
Posts: 29
From: Cape Coral, FL

Getting my Superhawk on the Road
Starting up a thread here to track and get feedback on repairing my 98' Superhawk and getting it on the road.
History: I bought the bike a couple weeks ago from a friend at work. The bike has been sitting for 3-4 years and does not currently run.
What's Been Done
Today I pulled the tank and confirmed fuel in the lines. I pulled the top off the air box and removed the filter. I confirmed that when I am cranking it that twisting the throttle causes the needles to flutter. It seems it is getting fuel through the carbs because I got some in my eye from the carbs...lol.
So I'm now researching next steps. It has fire...has fuel...why no start? I could understand it running rough I guess..but with both of those systems apparently working it should at least try to start, right?
History: I bought the bike a couple weeks ago from a friend at work. The bike has been sitting for 3-4 years and does not currently run.
What's Been Done
- Put a new battery in it.
- Changed the oil and filter.
- Changed the coolant.
- Cleaned up the fuel tank and fixed the petcock (was stuck).
- Pulled and cleaned up the carbs.
- Washed and recharged the K&N air filter.
- Pulled and lightly cleaned plugs. Confirmed they are firing.
- Won't start.
- Turns over strong with battery charged.
- When the starter button is pushed it sounds like one of the cylinders fires once or twice and then it just turns over and over...
Today I pulled the tank and confirmed fuel in the lines. I pulled the top off the air box and removed the filter. I confirmed that when I am cranking it that twisting the throttle causes the needles to flutter. It seems it is getting fuel through the carbs because I got some in my eye from the carbs...lol.
So I'm now researching next steps. It has fire...has fuel...why no start? I could understand it running rough I guess..but with both of those systems apparently working it should at least try to start, right?
Last edited by Lurkmoor; Dec 27, 2010 at 07:36 PM.

Senior Member
Back Marker
Joined: Mar 2008
Posts: 139
From: Brisbane, Australia
Checked to see if the plugs are wet? For the petcock to be stuck it has some serious gum in the system from the stale fuel - how did you clean the carb jets?
Checked it has compression/all valves working?
Normal starting technique for me is choke fully out (checked the operation of that?), no throttle.
Checked it has compression/all valves working?
Normal starting technique for me is choke fully out (checked the operation of that?), no throttle.
Thread Starter
Junior Member
Squid
Joined: Dec 2010
Posts: 29
From: Cape Coral, FL
Not PVLIR. Vacuum is in the right place and I used a vacuum gauge to confirm that it pulses vacuum when cranking. Plus there is fuel in the fuel lines when I remove them.
When I got the bike the fuel tank was empty. I got some premium gas, added some fuel system cleaner and Stabl. I've pulled the carbs and soaked the jets in carb cleaner, flushed the carbs with carb cleaner. Disassembled the vacuum chambers and needles (one was stuck before cleaning).
I'll have to get a compression gauge. How do I confirm the valves? I think I can see the 2 intake valves with the carbs off, but what about exhaust?
I've tried with and without choke. With and without throttle action. No luck.
2nd mouse gets the cheese
SuperBike
Joined: Jan 2008
Posts: 1,697
From: Beaverton, OR
My guess would be there is still a problem with the carbs, an assumption since you made no mention of taking compressed air and blowing out every opening every jet and passage. One little bit of laquer in the right place in the carb will cause it not to run just loosening the buildup by soaking it is not enough.
So if you did then it is electrical or compression.
Do you know why the bike was parked?
If it broke a cct it could have not enough compression to run. Although truthfully the hawk will run fine on a cylinder as far as starting and idling it will do it on one.
So if you did then it is electrical or compression.
Do you know why the bike was parked?
If it broke a cct it could have not enough compression to run. Although truthfully the hawk will run fine on a cylinder as far as starting and idling it will do it on one.
Thread Starter
Junior Member
Squid
Joined: Dec 2010
Posts: 29
From: Cape Coral, FL
OK, so I was working on it tonight with a friend. He got it to start but just barely and it would die right after. So we started digging into it.
Confirmed that the fuel lines had gas in them.
We were able to get it to fire up and run for a few seconds by spraying some carb cleaner into the throttles. So ignition system is fine and the engine works.
You can see some fuel wetting the needles when you are cranking it, but it must be in the carbs, since it runs on spraying carb cleaner in it.
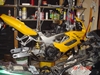
So I pulled the carbs. Going back over everything, the only thing that I could not do was pull the pilot screws. Based on the shop manual I think I know where they are, but appear to require a special tool to screw in or out. Here is a photo of the carb with the bowl off. I have pulled the main and slow jets.
Also, to answer a previous question, both intake valves are working in each cylinder. When pulling the carbs, both bowls had fuel in them.
A is what I think the pilot screw is. Can someone confirm? Also, what is B?
Last question (for this post) could the air cut-off valve cause this? I haven't pulled it because I haven't separated the carbs yet.
Confirmed that the fuel lines had gas in them.
We were able to get it to fire up and run for a few seconds by spraying some carb cleaner into the throttles. So ignition system is fine and the engine works.
You can see some fuel wetting the needles when you are cranking it, but it must be in the carbs, since it runs on spraying carb cleaner in it.
So I pulled the carbs. Going back over everything, the only thing that I could not do was pull the pilot screws. Based on the shop manual I think I know where they are, but appear to require a special tool to screw in or out. Here is a photo of the carb with the bowl off. I have pulled the main and slow jets.
Also, to answer a previous question, both intake valves are working in each cylinder. When pulling the carbs, both bowls had fuel in them.
A is what I think the pilot screw is. Can someone confirm? Also, what is B?
Last question (for this post) could the air cut-off valve cause this? I haven't pulled it because I haven't separated the carbs yet.
Last edited by Lurkmoor; Dec 26, 2010 at 05:29 PM.
Slacker
Superstock
Superstock
Joined: Jun 2005
Posts: 489
From: San Antonio, TX

'B' is the starter jet. That is where fuel runs when the choke is operating. It must be clear enough to hear air blowing through from a compressed air source. I am not sure but you may need to operate the choke cable to allow clear passage while blowing it out.
'A' is the pilot fuel screw. You WILL need to remove both in order to clear out the passages completely, else the engine will not get enough fuel to run. Either purchase the special wrench or use a dremel to slot them for a flat blade screwdriver. They should turn easily. Make sure to turn them IN first while counting the amount of rotation so that you can adjust them back to the original settings.
I am fairly confident that once both of these have been correctly cleaned your engine should start and run.
Thread Starter
Junior Member
Squid
Joined: Dec 2010
Posts: 29
From: Cape Coral, FL
I have not tested compression...don't have a gauge. However, the engine runs when I spray carb cleaner into the carbs, so it shouldn't be a problem there.
I'll get the pilots slotted tonight and cleaned up and see what that does for it. I think that would be the last part of the carbs...wish me luck!
And thanks to everyone who has provided ideas and feedback! Great community.
I'll get the pilots slotted tonight and cleaned up and see what that does for it. I think that would be the last part of the carbs...wish me luck!
And thanks to everyone who has provided ideas and feedback! Great community.
Senior Member
Back Marker
Joined: Mar 2008
Posts: 139
From: Brisbane, Australia
Hope you are up and running before you get back to this, but....the main thing to know is that the pilot jets are extremely small orifices and the slightest bit of varnish or crud will render them useless.
Sounds like you are getting close though. Since the bike is an unknown quantity the compression test will give you an idea if the bike was not used due to a mechanical problem like a broken cct. How was the coolant - no crud or floaties? Ditto for the oil?
Just re-read your original post - very common mistake to over-oil the K&N's - it will stop airflow - worth checking.
After sitting so long I would also change the brake and clutch fluids too.
Thread Starter
Junior Member
Squid
Joined: Dec 2010
Posts: 29
From: Cape Coral, FL
Woot! Progress!!
So I slotted the pilots and cleaned them. Was a bit interesting as I thought that I had tightened the first one and counted 1 1/4 turns before meeting moderate resistance. The shop manual says that fully seating them can damage them so I was being gentle. After pulling it and find that the spring I used a bit more muscle (finger muscles only...not getting tough on it or anything) and counted almost a full 6 turns before it compressed the spring and seated!
Interesting also that when I returned it to where it was set when I pulled it, it was barely over a turn from coming out. What's up with that?!
I did some research and found a post here that indicated they should start at 1 3/4 turns out when assembled.
I also hadn't noted which main jet was in which carb. One is 180 and the other is 185. I also saw in a post that you want the back carb to be a touch richer. Not being sure which jet would be richer I took a guess and put the 185 in the back one. Was that a correct guess? (fyi, aftermarket exhaust and K&N air filter).
So after cleaning the pilots (looked pretty clean but flushed the pilot port with carb cleaner for good measure) and reassembling the carbs I got everything installed back on the bike and put coolant in it. I left the air cleaner out with the box open and after a couple tries starting it....I started getting pops out of it. I found that if I had the choke off and the throttle full open it would start...rev up a bit then die.
I figured that it must be getting way too much air, so I put the filter in and the top on the box and tried again. After a few pops and no starts it finally started with the choke out and no throttle. Ran for a few seconds then died. After doing this a few more times it finally started and ran at idle for about 5 minutes.
I barely opened the throttle and it died. After that it would start...idle and die with any throttle action. Only once did I get it to let me open the throttle and rev it up to about 8k RPM, but lots of popping after I let up on the throttle.
So...
1. Did I put the jets in the right locations?
2. Feedback on the pilots. Should they only be 1.75 turns out...or based on how it is running do they need to be opened more? Is nearly 6 turns out too much?
3. Any other thoughts on how it is running?
Also, in response to revhead1957's comment on compression test...I talked to the previous owner about the condition of the bike before it sat. He had just gotten the R/R replaced and it was running before he moved down to Florida. He had recently laid down the RC51 pretty hard and was "taking a break from riding". Since then he hasn't had much time or desire to get back on and the SH just sat too long. Also, the coolant and oil were both clean...but the oil was ready for a change. Once I get it running smooth I'll flush and change the brake/clutch fluid.
Thanks again for all the feedback, ideas and help guys. I really appreciate it and I'm looking forward to getting this bike on the road and riding again!
Last edited by Lurkmoor; Dec 27, 2010 at 07:44 PM.
2nd mouse gets the cheese
SuperBike
Joined: Jan 2008
Posts: 1,697
From: Beaverton, OR
yeah main jets are right now although because they were not right makes me wonder if other things should be checked. You need to confirm what jet kit was used if any. Your air screws are also good enough for a baseline now and with a filter in and the cover on the bike should run if everything is clean and in the right place.

Moderator
MotoGP
Joined: May 2005
Posts: 2,708
Be aware that the emulsion tubes for each carb are different. Check the Factory Pro website for further details on that. Also, don't get buck wild revving it up until you've put some miles on it... varnish on the valve stems can cause them to stick resulting in a bent valve or four.
Senior Member
Back Marker
Joined: Mar 2008
Posts: 139
From: Brisbane, Australia
I presume that you have downloaded a manual from the knowledge base section to help with the carb assembly? Given the history it is probably not safe to assume that the previous owner had it correct.
Be meticulous in checking for manifold air leaks and pinholes in the carb diaphragms, and the positioning of the outer ring.
Be meticulous in checking for manifold air leaks and pinholes in the carb diaphragms, and the positioning of the outer ring.
Slacker
Superstock
Superstock
Joined: Jun 2005
Posts: 489
From: San Antonio, TX
The main jets are in the correct positions, but you may find that with your filter/exhaust setup and low altitude that 185/190 rear might be more appropriate. For now you should be close enough to ride.
1.75 turns on the pilot screws is a very good starting point. Fine tuning should be done with the engine idling after it has warmed from riding, if you have the proper tool to do the job. Any setting after 3 turns open should not make it any richer, I think. But, 6 turns shows that someone was certainly not doing it right!
Has a jet kit been installed? If so then needle position will be very important here and could explain why it resists throttle action. Also be sure to double check that the vacuum line is plugged into the petcock side and that it is in good condition with no cracks/leaks. Replace the vacuum hose if not 100% sure. Also make sure that the vent plugs are properly installed under the K&N.
Thread Starter
Junior Member
Squid
Joined: Dec 2010
Posts: 29
From: Cape Coral, FL
I am definitely not trying to rev it to redline, but I can't take it for a ride if I can get it above idle...so just trying to rev it a bit to make sure it will hold up.
I do have the shop manual downloaded and printed. I use it as a reference for the teardown and reassemble process. It's been a handy thing to have!
After doing some reading here I would guess that it has an aftermarket jet kit in it. The needles are adjustable (several grooves for the c-clip). The slow jets are both 45s and as noted before the mains are 180/185.
After only a few days of browsing this forum and with only 2 posts, I have seen the reference to PVLIR about 500 times. I have disassembled the petcock twice and I am very clear on how it operates and where the vacuum line should be located. I also bought a vacuum gauge/pump just so I could be sure that it was working correctly. When cranking the bike the vacuum line pulses solid vacuum.
I actually picked up some fuel/vacuum line at my local Advanced Auto, but they sold me SAE lines, not metric and the vacuum line is just a bit too big. I guess I need to find the actual specs on it and maybe order some online. Will probably order a rebuild kit for the carbs so I can replace all the gaskets and such. I noticed this morning that there is a slow drip leak of gas from the carbs after putting it back together last night.
Another thing I noticed was that one of the choke attachments is broken. The threads are still attached to the angled part at the carb, but it is torn about half way through. Would this cause any major issue? Can I replace just that angled part or do I have to replace the entire chose cable assembly?

Thread Starter
Junior Member
Squid
Joined: Dec 2010
Posts: 29
From: Cape Coral, FL
Well, I'm getting pretty good at taking off these carbs and working on them. Unfortunately, while pulling them this time the choke attachment elbow finally broke off. Had to fenagle the threads out so I could pull the carbs. It was easy to pull the needle part off and remove the plastic collar that broke...now I just have to find a replacement...
Figure I'll be down until that is fixed. While I had the carbs off I opened the pilots to 2 turns and will see if that helps it run a little better. It started up pretty easy when I got home from work and started working on it, but still runs pretty rough.
Figure I'll be down until that is fixed. While I had the carbs off I opened the pilots to 2 turns and will see if that helps it run a little better. It started up pretty easy when I got home from work and started working on it, but still runs pretty rough.

Out of my mind, back in 5
MotoGP
Joined: Nov 2006
Posts: 6,109
From: Skurup, Sweden
Search the forum with words related to that and you will find that you aren't the first to break those parts... There are non-Honda parts that are made off brass that fit's with a bit of lateral thinking... Or just buy the replacements...
Thread Starter
Junior Member
Squid
Joined: Dec 2010
Posts: 29
From: Cape Coral, FL
You know rev, that's not a bad idea. I already have the carbs off the bike. My only concern with dipping the full carbs is that if there are any rubber parts they will swell as a result. I'll take a close look at the manual and exploded views to see if I can get every rubber part out and do that. Will probably be a week before I see the parts...
Thread Starter
Junior Member
Squid
Joined: Dec 2010
Posts: 29
From: Cape Coral, FL
Success! My latest round of parts finally came in. I spent a couple hours getting the carbs put back together (I'm getting pretty good at it!) and installed the new float bowl gaskets. Replaced the plastic threaded collar for the choke and got the carbs back onto the bike. Put the airbox back on and closed it up. I didn't mount the tank and instead just got it all hooked up and resting on the airbox.
It was a bit sluggish to start. I think the battery was a bit low so I put the charger on it in starter mode and cranked it for a bit. It seemed like it would pop on each cycle while the starter was turning it over, but didn't want to start at first. Finally it started to want to run. Probably just needed to get fuel pulled through the carbs. They were completely dry from the cleaning.
Once I had it running at idle for a few minutes it died when I tried to give the throttle any twist. A couple more starts and it finally got it's act together and ran. It RAN! It ran SMOOTH! I let it run for a few minutes and then shut it down. Topped off the coolant, mounted the tank, put the seat on it and prepared to give it a try. It started, but after backing out of the garage it coughed and died. Then the battery was not ready for it...
Oh well, it's late and I don't want to have to push it from around the block, so I put it back in the garage, pulled the seat and put the charger on it. Figure I'll let it get completely charged tonight and we'll if she's ready tomorrow.
Thank you for all the feedback and help! I'm sure there will still be more needed, but I should only be a day away from taking it for a ride. Then insurance and tag...tires...and probably a chain. Sigh...always something else to do...but at least I'll be able to ride it soon!

Senior Member
MotoGP
Joined: May 2008
Posts: 3,452
From: San Clemente, CA
A tip...Don't leave the "choke" on for more than 30 seconds (it's actually an enrichening circuit). It could end up loading up the plugs and washing oil off the cylinder walls.
Carb farts and stalling at idle are typical for our bikes, being big bore V-twins with 48mm carbs. A little carb work (boy, I'll bet you didn't want to hear that) can minimize that problem, but it's pretty much the nature of the beast.
Keep the rubber side down, and enjoy the torque.
Carb farts and stalling at idle are typical for our bikes, being big bore V-twins with 48mm carbs. A little carb work (boy, I'll bet you didn't want to hear that) can minimize that problem, but it's pretty much the nature of the beast.
Keep the rubber side down, and enjoy the torque.
Thread Starter
Junior Member
Squid
Joined: Dec 2010
Posts: 29
From: Cape Coral, FL
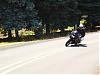
Took it around the block this morning. Was awesome to finally ride it! However, now it is leaking coolant.
Based on how it was leaking it could be coming from the carbs (sigh). I was wondering about the carb heaters...does anyone know what they do for the bike? Could I bypass the carbs?
When I take it apart again I think I will remove the PAIR setup. The bike has aftermarket everything and it pops quite a bit on deceleration.
Out of my mind, back in 5
MotoGP
Joined: Nov 2006
Posts: 6,109
From: Skurup, Sweden
The carb heaters is a topic of much discussion... You get as many answers as there are members on this site... In Florida you don't need to worry about cold starts, but I think it will still have effects on fuel atomisation... Do a search and you will find two or three threads about 4-5 pages long discussing the topic from just about any angle you can think of... So far no conclusive proof for either standpoint have been submitted... 
PAIR = ballast + noisemaker... Goes in the trashcan...
PAIR = ballast + noisemaker... Goes in the trashcan...
Slacker
Superstock
Superstock
Joined: Jun 2005
Posts: 489
From: San Antonio, TX
Mine came to me used without either of those gizmos, and I have no problems tuning out the popping on deceleration, carb farts, and stalling.
Thread Starter
Junior Member
Squid
Joined: Dec 2010
Posts: 29
From: Cape Coral, FL
Just finished getting the bike back together. Removed the PAIR stuff (flipped the reed stops and capped the nipples. I did not bypass the carb heaters though. I was planning to, but where the hose goes into the thermostat (?) on the right side was not reachable with pliers to get the clamp off. I would have to pull the entire thing to get it off and when I started to do that I realized I might have to replace all the hoses...and I'm not quite ready for that. Instead I bought some regular hose clamps and put them on it.
After running it a bit there is an ever so slight drip of coolant. If it doesn't seal itself up I may just order all the hoses and get it over with...but I want to get it on the road first!
Going to put the plastic back on it...will try to get some picks so you can see where it's beat up... =)
After running it a bit there is an ever so slight drip of coolant. If it doesn't seal itself up I may just order all the hoses and get it over with...but I want to get it on the road first!
Going to put the plastic back on it...will try to get some picks so you can see where it's beat up... =)
Thread Starter
Junior Member
Squid
Joined: Dec 2010
Posts: 29
From: Cape Coral, FL
Pics at last!
Definitely still a slight coolant leak. After riding it for about 20 minutes around the neighborhood it had a small amount of coolant sitting on the engine...ran off when I put in on the stand. You can see it in the left side photo.
Cosmetic damage...left side fairing broken off along the windshield. Right side fairing and engine case scraped up pretty good. Shifter lever bent from when it went down on the left side. And the tail lights were taped (yes...that is packing tape on the left one) to the tail. I'll have to figure out what I want to do with those...
I wasn't happy with the performance of the brakes, so will need to do some work there. This week I will get it registered and start looking for tires...


