Carb set up
 02-18-2011, 08:31 PM
#1
Banned
MotoGP
Thread Starter

Join Date: Aug 2007
Location: Lake View Terrace, CA
Posts: 5,942

Carb set up
As I've been asked a couple of time and with all the issues I've heard about with carb set up I guess it's time to pass on what I have learned in the last 14yrs of owning a SH (yes I picked mine up in 97)
Note: The following set up works with a stock airbox and stock air filter. If you want to run a aftermarket filter or airbox mods, you are pretty much on your own trying to get it dialed in correctly.
I have arrived at this set up by taking the info I have received from Dan Kyle, Bob Hayashida and HRC. Then by a little experimentation and looking at how HRC did things, I have come up with what I feel is a very good base line set up. As with all tuning, this is just a starting point and you will need to fine tune for your bike.
First lets cover a couple of things. First is the old axiom that the bigger the CV carb, the harder it is to tune. As this bike has the largest CV carbs factory installed, it is no wonder you hear about all the problems getting them "right". I've read many posts where people state that "the bike runs great, except at..... insert low end, mid-range, etc here.
To me this is unacceptable.
Then there is how the aftermarket jet kits (except HRC) deal with the stock set up. They address the low end /mid-range lean condition by running larger mains and a different needle profile and in the case of DynoJet by getting the slides to open sooner & quicker. While these methods work well with most bikes, on a SH there is IMHO a better way.
The HRC kit comes at things a bit differently. Though it is really for a full race set up and if you want to run ram air or a real high flow filter, then their method of plugging the air bleeds and running small jets is the way to go. On a street set up, this really isn't all that good of an idea. I'll just leave it at that for now. It can be discussed later but really doesn't have a lot to do with what this is trying to accomplish.
The main thing a street rider can get from the HRC set up is a modification they have done on the slides and their recommendation to run #48 pilots. The slide mod is useful to widen the power band on a bike with stock velocity stack. It also can be used for racing where the set up is 2 short stacks. This same method is what is needled with stacks like the Dr. Honda units which go rich in the mid-range. Though I am getting ahead of myself, so I'll explain the mod and what it does in a bit.
So back to the stock set up or starting point. The problem with a stock bike is it is a bit lean on the bottom and mid-range and pretty close on the top end by what I have seen. The good part is the stock needles actually are very good. In fact they are some of the best stock needles I have ever seen. Which leave us with how to get the best performance from the bike.
So here we go. The first step is to install a set of #48 pilot jets (per Dan Kyle & HRC). You will here people say they have tried this and it didn't work. The reason for this is that they have done it along with installing a jet kit. As I stated earlier, aftermarket kits install larger mains and different needles. When you change both, you end up too rich with a stock motor. It's a one or the other with this bike. By upping the pilots you cure the low end leanness and also add a little to the top end as the pilot circuit doesn't turn off, so larger mains are not required.
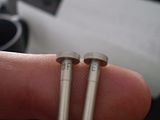
Then you need to shim up the needles. While they have a very good profile, they are a little too long for performance. The question here is how much do you shim them. Around .040" is a good starting point but will need to be tuned to each bike. Also there is more to it than just shimming both needles .040". One of the set up tips from HRC is to use one more shim on the rear needle than you use on the front (this tip might be helpful to try on bikes with an aftermarket kit also). So what I do when setting up a set of carbs is remove the stock thin washer that is under the front needle and leave it in place on the rear. With this method you actually end up with the front needle approx. .030" higher than stock and the rear .040" higher than stock which seems to work well.
So You can stop at this point, put it all back together and start with the pilot screw set at 2 1\4 turns in the front and 2 1\2 turns rear as a start and the bike will work pretty good but it can be better.
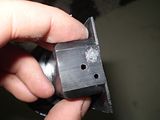
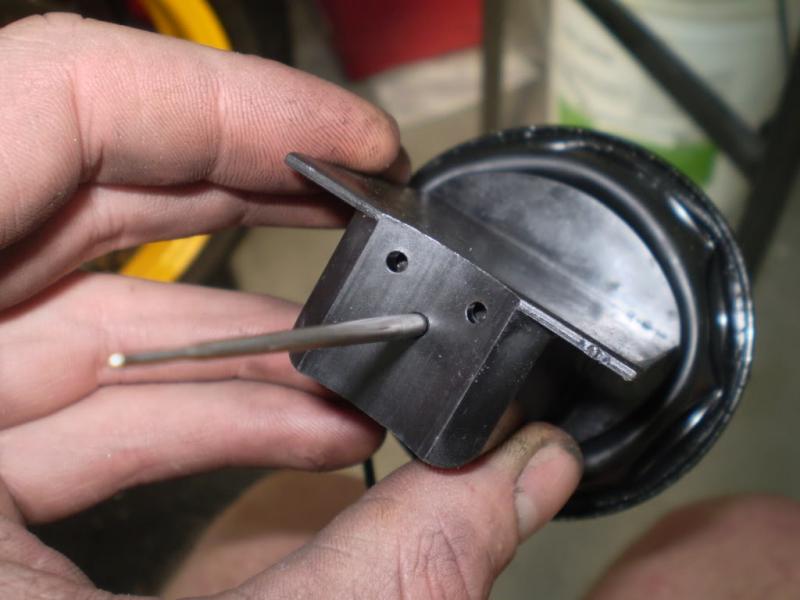
This is where the HRC slide mod comes into play. What is this "secret" mod? Well it really is quite simple. We'll start with this hijacked pick once again

The 2 holes are called lift holes. It's where the slide gets the pressure differential signal which causes the slide to open. That is why DynoJet has you drill an extra hole, to cause the slide to open sooner, but that is the wrong way to go IMHO.
Because of the different length velocity stacks what is really going on with the bike is the front cylinder slide opens too quickly causing the front cylinder to go rich in the low to mid-range. FactoryPro even recommended running an emulsion tube from the rear in the front to help cure this problem.
Now the HRC cure for this is to supply a slide with one lift hole. This will lean out the low & mid while not effecting the upper mid-range and top end. So the last step would be to use some epoxy and seal one of the lift holes in the front slide.
This will give you a very good baseline set up. Yes some tuning will be required but all it involves is adjusting the washer stack ( you might need to raise or lower the needles a small amount) and set the pilot jets per the service manual.
The HRC type slide is also the cure for the Dr. Honda stacks which cause the over rich mid-range. The problem here is the stacks create too good of a vacuum signal to the slides causing them to open to quickly. So in this case you would plug one hole in each slide. This will eliminate the rich condition without causing a lean condition on the top end.
Hope this is some help to you guys.
Note: The following set up works with a stock airbox and stock air filter. If you want to run a aftermarket filter or airbox mods, you are pretty much on your own trying to get it dialed in correctly.
I have arrived at this set up by taking the info I have received from Dan Kyle, Bob Hayashida and HRC. Then by a little experimentation and looking at how HRC did things, I have come up with what I feel is a very good base line set up. As with all tuning, this is just a starting point and you will need to fine tune for your bike.
First lets cover a couple of things. First is the old axiom that the bigger the CV carb, the harder it is to tune. As this bike has the largest CV carbs factory installed, it is no wonder you hear about all the problems getting them "right". I've read many posts where people state that "the bike runs great, except at..... insert low end, mid-range, etc here.
To me this is unacceptable.
Then there is how the aftermarket jet kits (except HRC) deal with the stock set up. They address the low end /mid-range lean condition by running larger mains and a different needle profile and in the case of DynoJet by getting the slides to open sooner & quicker. While these methods work well with most bikes, on a SH there is IMHO a better way.
The HRC kit comes at things a bit differently. Though it is really for a full race set up and if you want to run ram air or a real high flow filter, then their method of plugging the air bleeds and running small jets is the way to go. On a street set up, this really isn't all that good of an idea. I'll just leave it at that for now. It can be discussed later but really doesn't have a lot to do with what this is trying to accomplish.
The main thing a street rider can get from the HRC set up is a modification they have done on the slides and their recommendation to run #48 pilots. The slide mod is useful to widen the power band on a bike with stock velocity stack. It also can be used for racing where the set up is 2 short stacks. This same method is what is needled with stacks like the Dr. Honda units which go rich in the mid-range. Though I am getting ahead of myself, so I'll explain the mod and what it does in a bit.
So back to the stock set up or starting point. The problem with a stock bike is it is a bit lean on the bottom and mid-range and pretty close on the top end by what I have seen. The good part is the stock needles actually are very good. In fact they are some of the best stock needles I have ever seen. Which leave us with how to get the best performance from the bike.
So here we go. The first step is to install a set of #48 pilot jets (per Dan Kyle & HRC). You will here people say they have tried this and it didn't work. The reason for this is that they have done it along with installing a jet kit. As I stated earlier, aftermarket kits install larger mains and different needles. When you change both, you end up too rich with a stock motor. It's a one or the other with this bike. By upping the pilots you cure the low end leanness and also add a little to the top end as the pilot circuit doesn't turn off, so larger mains are not required.
Then you need to shim up the needles. While they have a very good profile, they are a little too long for performance. The question here is how much do you shim them. Around .040" is a good starting point but will need to be tuned to each bike. Also there is more to it than just shimming both needles .040". One of the set up tips from HRC is to use one more shim on the rear needle than you use on the front (this tip might be helpful to try on bikes with an aftermarket kit also). So what I do when setting up a set of carbs is remove the stock thin washer that is under the front needle and leave it in place on the rear. With this method you actually end up with the front needle approx. .030" higher than stock and the rear .040" higher than stock which seems to work well.
So You can stop at this point, put it all back together and start with the pilot screw set at 2 1\4 turns in the front and 2 1\2 turns rear as a start and the bike will work pretty good but it can be better.
This is where the HRC slide mod comes into play. What is this "secret" mod? Well it really is quite simple. We'll start with this hijacked pick once again

The 2 holes are called lift holes. It's where the slide gets the pressure differential signal which causes the slide to open. That is why DynoJet has you drill an extra hole, to cause the slide to open sooner, but that is the wrong way to go IMHO.
Because of the different length velocity stacks what is really going on with the bike is the front cylinder slide opens too quickly causing the front cylinder to go rich in the low to mid-range. FactoryPro even recommended running an emulsion tube from the rear in the front to help cure this problem.
Now the HRC cure for this is to supply a slide with one lift hole. This will lean out the low & mid while not effecting the upper mid-range and top end. So the last step would be to use some epoxy and seal one of the lift holes in the front slide.
This will give you a very good baseline set up. Yes some tuning will be required but all it involves is adjusting the washer stack ( you might need to raise or lower the needles a small amount) and set the pilot jets per the service manual.
The HRC type slide is also the cure for the Dr. Honda stacks which cause the over rich mid-range. The problem here is the stacks create too good of a vacuum signal to the slides causing them to open to quickly. So in this case you would plug one hole in each slide. This will eliminate the rich condition without causing a lean condition on the top end.
Hope this is some help to you guys.
Last edited by 8541Hawk; 04-07-2011 at 06:17 PM.

 02-19-2011, 07:25 AM
#4
Senior Member
MotoGP

Join Date: Apr 2005
Location: Montreal
Posts: 5,631
Good info Mike, and well explained.
FWIW, for bikes being used on the street, Roger Ditchfield (of Revolution Racing in the UK, for those who aren't familiar with him) recommends against drilling the extra hole as called for the in the DJ kit installation procedure.
FWIW, for bikes being used on the street, Roger Ditchfield (of Revolution Racing in the UK, for those who aren't familiar with him) recommends against drilling the extra hole as called for the in the DJ kit installation procedure.
 02-19-2011, 01:04 PM
#7
Senior Member
MotoGP

Join Date: Jul 2010
Location: Phoenix, AZ
Posts: 3,869
This is all great... I took pics of the whole process so far and can post them up when I have more time. I just have one quick question at this point:
Shimming the needles: where do I get washers? Would the hardware store work?
Shimming the needles: where do I get washers? Would the hardware store work?
02-19-2011, 01:17 PM
#8
ride it out
SuperSport

Join Date: Feb 2009
Location: NH
Posts: 745
I bought washers at the local Radio Shack, they have a little baggie of assorted sizes. This item http://www.radioshack.com/product/in...ductId=2103391
 02-19-2011, 01:25 PM
#10
Senior Member
MotoGP
Join Date: Jul 2010
Location: Phoenix, AZ
Posts: 3,869
I bought washers at the local Radio Shack, they have a little baggie of assorted sizes. This item http://www.radioshack.com/product/in...ductId=2103391
Stock carb slides have 2 holes, to answer that first question.
02-19-2011, 04:15 PM
#11
Banned
MotoGP
Thread Starter
Join Date: Aug 2007
Location: Lake View Terrace, CA
Posts: 5,942
#4 washers work fine and you can get them at most hardware stores.
Also some people say only use brass washers to shim needles but with my HRC kit the shims came in a nice Keihin bag with the factory part # and were made of steel. So use which ever make you happy.
Also some people say only use brass washers to shim needles but with my HRC kit the shims came in a nice Keihin bag with the factory part # and were made of steel. So use which ever make you happy.
02-19-2011, 04:33 PM
#12
Senior Member
MotoGP
Join Date: Jul 2010
Location: Phoenix, AZ
Posts: 3,869
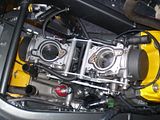
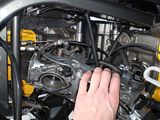
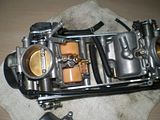
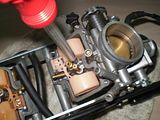
Ok, so I decided to document the process... Too much time on my hands, waiting for other parts to come in, liking pictures because words are for panzies, call it what you want but here it is, carb setup � la Mike:
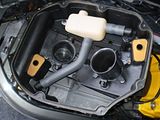
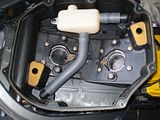
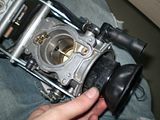
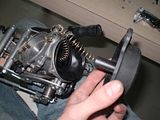

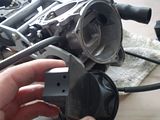
Replacing the #45 pilot jets with #48 (waiting on these parts to come in- Keihin Series 21 jets, correct?)

Alright, I'm guessing that most people who have dug into their carbs this is old news to, and there's a good probability that you shouldn't do things the way that I do, but figured I'd post it up b/c I had a camera anyway.
Mike, thanks a bunch- the explanations all helped, and were spot on in understanding level for someone as inexperienced as me.
Once I get a chance to fire this up, I'm excited to fine tune it. Funny, all of my carb and fuel "mods" entail going back to stock from what the PO installed. I feel like I'm upgrading "yeah, I loaded it with an OEM filter and uninstalled a FactoryPro Kit. Pretty sweet stuff, eh!?"


Replacing the #45 pilot jets with #48 (waiting on these parts to come in- Keihin Series 21 jets, correct?)


Alright, I'm guessing that most people who have dug into their carbs this is old news to, and there's a good probability that you shouldn't do things the way that I do, but figured I'd post it up b/c I had a camera anyway.
Mike, thanks a bunch- the explanations all helped, and were spot on in understanding level for someone as inexperienced as me.
Once I get a chance to fire this up, I'm excited to fine tune it. Funny, all of my carb and fuel "mods" entail going back to stock from what the PO installed. I feel like I'm upgrading "yeah, I loaded it with an OEM filter and uninstalled a FactoryPro Kit. Pretty sweet stuff, eh!?"
Last edited by inderocker; 02-19-2011 at 10:27 PM. Reason: moved photo's
02-19-2011, 04:39 PM
#13
Banned
MotoGP
Thread Starter
Join Date: Aug 2007
Location: Lake View Terrace, CA
Posts: 5,942
I'll try and remember to take a pic of a HRC slide and post that also.
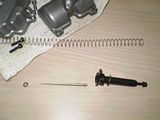
The only thing to add would be that there are couple parts to be careful of as they are different from front to rear.
The first is the emulsion tubes. Here is a pic of how they go if you get them mixed up.

The other part is the needles. Be real careful here as they do the same. I don't have a pic but they would look exactly them same anyways.
So either only work on one carb at a time or make sure you keep the parts separated so you don't cause yourself a lot of grief.
It also would be a good time to set the TPS if you haven't done it yet.
02-19-2011, 04:48 PM
#15
Senior Member
MotoGP
Join Date: Jul 2010
Location: Phoenix, AZ
Posts: 3,869
Hmm- there's a good chance that I switched the needles. I was pulling them from another set of carbs, and wasn't keeping track at all. Is there any way to figure this out? If pics don't work I'm SOL haha!
I did the TPS mod awhile back, but can document that as well while it is off the bike.
I did the TPS mod awhile back, but can document that as well while it is off the bike.
02-19-2011, 09:29 PM
#16
Senior Member
SuperBike

Join Date: Jan 2007
Posts: 2,116
Good write-up, thanks. I already did the needle shim & TPS calibration (on both my sets of OE carbs which I swap out every 20,000 miles for cleaning & worn part replacement as needed) many moons ago on my own 1997 but it was interesting about plugging the front slide hole. However, a while ago I installed a spare taller rear "velocity stack" on the front carb to balance out intake and the boost low-end. Consequently, I would think I would not need to plug one of the front slide holes, correct?
Also, whereas I think my VTR runs pretty well (for a 65,000 mile, hard run specimen), where, what is the part number and for about how much can I inexpensively buy the 48 pilots? Note, I'm (back to) running the OE US 49-state jetting, (immediately upon purchase) did the pairectomy (along with the bafflectomy), OE spark plugs, and a set of 2Bros C2 small oval aluminum slip-on cans.
What do you think about the stick-coil mod btw?
Thx
02-19-2011, 11:22 PM
#17
Senior Member
MotoGP
Join Date: Jul 2010
Location: Phoenix, AZ
Posts: 3,869
Here's where I found a good price on pilots:
http://www.hollisterhonda.com/eshopp...PILOT_JETS.htm
I think this site came recommended via 8541Hawk too.
#48 pilot jets are part number 46-9705
http://www.hollisterhonda.com/eshopp...PILOT_JETS.htm
I think this site came recommended via 8541Hawk too.
#48 pilot jets are part number 46-9705
02-20-2011, 08:39 AM
#18
Senior Member
MotoGP
Join Date: Jul 2010
Location: Phoenix, AZ
Posts: 3,869
Ok, well they do look almost EXACTLY the same. There is some lettering at the top, though, and one is labeled A1UE and on is labled A1UF.
I'm guessing that F is for the front carb. Knowing this, I'm venturing to guess that if there were a difference that Honda would design a needle that is shorter for the rear (as we are adjusting to make this happen)- visual inspection is very hard to tell. Measured the lengths and the one labeled F is 2.362", the one labled E is 2.359". So all of this theory checks out, the question is, have I just constructed my own story, or is this correct?

I'm guessing that F is for the front carb. Knowing this, I'm venturing to guess that if there were a difference that Honda would design a needle that is shorter for the rear (as we are adjusting to make this happen)- visual inspection is very hard to tell. Measured the lengths and the one labeled F is 2.362", the one labled E is 2.359". So all of this theory checks out, the question is, have I just constructed my own story, or is this correct?
Last edited by 7moore7; 02-20-2011 at 08:41 AM.
02-20-2011, 09:26 AM
#19
Banned
MotoGP
Thread Starter
Join Date: Aug 2007
Location: Lake View Terrace, CA
Posts: 5,942
Ok, well they do look almost EXACTLY the same. There is some lettering at the top, though, and one is labeled A1UE and on is labled A1UF.
I'm guessing that F is for the front carb. Knowing this, I'm venturing to guess that if there were a difference that Honda would design a needle that is shorter for the rear (as we are adjusting to make this happen)- visual inspection is very hard to tell. Measured the lengths and the one labeled F is 2.362", the one labled E is 2.359". So all of this theory checks out, the question is, have I just constructed my own story, or is this correct?
I'm guessing that F is for the front carb. Knowing this, I'm venturing to guess that if there were a difference that Honda would design a needle that is shorter for the rear (as we are adjusting to make this happen)- visual inspection is very hard to tell. Measured the lengths and the one labeled F is 2.362", the one labled E is 2.359". So all of this theory checks out, the question is, have I just constructed my own story, or is this correct?
That is some good guess work as you are correct. The needle location is listed on page 5-2 in the factory service manual.
02-20-2011, 09:29 AM
#20
Banned
MotoGP
Thread Starter
Join Date: Aug 2007
Location: Lake View Terrace, CA
Posts: 5,942
Good write-up, thanks. I already did the needle shim & TPS calibration (on both my sets of OE carbs which I swap out every 20,000 miles for cleaning & worn part replacement as needed) many moons ago on my own 1997 but it was interesting about plugging the front slide hole. However, a while ago I installed a spare taller rear "velocity stack" on the front carb to balance out intake and the boost low-end. Consequently, I would think I would not need to plug one of the front slide holes, correct?
I think it's a great idea, the only reason I haven't done it was I just replaced my stock coils around 2 weeks before it was posted here.
So in a couple of years i will do it also unless I find a deal I can't pass up on some.
02-20-2011, 09:36 AM
#21
Senior Member
MotoGP
Join Date: Jul 2010
Location: Phoenix, AZ
Posts: 3,869

Good thing you pointed that out too because I had switched the needles without knowing it.
BTW I can send you my extra stick coils as I only need two of the four that I bought. I don't have the wiring harness for them anymore but it's a start
02-20-2011, 10:04 AM
#22
Senior Member
SuperBike
Join Date: Jan 2007
Posts: 2,116
Whereas splicing the stick coil harness to the VTR harness is easy, not having the stick coil harness (BTW, off which bike?) makes it impossible to plug into the coils. Don't know how much the harnesses would be but probably expensive if new.
02-21-2011, 01:22 AM
#23
Out of my mind, back in 5
MotoGP

Join Date: Nov 2006
Location: Skurup, Sweden
Posts: 6,109
Used on eBay they cost about the same as the coils themselves... So not that big deal...
02-21-2011, 06:05 PM
#25
Member
Squid
Join Date: May 2010
Posts: 71
I just got the carbs off today, previous owner said that everything is stock. I have only had the bike now for a year and this will be the first time doing carb work on a motorcycle. I have Devil high mount exhaust on my bike and have been getting alot of advice on which set up to go with. I like this concept better. Has this method been used with alot of high flow exhausts before?
Last edited by aaugsbu; 02-22-2011 at 03:56 PM.
02-21-2011, 06:34 PM
#26
ride it out
SuperSport
Join Date: Feb 2009
Location: NH
Posts: 745
 02-21-2011, 06:40 PM
#27
Senior Member
MotoGP
Join Date: Apr 2005
Location: Montreal
Posts: 5,631
Dynojet installation instructions call for an additional "lift hole" to be drilled....
02-21-2011, 07:27 PM
#29
Banned
MotoGP
Thread Starter
Join Date: Aug 2007
Location: Lake View Terrace, CA
Posts: 5,942
Last edited by 8541Hawk; 02-21-2011 at 07:35 PM.
02-21-2011, 07:29 PM
#30
Banned
MotoGP
Thread Starter
Join Date: Aug 2007
Location: Lake View Terrace, CA
Posts: 5,942
I just got the carbs off today and started looking inside and found that everything is stock. I have only had the bike now for a year and this will be the first time doing carb work on a motorcycle. I have Devil high mount exhuast on my bike and have been getting alot of advice on which set up to go with. I'll like this concept better. Has this method been used with alot of high flow exhausts before?


