A 50˘ Solution for CCT modification
 11-24-2011, 12:45 PM
#1
Junior Member
Squid
Thread Starter

Join Date: Dec 2007
Posts: 11

A 50˘ Solution for CCT modification
Three stages to CCT failure ~ denial (that it will happen to me) disbelief (it happened to me) then anger.......that is how I found this forum. Like so many I got wise too late. After a new piston and a built head I started looking at all the after market options for the CCT.
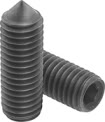
Frankly, I was still pissed at the time at the cost of this small disaster. Bugger the bike, I was determined not spend another dime on it. Kind of stupid really so I finally came up with my 50˘ solution with a couple of 5MX10mm pointed set screws
And this is what it looks like installed
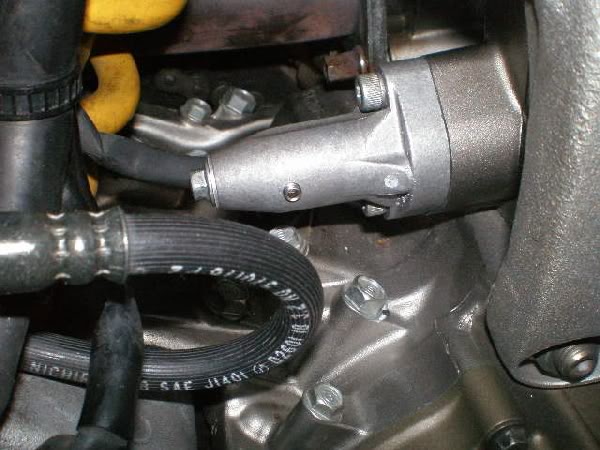
Here are the steps taken to get there:
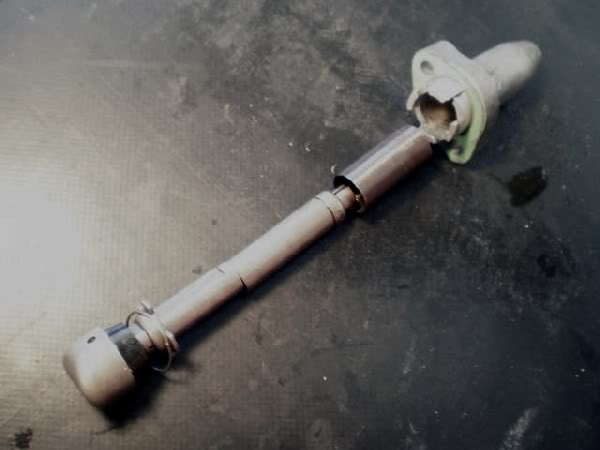
1) Disassemble the CCT
2) Drill hole to tap for the set screw 18.5mm from the top of the CCT body. Be very careful drilling as there is a metal shoulder hidden in the aluminum CCT and this hole hits the edge of it which will throw the drill off center. I trashed my first attempt so beware!!!!! The second time I used a higher RPM with oil, a light touch and some patience.
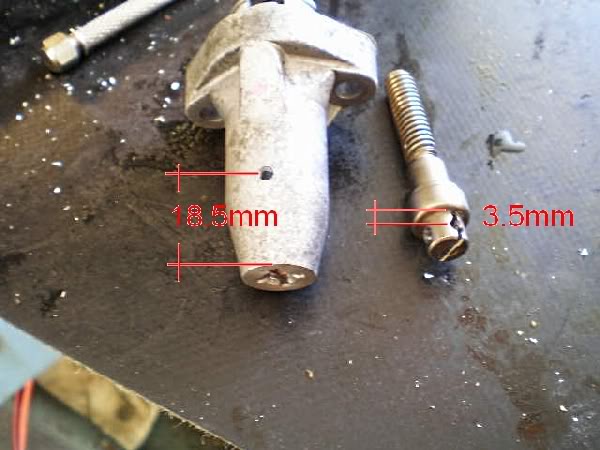
3) Then tap hole for your 5M set screw ~ again due to the steel shoulder a little patience and care is needed otherwise it will snap the tap. I did this modification on two sides but this was probably overkill.
4) Now move on to modifying the CCT adjustment screw. The picture here shows drilling 3.5mm from the top CCT acme screw head.
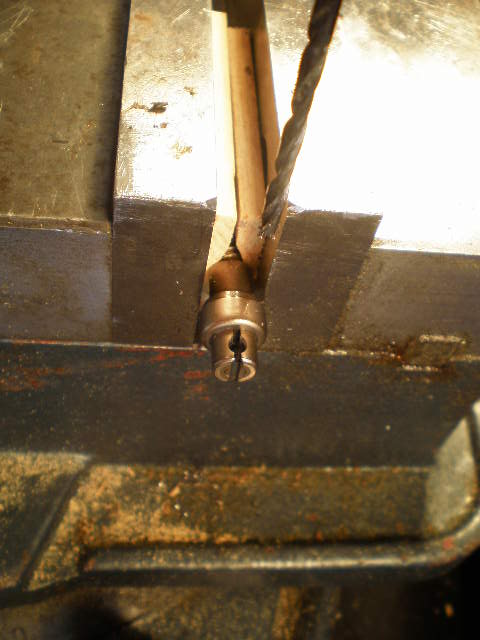
On reflection it is probably better and simpler to make small indents and not even try to drill thru the slot. Use your own judgment here but the idea is to seat the point of the set screw so the CCT adjustment screw does not budge once set.
5) Reassemble making sure to pre-load the CCT spring and install. With the set screws backed out the CCT should tension the cam chain just as if it was stock. Make adjustments to your liking aligning the holes in the CCT screw head with the set screw holes and screw down the set screws securing the CCT screw from moving and backing out.

I have skipped all the very important advise on how to install a new CCT. It is far too easy to let the timing slip on the cam chain when doing this so read all the other technical advise on how to install aftermarket CCT which should be applied here.
As mentioned earlier I tapped both sides of the CCT body so the adjustment screw is captive between two set screws. I think this was overkill and makes adjustment more difficult. The back of the rear CCT is difficult to get to so if I had to do it again, it will be only one set screw per CCT.
I have a four thousand miles on the engine with this mod and I have never been happier. The only problem I had was a slight oil leak from the rear CCT set screws. This was corrected with some PTF (plumbers) tape on the set screws before re-seating them.
Hope you find this useful
J
Frankly, I was still pissed at the time at the cost of this small disaster. Bugger the bike, I was determined not spend another dime on it. Kind of stupid really so I finally came up with my 50˘ solution with a couple of 5MX10mm pointed set screws
And this is what it looks like installed
Here are the steps taken to get there:
1) Disassemble the CCT
2) Drill hole to tap for the set screw 18.5mm from the top of the CCT body. Be very careful drilling as there is a metal shoulder hidden in the aluminum CCT and this hole hits the edge of it which will throw the drill off center. I trashed my first attempt so beware!!!!! The second time I used a higher RPM with oil, a light touch and some patience.
3) Then tap hole for your 5M set screw ~ again due to the steel shoulder a little patience and care is needed otherwise it will snap the tap. I did this modification on two sides but this was probably overkill.
4) Now move on to modifying the CCT adjustment screw. The picture here shows drilling 3.5mm from the top CCT acme screw head.
On reflection it is probably better and simpler to make small indents and not even try to drill thru the slot. Use your own judgment here but the idea is to seat the point of the set screw so the CCT adjustment screw does not budge once set.
5) Reassemble making sure to pre-load the CCT spring and install. With the set screws backed out the CCT should tension the cam chain just as if it was stock. Make adjustments to your liking aligning the holes in the CCT screw head with the set screw holes and screw down the set screws securing the CCT screw from moving and backing out.
I have skipped all the very important advise on how to install a new CCT. It is far too easy to let the timing slip on the cam chain when doing this so read all the other technical advise on how to install aftermarket CCT which should be applied here.
As mentioned earlier I tapped both sides of the CCT body so the adjustment screw is captive between two set screws. I think this was overkill and makes adjustment more difficult. The back of the rear CCT is difficult to get to so if I had to do it again, it will be only one set screw per CCT.
I have a four thousand miles on the engine with this mod and I have never been happier. The only problem I had was a slight oil leak from the rear CCT set screws. This was corrected with some PTF (plumbers) tape on the set screws before re-seating them.
Hope you find this useful
J
 11-24-2011, 05:16 PM
#2
Senior Member
MotoGP

Join Date: Sep 2006
Location: Austin, Tx
Posts: 4,138
No offense but it's not really the device but the assembly. For $97 from APE or Trucker's Version - this a no brainer but this is a good alernative for folks that do not have the $97. The assembly is the important part.
11-25-2011, 10:07 AM
#3
Out of my mind, back in 5
MotoGP

Join Date: Nov 2006
Location: Skurup, Sweden
Posts: 6,109
able2able... Sorry to butt in, but this is NOT a good solution... I would NOT recommend it to anyone else...
This will indefinetly lead to a broken engine at some point... If I where you, at 4k on those, I'd order replacement CCT's, OEM or manual...
The reason for this is pretty simple... You have taken a perfectly working automatic CCT, which should be replaced as a wear item, and made it some sort of hybrid between automatic and manual... As such you haven't fixed the problem, just the symptom...
What makes the stock CCT break and back out, is the fact that the spring is moving around and becomes fatigued, and/or the seat becomes worn... That's when the CCT backs out... And your "fix" doesn't change that at all...
Your spring is still moving around once you have locked the body... And sooner or later, that spring will break... Infact, with the ability to autoadjust gone, your CCT's are probably wearing faster than stock, since the body cannot tighten up, soon leaving the spring moving around in larger cavity than normal, and wearing faster than normal...
When that spring does break, it won't back out, but it will not provide the correct tension anymore... So your CCT's are still a wear item, just as before...
Since they won't back out, they are unlikely to grenade the engine completely, and you will most likely have enough tension to be able to slowly close the trottle, coast to a stop, tow the bike and swap the CCT's, without implosion...
So, better than stock to some extent, but worse than stock in others, but definetly not "fixed"...
11-25-2011, 10:12 AM
#4
Out of my mind, back in 5
MotoGP
Join Date: Nov 2006
Location: Skurup, Sweden
Posts: 6,109
And just FYI, a few dollars more at the hardware store, and you could have bought two carriage bolts, four nyloc nuts, and a pair of cotter pins... That along with a drill press makes the stock CCT housing into a fully manual CCT, with absolutely no wear what-so-ever... No replacement needed, forever... Needs to be adjusted manually though...

 11-25-2011, 07:02 PM
#7
Junior Member
Squid
Thread Starter
Join Date: Dec 2007
Posts: 11
I think there is a misundertsanding
My experience with CCT failure was caused by a stall from high revs while on a steep mountain road as I was slipping the clutch to pull the beast around. The engine stalled and reversed for 1<2 revolutions. This reversal pulled the lightly tensioned side of the cam chain very taught and overcame the spring, backing out the CCT with resulting chain jumping the cam cogs resulting in bent valves.
All I did here was use a couple of set screws to lock the screw that adjusts the chain guide_tensioner that was previously sprung loaded.
As far as I am concerned this turns the stock CCT into a manual CCT and will need regular care and maintenance like any manual CCT.
I like the engine looking stock, but the stock CCT have design issues well documented on this forum. This was my attempt to solve it both the look and the function. Take it on its own merits but realize this mod turns them into manual CCT.
11-26-2011, 12:50 AM
#8
Out of my mind, back in 5
MotoGP
Join Date: Nov 2006
Location: Skurup, Sweden
Posts: 6,109
My experience with CCT failure was caused by a stall from high revs while on a steep mountain road as I was slipping the clutch to pull the beast around. The engine stalled and reversed for 1<2 revolutions. This reversal pulled the lightly tensioned side of the cam chain very taught and overcame the spring, backing out the CCT with resulting chain jumping the cam cogs resulting in bent valves.
All I did here was use a couple of set screws to lock the screw that adjusts the chain guide_tensioner that was previously sprung loaded.
As far as I am concerned this turns the stock CCT into a manual CCT and will need regular care and maintenance like any manual CCT.
I like the engine looking stock, but the stock CCT have design issues well documented on this forum. This was my attempt to solve it both the look and the function. Take it on its own merits but realize this mod turns them into manual CCT.
All I did here was use a couple of set screws to lock the screw that adjusts the chain guide_tensioner that was previously sprung loaded.
As far as I am concerned this turns the stock CCT into a manual CCT and will need regular care and maintenance like any manual CCT.
I like the engine looking stock, but the stock CCT have design issues well documented on this forum. This was my attempt to solve it both the look and the function. Take it on its own merits but realize this mod turns them into manual CCT.
The spring is not just there to adjust the CCT... The spring makes the CCT "dynamic", ie it can flex a little under engine load, making the tension dynamic, and keeping the CCT silent... You have locked the part holding the spring, not the spring itself...
The result is that yes, the CCT is now unable to back out, but the spring is still dynamic... It still flexes... So the spring will still wear... And the spring seat will wear... And no surprises here, those things are weaker and wear faster than the camchain... Also, since the CCT is unable to adjust (the downside of locking it) those two things will likely wear faster than normal...
What you have created is a manual CCT as far as downsides are concerned, ie needing to adjust, in your case "unlocking it" and going for a ride... But it also have a few more... How many miles before it's adjusted and can be locked again? Guessing games... Will it fail immidiately when you unlock it, because the spring seat is now worn? Guessing game...
It is however NOT the same as a manual in terms of advantages... It keeps the spring, meaning it will wear... A fully manual CCT has a solid bolt, and no parts that can move or wear during riding... The only time anything moves is when you unlock the CCT and adjust it...
So, you now have a stock looking CCT, which keeps some of the advantages like a spring keeping it quiet... But with a really, really big dowside, it will wear faster... How much faster is just a guessing game... And since stock CCT's are all over the chart on mileage, you have just made it even harder to predict...
My best of luck to you, and I do think you have "solved" the catastrophic failure mode of backing out with that mod... But you have created another problem in doing so... So again, I DO NOT RECOMMEND THIS TO ANYONE!
If you want a manual CCT, take a look at this...
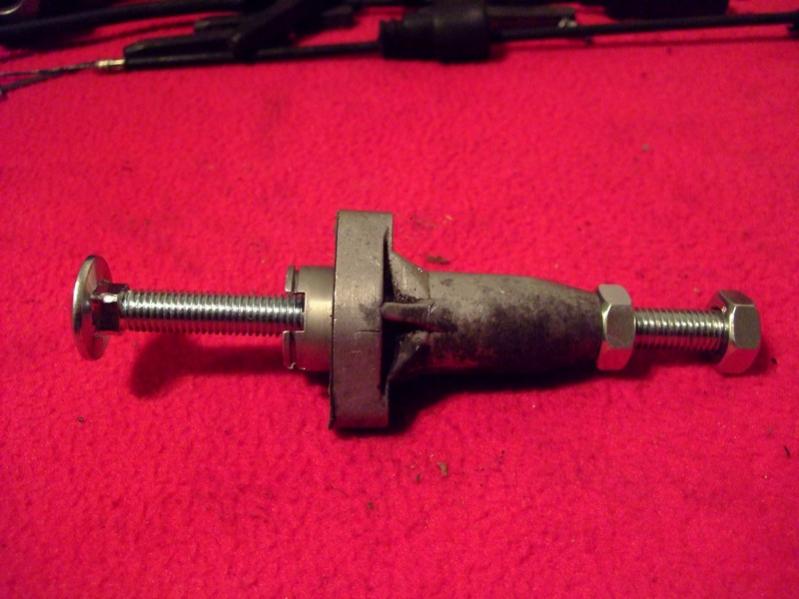
Stock CCT housing, removed insides, drilled and tapped thread for a carriage bolt... Then a nyloc nut (not the one in the image) at the end of the housing with a washer and some sealant to keep it from weeping oil, the nut at the end drilled for a locking pin, so you can use it for adjustment...
It looks stock enough to my eyes, and you can make the bolt a lot shorter, if you are prepared to take it apart once you have set it, making it look even more stock... It needs only about an inch of exposed thread and you can still adjust it for the lifetime of the bike...
11-26-2011, 08:34 AM
#10
Senior Member
SuperSport

Join Date: Jul 2008
Location: Twin Cities
Posts: 505
Pardon my ignorance here, but I am curious exactly how these stock tensioners work. It seems to me like more than just a spring would have to give way. Some sort of locking mechanism. They are more complex than most ther brands of bikes, or the ones I've dealt with anyway. Looks like more adjustability but more moving parts that the ratcheting type.
I've looked at a pic or two and still don't understand it. I'm sure someone here knows what's going on in there. Expoloded diagram maybe?
Shoulda took mine apart when I changed them out. One thing I did do for fun though was putting one in a vice. I squeesed then hell out it. Much more force that I could imagine the chain creating. It bent, but didn't retract.
11-26-2011, 12:34 PM
#11
Out of my mind, back in 5
MotoGP
Join Date: Nov 2006
Location: Skurup, Sweden
Posts: 6,109
Well, if you mean me, I'm not hating... I'm discussing... And I still say it's fixing a symptom, not the problem...
11-26-2011, 01:03 PM
#12
Out of my mind, back in 5
MotoGP
Join Date: Nov 2006
Location: Skurup, Sweden
Posts: 6,109
Pardon my ignorance here, but I am curious exactly how these stock tensioners work. It seems to me like more than just a spring would have to give way. Some sort of locking mechanism. They are more complex than most ther brands of bikes, or the ones I've dealt with anyway. Looks like more adjustability but more moving parts that the ratcheting type.
I've looked at a pic or two and still don't understand it. I'm sure someone here knows what's going on in there. Expoloded diagram maybe?
Shoulda took mine apart when I changed them out. One thing I did do for fun though was putting one in a vice. I squeesed then hell out it. Much more force that I could imagine the chain creating. It bent, but didn't retract.
I've looked at a pic or two and still don't understand it. I'm sure someone here knows what's going on in there. Expoloded diagram maybe?
Shoulda took mine apart when I changed them out. One thing I did do for fun though was putting one in a vice. I squeesed then hell out it. Much more force that I could imagine the chain creating. It bent, but didn't retract.
Removing the moving parts all together makes it unable to fail, but then you are responsible for adjustment...
Locking some of the moving parts but not all, means that logically the wear will accelerate...
Let's see if I can explain the function of the OEM CCT in a understandable way...
Basically the plunger loads the spring, and vice versa... It's meant to take up small differences in tension, like when the engine goes from cold to hot... When the spring is unloaded, the ratchet moves tightening the CCT as the chain wears... You can manually back the plunger out by using a "key", basically a flat screwdriver will work, but without that, it's not supposed to go in that direction...
The ratchet is supposed to only move one way, going in, and tighening the CCT as the chain wears... But if the spring gets worn enough, or other parts inside, the ratchet can back out, which is what happens when the VTR engine self destructs...
The CCT is almost the exact same design as on several other Honda engines from similar years, just the hole design on the body is different in some cases... And none of those are woulnerable to the "self destruct sequence" that the VTR has... Simple reason, the design of the VTR engine means expensive parts can meet when the CCT goes crunch, on a IL4 with a common camshaft for all the cylinders they keep moving somewhat in unison even with a failed CCT, just not perfectly timed... So they just make a lot of noise and you have time to ease of the throttle before you bend stuff... On the VTR, you usually don't have the time for that...
11-27-2011, 02:14 AM
#13
aka tony.mon, vtr1000.org
Squid

Join Date: Mar 2009
Posts: 45
Simple reason, the design of the VTR engine means expensive parts can meet when the CCT goes crunch, on a IL4 with a common camshaft for all the cylinders they keep moving somewhat in unison even with a failed CCT, just not perfectly timed... So they just make a lot of noise and you have time to ease of the throttle before you bend stuff... On the VTR, you usually don't have the time for that...
The reason that the chain skips over teeth on the chainwheel is that although the chain is trying to pull the chainwheel forward, it's acting against the ramp of the cam, which provides enough resistance to "hold" the cam in place while the wheel turns beneath the chain, jumping teeth.
With an il4, the cams are all mounted on either one, two or four camshafts, but either way there are more cam ramps in operation at any one time- those that have passed cam lobe centre will be trying to push the wheel forward under the chainwheel teeth, at the same time as those where the cam is operating on the upside of the ramp are trying to push it backwards.
Net result is that although the chain can't grip the chainwheel securely, it usually grips enough to keep it turning.
This can't happen with the single cam per chainwheel VTR design.
As regards this mod, it's much better than leaving a standard timebomb in place, IMO, but I am concerned about how you adjust it.
If you merely back off the set screw and wait for the CCT to self-adjust under spring pressure, all will be well until the spring fails. Once it has failed, there is no force acting on the CCT, so it won't adjust or move at all. If you start the engine with the screw loosened- cct failure.
The only way that these could be adjusted safely, whether the spring has failed or not, would be to use a small flat blade screwdriver in the end and adjust by hand, but to achieve good tension, unless you've adjusted many of these and can do it by feel alone, you would need to take off the cam covers and check tension that way.
You would need to adjust it by visually checking chain tension.
With a coachbolt conversion, if it sounds like it needs adjusting, you can just nip it up a flat or two while the engine's running, and listen for the rattle to go away. I would have thought that this process with the set screw conversion would be much more difficult; one slip with the screwdriver and the CCT can wind itself straight out.
But good idea, thanks for putting it forward, sometimes an idea needs to be explored before it can be properly evaluated.
11-27-2011, 07:15 AM
#14
Just hangin' out
Back Marker

Join Date: Apr 2011
Location: Delaware, Ohio USA
Posts: 136
One problem with the set screw set up is that, should there need to be adjustment the screw has marked the tensioner rod and that mark will not allow for the adjustment necessary. I have seen this issue on the old Kawasaki and Yamaha units (along with an RM450 Suzuki) that used set screws. The screws mark the adjuster rod and there is a tendency for the rod to slip back to the marks due to vibration and or the fact that the small adjustment the chain may need isn't enough to get the screw far enough away from the mark to get a good seating.
There is also the pressure when the cam drive pushes back under deceleration. The constant pressure may actually cause the adjuster rod to slip. That was the problem we had with the RM. The guy would have the cam drive hit hard enough to push the adjuster rod back. He had to carry an allen wrench with him to fix it. I made him a manual straight thru adjuster bolt cam chain tensioner and no more carrying wrenches. There is just no way that cam drive can compress an 8mm bolt since the stress is directed straight through the center of the bolt.
The set screw will work for one adjustment for sure, but the absolute best set up is a fixed thru bolt. Adjustment locks in, yet can be easily and accurately adjusted as needed.
In a side note, any of the ratchet type tensioners have an issue with the mechanical flaw of indexing in specific steps, the cam drive wears dynamically and has infinite adjustment needs. When the adjuster rack doesn't get fully seated, the cam drive reversal pressure will cause the tensioner rack to snap back under the pawl, chipping and rounding the rack tooth and pawl, allowing it to snap back easier and easier.
I have a ZX6 tensioner in my garage that has evidence of that chipping, the one tooth has the oxide surface chipped away. The next four teeth back show a wear pattern where the tensioner slides back forward when the cam drive pulls taut again in the front... then it happens all over again under decel again... and again and again and again.
These are the things I have seen as I have made tensioners for myself and now several hundred other riders around the world.
Last edited by klx678; 11-27-2011 at 07:20 AM.
11-27-2011, 04:21 PM
#15
Connie Demico does toad?
Superstock

Join Date: Oct 2011
Location: Lakeway
Posts: 383
Hey Kreiger,
I got those ccts installed the other day, a little fiddly but not too bad. Do I need to hear some cam chain noise when cold to verify proper tension? How long should they tick before quieting down? Half a minute, a minute, until the bike is full op temp? Sorry to hijack. Frazier
12-05-2011, 05:54 PM
#16
Senior Member
SuperBike

Join Date: Aug 2005
Location: Fort Wayne, IN
Posts: 1,858
Hey Tweet, I thought the failure mode was, in fact, the spring breaking. You're saying that's not the case?
12-05-2011, 06:09 PM
#17
Senior Member
SuperBike

Join Date: Mar 2007
Location: Belgium, WI
Posts: 1,611
I am certain that mine did not snap. It "does what it should" when out of the bike, but still rattled like mad. I think it gets a lack of lubrication and a bunch of condensation. Only thing I know is that it can't do what it should when in the bike.
12-06-2011, 11:26 AM
#18
Out of my mind, back in 5
MotoGP
Join Date: Nov 2006
Location: Skurup, Sweden
Posts: 6,109
Well, mine didn't snap the spring... The seat of the ratchet mechanism was visibly worn to the point that parts could move around in ways they shouldn't when i did an "autopsy" todrill them and make them manuals, so my guess is that it just "slipped" and backed out...
So it can definitely happen both ways... I dunno which is the most common though, I haven't seen to many people open their CCT's up after a blowup...
So it can definitely happen both ways... I dunno which is the most common though, I haven't seen to many people open their CCT's up after a blowup...
Last edited by Tweety; 12-06-2011 at 11:29 AM.
12-08-2011, 02:40 PM
#19
Just hangin' out
Back Marker
Join Date: Apr 2011
Location: Delaware, Ohio USA
Posts: 136
I got those ccts installed the other day, a little fiddly but not too bad. Do I need to hear some cam chain noise when cold to verify proper tension? How long should they tick before quieting down? Half a minute, a minute, until the bike is full op temp? Sorry to hijack. Frazier
By the way, here is an example of what happens to the Kawasaki ratchet type tensioners:

Last edited by klx678; 12-08-2011 at 02:44 PM.

Thread
Thread Starter
Forum
Replies
Last Post


