buell peg mod w/pics
 04-13-2009, 05:49 PM
#1
Senior Member
SuperBike
Thread Starter

Join Date: Jul 2008
Location: moncton nb canada
Posts: 1,269

buell peg mod w/pics
this mod is easy to do, cheap and effective.
you need a bench grinder and a drill.
get the pegs from your hardley dealer.
you will need to go to some sort of metal, machine shop, or local small engine shop. there you will fabricate a bushing that will pick up the slack between the holes in the buell peg and the honda pin. the bushing needs to be a cylindrical shape with correct OD, and you will drill the correct ID to fit the pin through.
then you will have to grind the pegs a little bit to get them to fit. you will first grind the two mount points to make them more narrow. then you will need to grind the back so they will stop in a level position. the grinding is trial and error. small bits at a time because you don't want to grind too much off. keep going back and forth between taking more off with the bench grinder and fitting them up to the bike.
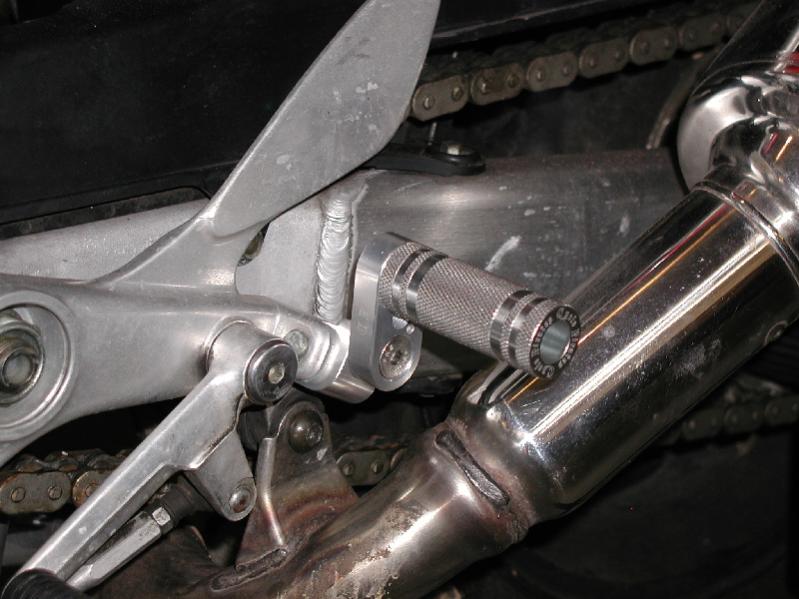
i have the pegs on my hawk and rc51 and it's the exact same proceedure. these pics are my rc51.
you need a bench grinder and a drill.
get the pegs from your hardley dealer.
you will need to go to some sort of metal, machine shop, or local small engine shop. there you will fabricate a bushing that will pick up the slack between the holes in the buell peg and the honda pin. the bushing needs to be a cylindrical shape with correct OD, and you will drill the correct ID to fit the pin through.
then you will have to grind the pegs a little bit to get them to fit. you will first grind the two mount points to make them more narrow. then you will need to grind the back so they will stop in a level position. the grinding is trial and error. small bits at a time because you don't want to grind too much off. keep going back and forth between taking more off with the bench grinder and fitting them up to the bike.
i have the pegs on my hawk and rc51 and it's the exact same proceedure. these pics are my rc51.
Last edited by finepooch; 11-29-2009 at 09:41 AM.

 04-13-2009, 05:56 PM
#3
Senior Member
SuperBike
Thread Starter
Join Date: Jul 2008
Location: moncton nb canada
Posts: 1,269
sorry should have put the link to the buell site up. here is the part:
canada, # N0006.1AD:
http://www.buell.com/en_ca/gear/acce...ProductID=1941
usa, same # N0006.1AD:
http://www.buell.com/en_us/gear/acce...ProductID=1941
canada, # N0006.1AD:
http://www.buell.com/en_ca/gear/acce...ProductID=1941
usa, same # N0006.1AD:
http://www.buell.com/en_us/gear/acce...ProductID=1941
04-14-2009, 12:06 AM
#4
Senior Member
Back Marker

Join Date: Jun 2007
Posts: 158
I've seen the Buell peg swap on a few different bikes. It seems that's something Buell has done better than any other manufacturer...lol
________
Wellbutrin Lawsuits
________
Wellbutrin Lawsuits
Last edited by Malice; 05-01-2011 at 07:28 AM.
04-14-2009, 01:21 AM
#5
Senior Member
SuperBike

Join Date: Jan 2007
Posts: 2,116
Whereas the Buell swap is much cheaper and bring the pegs down about an inch, they also put them back about 3/4" rather than straight down. I eventually wanted them more straight down, so I went with the 8 position adjustable MFW Vario 2-pc adapter/arms and "racing" pegs which cost about $90 total. I got the 1.18" (30mm) lower adapter brackets (arms) but they make 25MM & 50mm brackets too; I thought 50mm ( about 2") was too much. I posted a thread about this before with pics.
see:
http://www.bustersclassic.co.uk/products.asp?id=75
http://www.twistedthrottle.com/trade...view/4687/151/
The trick is removing the locknuct and shortening the threaded rod on the rear brake MC to lower the brake pedal to the max. The shift lever adjusts down enough but I splice-welded 3/4" into the shift lever for my size 11 boots. I also added extensions to the shift lever "peg" and brake pedal "flat" because the Varios bring your boot out about 12mm.
 04-15-2009, 06:14 PM
#9
Senior Member
SuperBike
Join Date: Jan 2007
Posts: 2,116
I think I see a little hole in back for some type of pin for rotation indexing. THe MFW Varios use a castle nut type arrangemet for rotation (8 postions vs CP's 56) that appears stronger, have options for 25, 30 & 50 MM lengths, and their "racing" pegs are lighter & beveled for better ground clearance when set low.
Last edited by skokievtr; 04-15-2009 at 06:22 PM.
04-16-2009, 04:08 AM
#10
Senior Member
Superstock

Join Date: Apr 2007
Location: Warren, NH
Posts: 284
You can mount these in a lot of different potions. I mount them highest location for the track bike. You can actually see the lower mounting hole in the picture also. You can flip the bracket 180 and mount them lower or even forward if you wanted to. They use an indexing pin to locate them with and allen bolt to hold them in place.

 06-07-2014, 11:42 PM
#14
Deals Gap is a Hoot!
Back Marker

Join Date: Mar 2013
Location: St. Louis, Mizzery
Posts: 104
Hmmm it does not look like the "Cycle Pirates" pegs are spring loaded and folding.
I guess your good as long as you don't dump the bike otherwise your SOL if you lay her down...
I like the look and cost is cool but it may be difficult getting the bike home with a snapped off foot peg do to the lack of a place to rest your foot while riding.
SIRR1
I guess your good as long as you don't dump the bike otherwise your SOL if you lay her down...
I like the look and cost is cool but it may be difficult getting the bike home with a snapped off foot peg do to the lack of a place to rest your foot while riding.
SIRR1
06-08-2014, 06:26 AM
#15
Senior Member
SuperBike

Join Date: Sep 2010
Location: Bisbee, AZ
Posts: 1,873
Hmmm it does not look like the "Cycle Pirates" pegs are spring loaded and folding.
I guess your good as long as you don't dump the bike otherwise your SOL if you lay her down...
I like the look and cost is cool but it may be difficult getting the bike home with a snapped off foot peg do to the lack of a place to rest your foot while riding.
SIRR1
I guess your good as long as you don't dump the bike otherwise your SOL if you lay her down...
I like the look and cost is cool but it may be difficult getting the bike home with a snapped off foot peg do to the lack of a place to rest your foot while riding.
SIRR1

Thread
Thread Starter
Forum
Replies
Last Post
joshuatest
Modifications - Cosmetic
4
06-20-2008 08:07 PM
andy9743
General Discussion
6
09-06-2007 12:21 PM


