Valve adjustment... special tools / parts needed?
 03-16-2009, 08:56 AM
#1
Senior Member
SuperSport
Thread Starter

Join Date: Jul 2008
Location: San Diego, CA
Posts: 987

Valve adjustment... special tools / parts needed?
My bike just hit 30K, and although it has manual CCTs. I'm getting a louder tapping noise from the engine. It doesn't sound like an exhaust leak. I tried the "finger tight minus a 1/4 turn" cct adjustment, but I don't feel good about that. I have no idea when the valves where adjusted last, if ever.
I want to adjust the valves and check chain tension. I know the front cover is a bitch to pull, I did it once already for a leak and should have checked the valves then.
The best thread I can find is here: https://www.superhawkforum.com/forum...ad.php?t=16497
Is there anything else?
Are the shims easy to find at the Honda dealer? If not, where do you buy them? The last thing I want is to get the bike all torn apart and then have to wait another 10 days for special order parts. (I'll die if I go more than a week without riding.)
I have the factory manual, so I'll print out those pages.
Anything I'm missing? I thought I'd be able to find a big massive thread with everything you need to know on valve adjustment, but haven't come across it yet.
And of course, anything else that needs doing while you're in there?
Any shortcuts on pulling the front valve cover? Last time I had to loosen the carbs and remove the plastic in front of them.
 03-16-2009, 09:51 AM
#2
Senior Member
SuperSport

Join Date: Jun 2008
Location: San Diego
Posts: 916
Kevin the only special tools that you may need are feeler gauges.
Easy way to swap out shims is to contact some shops and see if they will swap them with you.
There was a seller on ebay selling a whole shim kit you may want to look into that. Or let me know we can go in on halve for it.
Easy way to swap out shims is to contact some shops and see if they will swap them with you.
There was a seller on ebay selling a whole shim kit you may want to look into that. Or let me know we can go in on halve for it.
03-16-2009, 11:03 AM
#3
Fastest Color
SuperBike

Join Date: Jul 2007
Location: Lithia, FL
Posts: 2,091
03-16-2009, 11:24 AM
#4
Will drum for BBQ
Back Marker

Join Date: Jul 2008
Location: Kentucky
Posts: 166
You want a gasket sealer of your choice to put in the half round area of the head to reseal the gasket.
You can get the front cover off by taking the bolts out of the oil cooler and moving it out of the way as much as possible. It will come out without removing anything else (obviously the connecting hoses have to come off the cover.)
You can get the front cover off by taking the bolts out of the oil cooler and moving it out of the way as much as possible. It will come out without removing anything else (obviously the connecting hoses have to come off the cover.)
03-16-2009, 02:25 PM
#5
Senior Member
SuperSport
Thread Starter
Join Date: Jul 2008
Location: San Diego, CA
Posts: 987
On another bike forum I went to, we had some shim kits that floated around and the members would trade.
If there's not one here, maybe I'll just buy that kit and be that guy.
I don't know how you got the cover off from underneath, I wasn't able to get to the back bolts that way, but I'll give it a shot.
I don't need a valve spring compressor?
03-16-2009, 02:31 PM
#6
Senior Member
SuperSport
Join Date: Jun 2008
Location: San Diego
Posts: 916
You would only need a valve spring compressor if you were removing the valves.
As the valves and seats wear the distance that the tip of the stem is from the cam lobe changes.
You have to do the check and adjustment with a cold motor.
As the valves and seats wear the distance that the tip of the stem is from the cam lobe changes.
You have to do the check and adjustment with a cold motor.
 05-15-2009, 07:55 AM
#8
Senior Member
SuperSport

Join Date: Jul 2005
Location: NYC
Posts: 562

Thanks!
05-15-2009, 08:21 AM
#9
Senior Member
SuperSport

Join Date: Nov 2007
Location: Hamilton, Ontario, Canada
Posts: 807
Not much to add. It's essential to have a magnet to remove the buckets over the shims. A torque wrench would lead to more peace of mind. Cable ties, obviously. It's a good time to put in new spark plugs if you're inclined. The best place to start is with the removal of the crankshaft hole cover on the left side cover. They have a tendency to seize. It would be a shame if you'd removed the front cylinder head cover only to discover that you can't rotate the crank.
05-15-2009, 09:03 AM
#10
Senior Member
MotoGP

Join Date: Mar 2007
Location: Phoenix, AZ
Posts: 3,132
BTW to remove the crank shaft hole cover, you can use the spark plug wrench from the standard tool kit turned around, it's the right size hex.. And put one of the standard wrenches from the kit on it first to turn it.
05-15-2009, 09:46 AM
#11
Ottawa, Ont.
Squid
Join Date: Apr 2009
Location: Ottawa, Ont.
Posts: 65
Agreed that rotating the engine by socket wrench is best, but bumping it via the rear wheel in 6th gear is effective ...but a bit Neanderthal.
05-15-2009, 10:49 AM
#12
Senior Member
SuperBike

Join Date: Nov 2004
Location: Richmond, Virginia
Posts: 1,315
My mechanic friend had a couple tricks when we did mine.
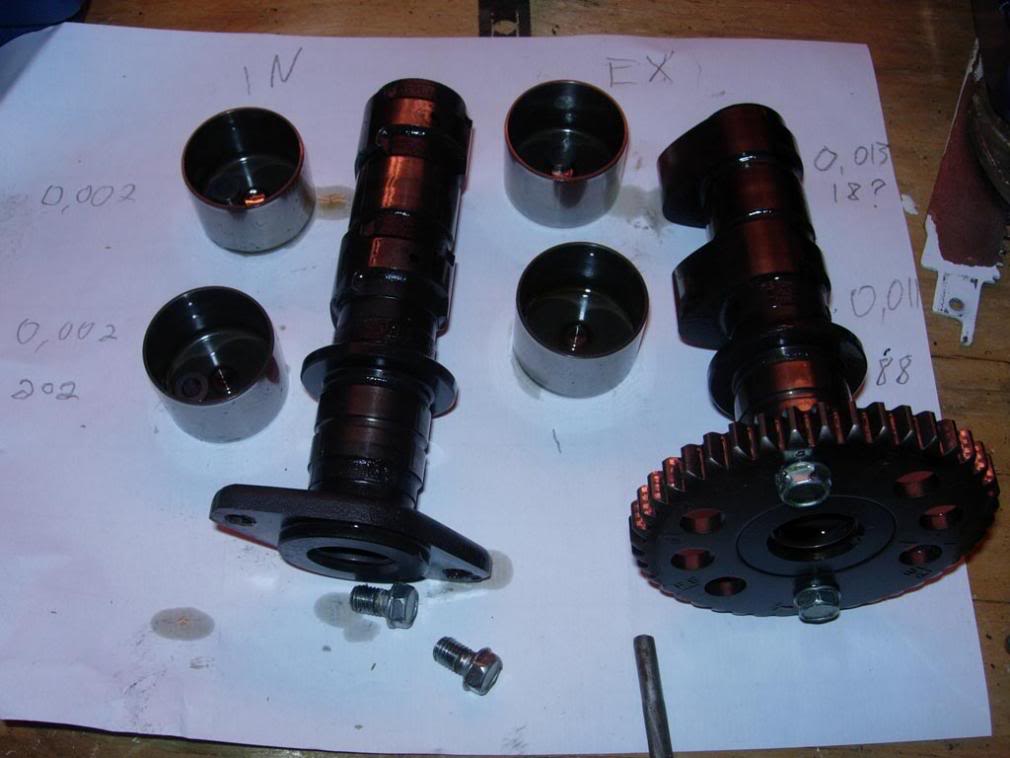
Used Magic Marker to mark the starting position of each cam gear/cam chain position by making a mark across each that we used to match them back up in the same position later.
Also, used little bungees to keep the cam chain under tension to keep it from falling into the cases.
Used the Magic Marker to mark the position of each bucket before removing it (FRE - front right exhaust, RRI - rear right intake, etc.). Just write it on the top surface of the bucket. We had 8 zip-lok bags. Put each matching bucket & shim in a separate bag to keep everything straight when taking them to the dealer to swap the shims.
Take care not to drop the shim down in the engine (as i did) when taking them out & putting them back.
05-15-2009, 11:09 AM
#13
Senior Member
Superstock

Join Date: May 2008
Location: S.Dak USA
Posts: 347
When adjusting valves,first measure the clearance and write down the figures for each valve,then disassemble.Measure each shim in turn with a good micrometer.The clearance is adjusted by increasing/decreasing the shim size (thickness) according to the first measurements you took to attain the required clearance.
So if you had a clearance of 17 thou for valve #1 and you need 15 thou,you need a shim 2 thousands bigger. The trick is careful note taking and careful measurement.When all done you should also sync your carbs. Good luck..!
So if you had a clearance of 17 thou for valve #1 and you need 15 thou,you need a shim 2 thousands bigger. The trick is careful note taking and careful measurement.When all done you should also sync your carbs. Good luck..!
05-15-2009, 12:20 PM
#14
guru of things sparky
SuperSport

Join Date: Oct 2008
Location: Grand Prairie , Texas
Posts: 599
empty egg cartons are great for holding your shims. especially on 16 valve motors.
Put each shim with a strip of paper marked with its cold clearance into the proper egg socket. Do the math for each valve and write down what shim thickness you want for each. swap around shims that have the desired thickness, and pull the oddballs out of the mix...drop in any new shims and assemble.
8 valve motors not as confusing, but so many times shim jobs get done poorly on 16 valve motors only because they confused the shims on re-assembly.
05-16-2009, 05:51 AM
#15
Senior Member
SuperSport
SuperSport

Join Date: Dec 2006
Location: Victoriaville, Quebec, Canada
Posts: 880
+1 on Magnet, torque wrench (small) and feeler gage.
The rest is cake and +1 on the egg cartons for multi valve engines.
For the VTR I used a piece of paper and wrote down the clearances and lifter placement, went like a charm
If you happen to have shims with worn out numbers like me, go get a 20 $ caliper, well worth the money.
The rest is cake and +1 on the egg cartons for multi valve engines.
For the VTR I used a piece of paper and wrote down the clearances and lifter placement, went like a charm
If you happen to have shims with worn out numbers like me, go get a 20 $ caliper, well worth the money.

Thread
Thread Starter
Forum
Replies
Last Post
Bluesuperhawk83
Modifications - Performance
10
05-28-2010 04:40 AM
viperkillertt
Technical Discussion
3
04-21-2009 10:20 AM
AZZKIKER
Technical Discussion
4
03-21-2006 09:43 PM


