My Journey Into the Heart of The VTR
 01-28-2015, 12:09 PM
#1
Senior Member
Superstock
Thread Starter

Join Date: Dec 2014
Location: Dallas, TX
Posts: 283

My Journey Into the Heart of The VTR
When I first logged on to this forum, my interest was in CCTs since my new VTR was making a noise. I have since discovered that the "noise" was more serious. It was a loose rod. I tore it down and upon inspection discovered that not only was the rod bearing suspect, it was actually missing. The pan had a liberal amount of goo and some metal flakes but not nearly enough to account for a missing bearing shell.
My speculation is that the PO did actually pull the sump and removed the rod bearing. He then sold it on. It was not his problem anymore. The video below tells the whole story.
https://www.youtube.com/watch?v=8rUo...ature=youtu.be
With quite a bit of the bike already torn down I decided to go for broke and replace the rods and crank with a good used item. Right now the job has turned into a careful strip down. All components are being bagged in ziplock plastic bags and labeled. My shelves are filling up fast.
 01-28-2015, 12:14 PM
#2
Senior Member
Superstock
Thread Starter
Join Date: Dec 2014
Location: Dallas, TX
Posts: 283
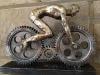
Today, I am far enough along to need supports for the engine and the frame. I am going to build a short sawhorse to rest the rear of the frame on when I pull the swing arm. I needed some sort of A-frame on which to hang my block and tackle to lift the bike and the engine. In the old days I would have muscled the bike around but my back won't take that kind of abuse anymore. I had planned to build a derrick of sorts out of 2x4s and I was looking around the barn for spare lumber. You have to understand that I have 20 years of junk in the barn and outbuildings and I can usually find something to work with. I was looking around when I had to move an, old above ground pool, ladder. We had an above ground swimming pool for the kids years ago and the ladder is the only thing left. All of a sudden it hit me �The pool ladder!� Of course. It�s the right width, the right height, it is rated at 200 pounds when means it will go to 500 or even 600 before collapsing and I only need 350 at most. It�s light weight and if I screw it up its junk anyway.
All the above was theory. It looks really funny but it actually works.

All the above was theory. It looks really funny but it actually works.
01-28-2015, 12:30 PM
#3
Senior Member
Back Marker

Join Date: May 2014
Location: Champions Gate, FL.
Posts: 191
Very creative and looks like you have your work cut out for you. Can't believe prior PO didn't give you fair warning on the damage. Be careful with the hoist and good luck on the repairs.
01-28-2015, 01:03 PM
#4
Senior Member
Superstock
Thread Starter
Join Date: Dec 2014
Location: Dallas, TX
Posts: 283
Anyway, my crank and rods came in today. I paid $89 including shipping so I am a happy camper. All I have to do now is get the engine out, strip and check the rods and crank bearings, install everything and build it back. Piece of cake!

It's starting to make a shelf full of parts in labeled bags. (the PA is my shop sound system.)
Last edited by Big_Jim59; 01-28-2015 at 01:09 PM.
 01-28-2015, 03:08 PM
#6
Administrator
MotoGP

Join Date: Apr 2006
Location: Kempner, TX
Posts: 4,402
Hey Dallas, not local, but not far (in TX Standards)
Have fun with the build.... My motor is almost ready for a refresh.. still gathering parts... But ordered the pistons just today.
keep hoping for a near free motor (case, crank, rods) so i can build with no down time... but no luck yet.
Post up as you go, be nice to follow along.
Do you have the castle nut tool for the frame / engine bolts/ nuts?
Last edited by E.Marquez; 01-28-2015 at 03:15 PM.
01-28-2015, 03:46 PM
#7
Senior Member
Superstock
Thread Starter
Join Date: Dec 2014
Location: Dallas, TX
Posts: 283
01-28-2015, 04:07 PM
#8
Senior Member
MotoGP

Join Date: Jul 2007
Location: NYC
Posts: 5,033
This is an awesome project based on that gantry crane alone. Zip ties holding the angle iron on? Dude, shoot some sheet rock screws in on either side of it at least just for OSHA regulations.
Good luck on the rebuild. Post up your progress.
Good luck on the rebuild. Post up your progress.
01-28-2015, 04:13 PM
#9
Senior Member
Superstock
Thread Starter
Join Date: Dec 2014
Location: Dallas, TX
Posts: 283
I have a Ducati friend that is looking for her own pool ladder since her Monster needs steering head bearings. I may have started a trend.
01-28-2015, 04:20 PM
#10
Senior Member
Superstock
Thread Starter
Join Date: Dec 2014
Location: Dallas, TX
Posts: 283
Hey Dallas, not local, but not far (in TX Standards)
Have fun with the build.... My motor is almost ready for a refresh.. still gathering parts... But ordered the pistons just today.
keep hoping for a near free motor (case, crank, rods) so i can build with no down time... but no luck yet.
Post up as you go, be nice to follow along.
Do you have the castle nut tool for the frame / engine bolts/ nuts?
Have fun with the build.... My motor is almost ready for a refresh.. still gathering parts... But ordered the pistons just today.
keep hoping for a near free motor (case, crank, rods) so i can build with no down time... but no luck yet.
Post up as you go, be nice to follow along.
Do you have the castle nut tool for the frame / engine bolts/ nuts?
Military??
You get that running and we'll do the Sisters ride.
01-28-2015, 05:38 PM
#11
Administrator
MotoGP
Join Date: Apr 2006
Location: Kempner, TX
Posts: 4,402
And mine runs just fine, just want to build a fresh motor.. So.. Pfffffft you get YOURS running and we can go for that ride....lol
Of course there is the part that I teach Basic and Advanced riding most every weekend..., and M-T-W, and 2 Thur a month, and privet lessons in between..... Plus Marquez Racing work load has me backed up 4-6 weeks on taking in new work,,,,,lol.. but hey I'd find the time to ride the sisters again.
Though this time Im getting a hotel down there someplace... it was a 21 hour adventure last time.... Im too old for that chit..
01-28-2015, 06:29 PM
#12
Senior Member
Superstock
Thread Starter
Join Date: Dec 2014
Location: Dallas, TX
Posts: 283
Been here since 2005, yes Military, retied in 1st of the year 2014.
And mine runs just fine, just want to build a fresh motor.. So.. Pfffffft you get YOURS running and we can go for that ride....lol
Of course there is the part that I teach Basic and Advanced riding most every weekend..., and M-T-W, and 2 Thur a month, and privet lessons in between..... Plus Marquez Racing work load has me backed up 4-6 weeks on taking in new work,,,,,lol.. but hey I'd find the time to ride the sisters again.
Though this time Im getting a hotel down there someplace... it was a 21 hour adventure last time.... Im too old for that chit..
An instructor?. All I can say is I have been at this riding thing for 40 years and I still feel like I don't know anything. I don't think I will ever be as good a rider as I want to be.
01-28-2015, 06:45 PM
#13
Administrator
MotoGP
Join Date: Apr 2006
Location: Kempner, TX
Posts: 4,402
I'll take the Viffer if the SHawk's not running by then (but it will be). We rode down on a Saturday night after the shop closed and got to Marble Falls around 11:30. My headlights were picking up deer eyes staring back at us just off the road. No good. We made a long two days out of the trip and it was pretty fast. It's a great ride but I prefer a little easier pace.
An instructor?. All I can say is I have been at this riding thing for 40 years and I still feel like I don't know anything. I don't think I will ever be as good a rider as I want to be.
An instructor?. All I can say is I have been at this riding thing for 40 years and I still feel like I don't know anything. I don't think I will ever be as good a rider as I want to be.
I've been training others at one thing or another for more than 30 years now... and what i know is I don't know it all and that you can be a subject matter expert on a select set of tasks, without being an expert on the whole field.
01-31-2015, 11:02 AM
#14
Senior Member
Superstock
Thread Starter
Join Date: Dec 2014
Location: Dallas, TX
Posts: 283
I made good use of my Saturday. I got the swing arm out. It went kind of slow because I do not have much experience with "modern" suspension linkage. I did expect to find the bearings shot but surprisingly everything works smooth and nothing was stuck. The swing arm pivot shaft was a bear to get out.
I did manage to remove both the counter shaft sprocket bold and the flywheel retaining bolt. I broke a 14mm 3/8" drive socket on the counter shaft sprocket. So I went up to the local auto parts store, which is surprisingly well stocked with tools, and purchased a 1/2" drive 17 and 14. On my return, while I was waiting for my wife to assist me by stepping on the rear brake, I hit the flywheel nut with my rattle gun and the new 17mm socket. To my surprise and delight it spun right out.
I reached back into the "special tools" drawer of my tool box and retrieved my Honda flywheel puller, threaded it into the flywheel and a few taps from the air wrench and it was off. The Counter shaft sprocket nut came off thinks to my trusty Sear's Craftsman 1/2" drive cheater bar, my wife's foot on the rear brake and my not too considerable weight bearing down on the bar.
The engine is now ready to drop out. I am waiting on the frame nut tool I ordered. I tried the frame adjusters using my homemade castle wrench but it slipped and I was afraid of damaging the slots. I decided to hold of and punt, ordering a real wrench to work with.
Progress was made.
02-03-2015, 08:32 PM
#15
Senior Member
Superstock
Thread Starter
Join Date: Dec 2014
Location: Dallas, TX
Posts: 283
I have made it to my destination. The engine is out, the cases are split and like an ancient Mayan priest I have its beating heart in my hand. The rod bearings and main bearings are just nasty. They are all skinned down to the copper and the crank is worn badly in more places then the rod journal. I have a nice used unit from the good folks at eBay.
I still don't know why this all happened. It could be the rod got loose from abuse and after that the oil pressure went south causing the mains to wear. I just don't know. I checked the used crank and rods and one rod shows .004" which is right at the outside of the wear limit. The other rod is .003 which is much better. The looser of the two actually shows a bit of wear but I have no idea how many miles if on this crank. They will get new bearings so the bottom end will be fresh.
I need to check my pistons clearances so I can determine what rings I need and then I can order parts. In the mean time I have a lot of cleanup to do.
Last edited by Big_Jim59; 02-03-2015 at 08:51 PM.
02-04-2015, 03:02 AM
#16
Senior Member
SuperBike

Join Date: Mar 2012
Location: New South Wales Australia
Posts: 1,544
Post plenty of pics mate, be very careful of the rod bolts.
Please use new ones, if you are freshening the bottom end best to do it right.
Painful I know but it's worth it for the peace of mind.
Have a look on here and you will see the results of a rod bolt letting go.
Not pretty to say the least.
Seems you know your way around a bike and you may already be going to do that, however I thought I would chuck my two bobs worth in! (Opinion in Ozzy)
Good luck with the build mate!
02-04-2015, 07:18 AM
#17
Senior Member
Superstock
Thread Starter
Join Date: Dec 2014
Location: Dallas, TX
Posts: 283
Post plenty of pics mate, be very careful of the rod bolts.
Please use new ones, if you are freshening the bottom end best to do it right.
Painful I know but it's worth it for the peace of mind.
Have a look on here and you will see the results of a rod bolt letting go.
Not pretty to say the least.
Seems you know your way around a bike and you may already be going to do that, however I thought I would chuck my two bobs worth in! (Opinion in Ozzy)
Good luck with the build mate!
Please use new ones, if you are freshening the bottom end best to do it right.
Painful I know but it's worth it for the peace of mind.
Have a look on here and you will see the results of a rod bolt letting go.
Not pretty to say the least.
Seems you know your way around a bike and you may already be going to do that, however I thought I would chuck my two bobs worth in! (Opinion in Ozzy)
Good luck with the build mate!
I talked to the head mechanic at the dealership that is a client of mine. He said to be careful. Honda has this system of numbers, colors and letters for cranks, cases and rods that indicate the bearing sizes to be used for that particular crank and block. He built a Gold Wing engine and found the new bearings locked it up. You have to check EVERYTHING!
 02-04-2015, 07:26 AM
#18
Senior Member
Superstock
Thread Starter
Join Date: Dec 2014
Location: Dallas, TX
Posts: 283
I would make one suggestion, based on what I have seen in the engine, that the owners of this bike not lug the engine. I know this bike make a lot of torque and it feels wonderful to power out of a turn without shifting down but I think the bottom end does not like this treatment. We used to see some bottom end troubles in BMWs because people didn't spin the engine they rode then like Harley's thinking that to run them in higher RPM was hurting the engine. I fact it was exactly the opposite. Spinning the engine takes the pounding loads off the rods. Just my two cents.
Last edited by Big_Jim59; 02-04-2015 at 07:52 AM.
02-04-2015, 07:37 AM
#19
Administrator
MotoGP
Join Date: Apr 2006
Location: Kempner, TX
Posts: 4,402
The rods can be reconditioned by any decent auto machine shop. They will press out the rod bolts, grind the mating surface, then resize the big end to perfection .
The small end can be resized as well with a new bushing installed and then honed to size.
This is all common work done when building a motor.. so cost should be minimal. While you're at it, have them stress relieved, polished and weight matched, then have the entire rotating assembly balanced and.......lol yes it never ends
Last edited by E.Marquez; 02-04-2015 at 12:15 PM.
02-04-2015, 10:38 AM
#20
Not Realy A Squid
Squid

Join Date: Sep 2006
Location: Portland Oregon area
Posts: 93
I would suggest while the cases are split to verify all the oil galleries are clear. Just because it had pressure does not necessarily mean everything was getting oil.
You may have already been planning to do that but just in case I thought I would bring it up. Also it will now be here for anyone looking at this thread later.
Walt
You may have already been planning to do that but just in case I thought I would bring it up. Also it will now be here for anyone looking at this thread later.
Walt
02-04-2015, 01:03 PM
#21
Senior Member
Superstock
Thread Starter
Join Date: Dec 2014
Location: Dallas, TX
Posts: 283
I would suggest while the cases are split to verify all the oil galleries are clear. Just because it had pressure does not necessarily mean everything was getting oil.
You may have already been planning to do that but just in case I thought I would bring it up. Also it will now be here for anyone looking at this thread later.
Walt
You may have already been planning to do that but just in case I thought I would bring it up. Also it will now be here for anyone looking at this thread later.
Walt
 02-04-2015, 03:41 PM
#24
Senior Member
Superstock
Thread Starter
Join Date: Dec 2014
Location: Dallas, TX
Posts: 283
 02-04-2015, 06:48 PM
#27
Retired- but not tired!
SuperBike
Join Date: Aug 2010
Location: Pittsburgh
Posts: 1,478
02-07-2015, 07:22 AM
#28
Senior Member
Superstock
Thread Starter
Join Date: Dec 2014
Location: Dallas, TX
Posts: 283
I have taken stock of my parts (crank, rods and case) and have used Honda's number, letter, color codes to determine the necessary bearings. I have made my parts list and turned it in at my dealer (I get a discount!)
Careful examination shows that the bearings failed from the right to the left. I cannot tell what shape the rear rod bearing was in because it is missing but I will assume it was similar the the right main bearing. (See image below.) The right main was locked to the crank. This is the natural state of a spun bearing. Lack of oil makes the bearing surface very hot. It becomes sticky and it locks to the crank.
This is my only concern. The main bearing spun making a slight and I mean really slight indentation in the case. You can feel it if you rake a fingernail over it. The old bearings do not fit, having collapsed but the bearings from the left side fit just fine. I am not going to replace the case. The best insurance against a spun bearing is plenty of clean oil and good oil pressure.
I am still thinking this was caused by abuse and not by any one component failure.