Plastics repair and paint
 04-20-2013, 10:22 PM
#1
Senior Member
Superstock
Thread Starter

Join Date: Apr 2013
Location: SF Bay Area
Posts: 466

Plastics repair and paint
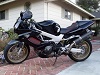
Hi all, I’m new to the SH community and just picked up a 99 SH with 55k mi, high I know but it’s what I could get/ afford. The guy before me used it as a commuter and moved to a dual sport for a more comfortable riding position.
Transferring from a 95 XR250L to a 85 KLR600, with a 01 CR250 for the dirt in the mix, I am new to the street bike world too. The bike is mechanically sound no CCT issues and a new upgraded r/r. With that being said I am open to all advice/feedback I can get. Two sergeant seats and a box of parts sweetened the deal.
The cosmetics left some to be desired…. Cracked fairing, and some body rash. Being the 18 y/o I am and having access to a full shop at school, couldn't leave well enough alone and went to fixing the plastics. The following is the pictures/ steps I've taken so far, with comments. As I got her.
 Dent in tank
 First of the bondo work
 Final Bondo
 Filling in the crack
 Last of the plastic bumper repair, before blocking and drilling hole for mounting
 Back side of mounting hole that was broken.
SuperHawk Forum - KCCO's Album: Repair and Paint
The only aftermarket parts I have for the bike so far are DB Dark Smoke, Targa Formula II cowling, and T-Rex sliders.
Thanks all! Any advise is welcome!
Transferring from a 95 XR250L to a 85 KLR600, with a 01 CR250 for the dirt in the mix, I am new to the street bike world too. The bike is mechanically sound no CCT issues and a new upgraded r/r. With that being said I am open to all advice/feedback I can get. Two sergeant seats and a box of parts sweetened the deal.
The cosmetics left some to be desired…. Cracked fairing, and some body rash. Being the 18 y/o I am and having access to a full shop at school, couldn't leave well enough alone and went to fixing the plastics. The following is the pictures/ steps I've taken so far, with comments.
As I got her. Dent in tank First of the bondo work Final Bondo Filling in the crack Last of the plastic bumper repair, before blocking and drilling hole for mounting Back side of mounting hole that was broken. SuperHawk Forum - KCCO's Album: Repair and Paint
The only aftermarket parts I have for the bike so far are DB Dark Smoke, Targa Formula II cowling, and T-Rex sliders.
Thanks all! Any advise is welcome!
Last edited by KCCO; 04-27-2013 at 09:12 PM. Reason: Found out how to embed photos

 04-20-2013, 11:16 PM
#3
Senior Member
Superstock
Thread Starter
Join Date: Apr 2013
Location: SF Bay Area
Posts: 466
I'm going with a black base with yellow, pearlized, racing stripes all with a satin clear coat. I know the idea of spraying a satin clear over pearl may not make much sense, but I want to see what it will do, I can always take it off and do it again. The stripes are to match the Shoei Glacier Shoei RF-1100 Glacier Helmet - RevZilla
04-20-2013, 11:36 PM
#4
Senior Member
SuperBike

Join Date: Sep 2008
Location: Essex, UK
Posts: 1,707
What kind of filler did you use on the fairings?
I prefer 'plastic bumper' filler as this has elasticity compatible with the ABS plastics.

www.vtr1000.org • View topic - Plastic repair & prep on fairings with pics
I prefer 'plastic bumper' filler as this has elasticity compatible with the ABS plastics.
www.vtr1000.org • View topic - Plastic repair & prep on fairings with pics
04-21-2013, 08:17 AM
#6
Senior Member
SuperSport
SuperSport

Join Date: Aug 2007
Location: Tarpon Springs, FL
Posts: 524
You might not want to bother with pearls if it's going to be underneath matte clear. You'll lose a great deal of the shimmer to the matte. I'm just saying, since pearl is an expensive addition to your scheme, you can save yourself some ducketts.
Nevermind... I see you already mentioned you're aware. If it's an experiment, then I'll shut up.
Nevermind... I see you already mentioned you're aware. If it's an experiment, then I'll shut up.
04-21-2013, 08:47 AM
#7
Senior Member
Superstock
Thread Starter
Join Date: Apr 2013
Location: SF Bay Area
Posts: 466
The yellow and pearl are free, as is the primer, bondo, and sand paper. Must love shop leftovers. The clear is satin, rather than flat, maintaining about 30% "shine" over the 0% "shine" the matte clear would give me. But like I said, that all in theory, we will see what it actually does.
04-22-2013, 04:49 PM
#8
Senior Member
Back Marker
Join Date: Sep 2012
Location: California
Posts: 133
2For ~ $400 you can purchase a full set of fairings including new windscreen off E-Bay. OHH NO DID I JUST RECOMMEND CHINESE FAIRINGS?!?!?!
.....Yes...I most certainly did.
Sure some of the holes need to be re-tapped...~$10 tap kit from Home Depot + matching bolts. Solved.
Sure the Mounting bolts are epoxied on and not part of the initial mold....~$15 epoxy from Home Depot generously applied around all the mounting tabs...Problem solved.
Sure they are thinner and possibly more prone to warping... ~$15 adhesive heat shielding all over the fairings + expanding glue to ensure it stays there. Problem solved and not one person at work who rides can tell they are aftermarket and tell me it looks great.
I DID need to drill out the holes larger...easy
~$400 Chinese fairings + ~$350 tank repair + clear coat + wet sanded to perfection.
Don't Ghetto up your bike just because you are broke, I rode around with cracked fairings until I decided what to do. I still have the OEM fairings just in case.
**Selena motorsports was who I purchased from E-Bay....SURE THEY ALL COME FROM THE SAME FACTORY in China...However this seller gave me $150 off because the windscreen was cracked and I bitched about all the extra work I had to do....(I also said I had to pay someone to do the work...though I did it myself...however time is MONEY)
New painted fairings + Fresh Painted Gas Tank = ~$600
Last edited by WhOrD; 04-22-2013 at 04:52 PM.
04-22-2013, 05:27 PM
#9
Senior Member
Superstock
Thread Starter
Join Date: Apr 2013
Location: SF Bay Area
Posts: 466
WhOrD,
Thanks for the advise, but I'm looking forward to doing the work on the plastics, tanks, and paint. My teach at school has been doing custom cars and bikes for 35 years and runs his own shop. Hes keeping a watchful eye on us, and if I mess it up, it's my own project and not messing up someone else's project. Should be up and "done" (the project is never done haha) in two weeks. Only thing left is the right side of the fairing and paint. I'll post the final product once it's back on the road.
Thanks for the advise, but I'm looking forward to doing the work on the plastics, tanks, and paint. My teach at school has been doing custom cars and bikes for 35 years and runs his own shop. Hes keeping a watchful eye on us, and if I mess it up, it's my own project and not messing up someone else's project. Should be up and "done" (the project is never done haha) in two weeks. Only thing left is the right side of the fairing and paint. I'll post the final product once it's back on the road.
04-25-2013, 04:55 PM
#10
Senior Member
Superstock
Thread Starter
Join Date: Apr 2013
Location: SF Bay Area
Posts: 466
For anyone following the progress: I brought the bike back home today to put it all back together to ride and test for stress cracks before we throw paint on it... I'll be posting more pics once it is back together.
 05-06-2013, 08:04 PM
#12
Senior Member
Superstock
Thread Starter
Join Date: Apr 2013
Location: SF Bay Area
Posts: 466
After tear down and getting more bumper filler here is the results of today's work:

Stripped, drilled, V'd, and scuffed.

Filled and hopefully the last of the bumper filler, bondo to follow tomorrow and primer by Thursday...If everything goes as planned.
Stripped, drilled, V'd, and scuffed.
Filled and hopefully the last of the bumper filler, bondo to follow tomorrow and primer by Thursday...If everything goes as planned.
05-16-2013, 11:28 AM
#13
Senior Member
Superstock
Thread Starter
Join Date: Apr 2013
Location: SF Bay Area
Posts: 466
Brought her back home for the weekend to put back together after priming everything on Friday. Three coats of primer and a nice bake cycle later she's a nice coat of gray and crack free....that is until the left side mirror mount area cracked.

After some discussion we decided to bend some 1/4 in rod that was laying around the shop to match the curve and strengthen the area on the next round of plastic bumper repair. We will also be fabing a shim to relieve any stress on the area. Paint will be sprayed on the 24th, so it will be a busy week prepping.
After some discussion we decided to bend some 1/4 in rod that was laying around the shop to match the curve and strengthen the area on the next round of plastic bumper repair. We will also be fabing a shim to relieve any stress on the area. Paint will be sprayed on the 24th, so it will be a busy week prepping.
05-16-2013, 01:04 PM
#15
evil man of nothing
MotoGP

Join Date: Jan 2006
Location: Boynton Beach, FL
Posts: 4,484
Not sure why you keep having cracks reform but this stuff is the bomb. I've repaired countless cracks and even made new fairing tabs and attached them with this. When I bent the tab hard to test the strength the fairing actually cracked in a different place. Strongest thing I've ever used on plastic fairings.
05-16-2013, 02:32 PM
#16
Senior Member
Superstock
Thread Starter
Join Date: Apr 2013
Location: SF Bay Area
Posts: 466
Capt. I think my issue in the last area was I did not leave enough build on the front side. The stuff I'm using is what the shops in the area use, so I don't think it's the issue. Thanks for the advise, how deep of a coat do you usually use and do you "V" the crack?
05-16-2013, 04:06 PM
#17
evil man of nothing
MotoGP
Join Date: Jan 2006
Location: Boynton Beach, FL
Posts: 4,484
Yeah your technique looks pretty good-from what I've seen you want to round off the end of the crack so it won't spread-drilling a hole seems to work fine as you're doing, and yes I try to widen the crack and feather/"V" it in. Otherwise I just put enough material to fill the area in plus a little more. I did a whole set of fairings before I had them painted on a previous project bike and don't think I used any bondo, just a few coats of primer. And I know it's a lot more work but I'd rather fix oem fairings than buy the Chinese ones. I also mounted up my fairings prior to having them sprayed as you did so I could make sure all the mounting brackets lined up perfect and so I could tweak the ones that didn't. That way there was no stress on the mounting holes which can cause stress cracks in the paint and plastics. Be sure to post up pics when you're done.
05-22-2013, 09:10 AM
#19
Senior Member
Superstock
Thread Starter
Join Date: Apr 2013
Location: SF Bay Area
Posts: 466
Trailered it back to the shop yesterday and started the "final" tear down today, I swear I've put the same amount of miles on the bike as it has on the trailer. I picked up superbike bar yoke and a flat bar from krongsak, excellent communication and pick up, I plan on putting them on during the bake cycles between the coats on Friday. I'll post pics of the paint as it goes.
05-27-2013, 08:02 PM
#20
Senior Member
Superstock
Thread Starter
Join Date: Apr 2013
Location: SF Bay Area
Posts: 466
Sealer and the first two coats of base are on. They will be nibbed tomorrow morning and receive two more coats of base before the graphics are laid out.
This is after the sealer.
Nice paint booth for a high school huu? We got lucky with some grants
This is after the sealer.
Nice paint booth for a high school huu? We got lucky with some grants
05-27-2013, 08:11 PM
#21
Senior Member
Superstock
Thread Starter
Join Date: Apr 2013
Location: SF Bay Area
Posts: 466
Here is the rod that I bent to brace the area where the mirror mounts, aka the latest crack, when it was glued in there was no possible flex so fitting may be fun, but it wont crack again hopefully.

Not plastic nor paint, but this is the latest update: https://www.superhawkforum.com/forum...ke-yoke-30452/

Not plastic nor paint, but this is the latest update: https://www.superhawkforum.com/forum...ke-yoke-30452/
05-28-2013, 08:01 PM
#22
Senior Member
Back Marker

Join Date: Oct 2012
Location: Ottawa Ontario
Posts: 142
Wow that is a nice setup to be working with.. you clearly know a lot more about this stuff then I do..
When I did my plastic repair I went to a sign shop who sold me some ABS plastic about .5mm thick.. I used a heat gun to form it to the orginal area (back side) and then used 2 part ABS cement for plumbing pipes to glue it on, and some clamps to hold it till it cured. had the same crack on the mirror area you have.. that worked for me.. did leave it a little thicker then OEM but everything mounted up fine.
When I did my plastic repair I went to a sign shop who sold me some ABS plastic about .5mm thick.. I used a heat gun to form it to the orginal area (back side) and then used 2 part ABS cement for plumbing pipes to glue it on, and some clamps to hold it till it cured. had the same crack on the mirror area you have.. that worked for me.. did leave it a little thicker then OEM but everything mounted up fine.
05-28-2013, 09:55 PM
#23
Senior Member
Superstock
Thread Starter
Join Date: Apr 2013
Location: SF Bay Area
Posts: 466
Thanks for the kind words, but I cannot take credit for any of this process. My teacher has been showing me the steps. Tonight we just put in another four hours in the prep and booth. That got the nibbing, second base coat, stripes, and the yellow. I'll post a whole load of pictures and steps tomorrow after work. Tomorrow morning we will be the final coat of satin clear.
05-29-2013, 08:21 AM
#24
Senior Member
MotoGP

Join Date: Jul 2007
Location: NYC
Posts: 5,033
kcco, did I miss somewhere exactly what you are using for the plastic repair?
I did an sv a while back and used almost all abs plastic welding with steel mesh as reinforcement. Only a tiny bit of any body filler in some spots.
I am always interested in other ways to do things.
I did an sv a while back and used almost all abs plastic welding with steel mesh as reinforcement. Only a tiny bit of any body filler in some spots.
I am always interested in other ways to do things.
05-29-2013, 08:42 AM
#26
Administrator
MotoGP

Join Date: Apr 2006
Location: Kempner, TX
Posts: 4,402
IMHO, ABS plastic welding is the only better way to repair damaged plastics.. None I have repaired or seen repaired by a company no longer in biz... ever re cracks at the repair site through normal use (yes some were broken again in the same spot in later get offs)
Body filler does not seem to have the flexibility needed to keep from cracking again later...
Your milage may very and if plastic body filer works for you,, great.. But ABS plastic welding and filler material seems to work better for me.
Something like this
http://www.urethanesupply.com/step3b.php
Or this if you need to recreate tabs
http://plastex.net/
05-29-2013, 05:47 PM
#27
Senior Member
Superstock
Thread Starter
Join Date: Apr 2013
Location: SF Bay Area
Posts: 466
Smokinjoe, I'm using SEM Plastic bumper repair 68422. It is what the body shops use to repair "flexible" panels.
Marquez, The amount of bondo used was minimal on the plastic (I know the firts few pictures makes it looked caked on and it was, we later went and cut it down quite a bit), mainly just to fill pin holes. I agree that plastic welding may be the better option but this is what I was able to do. I plan to stay active on this forum, what a great source of knowledge and bad ideas haha. I'll report on the wear and tear at the repair sites.
Marquez, The amount of bondo used was minimal on the plastic (I know the firts few pictures makes it looked caked on and it was, we later went and cut it down quite a bit), mainly just to fill pin holes. I agree that plastic welding may be the better option but this is what I was able to do. I plan to stay active on this forum, what a great source of knowledge and bad ideas haha. I'll report on the wear and tear at the repair sites.
05-29-2013, 06:38 PM
#28
Senior Member
Superstock
Thread Starter
Join Date: Apr 2013
Location: SF Bay Area
Posts: 466
As promised here is the progress: the paint was finished completely today. In the attempt to make this a clean post  , I will embed one prep picture and the product before clear, as before the rest can be seen at: SuperHawk Forum - KCCO's Album: Repair and Paint
Now to the pictures: Here is one of the parts striped and taped for the yellow.

Note the white in the center. I used a vinyl decal for a little extra custom touch
Next comes the yellow. This was a little of a scare because the first coat went down green...

So... less pearl and more yellow

And now the final product, before clear as it was still drying as I had to leave.


And my favorite piece

I'll post up more after I complete final assembly on the bike. Thanks all for the advise and support.
Now to the pictures: Here is one of the parts striped and taped for the yellow.
Note the white in the center. I used a vinyl decal for a little extra custom touch
Next comes the yellow. This was a little of a scare because the first coat went down green...
So... less pearl and more yellow
And now the final product, before clear as it was still drying as I had to leave.
And my favorite piece
I'll post up more after I complete final assembly on the bike. Thanks all for the advise and support.
05-29-2013, 07:02 PM
#30
Senior Member
Superstock
Thread Starter
Join Date: Apr 2013
Location: SF Bay Area
Posts: 466
Easy to get online or in your local body supply shop. Sem Products 68422 Mini-Max Bumper Repair 1oz : Amazon.com : Automotive
I agree that it will be interesting to see how it looks on the bike. I hope it comes out like I imagine. Inspiration was drawn from my helmet as stated in the first few posts and my love for the old cafe style.
I agree that it will be interesting to see how it looks on the bike. I hope it comes out like I imagine. Inspiration was drawn from my helmet as stated in the first few posts and my love for the old cafe style.


