Petcock fix with pics
 08-11-2009, 10:55 AM
#1
Junior Member
Squid
Thread Starter

Join Date: Jun 2009
Location: Milton, ON
Posts: 13

Petcock fix with pics
I was having some idle and running issues and did a search. A few other posts explained the same issues that I had and the most recommended fix was a tear/leak in the petcock diaphragm.
The issues I had were
The new parts, $45 Canadian from Honda, took 1 day to get them

After you remove the seat and lower bolt from the tank put a towel over the metal bracket and seat area so you don't scratch your tank while flipping it upside down like I did.
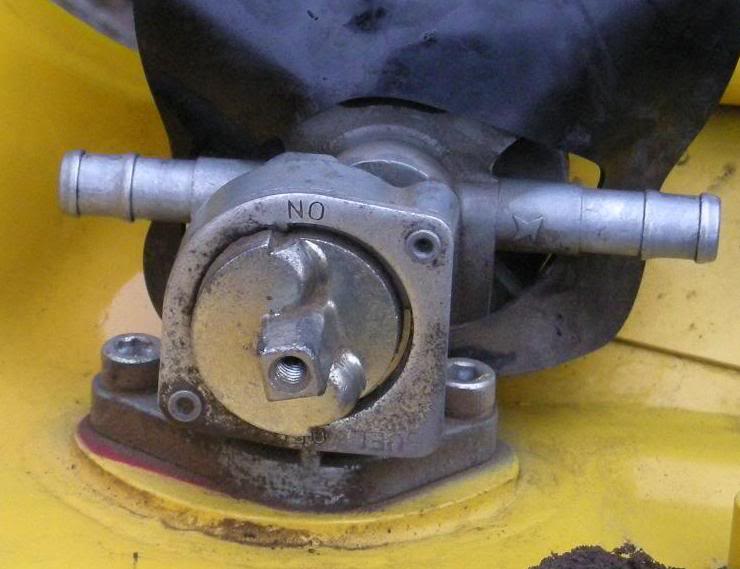
Petcock on the tank, at the front is a square part that you turn to cut off the fuel prior to taking off the hoses. When you remove it with the two Allen bots be careful not to pull or rip the fuel filter and O ring that attaches to the bottom
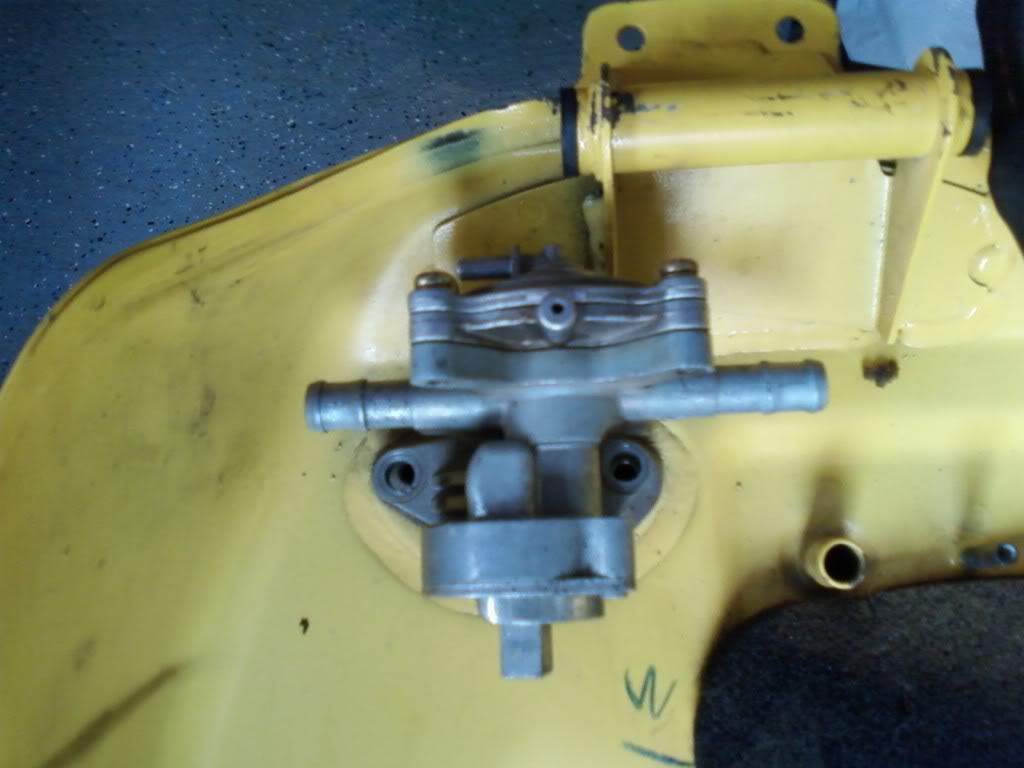
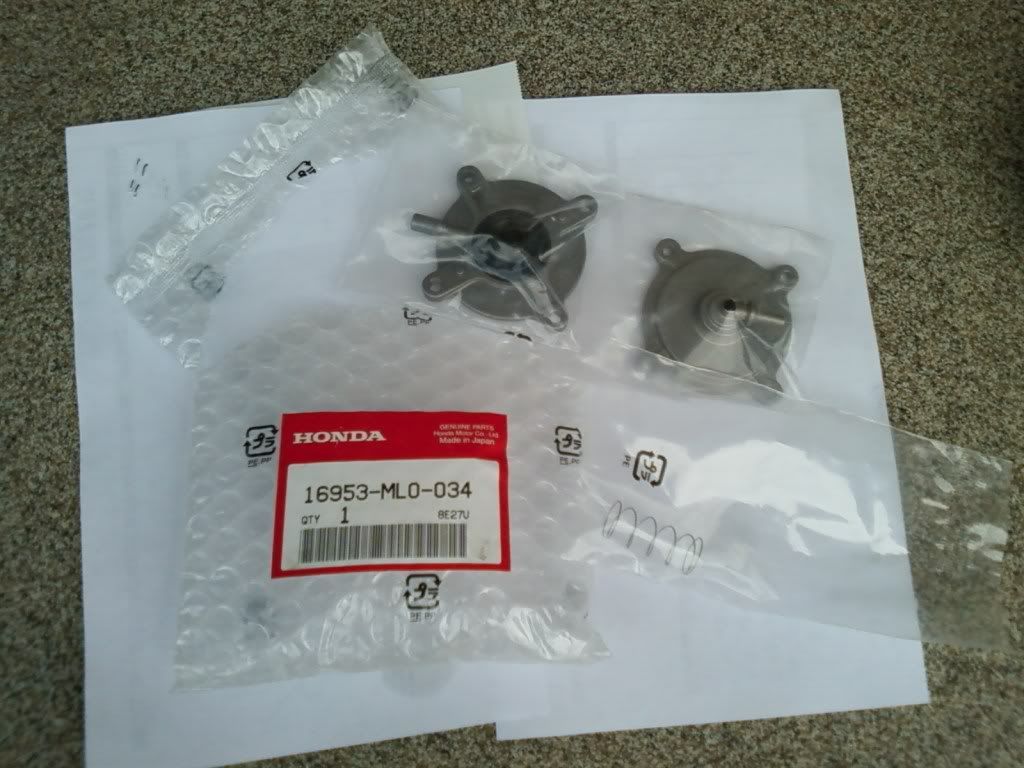
This is the part that gets replaced. Simply remove the four screws. Pay attention to the orientation of the openings. The kit comes with a new spring to go between the two plates.
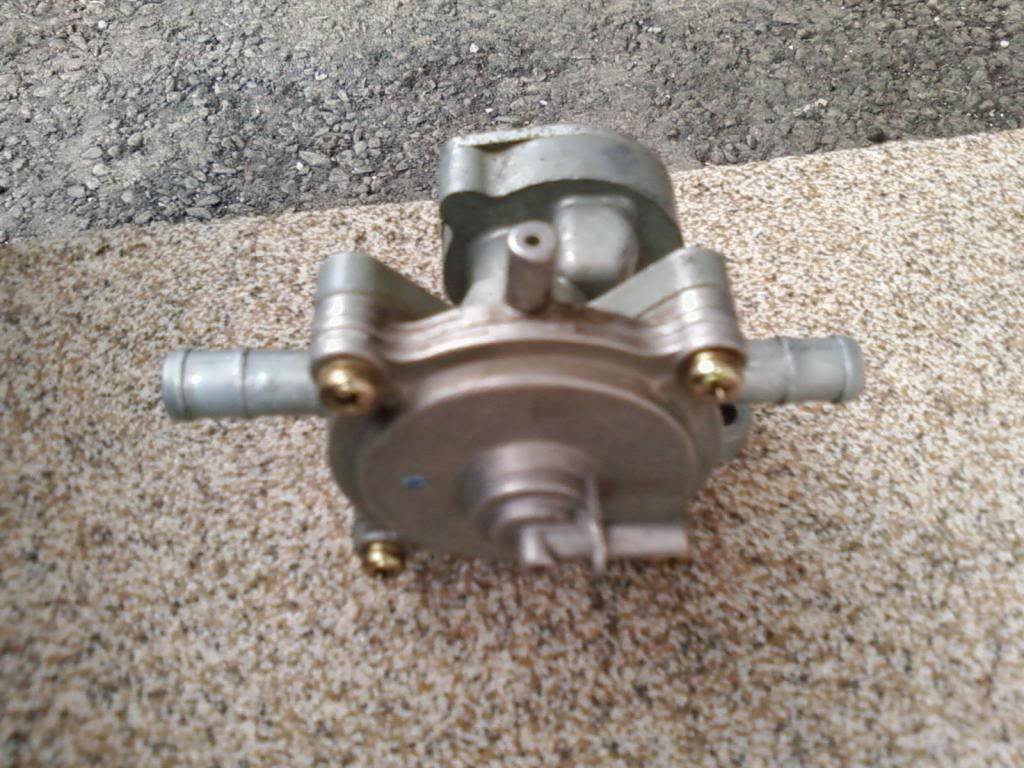
Back in with all the hoses reconnected.
2 hoses go to the carb, they both have the clips on them and due to the bends can't be mixed up.
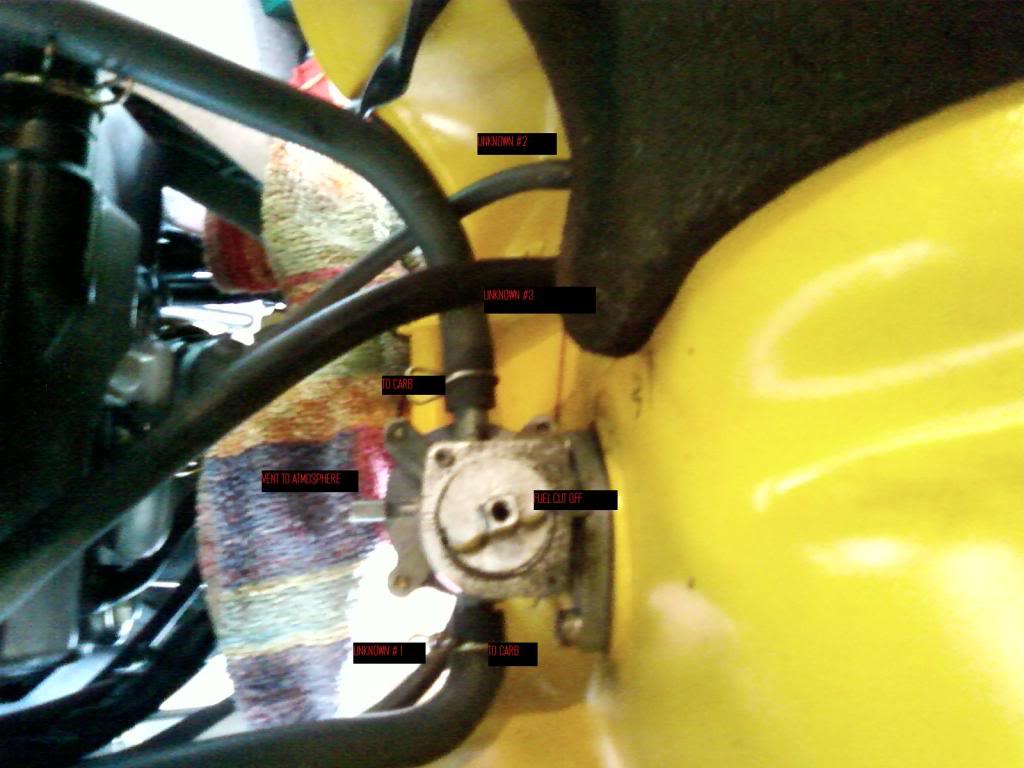
From what I read about the hook up it appears as my petcock was hooked up wrong so I would like someone to verify that this hook up is right. Also if anyone knows what the three unknown hoses are leading to please add that info.
Unknown # 1 has a small clip on it and goes to the side vent of the petcock. The bottom vent on the petcock vents to atmosphere. Here's a better pic of that hose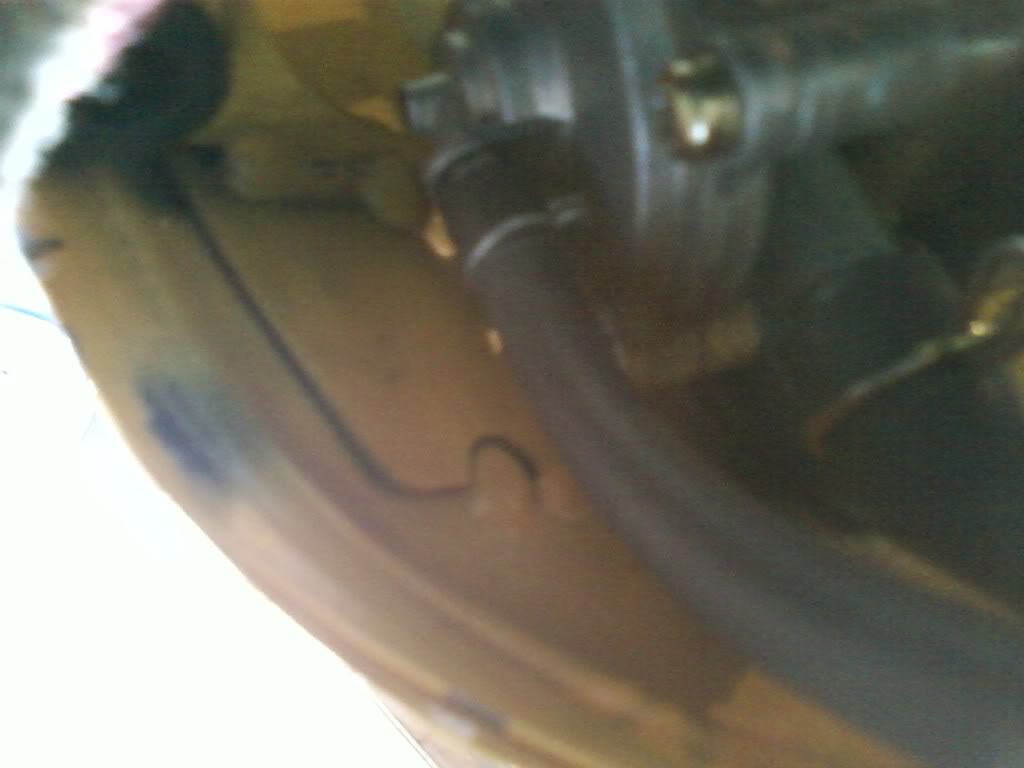
Unknown #2 goes to the far right side. *note* this should be the last hose removed and the first put back since it will leak fuel through the opening. This hose is long enough to leave it on while you flip the tank.
Unknown #3 goes to the larger opening beside #2, it's the only hose that will fit that opening.
Since #2 and #1 appear as they will fit either vent tie them off to their respective sides after removal so you don't mix them up.
The issues I had were
- stalling out at idle
- while cruising at 4-5k rpm I might lose power, be able to cruise but not accelerate more than a smart car with two fat men in it.
- rev it up high in neutral and it would go no problem but not sound that great.
- running rich
The new parts, $45 Canadian from Honda, took 1 day to get them
After you remove the seat and lower bolt from the tank put a towel over the metal bracket and seat area so you don't scratch your tank while flipping it upside down like I did.
Petcock on the tank, at the front is a square part that you turn to cut off the fuel prior to taking off the hoses. When you remove it with the two Allen bots be careful not to pull or rip the fuel filter and O ring that attaches to the bottom
This is the part that gets replaced. Simply remove the four screws. Pay attention to the orientation of the openings. The kit comes with a new spring to go between the two plates.
Back in with all the hoses reconnected.
2 hoses go to the carb, they both have the clips on them and due to the bends can't be mixed up.
From what I read about the hook up it appears as my petcock was hooked up wrong so I would like someone to verify that this hook up is right. Also if anyone knows what the three unknown hoses are leading to please add that info.
Unknown # 1 has a small clip on it and goes to the side vent of the petcock. The bottom vent on the petcock vents to atmosphere. Here's a better pic of that hose
Unknown #2 goes to the far right side. *note* this should be the last hose removed and the first put back since it will leak fuel through the opening. This hose is long enough to leave it on while you flip the tank.
Unknown #3 goes to the larger opening beside #2, it's the only hose that will fit that opening.
Since #2 and #1 appear as they will fit either vent tie them off to their respective sides after removal so you don't mix them up.
 08-11-2009, 11:40 AM
#2
Senior Member
MotoGP

Join Date: Mar 2007
Location: Phoenix, AZ
Posts: 3,132
Unknown #1 is the vacuum hose that makes the petcock work, and the one that people often mistakenly put on the air vent. (that creates PVLIR)
Unknown #2 is the tank vent (allows air into the tank to prevent it collapsing as the gas comes out)
Unknown #3 is the overflow hose (connects to the recessed part around the fill cap to drain excess gas from overfilling the tank)
Unknown #2 is the tank vent (allows air into the tank to prevent it collapsing as the gas comes out)
Unknown #3 is the overflow hose (connects to the recessed part around the fill cap to drain excess gas from overfilling the tank)

 06-23-2010, 08:25 AM
#5
Member
Squid

Join Date: Feb 2009
Posts: 37
Bit of an old thread revival. My petcock is leaking and I want to rebuild it, my Honda dealer cannot find a rebuild kit although he can find the part number on the bag below:
His computer says "cover" when he punches in the above part number, but it is about $45. Has anyone else had any luck ordering the above part number? Does it include all three pieces that the above photo shows? I PM'd the OP for input but without a response yet I am getting impatient (sorry).
The parts guy wants me to buy a whole petcock saying Honda does not show a "rebuild kit"...Frankly, that makes me want to chuck the whole bike in the crusher and move on.
 06-23-2010, 09:04 PM
#9
Member
Squid
Join Date: Feb 2009
Posts: 37
http://stores.shop.ebay.ca/Sirius-Co...__W0QQ_armrsZ1
Only $21
06-23-2010, 10:18 PM
#10
Senior Member
SuperSport

Join Date: Feb 2010
Location: NY State
Posts: 667
07-01-2010, 01:10 PM
#11
Member
Squid
Join Date: Feb 2009
Posts: 37
Thats what they tell me, don't do it...I purchased an after market rebuild kit today (contains all the rubber pieces, screws and spring) on ebay from these guys:
http://stores.shop.ebay.ca/Sirius-Co...__W0QQ_armrsZ1
Only $21
http://stores.shop.ebay.ca/Sirius-Co...__W0QQ_armrsZ1
Only $21
Other times I assemble it and it leaks almost immediately.
Frustration is setting in as this bike seems to be fighting me every step of the way, it does not want to run again.
I am beginning to think it was not assembled properly by a PO (certainly the vacuum port points straight down, not to the side as it should). Does anyone have a drawing or an explanation of how to assemble it properly?
I have assembled it in a way that seems self explanatory, and in the same way that I originally disassembled it.
Any information would be appreciated, thanks.
07-01-2010, 01:16 PM
#12
Out of my mind, back in 5
MotoGP

Join Date: Nov 2006
Location: Skurup, Sweden
Posts: 6,109
The port pointing straight down on the petcock is the went for the backside of the membrane... That should not have a line on it... The line on the middle of the backside should most definetly go to the side... Look at the pics in the top posts...
07-01-2010, 01:26 PM
#13
Good Root
Squid
Squid

Join Date: Jul 2009
Location: Shoebox
Posts: 87
Quick question while there are pics, but do all Hawks have the petcock mounted to the bottom of the tank?
I only ask because my 2001 has it attached to the frame next to the tank mount.
Makes it a bit more interesting when removing the tank.
BBB
I only ask because my 2001 has it attached to the frame next to the tank mount.
Makes it a bit more interesting when removing the tank.
BBB
07-01-2010, 01:37 PM
#14
Out of my mind, back in 5
MotoGP
Join Date: Nov 2006
Location: Skurup, Sweden
Posts: 6,109
Nope... 97-00 has them on the tank, the newer all have them on the frame like yours... Why remove it? Just stick in the hinge and tilt them back with a rag in between... If necessary it's one bolt to remove that from the frame...
BTW that's mainly used to lift at the rear end of bikes for various purposes, I was just using it so I wouldn't knock the tank over... Just don't do that with a full tank or pinch the overflow and vent lines first...
BTW that's mainly used to lift at the rear end of bikes for various purposes, I was just using it so I wouldn't knock the tank over... Just don't do that with a full tank or pinch the overflow and vent lines first...
Last edited by Tweety; 07-01-2010 at 01:41 PM.
07-01-2010, 03:34 PM
#15
Member
Squid
Join Date: Feb 2009
Posts: 37
On my last attempt at petcock re-assembly I did rotate the port to the side again. This did not help, it leaked everywhere long before any vacuum was applied.
Not sure why the port would need to be sideways, when I look at the cover I cannot see a difference, I assume Honda must have been worried about the vacuum line getting kinked and not releasing (or building) a vacuum.
07-01-2010, 07:31 PM
#16
Member
Squid
Join Date: Feb 2009
Posts: 37
Agreed, the vent is not covered.
On my last attempt at petcock re-assembly I did rotate the port to the side again. This did not help, it leaked everywhere long before any vacuum was applied.
Not sure why the port would need to be sideways, when I look at the cover I cannot see a difference, I assume Honda must have been worried about the vacuum line getting kinked and not releasing (or building) a vacuum.
My vacuum is not releasing, when I held the diaphragm "sandwich" together and used a tube to suck (with my mouth) on the vacuum port it would easily draw the diaphragm in, but when I stop sucking the vacuum does not relieve. In fact I could let go of the "sandwich" and the vacuum is strong enough to hold it together, regardless of the spring attempting to force them apart.
This is consistent with my findings of the petcock typically working immediately after assembly until I apply vacuum once at which point the petcock never closes again.
The reason for this could be one of two things:
- I can only blow/suck through the vacuum port in one direction (suck). I cannot blow through it at all. In effect this is functioning as a one way valve. Is this the way it is supposed to be? If so, how is the vacuum relieved to close the petcock?
- I attempted to force some WD-40 through the port (using the WD-40 straw), I could not get anything to flow through it.
- It does appear that there is some basic mechanism (another diaphragm?) on the vacuum port, I could see no easy way to disassemble this to inspect it.
- This is the way it is supposed to function and I have not waited long enough? Does this vacuum port allow a VERY small amount of flow back through it, requiring a few seconds or a minute to close it?
- This seems unlikely to me because of one past experience: Last fall when I went to drain the floats it seemed like an awful lot of gas was being drained (certainly more than the float bowl/hose could hold). I didn't think anything of it at the time as my reason for draining the carb was to get Stabil into the float bowls more so than drain the floats. Of course my new found knowledge of this petcock has shown me that this would not be possible.
Thanks.
07-04-2010, 07:30 PM
#18
Senior Member
Back Marker

Join Date: Aug 2009
Location: North
Posts: 112
I ordered Honda part #16953-ML0-034 from the dealer. Should have it in a day or 2 so that I can re-build mine.
I would just make sure I pay attention when I take mine apart, and then re-assemble it properly.
Sounds simple enough, not sure why you are having problems??
I would just make sure I pay attention when I take mine apart, and then re-assemble it properly.
Sounds simple enough, not sure why you are having problems??
Last edited by storm_rider; 07-04-2010 at 07:38 PM.
07-04-2010, 10:35 PM
#19
Member
Squid
Join Date: Feb 2009
Posts: 37
I ordered Honda part #16953-ML0-034 from the dealer. Should have it in a day or 2 so that I can re-build mine.
I would just make sure I pay attention when I take mine apart, and then re-assemble it properly.
Sounds simple enough, not sure why you are having problems??
I would just make sure I pay attention when I take mine apart, and then re-assemble it properly.
Sounds simple enough, not sure why you are having problems??
Mine is uni-directional so far, not sure if this is correct or not. If this is correct I have no idea how the vacuum is supposed to "release" to stop flow.
Thanks.
07-06-2010, 01:11 PM
#20
Senior Member
MotoGP
Join Date: Mar 2007
Location: Phoenix, AZ
Posts: 3,132
I remember hearing that you can empty the tank by just providing suction on the petcock for a brief moment.. So that sounds normal. Perhaps there is positive pressure in there for a second when you shut down? Or perhaps it shuts off if there is no fuel flow?
07-06-2010, 01:23 PM
#21
Out of my mind, back in 5
MotoGP
Join Date: Nov 2006
Location: Skurup, Sweden
Posts: 6,109
AFAIK it's a combination of no pressure, the spring and no flow... Ie as long as you have fuel flowing, it will stay open without pressure... That's normal... So for all I know, your petcock should work as intended kraher... Dunno what tests on the bike yielded? Or have you only tested it off the bike?
BTW What is it with you guys and WD40? It has absolutely no business near a fuel line, let alone the petcock... It's not a wonderful multi use chemical that cures all ill's... It'a giant PITA that messes up most things people try to use it on without knowing the effects... Take that petcock apart and clean every last molecule of WD40 of those membranes or you will be replacing them in a few months time...
BTW What is it with you guys and WD40? It has absolutely no business near a fuel line, let alone the petcock... It's not a wonderful multi use chemical that cures all ill's... It'a giant PITA that messes up most things people try to use it on without knowing the effects... Take that petcock apart and clean every last molecule of WD40 of those membranes or you will be replacing them in a few months time...
 07-06-2010, 06:33 PM
#23
Member
Squid
Join Date: Feb 2009
Posts: 37
AFAIK it's a combination of no pressure, the spring and no flow... Ie as long as you have fuel flowing, it will stay open without pressure... That's normal... So for all I know, your petcock should work as intended kraher... Dunno what tests on the bike yielded? Or have you only tested it off the bike?

The way I originally discovered the "problem" was that I disconnected the fuel line after the bike had not run in (at least) a few days and gas started pouring everywhere. Luckily I was able to plug it with my finger and had an 8mm wrench within reach to close the valve.
I guess I can see the vacuum taking a few seconds to stop flow, but days?? If it is days why not just have a gravity feed? I could easily live with it this way if I could turn the gas off without lifting the tank. I am not a fan of gas-oil or hydro-locked cylinders.
Unless, as said by lazn it takes a low flow condition to close. But, the testing I did most recently did not even have the petcock assembled, just the back "sandwich" (no flow whatsoever) and it still was not releasing the vacuum. If I have nuts to temporarily assemble the sandwich I can perform a longer than 10 second test.
Regarding tests on the bike: What tests can be done? The bike runs fine and is clearly getting fuel. Disconnecting the fuel line(s) after not running or cranking in days results in fuel gushing everywhere. I think the float needles are holding off the flow as they should, but I don't like relying on that too much.
BTW What is it with you guys and WD40? It has absolutely no business near a fuel line, let alone the petcock... It's not a wonderful multi use chemical that cures all ill's... It'a giant PITA that messes up most things people try to use it on without knowing the effects... Take that petcock apart and clean every last molecule of WD40 of those membranes or you will be replacing them in a few months time...
WD-40 was merely used because it has that convienient "straw" that I thought could be used to clear the vacuum port...to no avail. In my experience WD seems safe for rubber, but I am no expert and am certainly not going to pass that on as truth.
Thanks again for all the help...god I love forums for troubleshooting.
 07-06-2010, 08:03 PM
#24
Member
Squid
Join Date: Feb 2009
Posts: 37
I'm stumped, what exactly is the point of the vacuum petcock if it never closes?
07-06-2010, 08:20 PM
#25
Senior Member
MotoGP

Join Date: May 2008
Location: San Clemente, CA
Posts: 3,451
BTW What is it with you guys and WD40? It has absolutely no business near a fuel line, let alone the petcock... It's not a wonderful multi use chemical that cures all ill's... It'a giant PITA that messes up most things people try to use it on without knowing the effects... Take that petcock apart and clean every last molecule of WD40 of those membranes or you will be replacing them in a few months time...
07-06-2010, 11:42 PM
#26
Out of my mind, back in 5
MotoGP
Join Date: Nov 2006
Location: Skurup, Sweden
Posts: 6,109
It should be fairly obvious... Clean stuff with fuel... That's after all what the fuel line is made for...
BTW, that's not right... It should take a while and all, but it should close...
BTW, that's not right... It should take a while and all, but it should close...

 07-07-2010, 10:41 AM
#28
Administrator

World Champion

Join Date: Dec 2004
Location: Fulton, MO
Posts: 105,287
Gasoline is a distillate of petroleum as well. WD40 is mostly kerosene. It's also safe for most rubber. Again, depends on the type of rubber you're talking about. They make "rubber" o-rings out of hundreds of different compounds.
07-07-2010, 01:45 PM
#30
Member
Squid
Join Date: Feb 2009
Posts: 37
The thing is, unless my vacuum port is buggered and only flowing one direction this makes perfect sense to me. There is no way for air to get back in and allow the spring to push the diaphragm back.
99 VTR1000 for sale...cheap, problems unknown with petcock.


