KB Article #4 - Throttle Position Sensor
 11-04-2006, 08:11 PM
#1
Administrator

World Champion
Thread Starter

Join Date: Dec 2004
Location: Fulton, MO
Posts: 105,287

KB Article #4 - Throttle Position Sensor
This modification will improve low end response and smoothness on the VTR. It is especially effective if you have rejetted the carbs.
Disclaimer
This procedure requires a level of mechanical ability and you may screw it up. I take no responsibility for the effectiveness of this procedure and by doing it you assume all responsibility for the consequences. There, now that the mandatory jargon is dealt with I hope it works as well for you as it has for me. I have been most pleased.

Remove tank seat, place towel over bike where seat went. NOTE the two front bolts with washers go through metal grommets that YOU WILL LOOSE unless precautions are taken. When removing the tank be careful and pull them out of the rubber grommets, coat with contact cement and replace. Also be careful that the "bumpers" on the side of the tank are not dislodged.

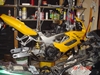
Next remove the airbox top, by undoing the screws around the perimeter. Lift the back of the airbox top and remove the air filter, then remove the airbox top. You will see this:
Note that the short trumpet (or velocity stack) is in the front.

Remove the trumpets.
Remove the 8 screws (careful now don't drop them down the carbs!!!), then release the clips holding the various hoses to the airbox. Next tip the airbox back.
And unscrew the PAIR valve on the bottom of the airbox.
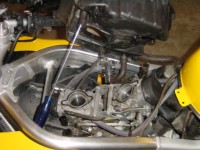
Loosen and remove the carbs from the boots. There are clamps around the boots. Loosen the one closer to the carbs. There is no need to remove the throttle cables, choke cables and carb heating hoses. You just need them off enough to be able to get to the TPS.
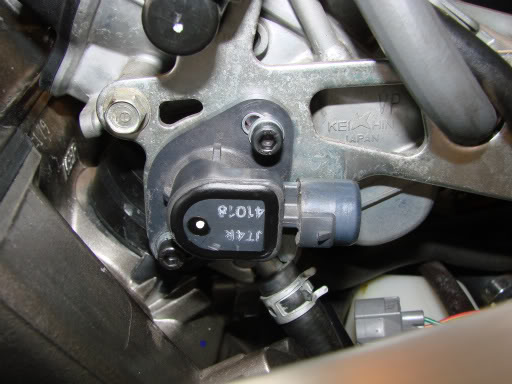
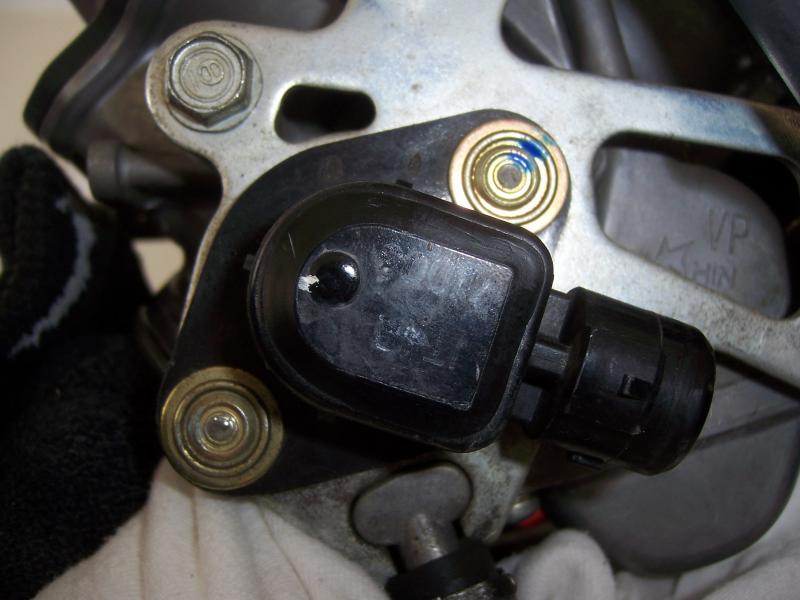 The throttle position sensor is used to vary the ignition timing for operating conditions based of throttle position (hence the clever name). The factory manual suggests that it needs to be set at 500 ohms +- 10. That is a tight tolerance. The folks that make the "factory" brand of jet kits suggest that it is "impossible to get a steady state low throttle cruise" if it is not set to that. I have done a couple of VTR's now and they were both over 700 ohms (one at 760 and the other at 810). Setting the TPS to the suggested value seems to make a big difference in bottom end. the bike will pull cleanly from as low as 2000 rpms and is much smoother.
Perhaps someone out there has a captive dynamometer and can give us some scientific data, however most dyno work is done at full throttle and it is the partial throttle and "tip in" that is most affected by this. I can pull off in second gear without touching the throttle!
After removing the factory screws, slotting and adjusting the TPS and replacing the screws with new.. it'll look something like this

Take 2 pieces of wire and 2 spade connectors or any such other contrivance as your fertile imagination can come up with and connect the ohm meter to the TPS. Measure the resistance between the top and middle pins. Resist the temptation to use the old mechanics trick of pushing a dressmakers pin into the wires as this leaves a place for invisible corrosion and may cause a failure at some time in the future. It should be 500 ohms +- 10 Ohms.
The TPS is located on the right side of the rear carb. Remove the electrical connector. Place a shop cloth under the carbs. Center punch the shear bolts and drill them to about 1/8 inch depth using the 1/16 bit. Then drill them out using the 3/16 bit. Some people have reported success using a dremel to slot the shear head screws and then removing them with a small screwdriver. Suit your self. Remove the shop cloth with the drill filings.
Once you have the TPS off you will see that the holes are elongated to facilitate adjustment. Replace the TPS using the 5mm screws with washers and set it to 500 ohms by rotating it on the screws. If you cant get it low enough then the tabs on the throttle shaft will have to be adjusted, Sorry but I forgot to take a picture of that! To get a larger range of adjustment downwards bend the leftmost tab to the left a small amount. reinstall the TPS and set it to 500 ohms. Repeat in small steps if your first tweak isn't enough. Tighten the screws and RECHECK.
Once you have the setting correct replace the connector.
Replace the PAIR valve. (unless this is when you have decided to rip all that stuff off)
Reinstall the carbs and airbox
Replace the trumpets (short one in the front). I did try the bike with 2 long trumpets, and it did noticeably increase the bottom end, no loss of top end by my seat of the pants dyno. 2 short ones didn't seem to make any difference from stock.
Replace the airbox top, and filter.
Replace the tank, watch out for the 2 metal grommets and 2 bumpers.
Replace the seat
DONE at last, should take 30-60 minutes
-Art
Throttle Position Sensor adjustment
By: Art Rutledge (vtrnut@biohazmat.com)
This modification will improve low end response and smoothness on the VTR. It is especially effective if you have rejetted the carbs.
By: Art Rutledge (vtrnut@biohazmat.com)
This modification will improve low end response and smoothness on the VTR. It is especially effective if you have rejetted the carbs.
Disclaimer
This procedure requires a level of mechanical ability and you may screw it up. I take no responsibility for the effectiveness of this procedure and by doing it you assume all responsibility for the consequences. There, now that the mandatory jargon is dealt with I hope it works as well for you as it has for me. I have been most pleased.
Tools Needed
- [*]
- [*]
- [*]
- [*]
- [*]
- [*]
- [*]
- [*]
- [*]
- [*]
- [*]
- [*]
- [*]
- [*]
- [*]
- [*]
Procedure
Remove tank seat, place towel over bike where seat went. NOTE the two front bolts with washers go through metal grommets that YOU WILL LOOSE unless precautions are taken. When removing the tank be careful and pull them out of the rubber grommets, coat with contact cement and replace. Also be careful that the "bumpers" on the side of the tank are not dislodged.
Next remove the airbox top, by undoing the screws around the perimeter. Lift the back of the airbox top and remove the air filter, then remove the airbox top. You will see this:
Note that the short trumpet (or velocity stack) is in the front.
Remove the trumpets.
Remove the 8 screws (careful now don't drop them down the carbs!!!), then release the clips holding the various hoses to the airbox. Next tip the airbox back.
And unscrew the PAIR valve on the bottom of the airbox.
Loosen and remove the carbs from the boots. There are clamps around the boots. Loosen the one closer to the carbs. There is no need to remove the throttle cables, choke cables and carb heating hoses. You just need them off enough to be able to get to the TPS.
The throttle position sensor is used to vary the ignition timing for operating conditions based of throttle position (hence the clever name). The factory manual suggests that it needs to be set at 500 ohms +- 10. That is a tight tolerance. The folks that make the "factory" brand of jet kits suggest that it is "impossible to get a steady state low throttle cruise" if it is not set to that. I have done a couple of VTR's now and they were both over 700 ohms (one at 760 and the other at 810). Setting the TPS to the suggested value seems to make a big difference in bottom end. the bike will pull cleanly from as low as 2000 rpms and is much smoother. Perhaps someone out there has a captive dynamometer and can give us some scientific data, however most dyno work is done at full throttle and it is the partial throttle and "tip in" that is most affected by this. I can pull off in second gear without touching the throttle!
After removing the factory screws, slotting and adjusting the TPS and replacing the screws with new.. it'll look something like this
Take 2 pieces of wire and 2 spade connectors or any such other contrivance as your fertile imagination can come up with and connect the ohm meter to the TPS. Measure the resistance between the top and middle pins. Resist the temptation to use the old mechanics trick of pushing a dressmakers pin into the wires as this leaves a place for invisible corrosion and may cause a failure at some time in the future. It should be 500 ohms +- 10 Ohms.
The TPS is located on the right side of the rear carb. Remove the electrical connector. Place a shop cloth under the carbs. Center punch the shear bolts and drill them to about 1/8 inch depth using the 1/16 bit. Then drill them out using the 3/16 bit. Some people have reported success using a dremel to slot the shear head screws and then removing them with a small screwdriver. Suit your self. Remove the shop cloth with the drill filings.
Once you have the TPS off you will see that the holes are elongated to facilitate adjustment. Replace the TPS using the 5mm screws with washers and set it to 500 ohms by rotating it on the screws. If you cant get it low enough then the tabs on the throttle shaft will have to be adjusted, Sorry but I forgot to take a picture of that! To get a larger range of adjustment downwards bend the leftmost tab to the left a small amount. reinstall the TPS and set it to 500 ohms. Repeat in small steps if your first tweak isn't enough. Tighten the screws and RECHECK.
Once you have the setting correct replace the connector.
Replace the PAIR valve. (unless this is when you have decided to rip all that stuff off)
Reinstall the carbs and airbox
Replace the trumpets (short one in the front). I did try the bike with 2 long trumpets, and it did noticeably increase the bottom end, no loss of top end by my seat of the pants dyno. 2 short ones didn't seem to make any difference from stock.
Replace the airbox top, and filter.
Replace the tank, watch out for the 2 metal grommets and 2 bumpers.
Replace the seat
DONE at last, should take 30-60 minutes
-Art
Last edited by E.Marquez; 01-29-2014 at 07:20 AM. Reason: Added a picture, replacing a dead linked opne
 05-29-2007, 09:46 PM
#2
Administrator
World Champion
Thread Starter
Join Date: Dec 2004
Location: Fulton, MO
Posts: 105,287
I'd like to add that slotting the shear bolts with a Dremel tool vice drilling the shear bolts out is a safer way to remove those bolts. Slot them and then use a flat bladed screwdriver for removal. I even put the original bolts back in the same way. Take your time. Go slowly. Cover the carbs and intake boots with a rag to prevent debris from entering.
06-04-2007, 03:36 PM
#3
Member
Squid

Join Date: May 2007
Location: Akershus, Norway
Posts: 99
I'd like to add that slotting the shear bolts with a Dremel tool vice drilling the shear bolts out is a safer way to remove those bolts. Slot them and then use a flat bladed screwdriver for removal. I even put the original bolts back in the same way. Take your time. Go slowly. Cover the carbs and intake boots with a rag to prevent debris from entering.
06-05-2007, 03:00 AM
#5
Member
Squid
Join Date: May 2007
Location: Akershus, Norway
Posts: 99
Mine used torx bolts but the more uncommon one with a pin in the middle. Not as easy to find but tools/bits are available. The bike is a '99 Fire Storm.
06-25-2007, 09:25 AM
#6
Senior Member
SuperBike
SuperBike

Join Date: Jun 2007
Location: Los Angeles ish
Posts: 1,031
http://www.harborfreight.com/cpi/cta...emnumber=91310
Or
http://www.harborfreight.com/cpi/cta...emnumber=93388
07-13-2007, 09:07 PM
#7
Senior Member
SuperBike

Join Date: Feb 2007
Location: Portland, Oregon
Posts: 1,051
calling captain obvious ! this worked really well. i somehow forgot to check & adjust it when i did the valves & the APE CCT's.
finally i had a few minutes...
wish i would have noticed the missing pics, i would have snap'd a couple more. mine was way out so i had to remove it and expand the slots.
i used my dremel and slotted the screws
tim
finally i had a few minutes...
wish i would have noticed the missing pics, i would have snap'd a couple more. mine was way out so i had to remove it and expand the slots.
i used my dremel and slotted the screws
tim
07-13-2007, 09:45 PM
#8
Senior Member
MotoGP

Join Date: Apr 2005
Location: Montreal
Posts: 5,631
"This modification will improve low end response and smoothness on the VTR"
Perhaps this should be changed to "This modification will, in theory, improve low end response and smoothness on the VTR" or perhaps "This modification is supposed to improve low end response and smoothness on the VTR".
I tried this adjustment and was quite disappointed with the results (no difference in vibration or mileage and a noticeable softening of engine power and response in the low-end and mid-range). After riding the bike this way (with TPS set at 500 ohms) for a few weeks, I re-set it to the original setting (somewhere around 800 I believe, info is listed on anoyther thread if you do a search for I documented it at the time) and got my kick-in-the-pants response back. Needless to say, it's staying just the way it is from now on....
BTW, I am not trying to start a "pissing contest" by posting this; I merely want to share my experience from when I tried this adjustment. Feel free to do what you wish with this info .
07-14-2007, 06:24 AM
#9
Senior Member
SuperBike
Join Date: Feb 2007
Location: Portland, Oregon
Posts: 1,051
notice this is in 'knowledge base' ? i think all comments are great ( no pissing contest.. i agree ), everybody has their own experience and should be expressed.
what i didn't understand was how an ignition advancer would help / hurt this mod. ( since it adjust the timing )
i had an off idle responce problem ( which on my suzuki i fixed by cutting down the slide spring ) and my idle smoothness wasn't the best. every once in a while i would get a hick-up at idle, like the bike was going to die.
so... i gave it a try. first ride was great, responce off idle was better.
tim
"This modification will improve low end response and smoothness on the VTR"
Perhaps this should be changed to "This modification will, in theory, improve low end response and smoothness on the VTR" or perhaps "This modification is supposed to improve low end response and smoothness on the VTR".
I tried this adjustment and was quite disappointed with the results (no difference in vibration or mileage and a noticeable softening of engine power and response in the low-end and mid-range). After riding the bike this way (with TPS set at 500 ohms) for a few weeks, I re-set it to the original setting (somewhere around 800 I believe, info is listed on anoyther thread if you do a search for I documented it at the time) and got my kick-in-the-pants response back. Needless to say, it's staying just the way it is from now on....
BTW, I am not trying to start a "pissing contest" by posting this; I merely want to share my experience from when I tried this adjustment. Feel free to do what you wish with this info .
Perhaps this should be changed to "This modification will, in theory, improve low end response and smoothness on the VTR" or perhaps "This modification is supposed to improve low end response and smoothness on the VTR".
I tried this adjustment and was quite disappointed with the results (no difference in vibration or mileage and a noticeable softening of engine power and response in the low-end and mid-range). After riding the bike this way (with TPS set at 500 ohms) for a few weeks, I re-set it to the original setting (somewhere around 800 I believe, info is listed on anoyther thread if you do a search for I documented it at the time) and got my kick-in-the-pants response back. Needless to say, it's staying just the way it is from now on....
BTW, I am not trying to start a "pissing contest" by posting this; I merely want to share my experience from when I tried this adjustment. Feel free to do what you wish with this info .
07-31-2007, 07:52 PM
#10
WERA #44
Superstock
Join Date: Jul 2007
Location: About 57 miles south of VIR
Posts: 265
I have my engine on a crate, as I am restoring the bike from a fire salvage purchase. Checked the factory specs on replace and adjust tps and sure enough, 490 to 510 ohms is right at flat idle (adjuster thumbscrew full out)
My tps was at 960, so brought it into spec. We'll see how it runs someday.
My tps was at 960, so brought it into spec. We'll see how it runs someday.
07-31-2007, 11:05 PM
#11
Senior Member
Superstock

Join Date: Jul 2007
Posts: 387
Just did mine today. I almost did the dremel to remove screws trick but then tapped them loose with a sharp screwdriver on the edge of the washer and replaced with regular screws. Had to file out the slots a bit (all the way out to the edge) to get enough adjustment room but it's at 487 now. BTW, I checked that it changes with throttle opening too..yep.
 01-17-2009, 12:49 PM
#13
Administrator
MotoGP

Join Date: Apr 2006
Location: Kempner, TX
Posts: 4,402
I found a sharp chisel works very well to loosen these shear screws.. No need to remove anything but the tank. (if you still have the pair valve assy, that would have to move also)
Just a few taps, and the shear screws come loose, remove with your fingers, install some new fasteners.
Just a few taps, and the shear screws come loose, remove with your fingers, install some new fasteners.
11-04-2009, 08:35 AM
#14
Senior Member
Back Marker

Join Date: Oct 2009
Location: Newport, RI
Posts: 143
I think I am misunderstanding something here - is the point of this article that it is common for VTR TPS's to be out of spec, and this is how you get it in spec? Does the comment "I've done a couple VTR's now and they were both over 700 ohms" mean that's what they were when you started, and you brought them to 500, which is what they should have been in the first place?
11-07-2009, 05:18 PM
#16
Senior Member
Back Marker
Join Date: Oct 2009
Location: Newport, RI
Posts: 143
Hey Everyone,
I tried this - I took an ohm meter to the TPS on the carb in my bike as well as the one in my basement. With the multimeter set to "Ohms x 1", I get almost no resistance between the middle and top pins. like 2-3 ohms, nowhere near 500 or 900.
Any idea what I'm doing wrong?
I tried this - I took an ohm meter to the TPS on the carb in my bike as well as the one in my basement. With the multimeter set to "Ohms x 1", I get almost no resistance between the middle and top pins. like 2-3 ohms, nowhere near 500 or 900.
Any idea what I'm doing wrong?
11-07-2009, 05:47 PM
#17
Senior Member
SuperBike
Join Date: Aug 2004
Location: Atlanta, GA
Posts: 1,802
Hey Everyone,
I tried this - I took an ohm meter to the TPS on the carb in my bike as well as the one in my basement. With the multimeter set to "Ohms x 1", I get almost no resistance between the middle and top pins. like 2-3 ohms, nowhere near 500 or 900.
Any idea what I'm doing wrong?
I tried this - I took an ohm meter to the TPS on the carb in my bike as well as the one in my basement. With the multimeter set to "Ohms x 1", I get almost no resistance between the middle and top pins. like 2-3 ohms, nowhere near 500 or 900.
Any idea what I'm doing wrong?
Measuring resistance with a multimeter
To measure the resistance of a component it must not be connected in a circuit. If you try to measure resistance of components in a circuit you will obtain false readings (even if the supply is disconnected) and you may damage the multimeter. The techniques used for each type of meter are very different so they are treated separately:
Measuring resistance with a DIGITAL multimeter
- Set the meter to a resistance range greater than you expect the resistance to be.
Notice that the meter display shows "off the scale" (usually blank except for a 1 on the left). Don't worry, this is not a fault, it is correct - the resistance of air is very high! - Touch the meter probes together and check that the meter reads zero.
If it doesn't read zero, turn the switch to 'Set Zero' if your meter has this and try again. - Put the probes across the component.
Avoid touching more than one contact at a time or your resistance will upset the reading!
Measuring resistance with an ANALOGUE multimeter
The resistance scale on an analogue meter is normally at the top, it is an unusual scale because it reads backwards and is not linear (evenly spaced). This is unfortunate, but it is due to the way the meter works.
- Set the meter to a suitable resistance range.
Choose a range so that the resistance you expect will be near the middle of the scale. For example: with the scale shown below and an expected resistance of about 50k choose the � 1k range.
 - Hold the meter probes together and adjust the control on the front of the meter which is usually labelled "0 ADJ" until the pointer reads zero (on the RIGHT remember!).
If you can't adjust it to read zero, the battery inside the meter needs replacing. - Put the probes across the component.
Avoid touching more than one contact at a time or your resistance will upset the reading!
 Analogue Multimeter Scales
 The resistance scale is at the top, note that it reads
backwards and is not linear (evenly spaced). Reading analogue resistance scales
For resistance use the upper scale, noting that it reads backwards and is not linear (evenly spaced). Check the setting of the range switch so that you know by how much to multiply the reading.
Sample readings on the scales shown:
� 10
range: 260 � 1k
range: 26k If you are not familiar with reading analogue scales generally you may wish to see the analogue display section on the general meters page.
11-07-2009, 06:13 PM
#19
Senior Member
Back Marker
Join Date: Oct 2009
Location: Newport, RI
Posts: 143
I suspect the multimeter too. I tried opening the throttle and letting it sweep up to 5 ohms, and then switched it to Rx10 and Rx100, and in both cases, with the throttle open, it still read 5. it should have pretty much pegged at 0 when multiplied.
 11-28-2009, 12:02 PM
#21
Bikes - Women - Rum
Squid
Join Date: Nov 2009
Location: Debary,Fl
Posts: 27
thanks for this info!
I was getting very frustrated with the low end after rejetting using the factory stage 1 kit. I could not get smooth responce around 2500 to 3000rpm. I raised & lowered the clip and played with the pilot screw. I finally went back to my best setting then adj. the TPS to about 490 and BINGO! smooooooth. Pulls like a tractor and putts around at 2000 with no banging, clanking or bucking!
11-28-2009, 03:38 PM
#22
Senior Member
Back Marker
Join Date: Oct 2009
Location: Newport, RI
Posts: 143
Really? Sounds awesome, exactly what I'm going for. What is the "factory stage 1 kit?" What are you using for exhaust?
I was getting very frustrated with the low end after rejetting using the factory stage 1 kit. I could not get smooth responce around 2500 to 3000rpm. I raised & lowered the clip and played with the pilot screw. I finally went back to my best setting then adj. the TPS to about 490 and BINGO! smooooooth. Pulls like a tractor and putts around at 2000 with no banging, clanking or bucking!
Last edited by avramd; 11-28-2009 at 03:40 PM. Reason: accidentally posted before early
11-28-2009, 05:32 PM
#23
Senior Member
SuperSport
Join Date: Jul 2008
Location: Twin Cities
Posts: 505
After rejetting with the factory pro jet kit with Jardine high mounts I was left with a similar situation to what captkirk has described. Nothing major but I felt it could be better. TPS adjustment definately does the trick.
03-25-2010, 03:36 PM
#24
Senior Member
SuperSport

Join Date: Feb 2010
Location: NY State
Posts: 667
Another great thread, which I followed and got the job done. Below is a photo of the TPS after adjustment. As you can see, it is rotated almost all the way counter-clockwise to get it to the 500 ohm spec. The photo in the manual is a bit misleading, you need to check the resistance between the center and top posts as stated earlier in this thread. I was able to cut a slot in the top bolt to remove it, and I had to grind the head off of the bottom bolt to remove it. I reassembled with allen bolts and red lock-tite. Remebmer to reattach the TPS connector using dilectric grease when you are finished. JB
Last edited by residentg; 03-25-2010 at 05:42 PM.
03-25-2010, 05:01 PM
#25
Banned
MotoGP

Join Date: Aug 2007
Location: Lake View Terrace, CA
Posts: 5,942
The two things I see missing from this thread are:
1) Don't remove the metal spacers that are in the TPS mount holes. These are there to keep the sensor from being over tightened, which can cause the sensor to bind. If the sensor does bind, the throttle will stick.
2) If you can not get the reading down to a low enough point, bend the tab on the carb that drives the sensor, a small amount is usually all it takes.
Cheers,
Mike
03-28-2010, 03:19 PM
#26
Former Superchicken Owner
SuperBike

Join Date: Sep 2008
Location: Ft. Worth, TX
Posts: 1,607
Followed the instructions today and found mine from the factory on my '02 SH at 873 ohms. I used a Dremel to slot the screws to remove them and went to Home Depot to get some 5mm cap head (hex) screws. Cranked it down to 570 because I was runnng short on time and I didn't really have time to bend the tabs and get it perfect but it really made a difference in the low end power when I tested it. It was much smoother rolling the throttle up, idles better it surprised me when hitting second gear under good acceleration that it got loose and spun the rear tire on me.
Thanks for the write up!
Thanks for the write up!
04-02-2010, 07:50 AM
#27
Junior Member
Squid

Join Date: Mar 2010
Posts: 14
Same stuff, more detailed pictures.
This works good, my 98 was at 960. Here are some pictures of the process. I found that a good pair of pliers will turn the bolt out with no drilling. This is after I drilled one already of course.