How-to: LED tail retrofit
 03-01-2009, 05:43 PM
#61
Senior Member
Superstock
Join Date: Oct 2008
Location: Muskego,WI
Posts: 388

Hak -
Did you only connect one wire set form the stock set up or did you cut both connecters off and tie all the original wires to the new single wires of the led light?
I am thinking i would only have to connect one set and just "cap" the other harness one.
any help would be great
Did you only connect one wire set form the stock set up or did you cut both connecters off and tie all the original wires to the new single wires of the led light?
I am thinking i would only have to connect one set and just "cap" the other harness one.
any help would be great
 03-02-2009, 03:32 AM
#63
Out of my mind, back in 5
MotoGP

Join Date: Nov 2006
Location: Skurup, Sweden
Posts: 6,109
If you unwind about a foot of the wire harness you will find where Honda spliced two wires onto one... So using one and capping the other or just wiring the two of them together and using them as one makes no difference at all...
05-14-2009, 06:27 AM
#64
Senior Member
Back Marker
Join Date: May 2009
Posts: 175
Great write-up haknslash, I want to do this mod but don't have a dremel or a soldering iron.. Is it possible to do without these tools? Also, I looked for it but didn't see in your artice where you bought the light and the price?
05-14-2009, 07:58 AM
#65
Senior Member
Back Marker

Join Date: Aug 2006
Location: IL
Posts: 227
05-14-2009, 09:11 AM
#66
Senior Member
SuperSport
Thread Starter

Join Date: May 2008
Location: Bham, AL
Posts: 702
You can buy the unit from your local Advanced Auto. Be sure to get the correct one. you want the thin one that has the black plastic flange on it. don't get the one you'll see that has the rubber grommet mount as that LED unit has no mounting options for the VTR.
Have fun. It's an easy mod that is cheap yet clean and very effective over the stock tail lights.
Last edited by haknslash; 05-14-2009 at 09:14 AM.
05-30-2009, 06:49 AM
#67
Senior Member
Back Marker

Join Date: Apr 2008
Location: Orlando, FL
Posts: 148
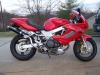
Thanks Hackenslash!!! I finally got around to doing this mod and all I can say is WOW! It really updated the look of the tail. As my WIFE said "if they can't see you now THEY MUST BE BLIND!" as she was wiping the color spots from her eyes LOL. For $20 great mod!
 08-15-2009, 05:19 AM
#72
COBB Member
Superstock
Join Date: Jul 2009
Location: NorthEast Connecticut
Posts: 292
Did mine last week, sweet. Thanks hak, oh, I also used computer conectors on mine, makes for an easy disconnect/reconnect plug and ya can scrounge em free from just about anywhere. Ya do need both ends though.
Last edited by stebbdt; 08-15-2009 at 05:20 AM. Reason: mis-spellied word
08-15-2009, 09:49 AM
#73
996 new guy
Superstock
Join Date: Jul 2009
Location: Universal city, Texas
Posts: 300
haknslash... I am having trouble finding this light in stores... do they still have them in stock near you? If so I may have you pick one up for me and pay you. Unless anyone has been able to find an online vendor... I have searched to no avail...
08-15-2009, 11:38 AM
#74
Senior Member
SuperBike
Join Date: Oct 2008
Location: New Braunfels, Texas
Posts: 2,188
I think you can get them at the "Magnum Trailer" place on the east side of I-35 at the Weidner exit in San Antonio.
08-22-2009, 03:17 PM
#76
COBB Member
Superstock
Join Date: Jul 2009
Location: NorthEast Connecticut
Posts: 292
Here's an online place, I was able to get mine from Advance auto. Good luck.
http://www.trailerpartsdepot.com/NEM...s/STL-78RK.htm
Here's a place for the clear one, great price
http://www.pipe-light.com/single.php?model=1-STL-88RCB
http://www.trailerpartsdepot.com/NEM...s/STL-78RK.htm
Here's a place for the clear one, great price
http://www.pipe-light.com/single.php?model=1-STL-88RCB
Last edited by stebbdt; 08-24-2009 at 09:25 AM. Reason: New info recieved
08-22-2009, 11:26 PM
#77
Senior Member
SuperBike

Join Date: Jan 2007
Posts: 2,116
Optronics sells direct. I'm buying 2 STL88RCB clear lens units for $26 including shipping. The clear lense is identical to the red lens, so the light should be that much brighter through the Honda OEM lense without the added Optronics red filtering out lumens. No? The red lens STL78 is the same price.
Talk to Terry at 800-364-5483 at X241, tell em Bret sent ya
Talk to Terry at 800-364-5483 at X241, tell em Bret sent ya
08-25-2009, 02:07 PM
#78
Senior Member
SuperBike

Join Date: Aug 2009
Location: thorold ontario
Posts: 1,978
this is pretty sweet and i think its gonna be a winter thing for me. i remember years ago when clear tail lights were popular on cars there were led light bulbs available. each bulb had like 5 or 6 red leds in it. wonder if those are still around and if theyd work as well on the bike.
very cool though, do you have dimensions on the piece you used?
very cool though, do you have dimensions on the piece you used?
08-31-2009, 07:59 PM
#79
Senior Member
SuperSport
Thread Starter
Join Date: May 2008
Location: Bham, AL
Posts: 702
If you can't source it local then just order thru Optronics as mentioned above. Might want to try any big rig (18-wheeler) truck places as those guys usually carry TONS of LED lighting. They usually carry Optronics, Maximma, etc. Hidden-hitch.com also carries them
this is pretty sweet and i think its gonna be a winter thing for me. i remember years ago when clear tail lights were popular on cars there were led light bulbs available. each bulb had like 5 or 6 red leds in it. wonder if those are still around and if theyd work as well on the bike.
very cool though, do you have dimensions on the piece you used?
very cool though, do you have dimensions on the piece you used?
Here is the dimensions for the Optronics LED unit...

Last edited by haknslash; 08-31-2009 at 08:10 PM.
10-19-2009, 03:20 PM
#80
Nose Picker
Back Marker

Join Date: Oct 2008
Location: Tacoma, WA 98408
Posts: 130
I finished up mod yesterday and it looks great. Ill be seen better now!! Thanks again haknslash for the write up. I ended up using led license plate bolts for the license plate light...it works well.
 05-31-2010, 05:13 PM
#83
Senior Member
SuperBike
Join Date: Jan 2007
Posts: 2,116
Its Done & Then Some
Post #77 08-23-2009, 12:26 AM
Optronics sells direct. I'm buying 2 STL88RCB clear lens units for $26 including shipping. The clear lense is identical to the red lens, so the light should be that much brighter through the Honda OEM lense without the added Optronics red filtering out lumens. No? The red lens STL78 is the same price.
Talk to Terry at 800-364-5483 at X241
Labor Day 2010 Post #83
Finally my tail light LED conversion utilizing the Optronics clear lens / red LED unit (PN STL-88RCB) as per my prior post (also see plan with dimensions posted by Haknslash in post #79).
Below is a template I made of the STL-88RCB after it was trimmed. I used a coping saw for rough cutting and a fine-grit belt sander for finished sizing. I utilized my trusty Dremel tool for cutting the back of the reflector so that the trimmed LED unit could recess a bit farther back into the OEM housing to provide more light setback (relief) from the OEM red lens. I felt doing so would permit better radial and more uniform dispersion of the light before it passed through the lens. I can’t be sure but I believe using the clear lens Optronics unit versus the otherwise identical red lens unit does offer brighter apparent output. I touched up all scratches in the reflector with matching “paint” and deburred all holes and cuts. I bedded the unit into the reflector using “plumber’s epoxy” (a 2-part epoxy putty) and through-bolted with three 5/32” machine bolts. The epoxy putty along with 3M sealant sealed the reflector relief cuts; I also ran the sealant around the lens / reflector body joint. I also placed a dab of sealant on the nuts to serve as a locking method.
I am expecting to hear even more squealing tires and screeching brakes when I hit the brakes than I did before with the converted OEM Tail light in conjunction with my ancient red neon license plate surround (connected to the brake circuit) and with the OEM front turn signals / running lights moved to the rear (which requires installing a 3rd wire to power the running light. I have LP Type 3 3-wire flush mount turn signals / running lights on the front).
Also below is a crude power circuit diagram / wire color code cross reference of the OEM brake light plug, which I wired the Optronics unit into; for the post part keeping OEM appearance, weather tightness and, hopefully, reliability. I fabricated small 22-gage copper “tabs” to which I soldered the Optronics wires onto. I then bonded a thin hypalon (CSPE) synthetic rubber dielectric isolator between the back-to-back brake and tail light positive wire tabs. The tab for ground actual is a “U” so it spring-locks itself into the plug. I then hot-glued the wires into the OEM plug for added security, and added a small zip-tire before installing the plug into the tail light.
All in all I spent waaay too much time on the project but am very satisfied with my efforts. The only fly in the ointment is I utilized a used OEM tail light assembly I bought from another forum member. Apparently he had “bobbed” his rear fender (which I think is not a practical modification), so the lens had been pitted my debris thrown up by the rear tire. I had done a thorough job polishing out the worst blemishes with 10,000 grit wet-sanding media but my own OEM tail light (which is going into my “attic stock”) in comparison is still almost like new.
See post #84 & 85 for mores photos; additional pics available upon request
Last edited by skokievtr; 05-31-2010 at 05:40 PM.
05-31-2010, 05:31 PM
#85
Senior Member
SuperBike
Join Date: Jan 2007
Posts: 2,116
And the DOT said "Let there be light"
Pretty good huh?
The lower amperage draw of the LED now offsets the load of my neon auxiliary brake light. Without giving myself an "kina hora" (Yiddish for jinxing myself), my original unfinned 98 vr/r with PC cpu heat sink & fan are still keeping things powered and cool!
The lower amperage draw of the LED now offsets the load of my neon auxiliary brake light. Without giving myself an "kina hora" (Yiddish for jinxing myself), my original unfinned 98 vr/r with PC cpu heat sink & fan are still keeping things powered and cool!
11-06-2010, 06:14 AM
#86
Member
Squid
Join Date: May 2010
Posts: 71
Haknslash,
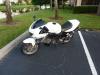
This isn't a question about the tail light conversion but I saw the pics and was wondering if you had the Devil high mounts on your hawk (they look like it from the pics you have on here). I noticed that you don't have the baffle in the middle of the can like mine do. How did you remove them and did you have to do any carb work after?
Thanks
11-28-2010, 12:30 PM
#87
Senior Member
SuperSport
Thread Starter
Join Date: May 2008
Location: Bham, AL
Posts: 702
Haknslash,
This isn't a question about the tail light conversion but I saw the pics and was wondering if you had the Devil high mounts on your hawk (they look like it from the pics you have on here). I noticed that you don't have the baffle in the middle of the can like mine do. How did you remove them and did you have to do any carb work after?
Thanks
11-07-2011, 11:22 PM
#88
Member
Squid

Join Date: Apr 2011
Location: El Segundo, CA
Posts: 69
I did this over the weekend and when the rain quit I installed it on the bike. The one good thing about the rain was that I had a lot of time to make it right by shrink wrapping the connectors to the wires etc. I hard mounted the unit to the stock reflector by drilling three holes (two on top and one on bottom) and used small diameter bolts with nylock nuts. I love the new look and much brighter than before!
02-20-2012, 10:55 AM
#89
Snap, Tap or Nap!!!!
Back Marker

Join Date: Feb 2012
Location: Melbourne, FL
Posts: 197
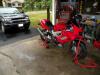
Not to hijack this or anything, but you mentioned moving the plate, if your plate holes line up this works well. Sorry about the quality, it's a 5 year old pic, I don't even think it was a 1 megapixel camera.

Also with the LED in the tail, you could probably just drill a single white LED in the bottom of the lens to light the plate, that is how my undertail is and it's plenty bright.
Also with the LED in the tail, you could probably just drill a single white LED in the bottom of the lens to light the plate, that is how my undertail is and it's plenty bright.
 02-21-2012, 12:25 PM
#90
Senior Member
Back Marker
Join Date: Feb 2012
Location: lynnwood w.a
Posts: 162
eBay - New & used electronics, cars, apparel, collectibles, sporting goods & more at low prices
look this up, its cheap looks great and its all plug and play no cutting of wires at all, this is what on my hawk, you can get them in clear to, smoked looks best in my opinion, hope this helps
look this up, its cheap looks great and its all plug and play no cutting of wires at all, this is what on my hawk, you can get them in clear to, smoked looks best in my opinion, hope this helps


