How-to: LED tail retrofit
 06-25-2008, 10:56 AM
#1
Senior Member
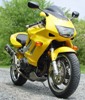
SuperSport
Thread Starter

Join Date: May 2008
Location: Bham, AL
Posts: 702

How-to: LED tail retrofit
Guys, just wanted to let you all know the LED tail light retrofit will begin tonight. I just got back from Advanced and bought the Optronics 6" LED trailer light that has the 3-function Stop/Tail/Turn function. Rather than use the same Maxxima LED unit I used on my CBR that has 60 LEDs which was bright as hell but I wanted something this time a little more distinct. Something like how the newer bikes come.
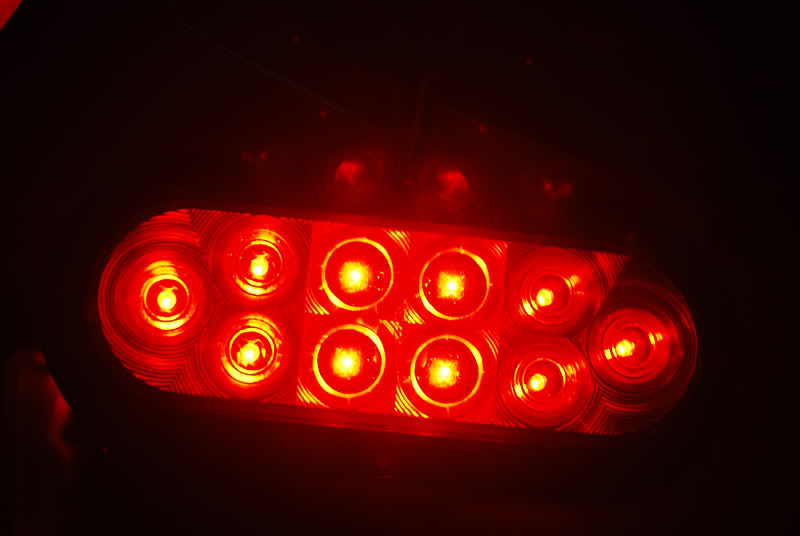
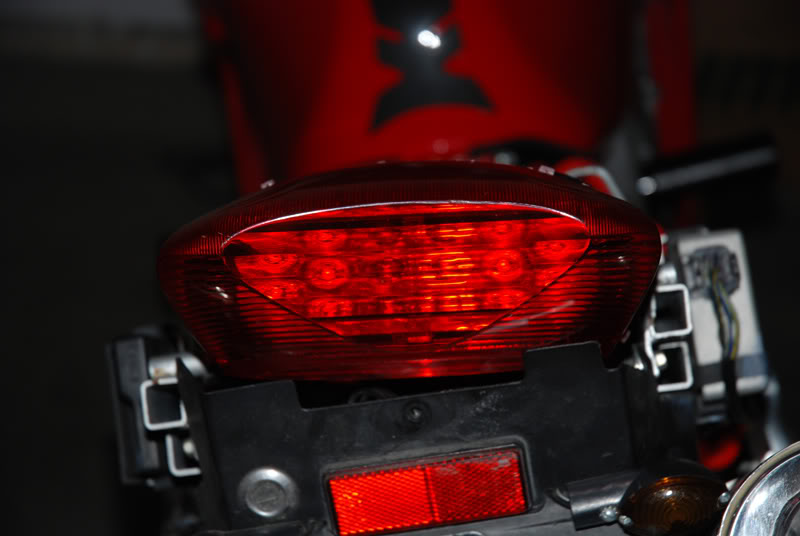
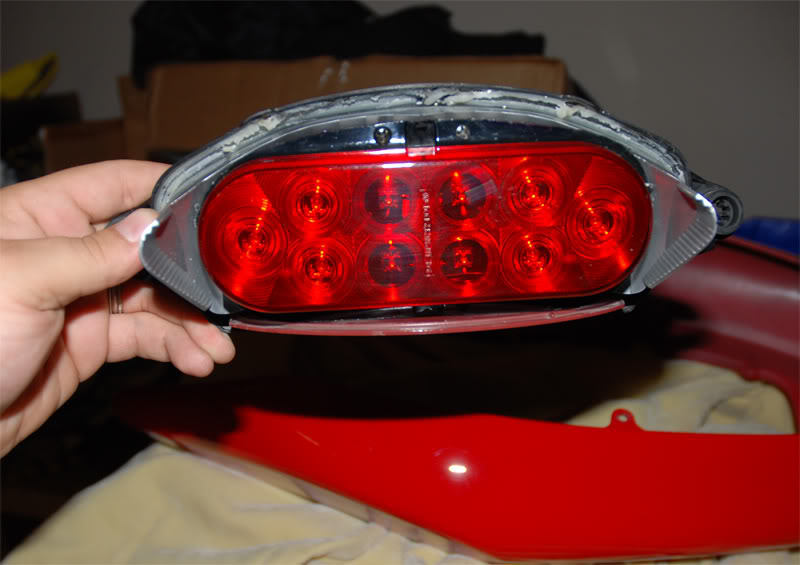
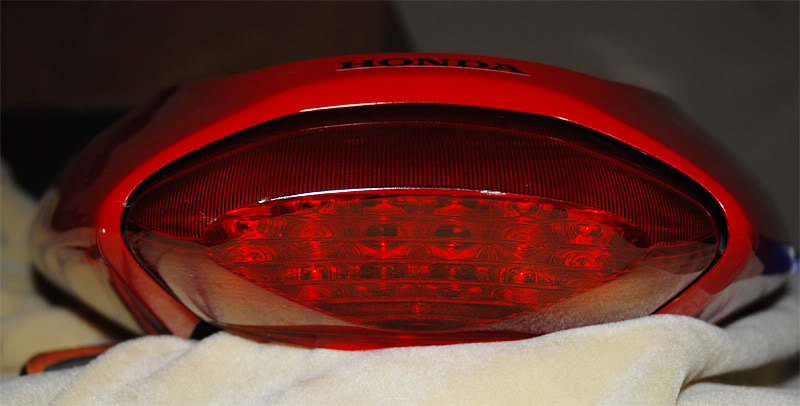
The Optronics STL-78RK has 10 "super diode" LEDs in their own reflector to make it even more visible. I test fired them up off my car battery when I got back from lunch and they are plenty bright in both tail and stop/turn function! I will be mounting this unit from the outside of the stock SH tail light housing. I'll dremel out the profile of the red polycarbonate lens of the LED unit on the SH tail housing.
The LED unit comes with a flange with mounting holes and hardware so there is no issue with securing it to the back of the tail light housing. Should be a very easy yet clean/OEM retrofit. When the lights are off it will look just like any other SH stock tail light but when they are on you'll see the LED pots even dispite the stock SH lens being semi-fluted thru the center area.
Here is a picture of the Optronics unit I bought. I'll post my own pics when I get home from bike night tonight as I start the process.

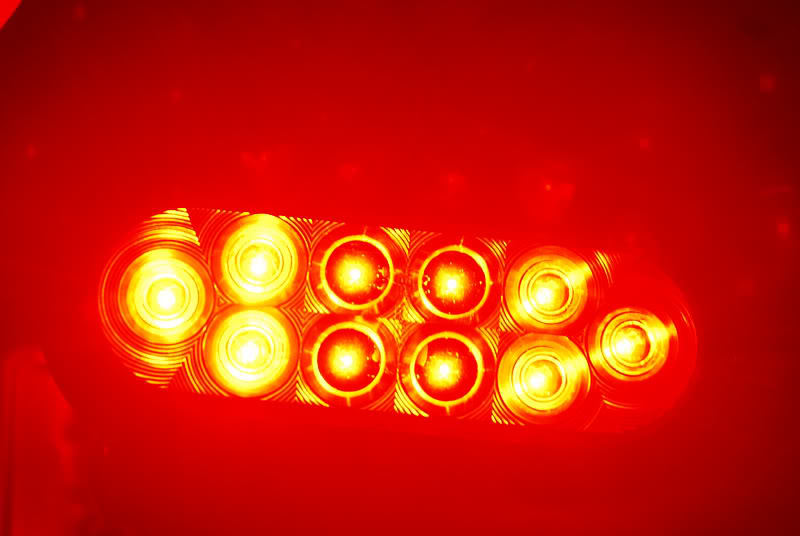
You'll notice the 4 inner LEDs look slightly different but it's just the slight angle of the pcb board their mounted to to make them seem brighter from directly looking at them head-on. All 10 LEDs are lit on the tail light mode but the inner 4 are slightly brighter than the others. Once you hit the brakes all 10 light up VERY bright and intense.
I'm going to reserve the next two posts as I'll use those to walk you guys on tackling this project on your own. the best part is this unit comes with a lifetime warranty, can be easily replaced, and costs only $25 at your local Advanced Auto store which carries these in stock.
Stay tuned....
The Optronics STL-78RK has 10 "super diode" LEDs in their own reflector to make it even more visible. I test fired them up off my car battery when I got back from lunch and they are plenty bright in both tail and stop/turn function! I will be mounting this unit from the outside of the stock SH tail light housing. I'll dremel out the profile of the red polycarbonate lens of the LED unit on the SH tail housing.
The LED unit comes with a flange with mounting holes and hardware so there is no issue with securing it to the back of the tail light housing. Should be a very easy yet clean/OEM retrofit. When the lights are off it will look just like any other SH stock tail light but when they are on you'll see the LED pots even dispite the stock SH lens being semi-fluted thru the center area.
Here is a picture of the Optronics unit I bought. I'll post my own pics when I get home from bike night tonight as I start the process.
You'll notice the 4 inner LEDs look slightly different but it's just the slight angle of the pcb board their mounted to to make them seem brighter from directly looking at them head-on. All 10 LEDs are lit on the tail light mode but the inner 4 are slightly brighter than the others. Once you hit the brakes all 10 light up VERY bright and intense.
I'm going to reserve the next two posts as I'll use those to walk you guys on tackling this project on your own. the best part is this unit comes with a lifetime warranty, can be easily replaced, and costs only $25 at your local Advanced Auto store which carries these in stock.
Stay tuned....
 06-25-2008, 10:57 AM
#2
Senior Member
SuperSport
Thread Starter
Join Date: May 2008
Location: Bham, AL
Posts: 702
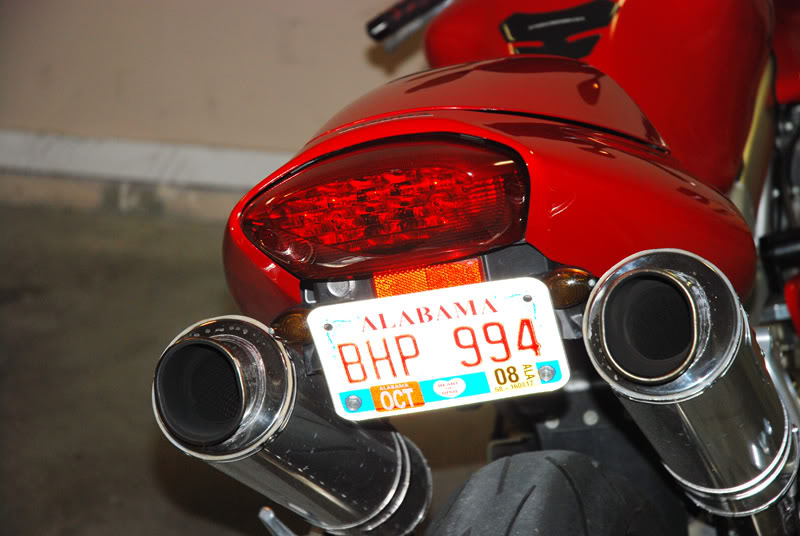
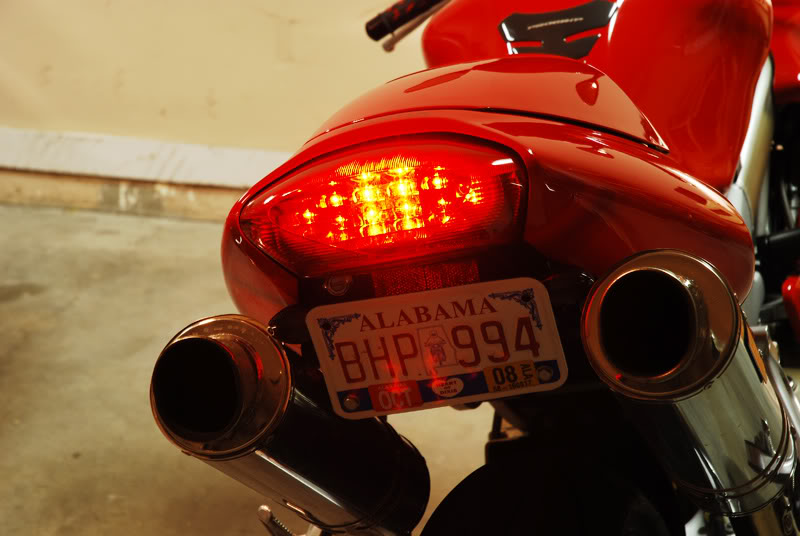
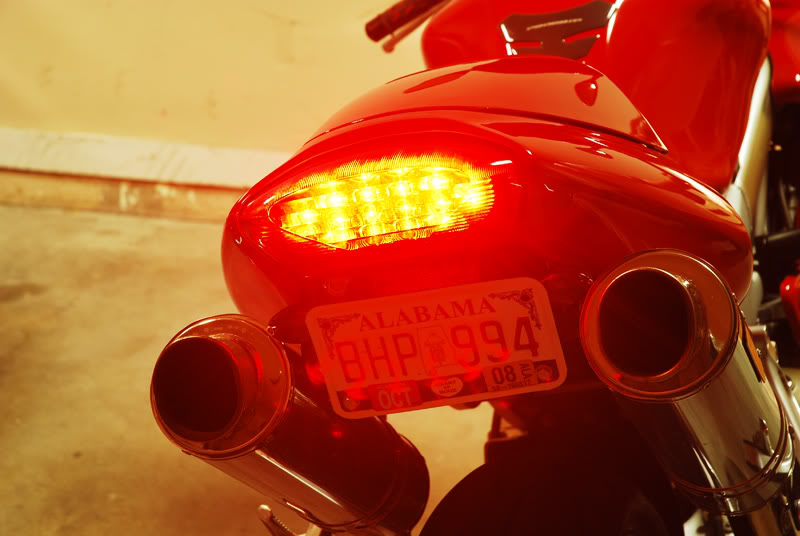
Here is a short video. I temporarily wired it up just to give you guys an idea of the tail light compared to the stock tail light. You'll notice the stocker only has one bulb working but honestly it wouldn't matter if both were fired up. The LED unit blows the stock luminosity out of the water!
Here are some pictures as well. I tried to get the exposure about as much as how it looked in reality. I also shot these in manual mode to keep the same settings for the comparison back to back shots.
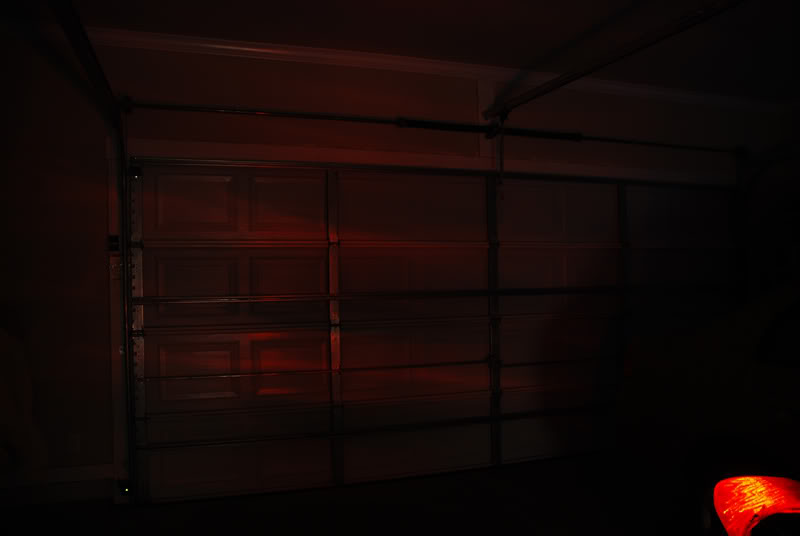
Stock tail light without brakes on....
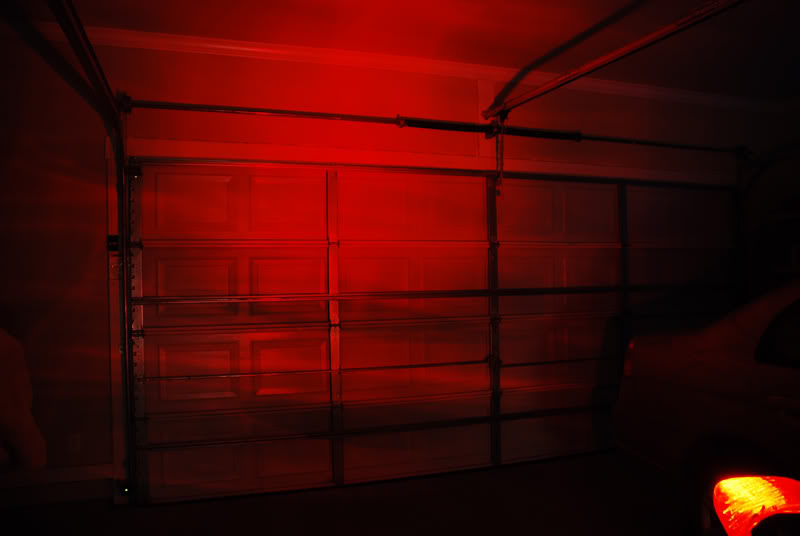
Stock tail light with brakes on.....
Stock tail light without brakes on.....
Stock tail light with brakes on.....
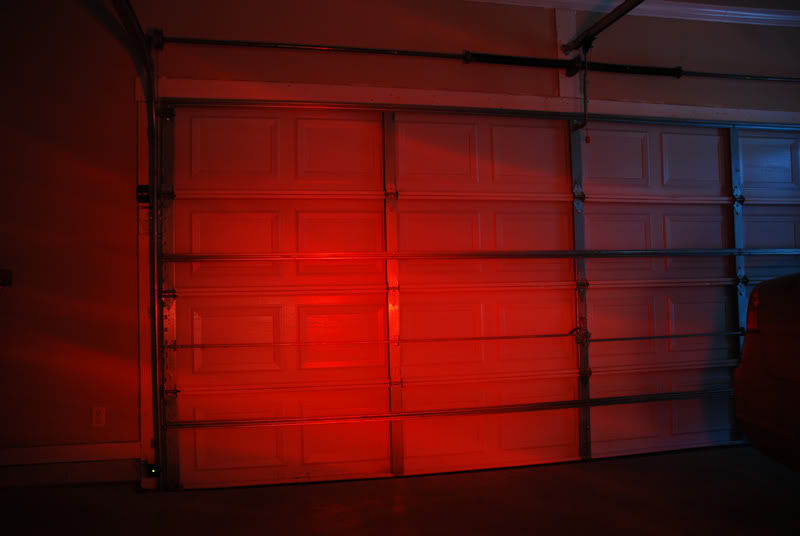
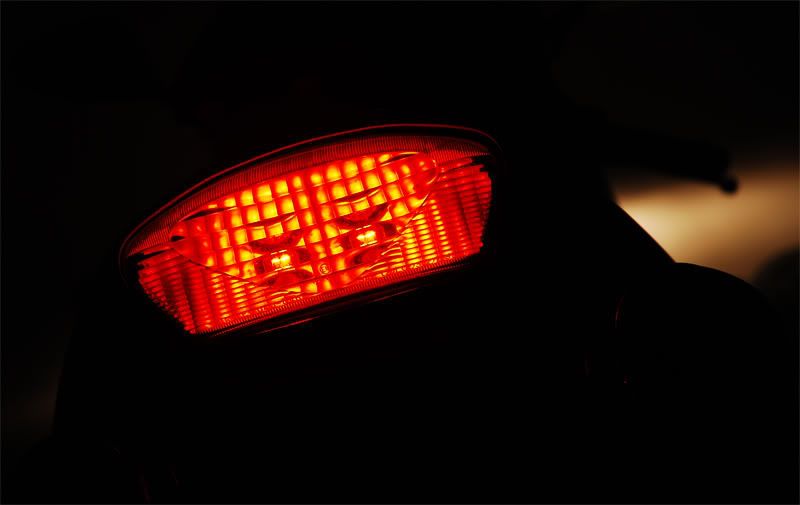
LED tail light without brakes on....
LED tail light with brakes on....
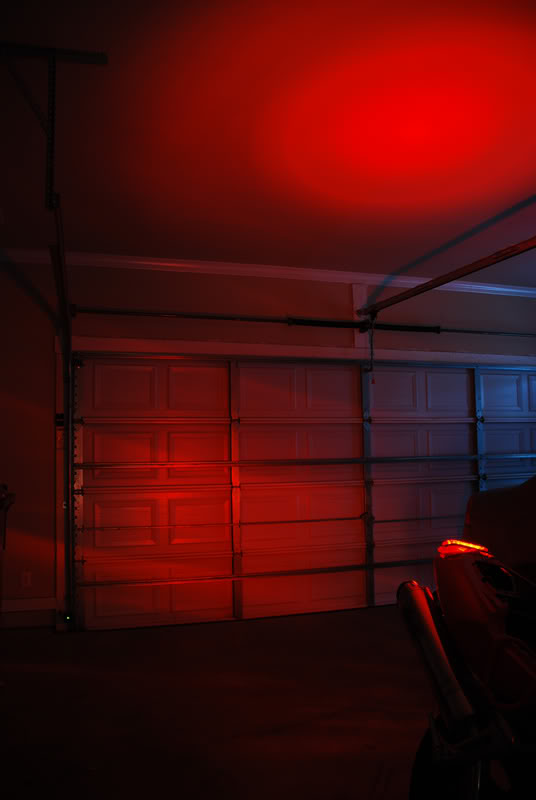
Time for the kicker. Both lit up....
Here are some pictures as well. I tried to get the exposure about as much as how it looked in reality. I also shot these in manual mode to keep the same settings for the comparison back to back shots.
Stock tail light without brakes on....
Stock tail light with brakes on.....
Stock tail light without brakes on.....
Stock tail light with brakes on.....
LED tail light without brakes on....
LED tail light with brakes on....
Time for the kicker. Both lit up....
Last edited by haknslash; 06-25-2008 at 05:35 PM.
06-25-2008, 10:58 AM
#3
Senior Member
SuperSport
Thread Starter
Join Date: May 2008
Location: Bham, AL
Posts: 702
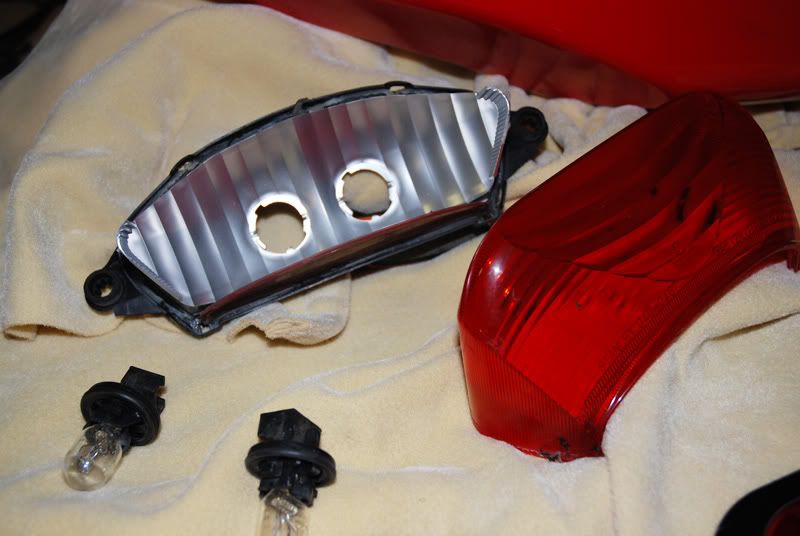
Ok, now we're getting somewhere. Change of plans though. I was going to mount this unit from the outside of the rear tail housing but I have decided to do it like my CBR was and mount the unit from the inside where the bulbs usually go.
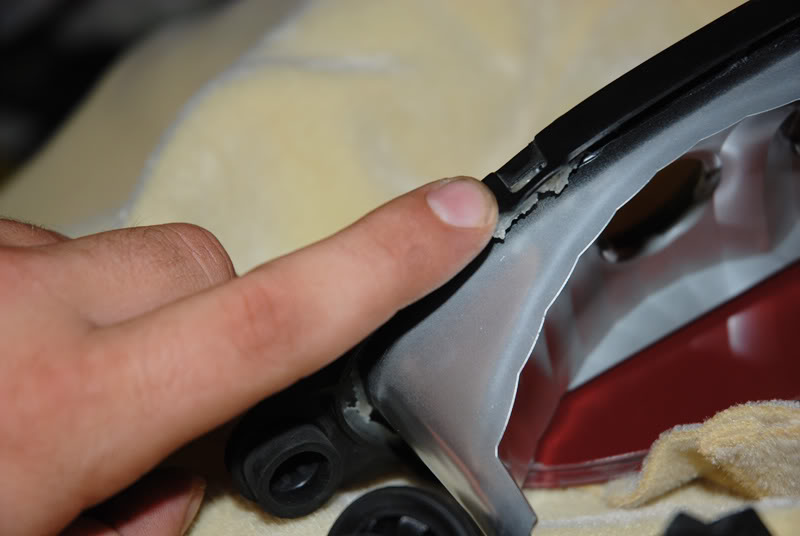
Doing so means you need to seperate the red polycarbonate lens from the tail light housing. This is very simple to do. Grab a heat gun and set it to low or use a hair dryer. Go along where the lens and the rear black housing meet. You'll see there is some adhesive that you'll need to heat up to loosen the lens from the tail light housing. You'll also notice the lens has some 'ribs' that mate with some 'rib slots' on the tail housing. This is what secured the two together along with the adhesive. As you heat up the housing, pay careful attention not to get too close to the lens as its delicate and could melt if you're a bonehead and not taking your time. It took me maybe ~5 minutes to seperate the two taking my time and making sure to evenly heat the housing so when I pry the two apart, there won't be a cold section that could cause the lens to crack from stress. Take your time and it will come right off just like so....
Here is one of the 'ribs' I was talking about...
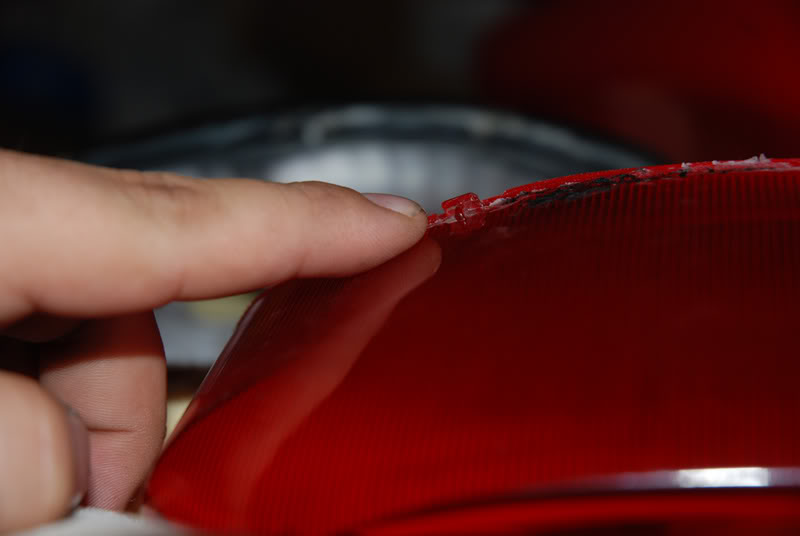
Here is one of the 'rib slots' I was talking about....
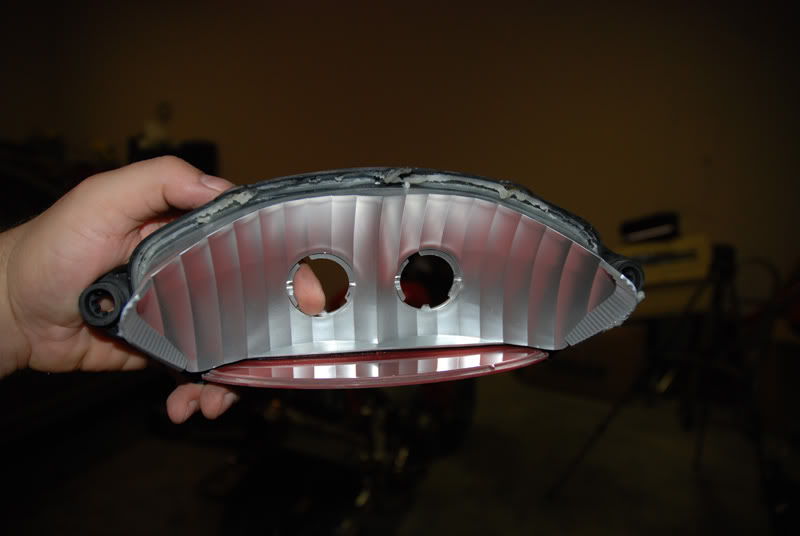
Here is the inner reflector of the tail light housing. I will trim up my LED untis mounting flange so that it will allow me to mount directly to the housing....
Now for some quicky test shots with the LED unit sitting loosely behind the stock red tail lens...
LEDs without brakes on....

With brakes on....
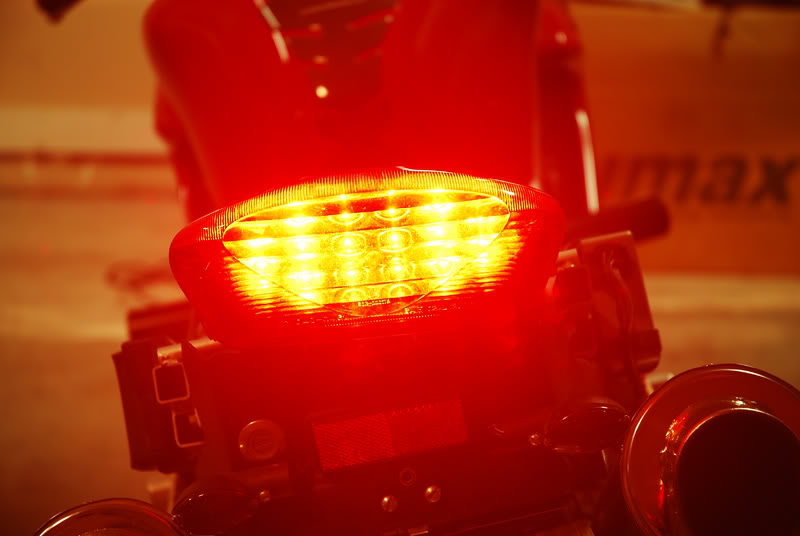
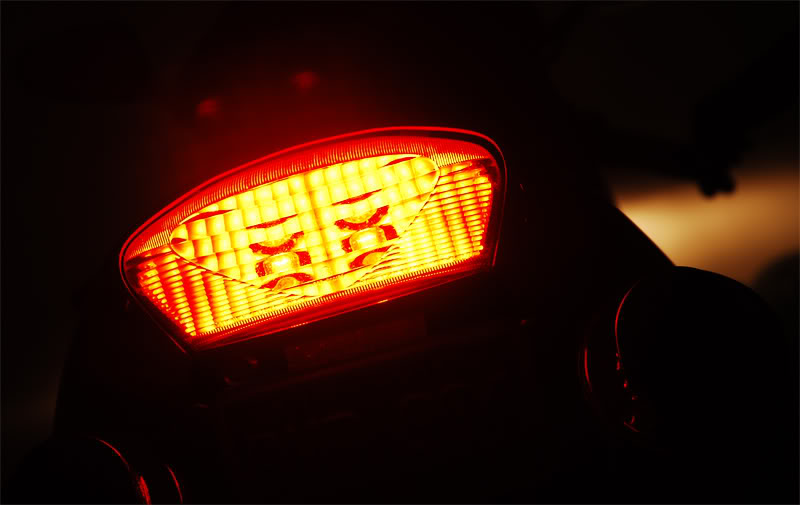
Angle shot showing how the 4 inner LEDs appear to be brighter. This is because they don't have a fresnel ring diffusing the lihgt like the other 6 do. Earlier I thought it was because of the PCB board angle but its flat and I looked closer and saw they were slightly different than the rest. This is a plus in my book as the number of LEDs that are lit appears to change as you walk around the bike depending on the angle you view them from. Most angles you'll see all 10 and others more like 4-6. Kind of unique looking. You can see this effect better than I can describe if you watched the vid closely....
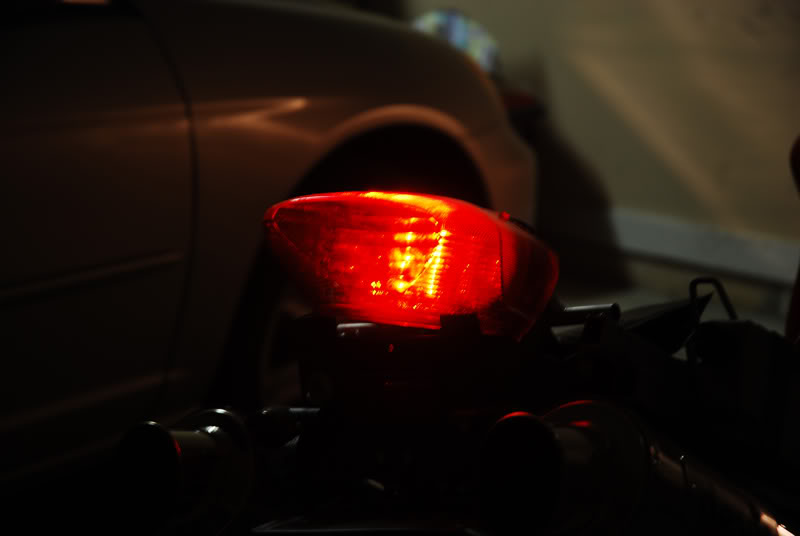
LED without brakes on....
Brakes on....
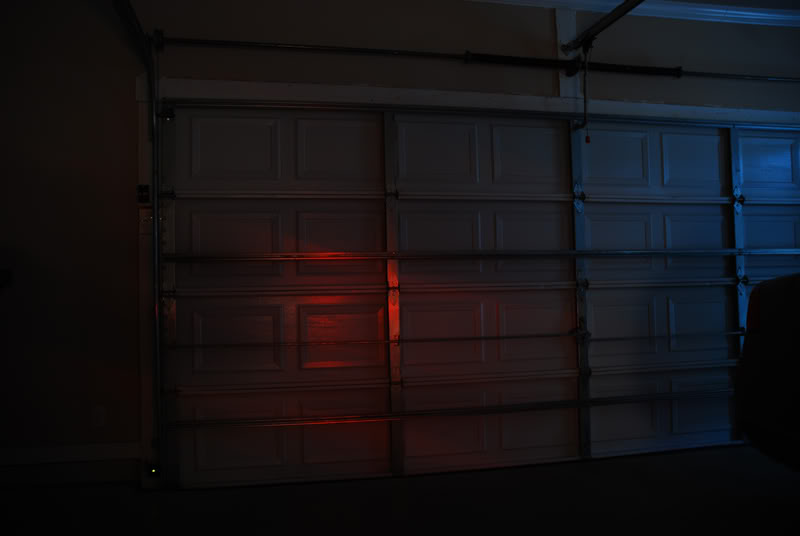
Rear shot with flash on the camera and with the lights turned off. This gives you an idea of how OEM it will look....
Doing so means you need to seperate the red polycarbonate lens from the tail light housing. This is very simple to do. Grab a heat gun and set it to low or use a hair dryer. Go along where the lens and the rear black housing meet. You'll see there is some adhesive that you'll need to heat up to loosen the lens from the tail light housing. You'll also notice the lens has some 'ribs' that mate with some 'rib slots' on the tail housing. This is what secured the two together along with the adhesive. As you heat up the housing, pay careful attention not to get too close to the lens as its delicate and could melt if you're a bonehead and not taking your time. It took me maybe ~5 minutes to seperate the two taking my time and making sure to evenly heat the housing so when I pry the two apart, there won't be a cold section that could cause the lens to crack from stress. Take your time and it will come right off just like so....
Here is one of the 'ribs' I was talking about...
Here is one of the 'rib slots' I was talking about....
Here is the inner reflector of the tail light housing. I will trim up my LED untis mounting flange so that it will allow me to mount directly to the housing....
Now for some quicky test shots with the LED unit sitting loosely behind the stock red tail lens...
LEDs without brakes on....
With brakes on....
Angle shot showing how the 4 inner LEDs appear to be brighter. This is because they don't have a fresnel ring diffusing the lihgt like the other 6 do. Earlier I thought it was because of the PCB board angle but its flat and I looked closer and saw they were slightly different than the rest. This is a plus in my book as the number of LEDs that are lit appears to change as you walk around the bike depending on the angle you view them from. Most angles you'll see all 10 and others more like 4-6. Kind of unique looking. You can see this effect better than I can describe if you watched the vid closely....
LED without brakes on....
Brakes on....
Rear shot with flash on the camera and with the lights turned off. This gives you an idea of how OEM it will look....
Last edited by haknslash; 06-25-2008 at 06:25 PM.

 06-25-2008, 01:40 PM
#6
pragmatic anarchist
Superstock
Join Date: Mar 2008
Location: Philadelphia, PA
Posts: 380
I'll be tuned in. $50 clear ebay units board is apparently fragile and of course you have to wait for shipping. I like all of my rear LEDs firing when I slow down or stop. If I can get a locally available unit to put inside the clear housing EVERYTIME I drop her or get hit that would be great.
06-25-2008, 01:47 PM
#7
Senior Member
SuperBike

Join Date: Jan 2007
Posts: 2,116
Amperage & Clarification
How many amps do the 2 OEM bulbs draw vs this led unit? Can U clarify about the ribbed OE lense showing thru (though your how 2 pics may do so)? And can you run the leds only on tail/stop w/o the TS function, as otherwise you need a min of 9" to as much as 14" TS separation to be legal?
 06-25-2008, 05:40 PM
#9
Senior Member
SuperSport
Thread Starter
Join Date: May 2008
Location: Bham, AL
Posts: 702
Update: video and pics have been added to the second post.
How many amps do the 2 OEM bulbs draw vs this led unit? Can U clarify about the ribbed OE lense showing thru (though your how 2 pics may do so)? And can you run the leds only on tail/stop w/o the TS function, as otherwise you need a min of 9" to as much as 14" TS separation to be legal?
You can see in the pics above that you can see thru the 'ribbed' section of the tail light. The stock bulbs are clearly visible in some sections as its clear there without distortion from the fluted 'bars'. The LEDs will have no problems blasting thru this. My CBR was much more fluted than the VTR tail and you could see the LEDs just fine. I will take a pic of this unit once its installed and that will give you a good idea.
The LED unit is a 3-wire hook-up. One for ground, one for tail light, and one for either stop or turn signal. You will use all three just as the stock bulbs are wired. This will give you both running tai light and brake light. Check out the video above.
06-25-2008, 09:23 PM
#11
Remember stock is BAD!
SuperSport
SuperSport

Join Date: Jun 2004
Location: Jacksonville FL
Posts: 760
Looks like it is coming together nicely.
To complement the clean brake light you should tear that reflector off of the fender, shave the fender and remount the lisc. plate.
To complement the clean brake light you should tear that reflector off of the fender, shave the fender and remount the lisc. plate.
 06-26-2008, 05:11 AM
#13
Senior Member
SuperSport
Thread Starter
Join Date: May 2008
Location: Bham, AL
Posts: 702
I actually have the fender trimmed and when the plate is flipped up, all you see is the license plate. I do need to remount it because the PO of the bike mounted it crooked
I made some good progress last night and could of finished it but my wife is sick so I had to stop every so often and tend to her. I will have it done tonight and will post a good amount of pics and some videos later on. I was doing some testing for visibility last night and from even about 40 feet away they are VERY bright. They look great at night and you can see the luxeon LEDs very nicely. I trimmed a good amount off the flange mount on the LED unit. It's now contoured to the inner shape of the reflector portion on the stock tail housing. All is left is to secure it down and then reseal the housing with some rubber butyl so it will be water tight. I'll modify and reuse the stock tail light bulb holders so it will look clean and be sealed from the rear of the housing as well.
Stay tuned guys....
06-26-2008, 09:08 AM
#16
Senior Member
SuperBike
Join Date: Jan 2007
Posts: 2,116
I trimmed a good amount off the flange mount on the LED unit. It's now contoured to the inner shape of the reflector portion on the stock tail housing. All is left is to secure it down and then reseal the housing with some rubber butyl so it will be water tight. I'll modify and reuse the stock tail light bulb holders so it will look clean and be sealed from the rear of the housing as well.
Please be sure to take some pics of the trimmed LED unit secured to the reflector (?) before you reinstall the OE lens, and include a wiring diagram with the wire colors. If you find a multimeter, see if you can do a comparo between OE & LED amperage. Looking good!
Last edited by skokievtr; 06-26-2008 at 03:56 PM.
 06-26-2008, 08:00 PM
#19
Senior Member
SuperSport
Thread Starter
Join Date: May 2008
Location: Bham, AL
Posts: 702
Here are a few more pics. More to come later tonight plus a video clip.
wiring for the stock tail plug...
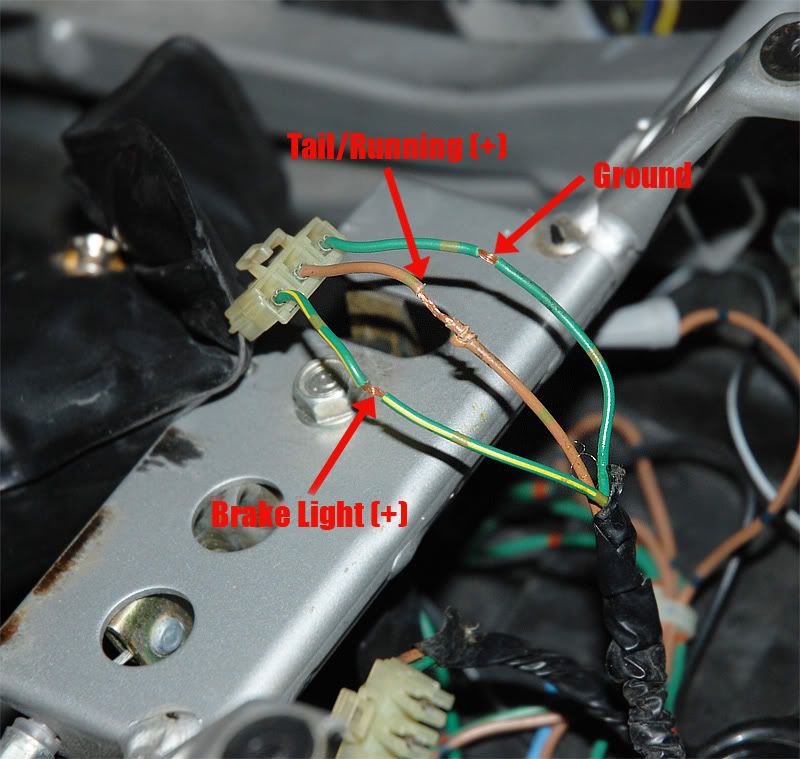
wiring for the LED unit...
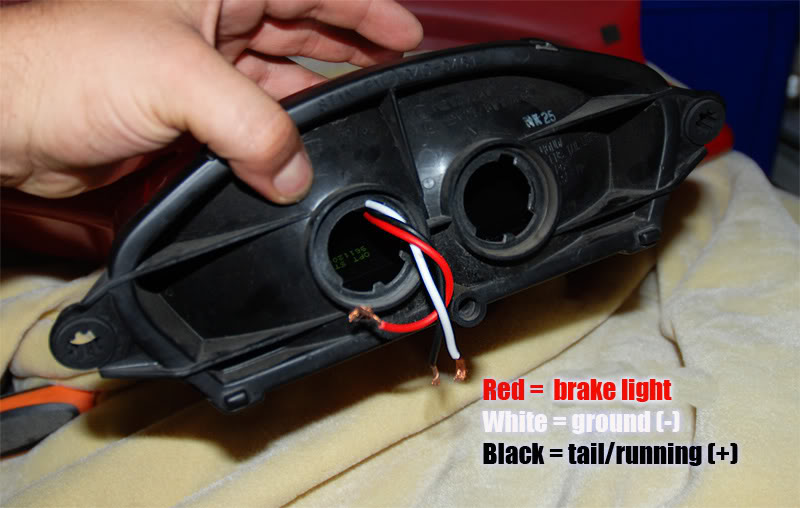
Solder, use barrel connectors, whatever your preference to connect the two.
Here is the trimmed flange on the LED unit. You have to trim it about this much in order to fit it inside. I predrilled some holes smaller than the diameter of the threads of the screws I used. This was you thread into the LED housing and also into the SH tail housing, thus making a very solid mount. On the back side you can use lock washers and bolts for extra security as that is what I will do based on the vibes the vtwin puts out. There are three bolts I used. Two up top and one down on the bottom in the middle which is kind of hard to see from the flash casting a shadow down there. The unit is wedgeed in as well. It's very tight and snug....
And here is just a quick reference shot to give you an idea of it within the rear body plastic....
I'll go over the other details such as sealing the tail light housing back up and then I'll post pics and a video. Stay tuned...
wiring for the stock tail plug...
wiring for the LED unit...
Solder, use barrel connectors, whatever your preference to connect the two.
Here is the trimmed flange on the LED unit. You have to trim it about this much in order to fit it inside. I predrilled some holes smaller than the diameter of the threads of the screws I used. This was you thread into the LED housing and also into the SH tail housing, thus making a very solid mount. On the back side you can use lock washers and bolts for extra security as that is what I will do based on the vibes the vtwin puts out. There are three bolts I used. Two up top and one down on the bottom in the middle which is kind of hard to see from the flash casting a shadow down there. The unit is wedgeed in as well. It's very tight and snug....
And here is just a quick reference shot to give you an idea of it within the rear body plastic....
I'll go over the other details such as sealing the tail light housing back up and then I'll post pics and a video. Stay tuned...
06-26-2008, 08:22 PM
#20
Senior Member
SuperBike
SuperBike
Join Date: Jun 2007
Location: Los Angeles ish
Posts: 1,031
I'm confused. Is that turn signal or brake light wiring. I only see three wires coming out of the housing (red being brake I'd assume), wouldn't you need a wire for each turn side?
06-26-2008, 08:38 PM
#21
Banned
Back Marker

Join Date: Aug 2005
Posts: 196

i think he means brake light not turn signal. the brown wire and red wire on led unit should be for the brake light. he's not wiring turn signals into it; just running/ brake lights.


 06-27-2008, 09:17 AM
#29
Out of my mind, back in 5
MotoGP

Join Date: Nov 2006
Location: Skurup, Sweden
Posts: 6,109
According to optronics.com they draw .243W / .046A...
Dunno if that's at full light(brake) or not but regardless it should be a lot less then the stock bulbs... I think those are 21W/5W ???
Dunno if that's at full light(brake) or not but regardless it should be a lot less then the stock bulbs... I think those are 21W/5W ???
06-27-2008, 09:32 AM
#30
Senior Member
SuperSport
Thread Starter
Join Date: May 2008
Location: Bham, AL
Posts: 702
Thanks for finding the info Tweety!
As for the tag light I'll probably buy one of those small white LED units you see at Cycle Gear made by Street FX. either the LED Flex strips that come with 24 ultra birght LEDs, BoltFX license plate lights, or maybe the ElectroPods unit. I'm not sure yet but there are many ways to get that tag lit up. Main thing is I don't want anything where you can physically see the LEDs but more so to mount them just so the light shines cleanly onto the plate.
Thanks guys
Last edited by haknslash; 06-27-2008 at 09:38 AM.


